Managing state in React can become cumbersome as the application logic grows increasingly complex. Third-party libraries such as Redux, Flux, and MobX help, but even these tools come with their own overhead.

A state machine, also called a finite state machine or finite state automata, is a mathematical model of computation. It is an abstract machine with a finite number of states at any given time.
In this guide, we’ll review the similarities, differences, pros, and cons of two state machines — XState and Robot — and walk through how to use them to simplify state management in React applications.
The Replay is a weekly newsletter for dev and engineering leaders.
Delivered once a week, it's your curated guide to the most important conversations around frontend dev, emerging AI tools, and the state of modern software.
State is an important part of most frontend applications, especially in React. Think of state as a representation of the part of an application that changes.
Consider a component that fetches data from an API.
const Todo = () => {
  const [data, setData] = useState([]);

  const handleClick = () => {
    fetch('https://jsonplaceholder.typicode.com/todos/1')
    .then(response => response.json())
    .then(todo => setData(data.push(todo))
    .catch(error => console.error(error) )
  }
  return(
    <div>
      <button onClick={handleClick}> Fetch Data </button>
      {data && data.map(todo => (<p key={todo.id}> {todo.title} <span> {todo.completed} </span></p>) )}
    </div>
  );
}
In this example, data is our state since it’s the part of the application that changes whenever an event occurs — in this case, the click of a button. The problem with this setup is that it can become complicated.
What happens while the user waits for the record to be fetched or if an error occurs while fetching? We need to add more states to handle these problems.
const Todo = () => {
  const [isLoading, setIsLoading] = useState(false);
  const [data, setData] = useState([]);
  const [isError, setIsError] = useState(false);

  const handleClick = () => {
    setLoading(true);
    fetch('https://jsonplaceholder.typicode.com/todos/1')
      .then(response => response.json())
      .then(todo => {
        setLoading(false);
        setData(data.push(todo));
      })
      .catch(error => {
        setLoading(false);
        setIsError(true);
      })
  }
  return(
    <div>
      {loading && <p> Loading Data... </p>}
      <button onClick={handleClick}> Fetch Data </button>
      {data && data.map(todo => (<p key={todo.id}> {todo.title} <span> {todo.completed} </span></p>) )}
      {error && <p> An error occured. Try again.</p>}
    </div>
  );
}
If your application is complex, things can quickly spiral out of control as new features are added, making your code difficult to understand, test, and enhance.
State machines approach this unique problem differently. With state machines, you can define all the states that our application can be in, the transitions between the states, and the side effects that can occur. This helps you avoid a situation where the application is in an impossible state.
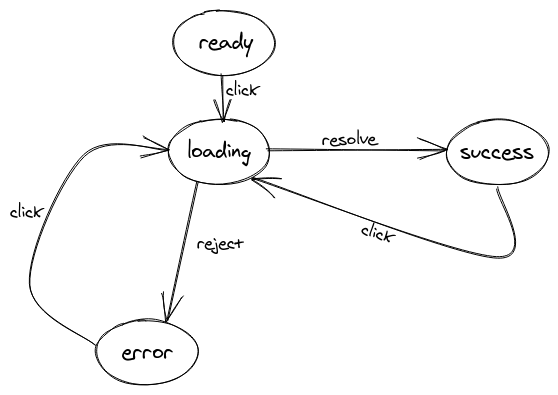
Our application can be in the following states:
ready — the initial state when the application starts uploading — when an event occurs i.e a button is clickedsuccess — when loading resolveserror — when loading is rejectedThe app transitions from one state to another when an action is triggered — i.e., when a user clicks a button. You have better control of your application when you can anticipate all the possible states it can be in.
According to its official documentation, XState is a library for creating, interpreting, and executing finite state machines and statecharts, as well as managing invocations of those machines as actors. It was created by David Khourshid to address the problems of state in user interfaces.
Robot is a lightweight, functional, and immutable library created by Mathew Philips for building finite state machines. It was inspired by XState, Statecharts, and the P programming language.
To follow along with this tutorial, you’ll need:
To demonstrate the similarities and differences between XState and Robot, we’re going to create an application that fetches data from an API.
Open a terminal and initialize a React application.
npx create-react-app state-machine
This creates a React application called State Machine.
Next, create a service to fetch the data from the API.
cd src && touch fetchTodo.js
The above command creates a file called fetchTodo.js in the src directory.
Open the file and input the following.
export const fetchTodo = () => {
  return fetch('https://jsonplaceholder.typicode.com/todos/1')
    .then((response) => response.json())
    .then((todo) => todo);
};
Basically, anytime the fetchTodo function is called, it returns the data retrieved from the API.
XState can be installed by using npm or yarn or embedding the script through a CDN.
To install the library using npm, open a terminal and run:
npm install xstate @xstate/react
This installs the xstate core library and a package for React called @xstate/react that allows you to use custom XState hooks in React applications.
You can install Robot using npm or yarn, but not a CDN.
To install Robot, launch a terminal and run the following command.
npm install robot3 react-robot
Robot also offers a package to use custom hooks in React called react-robot
Before you can use a state machine, you must first define it.
In the src directory, create a file called xstateMachine.js. Copy the code below into the created file.
import { Machine, assign } from 'xstate';
import { fetchTodo } from '../fetchTodo';
export const xstateMachine = Machine({
  id: 'clickButton',
  initial: 'ready',
  context: {
    todo: null,
  },
  states: {
    ready: {
      on: {
        CLICK: 'loading',
      },
    },
    loading: {
      invoke: {
        id: 'fetch-todo',
        src: fetchTodo,
        onDone: {
          target: 'success',
          actions: assign({
            todo: (context, event) => event.data,
          }),
        },
        onError: 'error',
      },
    },
    success: {
      on: {
        CLICK: 'loading',
      },
    },
    error: {
      on: {
        CLICK: 'loading',
      },
    },
  },
});
Machines are defined using the Machine() factory function. The machine we defined in the code above is made up of IDs, states, contexts, actions, and transitions. IDs are used to identify the state nodes.
The states in the machine are:
readyloadingsuccesserrorContext is an extended state that is used to represent quantitative data such as numbers, arbitrary string, objects, etc. The initial state of the application is defined as ready. When a button is clicked, a transition occurs, moving the state from ready to loading.
In the loading state, there’s an invoke property that is responsible for either resolving or rejecting a promise. Whenever the fetchTodo promise is resolved, the loading state transitions to the success state and the assign action updates the context with the result gotten from the promise. If it’s rejected, it moves to the error state.
Creating a machine with Robot is similar, albeit with some key differences. One major difference is that, since Robot is a functional library, most of the actions are carried out using functions, unlike with XState, which uses option objects.
Create a file called robotMachine.js in your src directory and paste the following.
 import { createMachine, invoke, reduce, state, transition } from 'robot3';
import { fetchTodo } from '../fetchTodo';
const context = () => ({
  todo: {},
});
export const robotMachine = createMachine(
  {
    ready: state(transition('CLICK', 'loading')),
    loading: invoke(
      fetchTodo,
      transition(
        'done',
        'success',
        reduce((ctx, evt) => ({ ...ctx, todo: evt.data }))
      ),
      transition(
        'error',
        'error',
        reduce((ctx, ev) => ({ ...ctx, error: ev.error }))
      )
    ),
    success: state(transition('CLICK', 'loading')),
    error: state(transition('CLICK', 'loading')),
  },
  context
);
In Robot, machines are created using the createMachine function, which accepts an object. A state is defined using the state function and can accept a transition as a parameter.
Moving from one state to another is done with the transition function, which accepts the event and the next state as parameters. Optionally, the reduce function can be added to the transition as a third parameter. Reduce functions take a reducer function as a parameter, which is used to update the context.
Robot also has an invoke function, similar to the invoke property in XState. When the application is in the loading state, the invoke function is called. The invoke function is a kind of state that invokes a promise and returns a function or another machine. If the invoke function resolves the promise, it will send a done event. If it’s rejected, it sends an error event.
Now that our machine is ready, the next step is to build a component that will utilize the machine.
Create a file in your src directory for the component and paste the following.
import React from 'react';
import { useMachine } from '@xstate/react';
import { xstateMachine } from './stateMachine';

function Todo() {
  const [current, send] = useMachine(xstateMachine);
  const { todo } = current.context;
  return (
    <div>
      <button onClick={() => send('CLICK')}>Fetch Todo XState</button>
      {current.matches('loading') && <p>loading...</p>}
      {current.matches('success') && (
        <p key={todo.id}>
          {todo.title} <span> {todo.completed} </span>
        </p>
      )}
      {current.matches('error') && <p>An error occured</p>}
    </div>
  );
}
export default Todo;
To use a machine we have to import the useMachine hook from the @xstate/react library as well as the machine we created earlier on.
The useMachine hook is a React Hook that interprets a machine. It’s responsible for starting a service to run throughout the lifecycle of a component.
The useMachine hook accepts a machine as a parameter and returns an array. The array contains the current state and send, which is a function that sends an event to the service created by the useMachine hook.
The current state is an object that contains the state, context, and some utility functions. To check the current state, use the matches property, which returns a boolean. When a user clicks the button, it sends an event to the service. It then checks the current state of the machine and renders the appropriate UI based on the state.
The Robot approach to building components is similar. A component built with Robot would look like this:
import React from 'react';
import { useMachine } from 'react-robot';
import { robotMachine } from './robotMachine';

function Todo() {
  const [current, send] = useMachine(robotMachine);
  const { todo } = current.context;
  return (
    <div>
      <button onClick={() => send('CLICK')}>Fetch Todo Robot</button>
      {current.name === 'loading' && <p>loading...</p>}
      {current.name === 'success' && (
        <p key={todo.id}>
          {todo.title} <span> {todo.completed} </span>
        </p>
      )}
      {current.name === 'error' && <p>An error occured</p>}
    </div>
  );
}
export default RobotTodo;
Robot also has a useMachine hook that can be accessed by importing the react-robot library. The difference in the implementation is in the way a state is compared. While XState uses the matches property, which is a function that accepts the string we are trying to compare, Robot uses the name property to check the current state before comparing.
State machines offer a much better-organized way to manage state in React applications and they’re easy to scale compared to other alternatives. XState and Robot are two very popular libraries that, while very similar, approach handling machines from very different points of view.
The repository for this tutorial is available on GitHub.
For more information, check out the following resources.
Install LogRocket via npm or script tag. LogRocket.init() must be called client-side, not
server-side
$ npm i --save logrocket

// Code:

import LogRocket from 'logrocket';
LogRocket.init('app/id');
// Add to your HTML:

<script src="https://cdn.lr-ingest.com/LogRocket.min.js"></script>
<script>window.LogRocket && window.LogRocket.init('app/id');</script>

Write agent-friendly API documentation with OpenAPI, clear schemas, workflow guidance, and llms.txt for safer AI automation.

Local AI proxy tutorial for detecting, masking, and rehydrating PII before prompts reach cloud LLMs.

Learn how Graph RAG uses connected knowledge structures to improve retrieval beyond simple text similarity.

Learn how sibling-index() enables clean, JavaScript-free stagger animations using native CSS.
Would you be interested in joining LogRocket's developer community?
Join LogRocket’s Content Advisory Board. You’ll help inform the type of content we create and get access to exclusive meetups, social accreditation, and swag.
Sign up now

