From note-taking apps to complex data structures, trees diagrams are everywhere around us. They help in the arrangement of data, thus allowing users to navigate their items easily. One notable example of tree usage can be the CodeSandbox editor:

In this article, you will learn how to render tree charts to the user interface in React. Furthermore, we’ll compare several libraries with basic code samples to help you determine the best fit for your web app.
We will cover the following libraries:
Geist UI offers a set of components that replicate Vercel’s design language. One of them is a File Tree component that renders a catalog of files and folders in a tree format.
To install the Geist UI library in your project, run the following terminal command:
npm i geist-ui/react
The following snippet renders a simple file tree:
import {Tree} from "@geist-ui/react"
return (
  <div>
    <Tree>
      <Tree.Folder name="src">
        <Tree.File name="app.js" />
        <Tree.File name="index.js" />
        <Tree.Folder name="Components">
          <Tree.File name="Layout.js" />
        </Tree.Folder>
      </Tree.Folder>
      <Tree.File name="package.json" />
    </Tree>
  </div>
);
Here, the Tree module denotes the start of a tree view. The Tree.Folder and Tree.File components represent folders and files respectively.
Geist even allows developers to append event handlers to the tree view. This is handy for situations where your app needs to execute some code if the client clicks on a particular element. One such example might be to open a new window or fetch data if the user clicks on a specific file name:
const eventHandler = (path) => {
    console.log(path); //output the clicked file's path
  };
  return (
    <div>
      <Tree onClick={eventHandler}>
      </Tree>
    </div>
  );
In this code, we passed in our eventHandler function to the onClick prop. This means that whenever the user clicks on a certain file, React will execute the eventHandler method.
Ant Design is one of the most well-known React UI technologies. This is because it is easy to use and lets developers build rich and interactive interfaces with minimal amounts of code. In fact, large corporations like Alibaba use it in their applications.
Just like Geist, Ant Design offers a tree component to represent hierarchical structures.
To use Ant Design’s features, install the antd dependency into your project like so:
npm install antd
Before rendering a tree, we need to define our data source first:
const treeData = [
  {
    title: "Main file structure",
    key: "MainStructure",
    children: [
      {
        title: "Layouts",
        key: "layoutFolder",
        children: [ //child element
          {
            title: "MainLayout.js",
            key: "mainlayout.js"
          }
        ]
      },
      { title: "index.js", key: "index.js" }
    ]
  }
];
Here, each item in this array needs to have a title and key property. The children array tells Ant Design to render child elements under its respective subgroup.
As the second step, pass in this treeData array into the Tree component like so:
import "antd/dist/antd.css";
import { Tree } from "antd";

return <Tree treeData={treeData} />;
In this code, we passed in our data into the treeData prop. This will display a tree component with our chosen data.
Ant Design also allows for customization. For example, to get checkboxes, use the checkable prop:
return <Tree checkable treeData={treeData} />;
Fluent UI is Microsoft’s component library that stems from the tech giant’s Fluent Design System. It will be used in upcoming Office products.
Just like all major component utilities, it also lets developers render simple tree diagrams via the tree element.
To install the Fluent UI React package, execute this bash command:
npm i @fluentui/react-northstar
As the first step, define your data source like so:
const items = [
  {
    id: "concepts",
    title: "Top concepts to learn"
  },
  {
    id: "top-tech",
    title: "Top technologies to learn",
    items: [{ id: "react", title: "React" }] //this item will have children
  },
  {
    id: "best-accessories",
    title: "Best iPad accessories",
    items: [
      {
        id: "screen-protector",
        title: "Screen protectors",
        //child items of this sub group:
        items: [{ id: "paperlike", title: "Paperlike protector" }]
      }
    ]
  }
];
Each element in the items array denotes a node in the tree. If an object includes an items property, this will tell Fluent UI to render a child node.
Next, pass in this data into the Tree component like so:
import { Provider, teamsTheme, Tree } from "@fluentui/react-northstar";

export default function FluentTreeComponent() {
  return (
    <Provider theme={teamsTheme}>
      <Tree items={items} aria-label="tree" />
    </Provider>
  );
}
Here, we have passed in the items array. This will render a tree based on our data source.

We can even enable checkbox support via the selectable prop:
<Tree items={items} selectable aria-label="tree" />
React D3 Tree is a React component that offers a way of building complex tree types; for example, family trees and binary trees.
To use this module, install the react-d3-tree package with this command:
npm install react-d3-tree
First, define your data structure:
const technologies = {
  name: "JavaScript",
  children: [
    {
      name: "React"
    },
    {
      name: "Node.js",
      children: [{ name: "Express" }, { name: "Http" }] //children of this element
    }
  ]
};
Each object in the array has to have a name element. The children property will render a child node.
Next, pass in your technologies array into the component:
return (
  <div id="treeWrapper" style={{ width: "100vh", height: "100vh" }}>
    <Tree
      data={technologies}
    />
  </div>
);
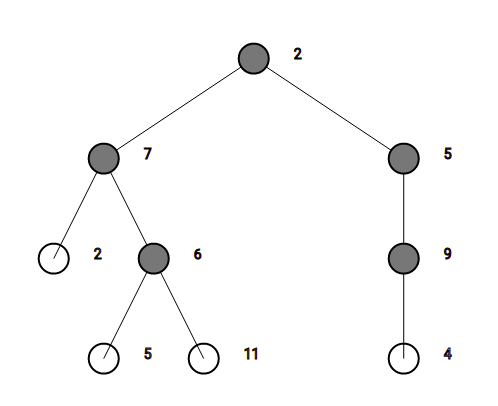
React D3 Tree is commonly used to build binary trees. As a demonstration, let’s recreate this tree diagram from Wikipedia:

This will be the corresponding data structure of the above diagram:
const binaryData = {
  name: 2, //root node
  children: [
    {
      name: 7,
      //children of the '7' node.
      children: [
        { name: 2 },
        { name: 6, children: [{ name: 5 }, { name: 11 }] }
      ]
    },
    { name: 5, children: [{ name: 9, children: [{ name: 4 }] }] }
  ]
};
<Tree
  data={binaryData}
  orientation="vertical"
  pathFunc="straight"
  nodeSize={{ x: 100, y: 100 }}
/>;
Here, the orientation prop changes the orientation of our chart to vertical. We also used the pathFunc property, which alters the look of the lines that connect each node. Furthermore, nodeSize controls the distance between each node.
If your app needs to render simple tree diagrams and you want customization options, use Ant Design. The documentation is well-explained and offers many code recipes. Other than that, the library is also a breeze to work with.
However, if you want to display complicated tree charts (for example, decision trees or traverse trees), look no further than React D3 Tree. On top of being straightforward, it also has a smaller footprint, which results in low performance costs.
In this article, we explored a handful of libraries to render trees diagrams in React. At this moment, I would opt for using Ant Design in my projects. Not only is it easy to use, but it’s also robust. Consequently, this brings app security and efficiency to the table.
Thank you so much for reading! Happy coding!
The source code for this article is located in this CodeSandbox project.
Install LogRocket via npm or script tag. LogRocket.init() must be called client-side, not
server-side
$ npm i --save logrocket

// Code:

import LogRocket from 'logrocket';
LogRocket.init('app/id');
// Add to your HTML:

<script src="https://cdn.lr-ingest.com/LogRocket.min.js"></script>
<script>window.LogRocket && window.LogRocket.init('app/id');</script>

Explore why npm dependencies are a major supply chain security risk and how to protect JavaScript apps from compromised packages and transitive threats.

Enabled React Compiler v1.0 on a production Next.js app. Here’s every warning, breakage, and silent opt-out I documented — and what actually worked.

We built the same app in TanStack Start RSC and Next.js RSC. TanStack shipped 40% less JS and built 4x faster — but Next.js is still the safer production bet.

From RSC vulnerabilities and the Vercel breach to TypeScript 7.0 Beta and AI agents — the nine frontend storylines that defined H1 2026, ranked.
Would you be interested in joining LogRocket's developer community?
Join LogRocket’s Content Advisory Board. You’ll help inform the type of content we create and get access to exclusive meetups, social accreditation, and swag.
Sign up now

