What’s the difference between client render, server render, and serverless?

Client render is when a server sends a small amount of code to a user and lets that code build the page on the user computer or phone. Server render, on the other hand, sends the page already built so the user’s machine will only have to show the page that it’s sent.
There’s also a third way to deliver information to your users that eliminates the burden of maintaining a server: serverless. Serverless means letting a provider like Google or Amazon handle the server and its resources (RAM and CPU, for example), which they scale as needed.
In this tutorial, we’ll demonstrate a small implementation of both client and server render and show how you can include a serverless framework that you can later deploy to your preferred cloud service.
The basic structure of our project is as follows.
src/
  |-private // folder with the templates to be rendered by the server with handlebars
    |-layouts
      main.handlebars
    server-render.handlebars
  |-public // folder with the content that we will feed to the browser
    |-js
      client-render.js
    index.html
  handler.js // serverless function will be here
  package.json
  server.js // our Node.js server
  serverless.yml // configuration of the serverless server
package.json{
"name": "client-server-serverless",
"version": "1.0.0",
"description": "Client vs server render vs serverless",
"main": "server.js",
"scripts": {
"start": "node server.js",
"server-debug": "nodemon --inspect server.js"
},
"author": "daspinola",
"license": "MIT",
"devDependencies": {
"nodemon": "2.0.4",
"serverless-offline": "6.8.0"
},
"dependencies": {
"express": "4.17.1",
"express-handlebars": "5.1.0",
"handlebars": "4.7.6",
"node-fetch": "2.6.1",
"serverless": "2.4.0"
}
}
Don’t forget to npm install. All the other files mentioned above will be filed as needed in the sections below.
The objective is to have the client handling all the construction of the divs, buttons, and navigation, leaving the server resources as free and fast as possible.
To do that, create an HTTP server that, when accessed in /, will just return an HTML file.
server.jsconst express = require('express')
const path = require('path')
const app = express()
app.use(express.static(path.join(__dirname, 'public')))
app.get('/', function(req, res) {
res.sendFile(path.join(__dirname, 'public/client-render.html'))
})
app.listen(7000, function () {
console.log(`Listening on port ${7000}!`)
})
The HTML file will have reference to all the resources it needs to generate the page that can be found in the public folder.
public/index.html<html>
<head>
<title>Client render</title>
</head>
<body>
<script src="/js/client-render.js"></script>
</body>
</html>
In this case, only client-render.js will have to be fetched as soon as the HTML file loads in the user browser.
public/js/client-render.jsdocument.addEventListener('DOMContentLoaded', init, false);
async function init() {
const body = document.querySelector('body')
const welcomeDiv = document.createElement('div')
const hourDiv = document.createElement('div')
const dateButton = document.createElement('button')
dateButton.innerHTML = 'Date'
welcomeDiv.innerHTML = `Welcome to the client render version, this text was added on your browser.`
body.appendChild(welcomeDiv)
body.appendChild(dateButton)
dateButton.addEventListener('click', () => {
const date = new Date()
hourDiv.innerHTML = `It's now ${date}`
body.appendChild(hourDiv)
})
}
Once the user downloads that file in the browser, it starts building the page on the spot.
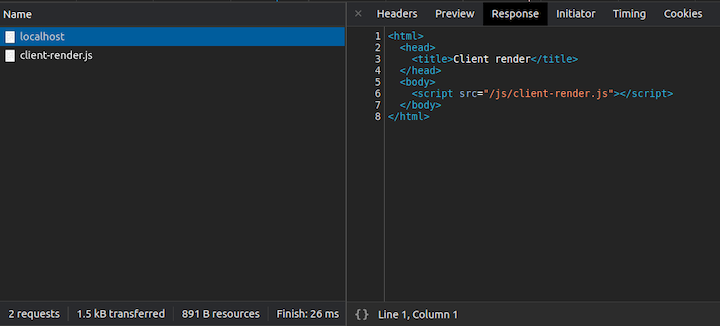
The request is made to / route (localhost in this scenario), the index.html file is loaded by the browser, and the resource client-render.js is found as a dependency. The browser requests to fetch that file, which, when loaded, will build the page.

If the Date button is pressed, the date of the browser is retrieved without any new request being seen in the Network tab of the developer tools.

If the target was to get the date of the server, a request would have to be made and the text updated. Regardless, the page would not reload since it would be our client-render.js requesting and updating the text and not the server.
Let’s zoom in on the pros and cons of using client render.
Now let’s say we now want the server to handle the rendering of the page and simply return the complete result to the user’s browser.
To simplify our example, I’ve removed the client render part. You can replace the server.js with the below or add a new route with the content of the route below.
server.jsconst express = require('express')
const exphbs = require('express-handlebars')
const path = require('path')
const app = express()
app.engine('handlebars', exphbs());
app.set('views', path.join(__dirname, 'private'))
app.set('view engine', 'handlebars');
app.get('/', function(req, res) {
const welcomeText = 'Welcome to the server render version, this text was added on the server'
const date = req.query.date === 'true'
? new Date()
: undefined
res.render('server-render', { welcomeText, date })
})
app.listen(7000, function () {
console.log(`Listening on port ${7000}!`)
})
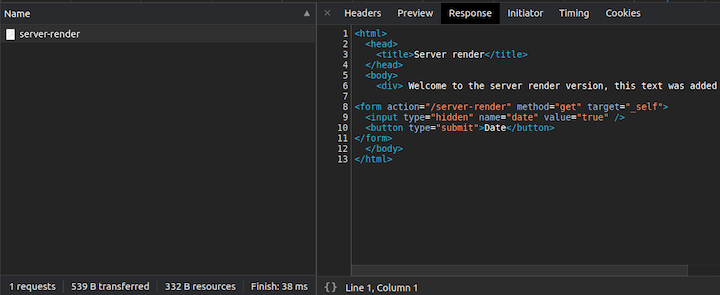
This is yet another HTTP server, but instead of sending an HTML file with JavaScript to be rendered on the client, this time we’ll render it with handlebars and send the complete result back to the client.
private/layouts/main.handlebars<html>
<head>
<title>Server render</title>
</head>
<body>
{{{ body }}}
</body>
</html>
private/server-render.handlebars<div> {{ welcomeText }} </div>
<form action="/server-render" method="get" target="_self">
<input type="hidden" name="date" value="true" />
<button type="submit">Date</button>
</form>
{{#if date}}
<div>It's now {{ date }}</div>
{{/if}}
To make life easier when using server-side render, you can specify a view engine that allows HTML to contain variables, conditions, and loops.
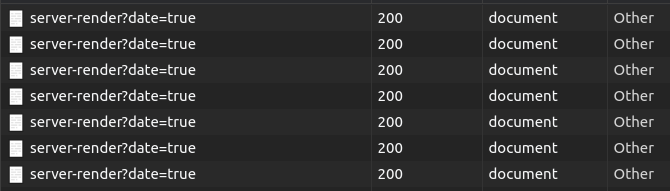
For this example, the engine is handlebars and the final result of the above when the client requests the route is HTML.
The resources transferred were also three times less than the client render counterpart since the only text is being retrieved in a single request.

There are two things to take into account with this implementation in compared to our client render example:
You can apply both methods described above to the serverless architecture. That means a page can be generated with either client or server render running within a serverless function, just like a normal HTTP server.
That approach, for a whole website, can bring large costs since serverless is most advantageous when triggered on individual functions that don’t happen often in an application.
Below is a way to run a serverless server and call the functions assigned to it locally without the need to deploy to a provider.
serverless.ymlservice: client-server-serverless
frameworkVersion: '2'
provider:
name: aws
runtime: nodejs12.x
functions:
serverDate:
handler: handler.serverDate
events:
- http:
path: serverDate
method: get
cors: true
plugins:
- serverless-offline
Aside from the serverless-offline plugin, which allows the tests to happens locally, the only other thing of interest is functions, where you should specify which functions are available to be triggered.
This configuration is responsible for generating the rout. In this case, it will be /serverDate, which should be defined in the handler.js file.
handler.jsmodule.exports.serverDate = async event => {
const serverDate = new Date()
return {
statusCode: 200,
body: JSON.stringify({
serverDate
}),
};
};
To run the server, npx sls offline start and the function will be available in localhost:3000/dev/serverDate.
![]()

When a request like this is made to a serverless function, you get charged for that request duration (parameters of billing vary by provider. You can get an idea of how much would it cost to run a function in serverless by looking at the estimate done on the console of your local serverless server.
Below is an example of a serverless function being called in the server-side render example.
server.jsconst express = require('express')
const exphbs = require('express-handlebars')
const fetch = require('node-fetch')
const path = require('path')
const app = express()
app.engine('handlebars', exphbs());
app.set('views', path.join(__dirname, 'private'))
app.set('view engine', 'handlebars');
app.get('/', function(req, res) {
const welcomeText = 'Welcome to the server render version, this text was added on the server'
const date = req.query.date === 'true'
? new Date()
: undefined
const serverlessResponse = await fetch('http://localhost:3000/dev/serverDate')
.then(res => res.json())
res.render('server-render', { welcomeText, date, serverlessResponse: serverlessResponse.serverDate })
})
app.listen(7000, function () {
console.log(`Listening on port ${7000}!`)
})
private/server-render.handlebars<div> {{ welcomeText }}. </div>
<div>Serverless function server date: {{ serverlessResponse }}</div>
<form action="/server-render" method="get" target="_self">
<input type="hidden" name="date" value="true" />
<button type="submit">Date</button>
</form>
{{#if date}}
<div>It's now {{ date }}</div>
{{/if}}

Like most topics in engineering, there’s no magic formula to help you decide to which path to choose. Usually, a hybrid approach is appropriate.
For example, you can take advantage of the server-side rendering speed and have the initial page rendered in the server while subsequent pages are rendered on the client side.
Likewise, functions that are one-offs, such as a tracking page or sending an email, should gel well with the serverless architecture.
You can access all the code referenced in this article on my GitHub.
Debugging code is always a tedious task. But the more you understand your errors, the easier it is to fix them.
LogRocket allows you to understand these errors in new and unique ways. Our frontend monitoring solution tracks user engagement with your JavaScript frontends to give you the ability to see exactly what the user did that led to an error.

LogRocket records console logs, page load times, stack traces, slow network requests/responses with headers + bodies, browser metadata, and custom logs. Understanding the impact of your JavaScript code will never be easier!

Learn how to protect full-stack projects from NPM supply chain attacks with a practical security checklist.

Explore 15 essential MCP servers for web developers to enhance AI workflows with tools, data, and automation.

Learn how contrast-color() automatically picks accessible text colors using native CSS, without JavaScript.

Learn how to build a harness-style AI workflow using Claude Code with specialized Dev, QE, and Ops subagents, gated handoffs, MCP telemetry, and LEARNING.md.
Would you be interested in joining LogRocket's developer community?
Join LogRocket’s Content Advisory Board. You’ll help inform the type of content we create and get access to exclusive meetups, social accreditation, and swag.
Sign up now

