Editor’s note: This post was originally written by Alex Merced. It was updated by Ikeh Akinyemi in December 2025 to incorporate the Bun 1.3 release and Anthropic’s acquisition of Bun.
When Bun first launched in 2022, the pitch was simple: a faster JavaScript runtime built on JavaScriptCore instead of V8. It was Node.js, but quicker.
Fast forward to the Bun 1.3 release in October 2025, which represents a fundamental shift in ambition. Bun 1.3 goes beyond a performance upgrade; it’s an attempt to replace your entire fragmented JavaScript toolchain with a single, batteries-included runtime.
And if the momentum wasn’t great enough, Anthropic acquired Bun one month later in November 2025. The acquisition will support Anthropic’s efforts to accelerate Claude Code, which had reached $1 billion in run-rate revenue just six months after becoming publicly available.
Bun will remain open source and MIT-licensed, with continued investment in making it the preferred runtime for JavaScript and TypeScript developers. In short, the backing of a leading AI company underscores Bun’s importance to the software development ecosystem.
In this guide, we’ll test the above claim by building a full-stack, real-time application using nothing but Bun 1.3 native APIs. Also, toward the end of the guide, we’ll briefly see how the “Bun stack” compares to the traditional Node.js ecosystem.
The Replay is a weekly newsletter for dev and engineering leaders.
Delivered once a week, it's your curated guide to the most important conversations around frontend dev, emerging AI tools, and the state of modern software.
JavaScript engines have always been browser-specific. V8 powers Chrome, SpiderMonkey runs Firefox, and JavaScriptCore handles Safari. In 2009, Ryan Dahl chose V8 to build Node.js, giving JavaScript access to file systems and networks beyond the browser. Node.js exploded, but its age began to show. Modern standards like ES modules, the Fetch API, and TypeScript didn’t exist when Node was designed.
Ryan Dahl’s second attempt, Deno, used Rust and embraced web standards, but required rewriting existing Node code. Then came along Bun in 2022, built in Zig, powered by JavaScriptCore, and committed to Node.js API compatibility. Developers could migrate without rewriting. The promise was speed and simplicity.
Bun 1.3’s 13,000-word release announcement is dense, but here’s what matters:
bun index.html, and Bun will automatically serve your frontend, resolvesES modules, and hot-reload changes. No Vite, no Webpack, no config files.mysql2 package required as it’s Bun.SQL with tagged template literals.RedisClient from "bun". No node-redis dependency needed again.--hot flag adds file watching and hot module reloading directly to Bun.serve(), replacing nodemon and Vite’s dev server.bun pm check integrates Socket.dev for vulnerability scanning. The new minimumReleaseAge option blocks packages published within X days, providing a direct protection against supply chain attacks like the 2025 npm incidents.bun pm migrate converts yarn.lock or pnpm-lock.yaml to bun.lockb, smoothing the transition from other package managers.The clear message is that Bun strives to be the only tool you need. Let’s prove it works.
To get started with Bun, first, we’ll have to install it. According to the Bun documentation, installation requires only the following command:
curl -fsSL https://bun.com/install | bash
Keep in mind, the above command will only work on Mac and Linux. So, if you’re using Windows, you’ll need to run one of the following commands to set up Bun:
powershell -c "irm bun.sh/install.ps1|iex"
# Or
scoop install bun
Once it’s done installing, make sure to read the confirmation prompt with directions for adding Bun to your PATH. Now, if you run bun--version, you should get a version number printed confirming you have installed it correctly.
Next, we’ll build a real-time task manager that demonstrates every headline feature of Bun 1.3, including MySQL for persistence, Redis for pub/sub, frontend serving with hot reload, and Server-Sent Events for live updates. The entire stack runs in a single process with zero npm dependencies.
Since MySQL and Redis aren’t included in Bun itself (they’re clients, not embedded databases), we’ll use Docker to spin them up locally. This keeps your machine clean and makes the setup reproducible.
Create a docker-compose.yml file:
version: '3.8'
services:
  mysql:
    image: mysql:8.0
    environment:
      MYSQL_ROOT_PASSWORD: rootpass
      MYSQL_DATABASE: taskdb
      MYSQL_USER: bunuser
      MYSQL_PASSWORD: bunpass
    ports:
      - "3306:3306"
    healthcheck:
      test: ["CMD", "mysqladmin", "ping", "-h", "localhost"]
      interval: 5s
      timeout: 3s
      retries: 5

  redis:
    image: redis:7-alpine
    ports:
      - "6379:6379"
Start the services and initialize your Bun project:
docker-compose up -d
bun init -y
mkdir public
No npm install, no dependency installation. The package.json that bun init creates will remain empty throughout this entire tutorial.
Bun 1.3’s MySQL client is accessed through the SQL class from the "bun" package. Unlike traditional database libraries where you call .query() methods, Bun uses tagged template literals. This is a JavaScript feature that lets you embed a function call directly into a template string.
Here’s how you initialize the connection and create your schema:
import { SQL } from "bun";

const db = new SQL({
  adapter: "mysql",
  hostname: "localhost",
  port: 3306,
  database: "taskdb",
  username: "bunuser",
  password: "bunpass",
});

// Create the tasks table using tagged template syntax
await db`
  CREATE TABLE IF NOT EXISTS tasks (
    id INT AUTO_INCREMENT PRIMARY KEY,
    title VARCHAR(255) NOT NULL,
    completed BOOLEAN DEFAULT FALSE,
    created_at TIMESTAMP DEFAULT CURRENT_TIMESTAMP
  )
`;
This is the first major departure from the Node stack. In a typical Express app, you’d install mysql2, import it, create a connection pool, and wrap queries in callbacks or promises. Bun’s approach is synchronous-looking (thanks to top-level await) and doesn’t require any external packages.
Redis in Bun 1.3 works similarly; just import RedisClient from "bun" and connect. We’ll create two clients, one for subscribing to updates and another for publishing them:
import { RedisClient } from "bun";

const redis = new RedisClient("redis://localhost:6379");
const pubClient = new RedisClient("redis://localhost:6379");

await redis.connect();
await pubClient.connect();
Why two clients? Redis has a quirk that once a connection enters “subscribe” mode, it can’t publish messages. You need separate connections for pub and sub operations.
Now we’ll set up a channel to broadcast task changes. Whenever someone creates, toggles, or deletes a task, we’ll publish a JSON payload to the task_updates channel:
const clients = new Set();

await redis.subscribe("task_updates", (message) => {
  for (const client of clients) {
    try {
      client.controller.enqueue(`data: ${message}\n\n`);
    } catch (e) {
      clients.delete(client);
    }
  }
});
The clients Set tracks active Server-Sent Events connections from browsers. When Redis receives a message on task_updates, we loop through all connected clients and push the update to them. This is how we’ll achieve real-time synchronization across multiple browser tabs without WebSockets.
Now comes the core server logic. Bun.serve() is Bun’s built-in HTTP server requiring no Express, no Fastify, no external framework. It’s surprisingly capable.
Here’s the structure:
import { mkdir } from "node:fs/promises";

await mkdir("./public", { recursive: true });

Bun.serve({
  port: 3000,
  async fetch(req) {
    const url = new URL(req.url);

    // We'll handle routing here
  },
});

console.log("🚀 Server running at http://localhost:3000");
Every request hits the fetch function. There’s no middleware chain, no app.get() or app.post(). You parse the URL and method manually. This feels primitive compared to Express, but it’s also explicit because there’s no magic routing happening behind the scenes.
One of Bun 1.3’s headline features is zero-config frontend serving. Instead of configuring Vite or setting up Express’s static middleware, you just return Bun.file():
// Inside the fetch function:
if (url.pathname === "/" || url.pathname.startsWith("/public")) {
  const filePath = url.pathname === "/"
    ? "./public/index.html"
    : `.${url.pathname}`;

  const file = Bun.file(filePath);
  if (await file.exists()) {
    return new Response(file);
  }
}
Bun.file() automatically sets the correct Content-Type header based on the file extension. If you request /public/app.js, Bun serves it as application/javascript. If you request /public/styles.css, it’s text/css. No configuration needed.
This is the feature that lets you run bun index.html from the command line and have it just work as Bun starts a server, resolves ES module imports, and hot-reloads changes.
Now the CRUD operations. First, fetching all tasks:
if (url.pathname === "/api/tasks" && req.method === "GET") {
  const tasks = await db`SELECT * FROM tasks ORDER BY created_at DESC`;
  return Response.json(tasks);
}
The tagged template returns a promise that resolves to an array of objects. No .then(), no .all(), no manual row parsing. You get plain JavaScript objects with keys matching your column names.
Creating a task involves inserting a row and then broadcasting the change via Redis:
if (url.pathname === "/api/tasks" && req.method === "POST") {
  const { title } = await req.json();

  await db`INSERT INTO tasks (title) VALUES (${title})`;
  const [task] = await db`SELECT * FROM tasks WHERE id = LAST_INSERT_ID()`;

  await pubClient.publish(
    "task_updates",
    JSON.stringify({ type: "create", task })
  );

  return Response.json(task, { status: 201 });
}
The ${title} interpolation is safe because Bun parameterizes it automatically. After inserting, we use MySQL’s LAST_INSERT_ID() function to fetch the newly created row. Then we publish a JSON payload to Redis, which our subscribe handler (from earlier) will broadcast to all connected browsers.
Toggling a task’s completion status follows the same pattern:
if (url.pathname.startsWith("/api/tasks/") && req.method === "PATCH") {
  const id = parseInt(url.pathname.split("/").pop());

  await db`UPDATE tasks SET completed = NOT completed WHERE id = ${id}`;
  const [task] = await db`SELECT * FROM tasks WHERE id = ${id}`;

  await pubClient.publish(
    "task_updates",
    JSON.stringify({ type: "toggle", task })
  );

  return Response.json(task);
}
Deleting is simpler since we don’t need to return the task:
if (url.pathname.startsWith("/api/tasks/") && req.method === "DELETE") {
  const id = parseInt(url.pathname.split("/").pop());

  await db`DELETE FROM tasks WHERE id = ${id}`;

  await pubClient.publish(
    "task_updates",
    JSON.stringify({ type: "delete", id })
  );

  return new Response(null, { status: 204 });
}
The final piece is the SSE endpoint that browsers connect to for live updates:
if (url.pathname === "/api/events") {
  const stream = new ReadableStream({
    start(controller) {
      const client = { controller };
      clients.add(client);

      controller.enqueue("data: {\"type\":\"connected\"}\n\n");

      req.signal.addEventListener("abort", () => {
        clients.delete(client);
        try { controller.close(); } catch (e) {}
      });
    },
  });

  return new Response(stream, {
    headers: {
      "Content-Type": "text/event-stream",
      "Cache-Control": "no-cache",
      "Connection": "keep-alive",
    },
  });
}
This creates a long-lived connection. When the browser opens /api/events, we add its controller to our clients Set. When Redis publishes a message (from our earlier subscribe handler), we push it to all clients via controller.enqueue(). When the browser disconnects, the abort event fires and we clean up.
This is how we achieve real-time updates without WebSockets. SSE is simpler because it’s just HTTP with a special content type.
Now for the client side. Create public/index.html:
<!DOCTYPE html>
<html lang="en">
<head>
  <meta charset="UTF-8">
  <meta name="viewport" content="width=device-width, initial-scale=1.0">
  <title>Bun 1.3 Task Manager</title>
  <link rel="stylesheet" href="/public/styles.css">
</head>
<body>
  <div class="container">
    <h1>⚡ Bun 1.3 Task Manager</h1>
    <p class="subtitle">Full-stack • MySQL • Redis • Zero dependencies</p>

    <form id="taskForm">
      <input type="text" id="taskInput" placeholder="What needs to be done?" required />
      <button type="submit">Add Task</button>
    </form>

    <ul id="taskList"></ul>
    <div class="status"><span id="connectionStatus">🔴 Disconnected</span></div>
  </div>

  <script type="module" src="/public/app.js"></script>
</body>
</html>
Notice the type="module" on the script tag. Bun automatically resolves ES module imports, meaning if you import React from 'react' in your frontend code, Bun will handle the resolution without a bundler.
Now public/app.js for the client-side logic:
const taskForm = document.getElementById('taskForm');
const taskInput = document.getElementById('taskInput');
const taskList = document.getElementById('taskList');
const connectionStatus = document.getElementById('connectionStatus');

async function loadTasks() {
  const response = await fetch('/api/tasks');
  const tasks = await response.json();

  taskList.innerHTML = tasks.map(task => `
    <li class="${task.completed ? 'completed' : ''}">
      <input type="checkbox" ${task.completed ? 'checked' : ''}
             onchange="toggleTask(${task.id})" />
      <span>${task.title}</span>
      <button onclick="deleteTask(${task.id})">❌</button>
    </li>
  `).join('');
}
This is standard DOM manipulation, nothing Bun-specific here. We fetch tasks and render them as list items. Next, form submission creates a new task:
taskForm.addEventListener('submit', async (e) => {
  e.preventDefault();
  const title = taskInput.value.trim();
  if (!title) return;

  await fetch('/api/tasks', {
    method: 'POST',
    headers: { 'Content-Type': 'application/json' },
    body: JSON.stringify({ title }),
  });

  taskInput.value = '';
  await loadTasks();
});
Toggle and delete are simple one-liner functions attached to window (so inline onclick handlers work):
window.toggleTask = async (id) => {
  await fetch(`/api/tasks/${id}`, { method: 'PATCH' });
  await loadTasks();
};

window.deleteTask = async (id) => {
  await fetch(`/api/tasks/${id}`, { method: 'DELETE' });
  await loadTasks();
};
Finally, the real-time connection using the browser’s built-in EventSource API:
const eventSource = new EventSource('/api/events');

eventSource.onopen = () => {
  connectionStatus.textContent = '🟢 Connected';
  connectionStatus.style.color = '#22c55e';
};

eventSource.onerror = () => {
  connectionStatus.textContent = '🔴 Disconnected';
  connectionStatus.style.color = '#ef4444';
};

eventSource.onmessage = (event) => {
  const update = JSON.parse(event.data);
  console.log('Real-time update:', update);
  loadTasks();
};

loadTasks();
When the SSE connection opens, we update the status indicator. When a message arrives (because someone created/toggled/deleted a task), we reload the task list. Open two browser windows side-by-side, create a task in one, and watch it appear instantly in the other.
Checkout the complete project on Github for the public/styles.css file that adds basic styling (omitted for brevity but included in the repository).
Now, start the server with hot reloading enabled:
bun --hot server.js
The --hot flag is new in Bun 1.3. It watches your files and restarts the server instantly when you save changes. This replaces nodemon entirely.
Open http://localhost:3000. Add tasks, toggle them, delete them. The server restarts in milliseconds, and refreshing the page shows your changes immediately:
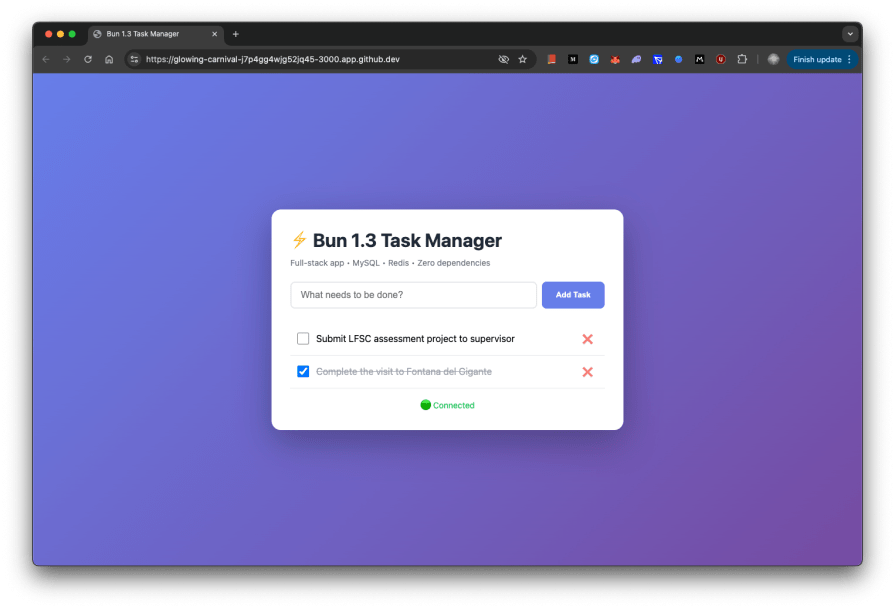
This is the full stack comprising MySQL persistence, Redis pub/sub, real-time SSE, and hot module reloading. One runtime, one process, one command. No node_modules folder weighing 300MB.
Let’s be explicit about what just happened. In a traditional Node.js stack, building the same task manager would require:
| Requirement | Node.js Stack | Bun 1.3 |
|---|---|---|
| Runtime | Node.js | Bun |
| Package manager | npm/yarn/pnpm | bun install |
| Dev server | Vite or Webpack Dev Server | bun --hot |
| Process manager | nodemon | Built-in |
| HTTP framework | Express or Fastify | Bun.serve() |
| MySQL client | mysql2 (1.2M weekly downloads) |
Bun.SQL |
| Redis client | node-redis (2M weekly downloads) |
RedisClient |
| Environment variables | dotenv |
Built-in |
| TypeScript | ts-node + config |
Built-in |
| Module bundler | Webpack/Rollup/esbuild | Built-in |
| npm packages | ~8-12 | 0 |
The Node ecosystem’s strength has always been its modularity, but that modularity has a cost: decision fatigue, version conflicts, security vulnerabilities scattered across dozens of dependencies, and the infamous node_modules black hole.
Bun 1.3’s bet is that most developers would trade that flexibility for a cohesive, batteries-included experience. It’s the same bet Ruby on Rails made in 2004, the same bet Laravel made in 2011. Developers want to build applications, not assemble toolchains.
Bun 1.3 isn’t just a faster runtime anymore. It’s a philosophical statement that the JavaScript ecosystem’s fragmentation of the endless choosing between Vite vs. Webpack, Express vs. Fastify, mysql2 vs. Prisma isn’t inevitable. A single, opinionated runtime can replace most of that complexity without sacrificing power.
The demo we built — a real-time task manager with MySQL, Redis, hot reloading, and zero npm dependencies — would have required a dozen packages and multiple config files in Node.js. In Bun 1.3, it’s one file, one command.
And Anthropic’s recent acquisition of Bun signals that this “batteries-included” approach has backing from a leading AI company. With over 7 million monthly downloads and adoption by companies like Midjourney, the momentum is clear. This philosophy isn’t just compelling for individual developers: it’s becoming a critical infrastructure for the next generation of software development.
Whether Bun overtakes Node remains to be seen. But it’s already proven that a “Rails for JavaScript” approach can work. For developers drowning in toolchain complexity, Bun 1.3 offers a compelling alternative: less configuration, fewer dependencies, faster iteration.
There’s no doubt that frontends are getting more complex. As you add new JavaScript libraries and other dependencies to your app, you’ll need more visibility to ensure your users don’t run into unknown issues.
LogRocket is a frontend application monitoring solution that lets you replay JavaScript errors as if they happened in your own browser so you can react to bugs more effectively.

LogRocket works perfectly with any app, regardless of framework, and has plugins to log additional context from Redux, Vuex, and @ngrx/store. Instead of guessing why problems happen, you can aggregate and report on what state your application was in when an issue occurred. LogRocket also monitors your app’s performance, reporting metrics like client CPU load, client memory usage, and more.
Build confidently — start monitoring for free.

Learn how to use Gemini CLI subagents to delegate frontend, backend, testing, and docs tasks to specialized agents with guardrails and clear ownership.

Learn how next-browser gives AI agents runtime context for debugging Next.js apps, including React props, hydration, PPR, forms, and performance.

Build dynamic LLM routing in Next.js with OpenRouter, TanStack AI, task classification, model fallbacks, and cost-aware routing.

TSRX adds first-class control flow, conditional hooks, and scoped styles to React via a TypeScript compiler extension — no new framework required.
Hey there, want to help make our blog better?
Join LogRocket’s Content Advisory Board. You’ll help inform the type of content we create and get access to exclusive meetups, social accreditation, and swag.
Sign up now

