
If you randomly pick a few games, each would probably have a different art style and mechanics, a different story, or even no story at all, but there’s one thing they’d all have in common: all games need to read and handle inputs from devices like keyboard, mouse, gamepad, joystick, VR controllers, and so on.
In this post, I’ll show you how to build a third-person controller in Unity with the new Input System package together with a follow camera driven by Cinemachine, another powerful package by Unity Technologies.
Our third-person controller will handle inputs from a keyboard and mouse and a standard gamepad, and because the new input system in Unity is quite smart, as you’ll soon see, adding support for another input device wouldn’t require any extra code.
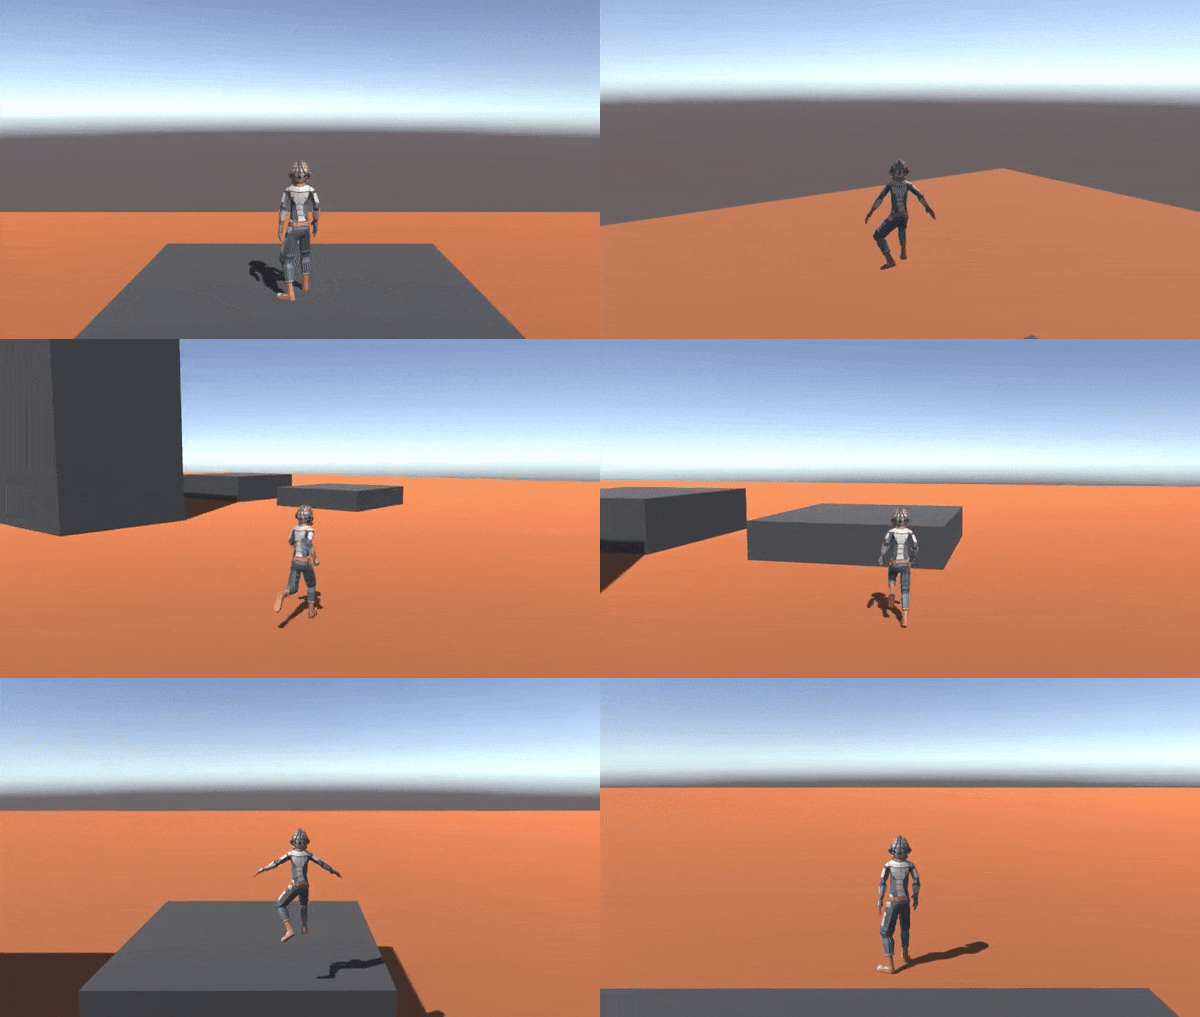
On top of that, you’ll see how to set up idle, run, jump, and fall animations and how to smoothly transition among them. We’re going to implement the core of the controller as a state machine with a focus on clean architecture and extendability.
In case you’ve never heard about state machines or the state design pattern before, fear not, I’ll explain everything step-by-step. However, I will assume you have a basic understanding of C# and OOP concepts like inheritance and abstract classes.
By the end of this post, you’ll be able to easily extend our controller with your own states and you’ll have under your belt a design pattern you’ll find useful in many different contexts.
Speaking of design patterns, apart from the state pattern we’ll use also another one, in game development very common, if not the most common: the observer pattern.
The Replay is a weekly newsletter for dev and engineering leaders.
Delivered once a week, it's your curated guide to the most important conversations around frontend dev, emerging AI tools, and the state of modern software.
Before we start building our player controller, let’s briefly talk about the difference between the new and the old Unity input system. I’m not going to repeat what you can read in the documentation, but rather highlight the main difference.
If you’ve been working with Unity before, you probably already know how to use the old input system. When you want some code to be executed every frame only when a given key is pressed, you do it like this:
void Update()
{
  if (Input.GetKeyDown(KeyCode.Space))
  {
    // Code executed every frame when Space is pressed
  }
}
You can make it a little bit better by binding keys and axes with names in Project Settings > Input Manager to then write your script like this instead:
{
  if (Input.GetKeyDown("Jump"))
  {
    // Code executed every frame when key bound to "Jump" is pressed
  }
}
And when you want to read values from the axes, you can do it like this:
void Update()
{
  float verticalAxis = Input.GetAxis("Vertical");
  float horizontalAxis = Input.GetAxis("Horizontal");

  // Do something with the values here
}
It’s pretty straightforward, right? The new input system is a little bit more complicated but brings a lot of advantages. I think you will fully appreciate them by the end of this tutorial. For now, I’m going to name just a few:
Update method, which brings better performanceThe gist of the new input system lies in an abstraction layer added between input devices and actions and the event-based API. You create an Input Action asset, which bind inputs with actions via UI in the editor, and let Unity generate the API for you.
Then you write a simple class that implements IPlayerActions to provide input events and values for a player controller to consume, and that’s exactly what we’re going to do in this blog post.
If you want to follow along, and I encourage you to do so, I recommend using Unity 2021.3.6f1. Create a new empty 3D project and first of all, go to Window > Package Manager. Select Unity Registry from the Packages dropdown list, type Cinemachine in the search field, select the package, and hit install. Then do the same for the InputSystem package.
While installing the InputSystem, Unity will prompt you to restart. After that, return to the Package Manager window, select Packages: In Project, and confirm both packages were installed.
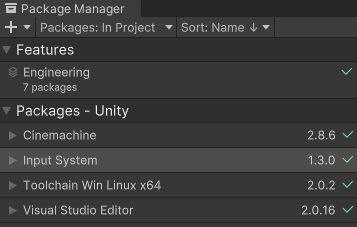
You can also remove the other packages, except the code integration support for your IDE. In my case, it’s the Visual Studio Editor package.
To set up the new Unity input system, we first need to bind inputs to actions. For that, we need a .inputactions asset. Let’s add one by right-clicking in the Project tab and selecting Create > Input Actions.
Name it Controls.inputactions and open the window for binding inputs by double clicking on this new asset.
In the top right corner click on All Control Schemes, and from the menu that pops up select Add Control Scheme…, name the new scheme Keyboard and Mouse, and via the plus symbol at the bottom of the empty list, add Keyboard and then Mouse input devices.
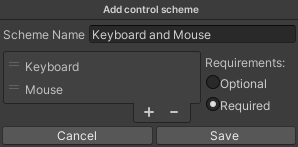
Repeat the process from the previous paragraph, but this time name the new scheme as Gamepad and also add the Gamepad to the input devices list. Also, select Optional from the two requirement options.
Back in the Controls (Input Action) window, click in the leftmost column labeled as Action Maps to a plus symbol and name the newly added record as Player. The middle column is where we’re now going to bind inputs with actions.
One action is already added, it’s labeled as New Action. Right-click on that action and rename it to Jump, then unfold it with the little triangle icon, select the binding <No Binding>, and in the Binding Properties on the right column, click on the dropdown icon next to Path.
You could either find Space in the Keyboard section or click on the Listen button and simply press the spacebar on your keyboard. Back in binding properties, below Path, tick the Keyboard and Mouse under Use in control scheme. Notice these are the schemes we’ve added previously.
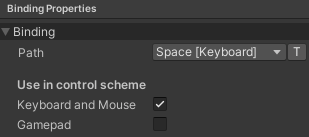
Space is now assigned to the jump action, but we also want another binding for a gamepad. In the Actions column, click on the plus symbol. Select Add binding, and in the Path, set Button South from the Gamepad section. This time, under the Use in control scheme, tick Gamepad.
Let’s add another action, this time for movement. With the plus symbol next to the Action label, add the new action and name it Move. Keep the Move action selected and in the right column, change Action Type to Value and Control Type to Vector 2.

The first binding slot, again labeled by default as <No Binding>, has been already added. Let’s use it for the gamepad because for the keyboard, we’re going to add a different type of action. In Path, find and assign the Left Stick from the Gamepad section.
Now, with the plus symbol next to the Move action, add a new binding, but this time select Add Up/Down/Left/Right Composite. You can keep the name of the new binding as a 2D Vector, what’s important is to assign a key for each component.
Assign W, S, A, and D for Up, Down, Left, and Right respectively, or arrow keys, if you prefer that. Don’t forget to tick Keyboard and Mouse under the Use in control scheme for each of them.
The last action we need to add is to rotate the camera in order to look around. Let’s name this action Look. For this action, also set Action Type to Value and Control Type to Vector. For the Keyboard and Mouse control scheme, bind Delta from the Mouse section, which is the amount of change in the X and Y positions of the mouse from the previous to the current frame, and for the Gamepad scheme, bind the Right Stick.
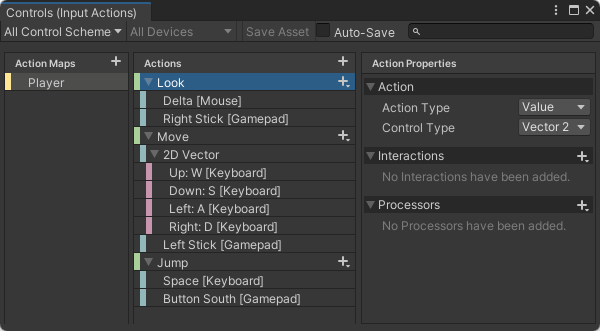
We now have all the input bindings for the keyboard and mouse and for the gamepad setup. The last thing we need to do in the Controls (Input Action) window is to click on the Save Asset button.
Notice that when we saved the asset, Unity generated a Controls.cs file for us in the Assets folder, right next to Controls.inputactions. We’re going to need the code that has been generated in this file while building our InputReader class, which we’re going to do in the next section.
InputReader classSo far we’ve been working only in the Unity editor. Now it’s time to write some code. Create a new C# script in your assets and name it InputReader. The InputReader class should inherit from MonoBehavior because we’re going to attach it as a component to our Player game object, later when we’ll have one.
Apart from that, the InputReader will implement Controls.IPlayerActions interface. This interface has been generated for us by Unity, when we saved Controls.inputactions asset at the end of the previous section.
Because we created Look, Move and Jump actions, the interface defines OnLook, OnMove, and OnJump methods with a context parameter of type InputAction.CallbackContext.
Do you recall I wrote the new Unity input system is event-based? This is it. We define in our InputReader class a member MoveComposite of type Vector2 and we implement OnMove like this:
public void OnMove(InputAction.CallbackContext context)
{
  MoveComposite = context.ReadValue<Vector2>();
}
Whenever an input we bound for Move action (W, S, A, D keys and Right Stick on a gamepad) is registered, this OnMove is called. From an event in that generated code, and from the context parameter that is passed, we then read the input value.
When, for example, a W key is pressed, the value from the context assigned to our MoveComposite will be 0 on the x-axis and 1 on the y-axis. When we press both W and A, it will be -1 on x, and 1 on y, and when we release the keys, values on both axes will be 0.
OnLook will be implemented in the same way and similarly also the OnJump method, with a little difference that instead of assigning the value, we’re going to raise an event in the InputReader itself:
public void OnJump(InputAction.CallbackContext context)
{
  if (!context.performed)
    return;

  OnJumpPerformed?.Invoke();
}
Notice that we return early from the function if the context.performed is false. Without that, the OnJumpPerformed event would be called twice: once when we press the spacebar and also when we release it. We don’t want to jump again after releasing the spacebar.
We also use a null conditional operator (?.) to skip over invoke when there’s no handler registered on the OnJumpPerformed event. In such a case, the object is null. If you prefer throwing an exception when no handler is registered on OnJumpPerformed, remove the operator, leaving just OnJumpPerformed.Invoke();
Here is the entire code of the InputReader.cs file:
using System;
using UnityEngine;
using UnityEngine.InputSystem;

public class InputReader : MonoBehaviour, Controls.IPlayerActions
{
    public Vector2 MouseDelta;
    public Vector2 MoveComposite;

    public Action OnJumpPerformed;

    private Controls controls;

    private void OnEnable()
    {
        if (controls != null)
            return;

        controls = new Controls();
        controls.Player.SetCallbacks(this);
        controls.Player.Enable();
    }

    public void OnDisable()
    {
        controls.Player.Disable();
    }

    public void OnLook(InputAction.CallbackContext context)
    {
        MouseDelta = context.ReadValue<Vector2>();
    }

    public void OnMove(InputAction.CallbackContext context)
    {
        MoveComposite = context.ReadValue<Vector2>();
    }

    public void OnJump(InputAction.CallbackContext context)
    {
        if (!context.performed)
            return;

        OnJumpPerformed?.Invoke();
    }
}
OnEnable and OnDisable methods are called when a game object on which the script is attached as a component is enabled and disabled respectively. When we run our game, OnEnable is called once right after Awake. For more information, see Order of execution for event functions in Unity documentation.
What’s important here is creating an instance of the Control class, which Unity generated based on Control.inputactions asset and Player action map. Notice how the names match and how we pass the instance of this (InputReader) to the SetCallbacks method. Pay attention also to when we Enable and Disable the action map.
PlayerFor our Player game object, we need a rigged humanoid model with idle, run, jump, and fall animations. Download this Spacesuit.fbx mode made by Quaternius and all animations (.anim files) from here.
Move .fbx and all .anim files somewhere inside the Assets folder in your project. Then, drag and drop Spacesuit.fbx into your scene and rename the Spacesuit game object in the Hierarchy tab to the Player.
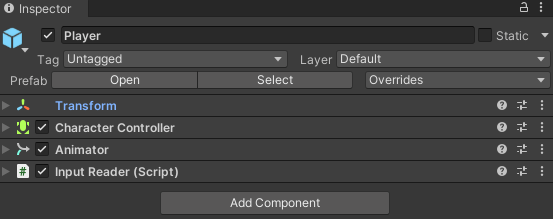
Keep the Player game object selected and in the Inspector tab, add Character Controller, Animator, and our InputReader as components.
Before we proceed to the next section, right-click in the Hierarchy tab, and from the context menu add 3D Object > Cube. Move this cube below the player and change its scale to create some ground. If you wish, you can also add some more cubes and build a few platforms from them.
Character ControllerA Character Controller component allows us to do movement constrained by collisions without having to deal with a rigidbody, as stated in the Unity documentation. That means we need to set up its collider, which is visualized in the Scene tab as a green wireframe capsule.
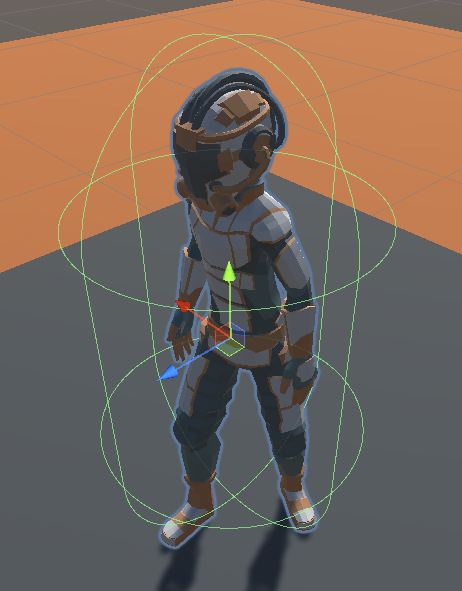
For this particular character model, the good values for the collider position and shape are Center X: 0, Y: 1, Z: 0.12, Radius 0.5, and Height 1.87. You can keep the other properties on their default values.

Now right-click on the Player in the Hierarchy and select Create Empty; this will create an empty game object with just a Transform component as a child object of the Player. Rename it to CameraLookAtPoint and set in the Inspector its Y-position to 1.5. You’ll see why we do that right in the next section.
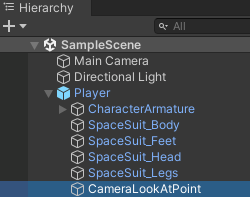
Cinemachine is a very powerful Unity package. It allows you to create, among other things, a free-look follow camera with advanced features like obstacle avoidance entirely in the editor UI, without any coding. And that’s exactly what we’re going to do now!
Right-click in the Hierarchy tab and add Cinemachine > FreeLook Camera. The CMFreeLook object that has been added to our scene is not a camera itself, but rather a driver for the Main Camera. In the runtime, it sets the position and rotation of the main camera.
While the CMFreeLook object is selected, drag and drop from the Hierarchy tab to the Inspector tab, under the CinemachineFreeLook component, our Player to the Follow property and its child object CameraLookAtPoint to Look At.

Now scroll down and set up values for top, middle, and bottom camera rigs. Set the TopRig Height to 4.5 and Radius to 5, MiddleRig to 2.5 and 6, and BottomRig to 0.5 and 5.

Notice in the Scene view, that there are three red circles around our player connected vertically with a spline when CMFreeLook is selected. These circles are the top, middle, and bottom rigs.
The vertical spline is a virtual rail for the camera, which will slide up and down when we move our mouse vertically, and the entire spline will rotate around these circles when moving the mouse horizontally.
And with the new Input System, it’s super easy to connect these mouse inputs with the camera. All you need to do is to add the Cinamechine Input Provider component to the CMFreeLook object and assign Player/Look (Input Action Reference) from our Control.inputactions asset to the XY Axis property.

To finish the Cinemachine setup, add the last component to CMFreeLook: the Cinemachine Collider. This will make the camera avoid obstacles instead of clipping through. You can keep all its values as they are.
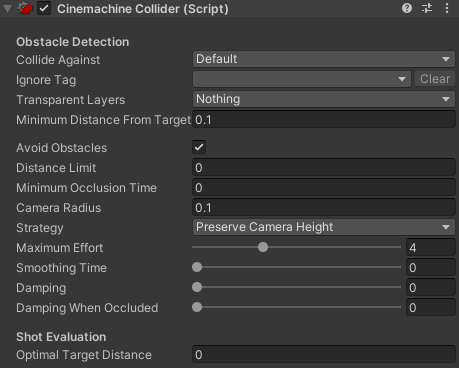
And that’s our player camera set up with Cinemachine, entirely without coding. If you play the game now, you should be able to rotate the camera around the player using the mouse or the left stick on a gamepad.
However, this is really just the tip of the iceberg. Smart people from Unity Technologies invested a lot of time into this package, and you can read more about it in the Cinemachine section on the Unity website.
The last thing we need to do before we start building our custom state machine from scratch in the next section is to set up an animator.
In the Animator, we’re going to create one Blend Tree for smooth transitions between Idle and Move animations and add two standalone animations for Jump and Fall.
If you’ve been working with Animator in Unity before, you probably know this Animator is also a state machine, but you might be surprised that we won’t add any transitions between Blend Tree and the animations. That is a valid approach here because later we’re going to initiate transitions among these animations in our own state machine.
First, we need to create an Animator Controller asset. Right-click in the project tab and select Cinemachine > Animator Controller. Name this new asset PlayerAnimator.
Now select in the Hierarchy tab our Player game object and in the Inspector, drag the asset to the Controller slot of the Animator component.

Now, in the menu bar go to Window > Animation > Animator. If you haven’t downloaded animation files (.anim) already, download them now.
Let’s start by creating a blend tree for transitions between Idle and Move animations. Right-click inside the griddled space in the Animator window and select Create State → From New Blend Tree.
This is our first state and Unity automatically marked it as the default one with the orange color. When we run the game, the Animator immediately sets the current state to this. It’s also illustrated in the UI with the orange arrow pointing from Entry to our Blend Tree state.
Select the Blend Tree state and in the Inspector tab, rename it to MoveBlendTree. Be careful to not make any typos and name it exactly as you see here, a good idea would be to copy and paste the name from here, because later we’re going to reference it from in code by this name.
In the left panel of the Animator window, switch from the Layers to Parameters tab, click on the plus symbol, select float as the type of the parameter and name the new parameter MoveSpeed. Again, make sure the name is correct, for the same reason as with the name of the blend tree.
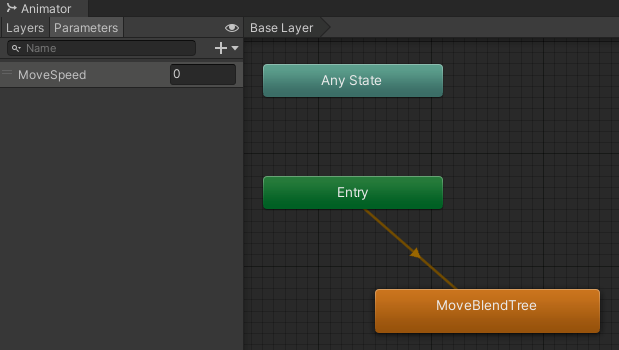
Now double-click on the MoveBlendTree, which opens another layer. Then select the grey box labeled as Blend Tree (it should also have a slider labeled as MoveSpeed and an input box with 0 in it) and in the Inspector click on the little plus symbol under the empty list of motions and click on Add Motion Field.
Do it once more to get another slot and then drag and drop from the downloaded animations (.anim files) the Idle into the first one and the Run to the second.
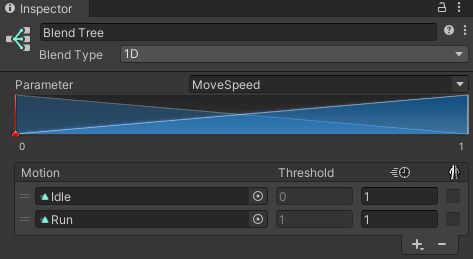
Blend trees are all about combining more animations into a final animation. Here we have two animations and one parameter MoveSpeed. When the MoveSpeed is 0, the final animation is all Idle and no Run. When MoveSpeed is 1, then it will be the exact opposite. And with the value of 0.5, the final animation will be the combination of both, 50% of Idle and 50% of Run.
Imagine you’re standing still and then you need to run somewhere. There is a specific movement you need to do to transition from standing still to running, right? That’s exactly what we’re going to use this Blend Tree for when we’ll be setting the value of MoveSpeed from our code in the next section.

At the moment, we’re almost done with the Animator. We just need to add standalone animations for jumping and falling. That’s much easier — go back from MoveBlendTree to Base Layer and just drag and drop Jump and Fall animations onto the Animator window.
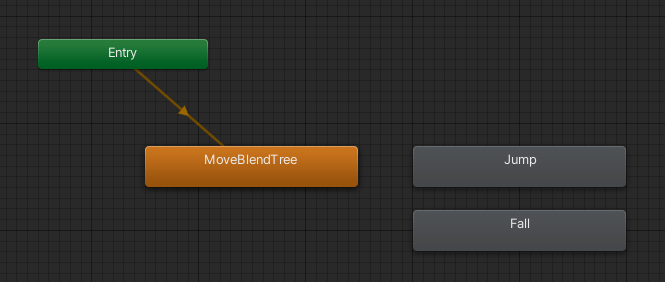
I’ve made the Jump animation purposely too slow, so you can see how you can tweak the speed of any animation in Unity. Click on the Jump animation in the Animator window and in the Inspector, change the value of the Speed property from 1 to 2. The animation will be played twice as fast.

Until now, we’ve spent most of the time in the Unity editor. The final part of this tutorial will be all about coding. As I wrote at the beginning, we’re going to use something called the state pattern, which is closely related to state machines.
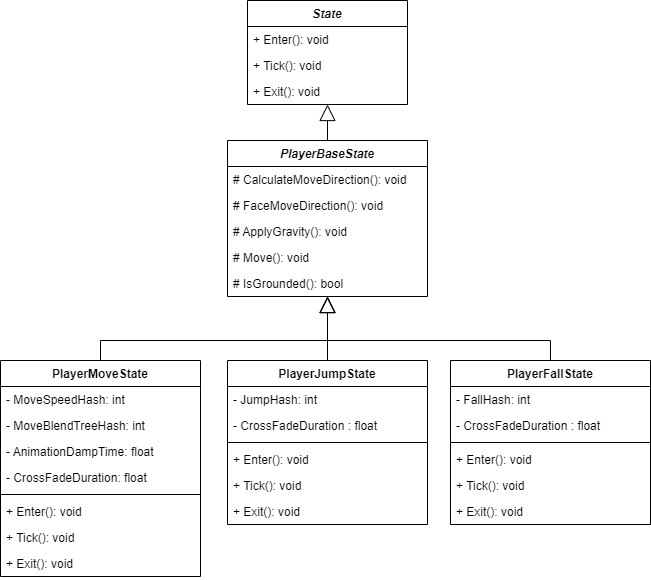
To start, we’re going to write a pure abstract State class (a class that has only abstract methods with no implementations and no data). From this class, we inherit an abstract PlayerBaseState class and provide concrete methods with logic useful in concrete states that will inherit from this class.
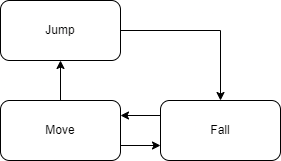
Those will be our states: PlayerMoveState, PlayerJumpState, and PlayerFallState. They each will implement Enter, Tick, and Exit methods differently.
All classes, the relations among them, their members, and methods are illustrated in the following UML class diagram. The members of concrete states like CrossFadeDuration, JumpHash, and others are for transitions between animations.
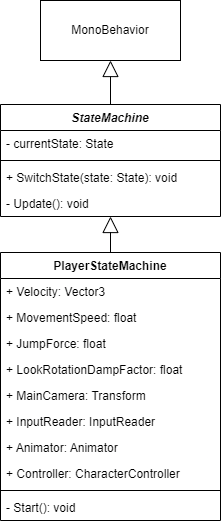
The state machine itself will consist of two classes. The first one will be StateMachine. This class will inherit from MonoBehavior and will have core logic for switching states and executing their Enter, Exist, and Tick methods.
The second class will be PlayerStateMachine; this one will inherit from StateMachine and thus indirectly also from MonoBehavior. We’re going to attach PlayerStateMachine as another component to our Player game object. That’s why we need it to be a MonoBehavior.
The PlayerStateMachine will have public references to other components and other members we’ll use in states through state machine instances we’ll pass from states.
If this is new to you and you’re confused, don’t worry — look closely at the following diagram and the previous one, pause, and think about it for a while. If you’re still confused, just continue and I’m sure you’ll wrap your head around it while you’ll be writing the code.
Well, enough theory, let’s get coding! Create a new C# script and name it State. It will be super simple. The entire code is just this:
public abstract class State
{
    public abstract void Enter();
    public abstract void Tick();
    public abstract void Exit();
}
Now add the StateMachine class, which is the class that together with the State class forms the essence of the state pattern:
using UnityEngine;

public abstract class StateMachine : MonoBehaviour
{
    private State currentState;

    public void SwitchState(State state)
    {
        currentState?.Exit();
        currentState = state;
        currentState.Enter();
    }

    private void Update()
    {
        currentState?.Tick();
    }
}
You can see the logic is very simple. It has one member, the currentState of type State, and two methods, one for switching states while calling the Exit method on the current state before switching to a new one and then calling Enter now on the new state.
The Update method comes from MonoBehavior and it’s called by the Unity engine once per frame, thus the Tick method of the currently assigned state will be also executed every frame. Pay attention also to the usage of the null conditional operator.
Another class we’re going to implement will be the PlayerStateMachine. You might be asking why creating a PlayerStateMachine and not using the StateMachine itself as a component of our Player.
The reason behind this, and partially also behind a PlayerBaseState as a direct parent of other states rather than the State itself, lies in reusability. The state machine would be useful typically also for enemies.
Enemies would use the same core state pattern logic, but their states would have different dependencies and logic. You don’t want to mix them with dependencies and logic for the player.
For enemies, you’d implement different EnemyStateMachine and EnemyBaseState instead of PlayerStateMachine and PlayerBaseState, but the core idea behind it as being states of a state machine would be the same.
However, that would be outside the scope of this tutorial, so let’s get back to our player and add the PlayerStateMachine class:
using UnityEngine;

[RequireComponent(typeof(InputReader))]
[RequireComponent(typeof(Animator))]
[RequireComponent(typeof(CharacterController))]
public class PlayerStateMachine : StateMachine
{
    public Vector3 Velocity;
    public float MovementSpeed { get; private set; } = 5f;
    public float JumpForce { get; private set; } = 5f;
    public float LookRotationDampFactor { get; private set; } = 10f;
    public Transform MainCamera { get; private set; }
    public InputReader InputReader { get; private set; }
    public Animator Animator { get; private set; }
    public CharacterController Controller { get; private set; }

    private void Start()
    {
        MainCamera = Camera.main.transform;

        InputReader = GetComponent<InputReader>();
        Animator = GetComponent<Animator>();
        Controller = GetComponent<CharacterController>();

        SwitchState(new PlayerMoveState(this));
    }
}
Using the RequireComponent attributes is not mandatory, but it’s a good practice. The PlayerStateMachine as a component on the Player game object needs InputReader, Animator, and CharacterController components to be attached to the Player as well.
Not having them would result in a runtime error. With the RequireComponent attribute, we can catch the eventual issue sooner, in compile time, which is generally better. Plus Unity editor will automatically add all required components to a game object when you add one that is decorated like this and also prevents you from accidentally removing them.
Notice how we assign references to required components using the GetComponent method in the Start method. The Start is called once when Unity loads a scene. In the Start method, we also assign a reference to the Transform component of the main camera, so we can in player states access its position and rotation.
From states, we’ll be accessing all these members via PlayerStateMachine. That’s why we pass a reference to the this instance when we create a new PlayerMoveState instance while passing it as an argument to the SwitchState method.
You could say the PlayerMoveState is the default state of the PlayerStateMachine and we yet need to implement it, but before we do, we’re first going to implement its parent, the PlayerBaseState class:
using UnityEngine;

public abstract class PlayerBaseState : State
{
    protected readonly PlayerStateMachine stateMachine;

    protected PlayerBaseState(PlayerStateMachine stateMachine)
    {
        this.stateMachine = stateMachine;
    }

    protected void CalculateMoveDirection()
    {
        Vector3 cameraForward = new(stateMachine.MainCamera.forward.x, 0, stateMachine.MainCamera.forward.z);
        Vector3 cameraRight = new(stateMachine.MainCamera.right.x, 0, stateMachine.MainCamera.right.z);

        Vector3 moveDirection = cameraForward.normalized * stateMachine.InputReader.MoveComposite.y + cameraRight.normalized * stateMachine.InputReader.MoveComposite.x;

        stateMachine.Velocity.x = moveDirection.x * stateMachine.MovementSpeed;
        stateMachine.Velocity.z = moveDirection.z * stateMachine.MovementSpeed;
    }

    protected void FaceMoveDirection()
    {
        Vector3 faceDirection = new(stateMachine.Velocity.x, 0f, stateMachine.Velocity.z);

        if (faceDirection == Vector3.zero)
            return;

        stateMachine.transform.rotation = Quaternion.Slerp(stateMachine.transform.rotation, Quaternion.LookRotation(faceDirection), stateMachine.LookRotationDampFactor * Time.deltaTime);
    }

    protected void ApplyGravity()
    {
        if (stateMachine.Velocity.y > Physics.gravity.y)
        {
            stateMachine.Velocity.y += Physics.gravity.y * Time.deltaTime;
        }
    }

    protected void Move()
    {
        stateMachine.Controller.Move(stateMachine.Velocity * Time.deltaTime);
    }
This class is a little bit longer than the previous ones because it contains all the common logic for other states. I’m going to explain the logic from top to bottom, method by method, starting with the constructor.
The constructor accepts the PlayerStateMachine and then assigns the reference to the stateMachine. In the protected CalculateMoveDirection, we then calculate the direction of player movement based on the orientation of the camera and input values from InputReader.MoveComposite, which is set by W, S, A, and D keys or the Left Stick on a gamepad.
However, we don’t move the player in the calculated direction in this method directly. We set the Velocity x and z values to respective values of calculated direction, multiplied by the MovementSpeed.
In the FaceDirection method, we rotate the player so it’s always facing the direction of movement, which is the direction from Velocity, with the y value zeroed, because we don’t want our player to be tilted up and down.
We set the rotation of the Transform component of our player via stateMachine because we can get the reference to the Transform component from any other component on a game object, and PlayerStateMachine will be one of them.
The rotation value itself is calculated using Slerp and LookRotation methods, which are provided by Unity as static methods of the Quaternion class. A spherical interpolation is a function that needs a start and a target rotation, and a t value for interpolation.
We’re going to call CalculateMoveDirection and FaceMoveDirection from the Tick method in PlayerMoveState, and to achieve smooth and framerate independent rotation, we pass our LookRotationDampTime multiplied by Time.deltaTime.
In the ApplyGravity, if the Velocity y value is greater than Physics.gravity.y, we continuously add its value multiplied by Time.deltaTime. The y value of gravity is in Unity by default set to -9.81.
This will cause the player to be constantly pulled to the ground. You’ll see the effect in the PlayerJumpState and PlayerFallState, but we’re going to call this method also in PlayerMoveState, to keep the player grounded.
The Move is the method where we actually move the player using its CharacterController component. We simply move the player in the direction of the Velocity multiplied by delta time.
Next, we’re going to add the first concrete state implementation, the PlayerMoveState:
using UnityEngine;

public class PlayerMoveState : PlayerBaseState
{
    private readonly int MoveSpeedHash = Animator.StringToHash("MoveSpeed");
    private readonly int MoveBlendTreeHash = Animator.StringToHash("MoveBlendTree");
    private const float AnimationDampTime = 0.1f;
    private const float CrossFadeDuration = 0.1f;

    public PlayerMoveState(PlayerStateMachine stateMachine) : base(stateMachine) { }

    public override void Enter()
    {
        stateMachine.Velocity.y = Physics.gravity.y;

        stateMachine.Animator.CrossFadeInFixedTime(MoveBlendTreeHash, CrossFadeDuration);

        stateMachine.InputReader.OnJumpPerformed += SwitchToJumpState;
    }

    public override void Tick()
    {
        if (!stateMachine.Controller.isGrounded)
        {
            stateMachine.SwitchState(new PlayerFallState(stateMachine));
        }

        CalculateMoveDirection();
        FaceMoveDirection();
        Move();

        stateMachine.Animator.SetFloat(MoveSpeedHash, stateMachine.InputReader.MoveComposite.sqrMagnitude > 0f ? 1f : 0f, AnimationDampTime, Time.deltaTime);
    }

    public override void Exit()
    {
        stateMachine.InputReader.OnJumpPerformed -= SwitchToJumpState;
    }

    private void SwitchToJumpState()
    {
        stateMachine.SwitchState(new PlayerJumpState(stateMachine));
    }
}
The MoveSpeedHash and MoveBlendTreeHash integers are numerical identifiers of the MoveSpeed parameter and MoveBlendTree in our Animator. We’re using a static method from the Animator class StringToHash to convert strings into “unique” numbers.
I’ve put unique into quotes because theoretically, a hash algorithm can produce the same results for two different input strings. That’s something known as a hash collision. Here it’s just a side note, and you really don’t have to worry about it. The chance is extremely small.
If you look down where we set a float value of our MoveSpeed parameter, stateMachine.Animator.SetFloat(MoveSpeedHash…, you can see how we use this hash to identify the name of the MoveSpeed parameter.
The reason for not using the string "MoveSpeed" directly is because comparing integers is much more performant than comparing strings. Although it is possible to pass a string to Animator.SetFloat method — and in our little example it doesn’t make much of a difference, relatively speaking — I wanted you to show the proper, more performant way.
Let’s head back to the top of the PlayerMoveState class. From the public constructor, we pass stateMachine to the base constructor; that’s the constructor of the parent class, the PlayerBaseState.
Then we have the Enter method, the one called once when the state machine sets the state as the current state. Here, we set the y value of the Velocity vector to the y value of Physics.gravity vector, because we want our player to be constantly pulled down.
Then we crossfade our Animator to MoveBlendTree state in a fixed time, which in our case results in a smooth transition between the fall animation and a result animation of MoveBlendTree when we’ll be later switching from PlayerFallState back to PlayerMoveState.
We also register the SwitchToJumpState method to the OnJumpPerformed event in our InputReader. When we press the spacebar or South Button on a gamepad, SwitchToJumpState will be called, which, as you can see at the very bottom, in the body of that function, switches the state machine into a new PlayerJumpState.
In the Exit function, the one that is called before the state machine switches the state to a new one, we simply unsubscribe that SwitchToJumpState method from the event, to break the connection between input and action.
That leaves us with the Tick method, which is executed every frame. First, we check if the player is grounded. If not, the player should start falling, thus we immediately switch our current state in the state machine to PlayerFallState, passing the stateMachine a constructor parameter.
If the player is grounded, we call CalculateMoveDirection, FaceMoveDirection, and Move methods from PlayerBaseState, the parent class of this, and soon also of the other two states, which we yet need to implement.
We already know how these methods work from when we were implementing them a while ago. Here we’re just calling them, every frame, over and over one after another until the state is changed.
Finally, we set the MoveSpeed parameter of our Animator according to the squared magnitude of MoveComposite from our InputReader.
We use squared magnitude because we’re not interested in the actual value; we just need to know if the value is 0 or not, and calculating the magnitude from squared magnitude requires an extra step, the square root. This is just about squeezing a little bit of performance, saving a few cycles every frame, when the Tick method is executed.
If the value is 0, we set the MoveSpeed parameter also to 0, otherwise, we set it to 1, effectively transitioning in our MoveBlendTree from Idle to Run animation. The other parameters, AnimationDampTime and Time.deltaTime, make this transition smooth and framerate independent.
We’re almost done; we just need to implement the PlayerJumpState and PlayerFallState. Let’s start with the latter:
using UnityEngine;

public class PlayerJumpState : PlayerBaseState
{
    private readonly int JumpHash = Animator.StringToHash("Jump");
    private const float CrossFadeDuration = 0.1f;

    public PlayerJumpState(PlayerStateMachine stateMachine) : base(stateMachine) { }

    public override void Enter()
    {
        stateMachine.Velocity = new Vector3(stateMachine.Velocity.x, stateMachine.JumpForce, stateMachine.Velocity.z);

        stateMachine.Animator.CrossFadeInFixedTime(JumpHash, CrossFadeDuration);
    }

    public override void Tick()
    {
        ApplyGravity();

        if (stateMachine.Velocity.y <= 0f)
        {
            stateMachine.SwitchState(new PlayerFallState(stateMachine));
        }

        FaceMoveDirection();
        Move();
    }

    public override void Exit() { }
}
You can see at first glance that this one is much simpler. At the top, we have our hash for Jump string, the name of the standalone animation for jumping in the Animator, and we pass the stateMachine instance through constructors. This is nothing new for us.
In the Enter method, apart from crossfading the animation to the Jump, similarly, as we crossfaded in the PlayerMoveState, we set Velocity to a new Vector3 that has the same x and z values and the current velocity, but the y value is set to the JumpForce.
Then, in the Tick method, when we call the Move, our Player is pulled up because the Velocity y value is now positive, but we also call ApplyGravity so its value is slowly decreased every frame, and once it gets to 0 or below, we switch to the PlayerFallState.
FaceMoveDirection is not mandatory here; it’s rather cosmetic. Personally, I find it nicer when the player always faces the direction of moving even while jumping.
What is mandatory is providing overwrites of all abstract methods of an abstract parent class unless the child class is also abstract, which it isn’t, so we have to provide an implementation for the Exit method, even if it doesn’t do anything.
If you think about it, it makes sense: what would be called from the SwitchState method on currentState.Exit() while exiting from this state?
We’re getting really close now to the complete implementation, and the last state, PlayerFallState, is even the most simple one:
using UnityEngine;

public class PlayerFallState : PlayerBaseState
{
    private readonly int FallHash = Animator.StringToHash("Fall");
    private const float CrossFadeDuration = 0.1f;

    public PlayerFallState(PlayerStateMachine stateMachine) : base(stateMachine) { }

    public override void Enter()
    {
        stateMachine.Velocity.y = 0f;

        stateMachine.Animator.CrossFadeInFixedTime(FallHash, CrossFadeDuration);
    }

    public override void Tick()
    {
        ApplyGravity();
        Move();

        if (stateMachine.Controller.isGrounded)
        {
            stateMachine.SwitchState(new PlayerMoveState(stateMachine));
        }
    }

    public override void Exit() { }
}
This time, in the Enter method, we crossfade into the Fall standalone animation and we’re setting the initial Velocity value to 0 on the y axis. Then in the Tick method, we call ApplyGravity and Move, which pulls our player down until it hits the ground and we switch the state to PlayerMoveState again.
And that’s it. Our third-person controller based on a state machine that allows our player to transition through move, jump, and fall states is done.
The last thing we need to do is to go back to the Unity editor and use it by adding the StateMachine.cs script as a component to the Player game object.

The complete Unity project from this tutorial is available for you on GitHub.
If you’re a beginner with Unity and this was your first encounter with most or all of what we’ve covered and you managed to get it working, well done! Pat yourself on the back, because that’s not a small achievement and you’ve learned a lot.
Apart from the state pattern, we’ve seen the observer pattern, we learned how to work with the new Unity Input System, how to use Cinemachine, and Animator, and also how to work with the CharacterController component.
And most importantly, we’ve seen how to put all this together to build an easily extendable third-person player controller. Speaking of extendability, I’d like to leave you a small challenge in the end. Try to implement a PlayerDeadState on your own.
A hint for the challenge: create a HealthComponent class with a Health property, attach it to the Player game object and store a reference to it in the PlayerStateMachine. Then use the observer pattern. When the Health property reaches zero, invoke an event that switches the state to the PlayerDeadState from any state.
Install LogRocket via npm or script tag. LogRocket.init() must be called client-side, not
server-side
$ npm i --save logrocket

// Code:

import LogRocket from 'logrocket';
LogRocket.init('app/id');
// Add to your HTML:

<script src="https://cdn.lr-ingest.com/LogRocket.min.js"></script>
<script>window.LogRocket && window.LogRocket.init('app/id');</script>

Learn how Vite+ unifies Vite, Vitest, Oxlint, Oxfmt, Rolldown, and Node.js management in one CLI.
AI companies are buying developer tools as coding agents turn runtimes, package managers, and linters into strategic infrastructure.
Learn how AI-assisted development governance uses rules, agents, hooks, and protocols to help AI coding tools produce safer, more consistent code.

A step-by-step guide to building your first MCP server using Node.js, covering core concepts, tool design, and upgrading from file storage to MySQL.
Hey there, want to help make our blog better?
Join LogRocket’s Content Advisory Board. You’ll help inform the type of content we create and get access to exclusive meetups, social accreditation, and swag.
Sign up now