One feature that makes Telegram stand out from other messaging apps is how easy it is to build bots in it. Telegram bots are lightweight, programmable applications that run within the Telegram app. They use the Telegram interface to accept commands and display results, allowing users to seamlessly interact with them.

Telegram bots don’t only run inside the app; they use the Telegram Bot API to perform tasks like messaging a user, joining groups or channels, and more. Bots can do most things a human user of the app can do — with the help of the API. And because bots are computer programs, they can be written in any programming language, making them highly flexible and adaptable.
Because they’re programmable, Telegram bots can automate tasks, perform logical operations, and offer custom interaction interfaces that aren’t available to regular users. In Telegram, bots are easily distinguishable from human users.
This article starts by exploring the many use cases of Telegram bots. It then walks you through a tutorial on building a Telegram bot using TypeScript and Node.js.
The Replay is a weekly newsletter for dev and engineering leaders.
Delivered once a week, it's your curated guide to the most important conversations around frontend dev, emerging AI tools, and the state of modern software.
Here are some key benefits Telegram users gain from bots:
Telegram bots have a wide range of uses, including serving as an alternative to mobile apps. Since they function similarly to apps, they can even run games. Developers can also use bots to quickly prototype CRUD applications
The rest of the article will focus on how to build a custom telegram bot in Node.js. To follow along, you need knowledge of Node.js APIs and TypeScript. Make sure to have Node.js v20 or above installed.
The following tutorial is an implementation of a Telegram bot any Telegram user can chat with about anything. The chatbot will be able to respond to text, photo, and voice messages. Our project will be implemented using the following tools:
gemini-1.5-flash AI model to generate the responses sent to users. It also uses that model to respond to voice notes and imagesThe final source code of the project can be found in this GitHub repository.
The first step to creating a new Telegram Bot is to message BotFather in the app. Open the Telegram App and give BotFather the /start command. BotFather will then provide a comprehensive menu of all the services it offers. Follow the menu to create a new bot.
For this example, the bot’s name is Gemini AI Bot with the username gemini01_bot. You’ll have to create a unique username for your use case.
Finally, BotFather will generate a bot token for you. This token is a unique authentication token for your new bot. Anyone with access to it can make changes to the bot, so be sure to copy it and store it somewhere safe — you’ll need it soon.
To get started with grammY in Node.js, first create the project folder. This tutorial will name the project telegram-bot:
mkdir telegram-bot
Then, navigate into the project folder and initialize npm in the command line:
cd telegram-bot
npm init -y
Next, install grammY, TypeScript, and Node.js type definitions (@types/node) from npm:
npm install grammy
# Install grammY -- the bot library -- as a dependency
npm install --save-dev typescript @types/node
# This is necessary for developing TypeScript applications in Node.js
Initialize TypeScript:
npx tsc --init
Inside the newly created tsconfig.json file, set the configuration below. This makes sure the project can use ES modules:
{
  "compilerOptions": {
    ...
    "target": "es2017",
    "module": "nodenext",
    ...
  }
}
Set up the following file structure for the project:
├── bot.ts
├── .env
├── .gitignore
├── node_modules
├── package.json
├── package-lock.json
└── tsconfig.json
Inside the .gitignore file, exclude the following from git commits:
node_modules/
.env
bot.js
Finally, open the .env file and bind the Telegram Bot token to a constant:
TELEGRAM_BOT_TOKEN=xxxxx
With that done, the folder is now set up for the project.
To get started with Google Gemini, you need to first create an API key. You can do so in the Google AI Studio.
After obtaining the API key, open the .env file and bind the API key to a constant:
...
GEMINI_API_KEY=xxxxx
After that, install the Google AI JavaScript SDK:
npm install @google/generative-ai
With the library installed, open the bot.ts file and use the constants in the .env file to configure both Gemini and grammY:
// bot.ts

import { Bot } from 'grammy';
import { GoogleGenerativeAI, type Part } from '@google/generative-ai';
import type { User, File } from 'grammy/types';

const BOT_API_SERVER = 'https://api.telegram.org';
const { TELEGRAM_BOT_TOKEN, GEMINI_API_KEY } = process.env;
if (!TELEGRAM_BOT_TOKEN || !GEMINI_API_KEY) {
  throw new Error('TELEGRAM_BOT_TOKEN and GEMINI_API_KEY must be provided!');
}

const bot = new Bot(TELEGRAM_BOT_TOKEN);
const genAI = new GoogleGenerativeAI(GEMINI_API_KEY);
const model = genAI.getGenerativeModel({
  model: 'gemini-1.5-flash',
  systemInstruction:
    'You are a Telegram Chatbot. Maintain a friendly tone. Keep responses one paragraph short unless told otherwise. You have the ability to respond to audio and pictures.',
});
const chat = model.startChat();
As you can see from the bot.ts file, it also imported some types from grammy/types, which will be important later. Also, observe the systemInstruction given in the Gemini Configuration. This lets you define consistent behavior for the responses to user queries in the chatbot.
To get your first response using the Gemini API with the chatbot, set up a response to the bot with the /start command. It is the first command any user will give a bot:
// bot.ts
...

bot.command('start', async (ctx) => {
  const user: User | undefined = ctx.from;
  const fullName: string = `${user?.first_name} ${user?.last_name}`;
  const prompt: string = `Welcome user with the fullname ${fullName} in one sentence.`;
  const result = await chat.sendMessage(prompt);
  return ctx.reply(result.response.text(), { parse_mode: 'Markdown' });
});

bot.start();
To make type checking and running the bot easier, set up your package.json with the following scripts:
// package.json
{
...
  "type": "module",
  "scripts": {
      "start": "node --env-file=.env bot.js",
      "watch": "tsc -w",
      "dev": "node --env-file=.env --watch bot.js"
    },
...
}
Finally, use the following CLI command to start the application:
npm run watch & npm run dev
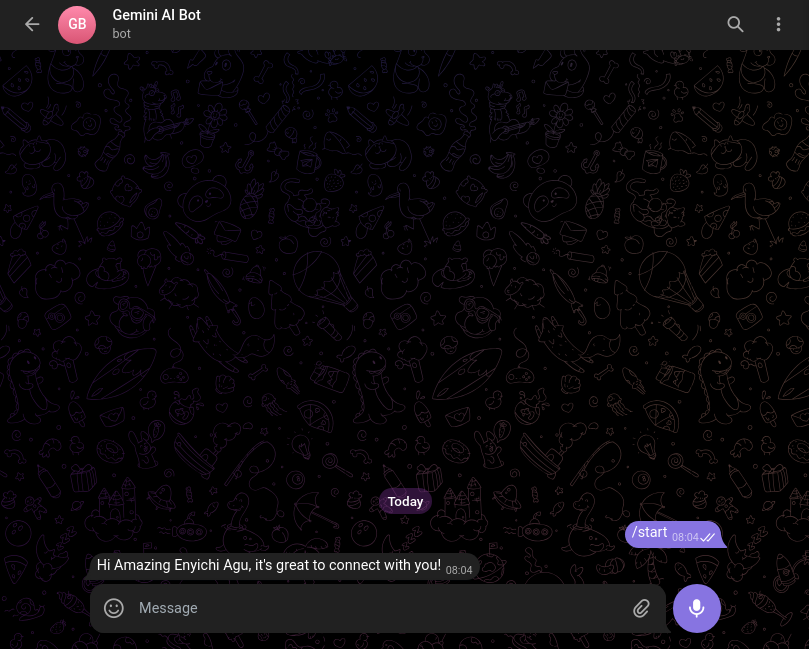
The command type checks the bot.ts file on any changes, compiles the file, and then runs the resulting bot.js file. After running the command, test your telegram bot using the URL https://t.me/<bot username>. Start the bot with the /start command and watch the bot respond. Make sure to keep the bot server running on your local host device:
As stated earlier, this bot will respond to texts using the Google Gemini API. We’ll learn how to implement that in this section.
In the bot.ts file, add the following:
// bot.ts
...
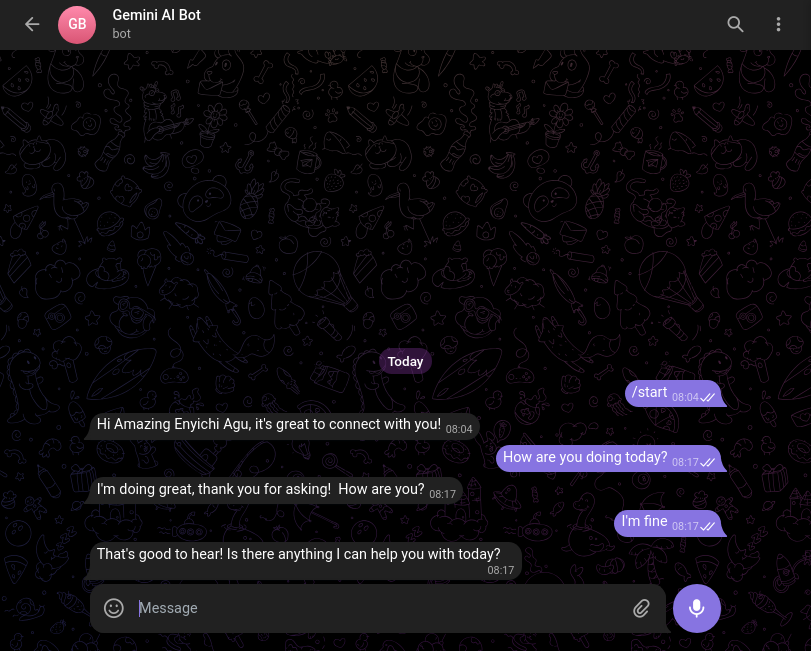
bot.on('message:text', async (ctx) => {
const prompt: string = ctx.message.text;
const result = await chat.sendMessage(prompt);
return ctx.reply(result.response.text(), { parse_mode: 'Markdown' });
});
bot.start()
Here, grammY listens for a text message sent to the bot. After that, grammY sends that text message to Gemini and forwards Gemini’s response as a reply to the user. Here is the result:
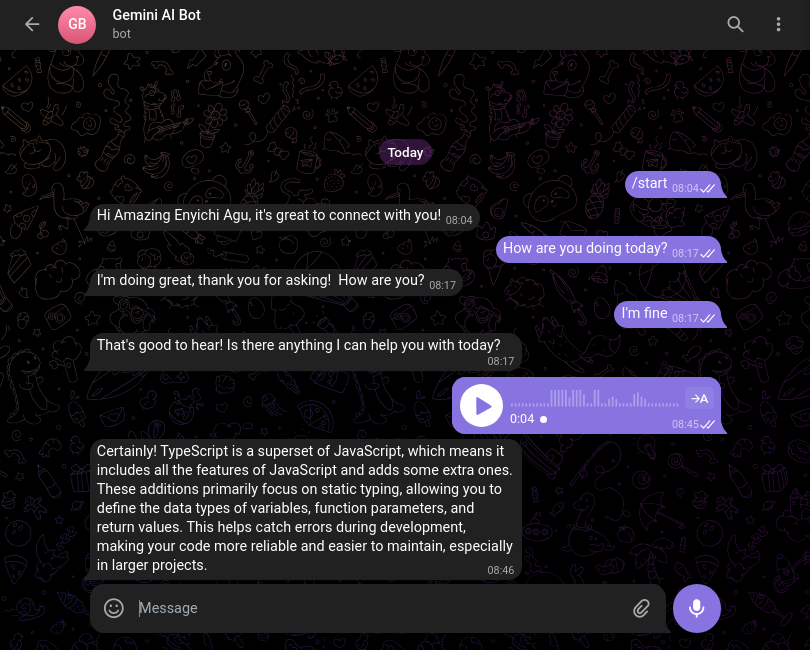
After receiving an audio file, Google Gemini can transcribe it and give a response. This project will prompt Gemini to reply to the transcript of the audio file. A user can send audio using Telegram’s built-in voice message feature:
// bot.ts

...
bot.on('message:voice', async (ctx) => {
  const file: File = await ctx.getFile();
  const filePath: string | undefined = file.file_path;
  if (!filePath) return;

  const fileURL: string = `${BOT_API_SERVER}/file/bot${TELEGRAM_BOT_TOKEN}/${filePath}`;
  const fetchedResponse = await fetch(fileURL);
  const data: ArrayBuffer = await fetchedResponse.arrayBuffer();
  const base64Audio: string = Buffer.from(data).toString('base64');

  const prompt: Array<string | Part> = [
    {
      inlineData: {
        mimeType: 'audio/ogg',
        data: base64Audio,
      },
    },
    {
      text: 'Please respond to the audio prompt.',
    },
  ];
  const result = await chat.sendMessage(prompt);
  return ctx.reply(result.response.text(), { parse_mode: 'Markdown' });
});

bot.start();
Now the bot should be able to reply to voice messages:
Similar to audio files, Gemini can also interpret images. Here, the project will use grammY to place a listener for sent images. Then it will prompt Gemini to either use the photo caption as a prompt or describe what is in the photo (if it does not have a caption):
// bot.ts

...
type MINE = 'image/jpeg' | 'image/png';
const ExtToMINE: Record<string, MINE> = {
  jpeg: 'image/jpeg',
  jpg: 'image/jpeg',
  png: 'image/png',
};

bot.on('message:photo', async (ctx) => {
  const caption: string | undefined = ctx.message.caption;
  const photoFile: File = await ctx.getFile();
  const photoFilePath: string | undefined = photoFile.file_path;
  if (!photoFilePath) return;

  const photoURL: string = `${BOT_API_SERVER}/file/bot${TELEGRAM_BOT_TOKEN}/${photoFilePath}`;
  const fetchedResponse = await fetch(photoURL);

  const data: ArrayBuffer = await fetchedResponse.arrayBuffer();
  const base64Photo: string = Buffer.from(data).toString('base64');
  let match: RegExpMatchArray | null = photoFilePath.match(/[^.]+$/);
  if (!match) return;

  let photoExt: string = match[0];
  const prompt: Array<string | Part> = [
    { inlineData: { mimeType: ExtToMINE[photoExt], data: base64Photo } },
    { text: caption ?? 'Describe what you see in the photo' },
  ];

  const result = await chat.sendMessage(prompt);
  return ctx.reply(result.response.text(), { parse_mode: 'Markdown' });
});

bot.start()
Now, the Telegram chatbot can respond to images as well:

One great benefit grammY offers is the ease of handling errors. With the library, a developer can use the bot.catch() method to catch and handle whatever errors a bot application encounters. Below is a simple error-handling script in grammY:
// bot.ts

...
bot.catch((error) => {
  const ctx = error.ctx;
  console.log(error);
  return ctx.reply('Something went wrong. Try again!');
});

bot.start()
The snippet above logs the error to the command line and then replies to a bot user with the message “Something went wrong. Try again.”
For a Telegram bot to keep running at all times, it needs to be deployed to a host that is always up and active. The developer’s local host is most likely unreliable as it could go off at any time.
The grammY documentation offers several guides for deploying a bot to different platforms. Fundamentally, a grammY application is a lightweight backend server (in Node.js or Deno), which means you can easily deploy it as you would deploy any other server. After deploying it, anybody can now interact with your Telegram bot at any point in time.
This article introduced Telegram bots and walked through the process of building one with Node.js. It began by exploring various use cases for bots, then covered how to obtain a bot token, set up a grammY project in Node.js, and get a Gemini API key. The tutorial then demonstrated how to use grammY and Google Gemini to respond to text, audio, and images.
As we’ve seen, Telegram bots can solve a wide range of problems, offering powerful automation and interaction capabilities. Use this guide as a starting point to experiment and build your own custom Telegram bot. You can find the complete source code for this project here.

LogRocket lets you replay user sessions, eliminating guesswork by showing exactly what users experienced. It captures console logs, errors, network requests, and pixel-perfect DOM recordings — compatible with all frameworks, and with plugins to log additional context from Redux, Vuex, and @ngrx/store.
With Galileo AI, you can instantly identify and explain user struggles with automated monitoring of your entire product experience.
Modernize how you understand your web and mobile apps — start monitoring for free.

I had four weeks to build a complete app from scratch using AI tools like OpenCode and Claude Opus: here’s how it went.

Learn how to build a reusable Vue 3 table engine that powers tables, cards, and lists with shared sorting and pagination logic.

Compare the best React chart libraries for 2026, including Recharts, Nivo, visx, Apache ECharts, MUI X Charts, and more.

Claude Code vs. OpenCode in a real Next.js refactor: benchmark results, mistakes, prompts, and when to use each CLI agent.
Hey there, want to help make our blog better?
Join LogRocket’s Content Advisory Board. You’ll help inform the type of content we create and get access to exclusive meetups, social accreditation, and swag.
Sign up now
