Running untrusted code in a JavaScript environment like Node.js has always posed serious risks. Node has access to the network and the underlying file system, so the damage caused by running a script from an unknown source can be extremely high. From data breaches to resource exploitation to illegal activities, the risk is multifold.
There are many ways in which these risks can be mitigated, one of which is to run code in a virtual isolated environment and not on the system directly. Virtualization allows us to control various factors like access to networks and resources.
One of the use cases of running untrusted code is a code evaluator. In this use case, a user submits code that solves a problem. The evaluator then checks the code against various test cases and either passes or fails it. If the code passes, the system returns the memory and the time required by the solution to solve the problem.
Let’s try to build something similar for JS code with the isolated-vm npm module. We’ll first build a frontend in React that accepts the code and passes it to the server. Then the server will evaluate and return the result to the frontend. isolated-vm is used by companies like Algolia and Screeps for running user-provided code.
Vite is a popular build tool for bootstrapping and running a React project. We’ll use Vite to create a React project. To bootstrap a project, run the following:
npm create vite@latest
Follow the prompts, and it will create a project directory. Once created, run this:
cd <project_name>
npm i
This will install all the necessary npm packages. Once we have completed the setup, let’s run the app:
npm run dev
Then open localhost:5173 in the browser, and it will show the starter page.
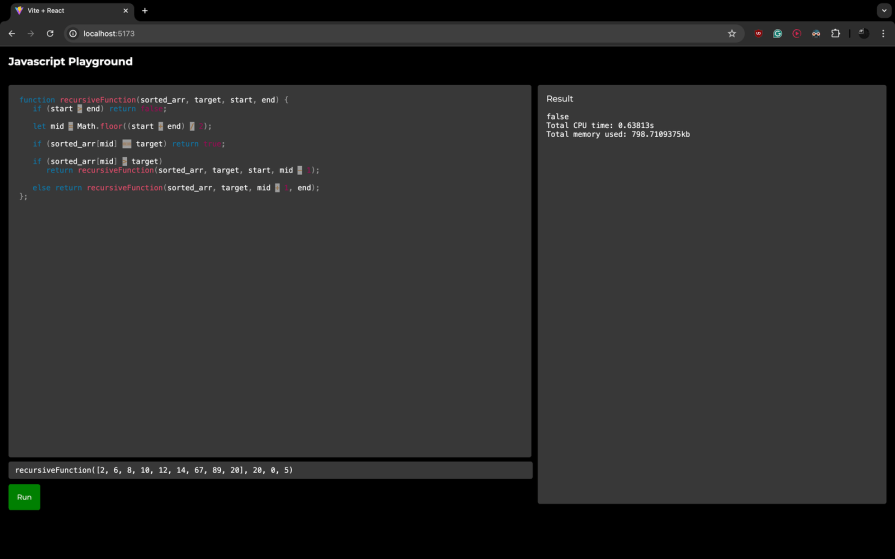
We will build a React app that looks something like this:
We will use the react-simple-code-editor library to create a code editor with syntax highlighting. To install this package, run the command below:
npm i react-simple-code-editor
Now let’s edit the App.jsx file located in src folder:
import Editor from "react-simple-code-editor";
import { highlight, languages } from "prismjs/components/prism-core";
import "prismjs/components/prism-clike";
import "prismjs/components/prism-javascript";
import "prismjs/themes/prism.css";
import { useState } from "react";
function App() {
  const [code, setCode] = useState("");
  const [call, setCall] = useState("");
  const [result, setResult] = useState("");
  const [time, setTime] = useState("");
  const [memory, setMemory] = useState("");
  const sendCode = () => {
    fetch("http://localhost:3000/eval", {
      method: "POST",
      headers: { "Content-Type": "application/json" },
      body: JSON.stringify({
        code,
        call,
      }),
    })
      .then((response) => response.json())
      .then(({ result, time, memory }) => {
        setResult(result);
        setTime(time);
        setMemory(memory);
      });
  };
  return (
    <div
      style={{
        display: "flex",
        flexDirection: "column",
        height: "100%",
        fontFamily: '"Montserrat", "sans-serif"',
        backgroundColor: "black",
        color: "white",
      }}
    >
      <div
        style={{
          fontSize: "1.25rem",
          padding: "1rem",
          fontWeight: "bold",
        }}
      >
        Javascript Playground
      </div>
      <div
        style={{
          display: "flex",
          flexDirection: "row",
          height: "100%",
          padding: "1rem",
        }}
      >
        <div style={{ flex: 3 }}>
          <Editor
            value={code}
            onValueChange={(code) => setCode(code)}
            highlight={(code) => highlight(code, languages.js)}
            padding={20}
            style={{
              fontFamily: '"Fira code", "Fira Mono", monospace',
              fontSize: 14,
              height: "80%",
              backgroundColor: "#383838",
              color: "white",
              borderRadius: "0.25rem",
            }}
          />
          <div style={{ marginTop: "0.5rem", width: "99%" }}>
            <input
              value={call}
              onChange={(e) => setCall(e.target.value)}
              style={{
                fontFamily: '"Fira code", "Fira Mono", monospace',
                width: "100%",
                backgroundColor: "#383838",
                color: "white",
                fontSize: "14px",
                padding: "0.5rem 0rem",
                paddingLeft: "0.75rem",
                borderRadius: "0.25rem",
                border: "none",
                outline: "none",
              }}
            />
          </div>
          <button
            style={{
              marginTop: 10,
              backgroundColor: "green",
              border: "none",
              color: "white",
              borderRadius: "0.25rem",
              padding: "1rem",
              cursor: "pointer",
              fontFamily: '"Montserrat", "sans-serif"',
            }}
            onClick={() => {
              sendCode();
            }}
          >
            Run
          </button>
        </div>
        <div
          style={{
            flex: 2,
            height: "90%",
            marginLeft: "0.75rem",
            backgroundColor: "#383838",
            borderRadius: "0.25rem",
          }}
        >
          <div style={{ padding: "1rem" }}>Result</div>
          <div
            style={{
              paddingLeft: "1rem",
              fontFamily: '"Fira code", "Fira Mono", monospace',
              fontSize: 14,
            }}
          >
            <div>{result}</div>
            {time && <div>Total CPU time: {time}s</div>}
            {memory && <div>Total memory used: {memory}kb</div>}
          </div>
        </div>
      </div>
    </div>
  );
}
export default App;
This is a straightforward code. We have three major parts of the UI:
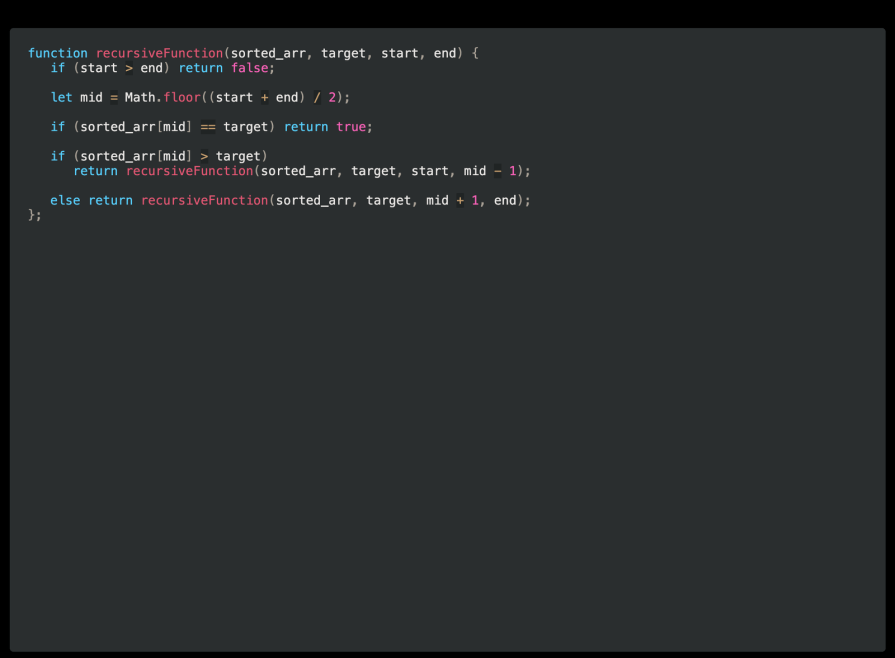
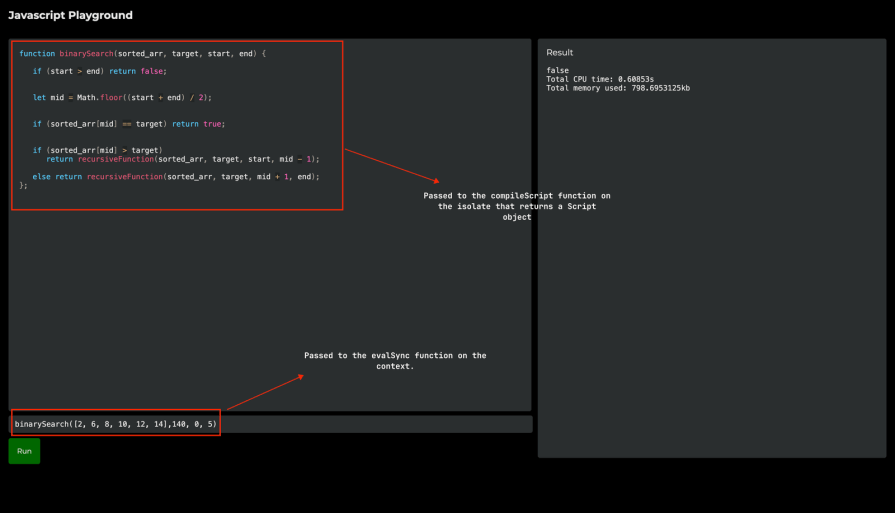
This is where the user can type in JS code. It uses the <Editor/> component from react-simple-code-editor. We pass it props like onValueChanged, padding, and highlight. We also pass it some styles.
![]()
This is a simple input element where the function is called with actual parameters.
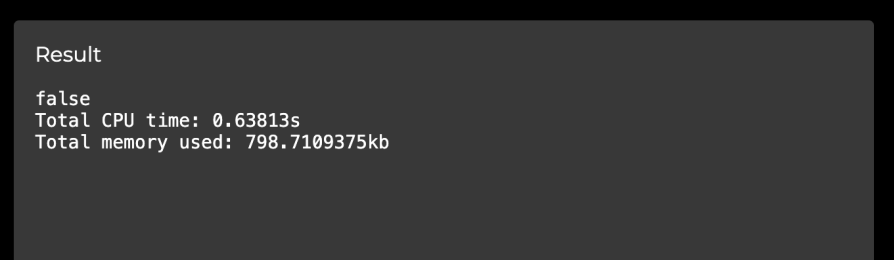
This component prints the results returned by the server.
When the user clicks on the green **Run** button, a POST request is sent to the /eval endpoint. The code is executed on the server, the result is returned to the frontend, and result is printed in the Result column.
Now let’s set up the server, and we’ll use Node 18 to run it. For running, installing, and managing multiple Node versions, we can use nvm.
Let’s first create a directory:
mkdir server
cd server
Then, initialize a Node project:
npm init
Follow the prompts, and once the project is set, run the below command:
npm i express isolated-vm cors
This command will install the necessary libraries required for the project.
Now let’s create two files — index.js and executor.js:
// ./index.js
import express from "express";
import cors from "cors";
import { executeScript } from "./executor.js";
const app = express();
app.use(cors());
app.use(express.json());
app.use(express.urlencoded({ extended: true }));
app.post("/eval", function (req, res) {
  const { code, call } = req.body;
  try {
    const { result, time, memory } = executeScript(code, call);
    res.send({ result, time, memory });
  } catch (e) {
    console.log(e);
    res.send({ result: "Something went wrong" });
  }
});
app.listen(3000, () => {
  console.log("Started server");
});
There are a few things to note here.
We create an Express app and use the cors and json middleware. The cors middleware allows requests to be made from different ports to the server. The json middleware parses the body and returns a JSON object.
We create a POST /eval endpoint. The request body holds two things:
- `code` → This is the code written in the code editor
- `call` → This is the function call text
We pass the code and call parameters to the executeScript function exported from the executor module. We’ll code this function in a bit. If the script execution is successful, the result is returned as a response.
We then start the server on port 3000.
Before we start coding the code executor, let’s first take a look at a few concepts that we will use in our code:
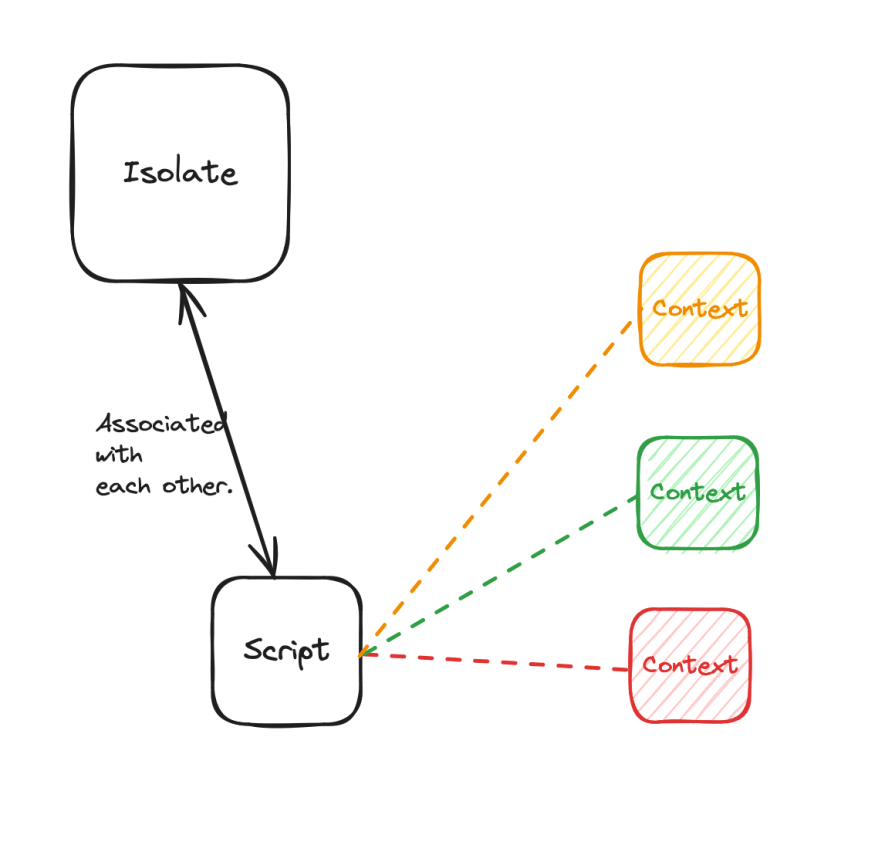
The above diagram summarizes the relationship between an Isolate, Script, and Context.
An isolate is an instance of the v8 engine. It allows execution of a JavaScript code and has its own heap and garbage collector. An isolate is the main class that we will use to create sub-entities like Context and Script.
We create an isolate by instantiating a new instance of ivm.Isolate class. We can pass a bunch of options like memoryLimit, inspector, or a callback to execute in case the isolate throws an unrecoverable error.
A Script object represents compiled js code. The script always runs in the isolate that it is created from, meaning it is bound to the constraints of the Isolate (like memoryLimit). A script always runs within a context.
We can create a Script object by using the compileScriptSync / compileScript function on an isolate. The Script object holds the compiled JS code of the code that we pass to the compileScript function. To run the compiled code, we can call the runSync function. As a teardown and clean-up action, we can call the release method on the Script object.
A context is a sandboxed environment in which we can evaluate code and return the result. To associate a context with a script, we call the runSync function on the script and pass a context to it.
Now the context holds reference to the functions and variables declared in the script. We call evalSync on the context, it evaluates the passed-in code in the context of the script, and it returns the result. Remember the result has to be of primitive type (hence the toString()— see line number nine in the code block below):
With these concepts now clear, let’s take a look at the code executor:
// ./executor.js
import ivm from "isolated-vm";

export function executeScript(code, call) {
  const isolate = new ivm.Isolate({ memoryLimit: 128 });
  const context = isolate.createContextSync();
  const script = isolate.compileScriptSync(code);
  script.runSync(context);
  const res = context.evalSync(`${call}.toString()`);
  const cpuTime = Number(isolate.cpuTime) / 1000000;
  const { used_heap_size } = isolate.getHeapStatisticsSync();
  context.release();
  script.release();
  isolate.dispose();
  return {
    result: res,
    time: cpuTime.toString(),
    memory: used_heap_size / 1024,
  };
}
There are a few things to unpack here.
We define a method executeScript that takes two parameters: code and call . We then create three things:
isolate using the new ivm.Isolate method — To this method, we pass an options object with the memoryLimit option. The memoryLimit option sets the maximum memory the isolate can use. This isn’t a hard limit; the script might exceed this before being terminatedcontext using the createContextSync() function on the isolate — We can add global functions and set a global configuration in the context. The script can access the functions or data set in the contextScript using the compileScriptSync() function on the isolate — This returns a Script object that can run compiled JavaScript within a contextTo run the JavaScript code, the runSync function on the Script object is invoked. Running the script initializes all the functions and variables defined in the script. It also returns the result of the last expression. One thing to notice is we pass the context that we created earlier to this function.
To finally execute the function and return the result, we call the evalSync API on the context. Notice that we append toString() to the call parameter. This is because the script returns a value only if it is transferable. All primitive data types are treated as transferable.
We can get stats like total memory used and total CPU time from the getHeapStatisticsSyncfunction and cupTime property on the isolate
We release the script and context and dispose of the isolate for a clean tear down of the environment
In this tutorial-style blog post, we learned how to use isolates to run code in a controlled environment. One thing to note is that isolated-vm is currently in maintenance mode. It is actively maintained, and even though no new features are being added, it promises to support existing features for newer Node.js versions. It has over 100k+ weekly downloads, so it does have a solid userbase.
There are other alternatives to isolated-vm like vm module offered by Node. It is baked into Node, so you don’t have to install any npm package. The level of isolation that vm offers is less than isolated-vm though. Here’s a quick comparison between the two:
isolated-vm |
vm |
|---|---|
| Available as an npm package | Baked in Node.js |
| Offers highest level of isolation | Offers context-level isolation. Contexts share the same isolate |
| Offers stable API for getting memory and cpu usage at an isolate level | Offers an experimental API to get memory usage at a context-level |
| Offers options to specify memory limit and handle failures that help in combating resource exploitation attacks | Offers no such options |
| Running an isolate is memory intensive. Caution needs to be taken when spinning up multiple isolates | Contexts are created in the same isolate |
| Suitable for running highly untrusted code | Suitable for running trusted javascript code |
There are other alternatives like duktape, vm2, and jailed, but some have been deprecated or haven’t been maintained in years.
Though isolated-vm offers options for setting up memory limits to counter resource exploitation attacks and disallowing usage of unsafe Node functions, it isn’t a silver bullet to run untrusted code. We can dockerize this application and run it in a container for increased security. Thank you for reading, and feel free to ask any questions in the comment box below.
 Monitor failed and slow network requests in production
Deploying a Node-based web app or website is the easy part. Making sure your Node instance continues to serve resources to your app is where things get tougher. If you’re interested in ensuring requests to the backend or third-party services are successful, try LogRocket.

LogRocket lets you replay user sessions, eliminating guesswork around why bugs happen by showing exactly what users experienced. It captures console logs, errors, network requests, and pixel-perfect DOM recordings — compatible with all frameworks.
LogRocket's Galileo AI watches sessions for you, instantly identifying and explaining user struggles with automated monitoring of your entire product experience.
LogRocket instruments your app to record baseline performance timings such as page load time, time to first byte, slow network requests, and also logs Redux, NgRx, and Vuex actions/state. Start monitoring for free.
Debugging code is always a tedious task. But the more you understand your errors, the easier it is to fix them.
LogRocket allows you to understand these errors in new and unique ways. Our frontend monitoring solution tracks user engagement with your JavaScript frontends to give you the ability to see exactly what the user did that led to an error.

LogRocket records console logs, page load times, stack traces, slow network requests/responses with headers + bodies, browser metadata, and custom logs. Understanding the impact of your JavaScript code will never be easier!
Install LogRocket via npm or script tag. LogRocket.init() must be called client-side, not
server-side
$ npm i --save logrocket

// Code:

import LogRocket from 'logrocket';
LogRocket.init('app/id');
// Add to your HTML:

<script src="https://cdn.lr-ingest.com/LogRocket.min.js"></script>
<script>window.LogRocket && window.LogRocket.init('app/id');</script>

A guide for using JWT authentication to prevent basic security issues while understanding the shortcomings of JWTs.

Discover how to build, render, and automate product demo videos with Remotion, replacing traditional screen recordings with reusable React code.

Chrome’s Modern Web Guidance embeds modern web platform skills into AI coding agents, helping them choose native HTML, CSS, and browser APIs over legacy patterns.

Learn how to use Fallow to analyze AI-generated code, detect dead code, duplicate logic, and complexity issues, and integrate automated code quality checks into your AI-assisted development workflow.
Would you be interested in joining LogRocket's developer community?
Join LogRocket’s Content Advisory Board. You’ll help inform the type of content we create and get access to exclusive meetups, social accreditation, and swag.
Sign up now

