
Imagine that you are an expert Android developer with an idea for a killer app. You are confident that you can build an app for Android easily, but are not so sure about iOS.
If you have experience developing mobile UIs for Android, you can probably follow some SwiftUI tutorials and get by just fine. But what about the core of the app? Even if you have experience with iOS development, rewriting the same core for iOS can be redundant.
So how can you execute your idea with a minimum learning curve? Enter Kotlin Multiplatform Mobile, or KMM.
According to their official website, “Kotlin Multiplatform Mobile (KMM) is an SDK designed to simplify the development of cross-platform mobile applications.”
With KMM, you can write the core of your app in Kotlin and use it in both Android and iOS applications. You only need to write platform-specific code like UI.
In this post, we’ll learn KMM by building a small note-taking application with local database operations. We’ll also see how common business logic, like database operations, can be reused. But first, we need to clear some prerequisites.
The Replay is a weekly newsletter for dev and engineering leaders.
Delivered once a week, it's your curated guide to the most important conversations around frontend dev, emerging AI tools, and the state of modern software.
First, we need to install Android Studio. If we want to try the iOS side of things, we’ll need to install Xcode, too. We can build and run the Android app with KMM code without Xcode.
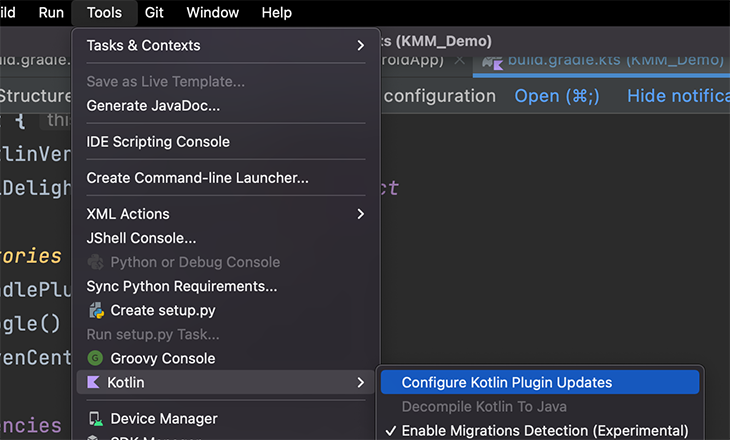
Next, we need to make sure we have the latest Kotlin plugin installed. Go to Android Studio Tools and then hover over Kotlin. Next, click Configure Kotlin Plugin Updates followed by Check again. You can see a visual below.

After that, search for the KMM plugin in the Plugin section of the Preferences menu. Click on Install Kotlin Multiplatform Mobile plugin and install it.

Needless to say, we also need to have JDK installed. Be careful with this, as it can be a little tricky. We may need to set the JDK installation path in System Paths to get this to work. Luckily, Stack Overflow has resources and answers for any troubles.
If you have to work with SQLDelight, make sure to install this plugin as well to make it easier to work with.
Now that the environment is set, let’s create a KMM project.
If you already have an Android/iOS project that you want to extend with KMM, you will need to add the KMM module into your Android project, restructure the code to move common code into shared modules, and configure the iOS project to link to the KMM framework. You can reference this process here, but let’s ignore this complicated case while starting out.
First, let’s create a new project in Android Studio by going to File -> New -> New Project. Then, select Kotlin Multiplatform App. This’ll come up if we finish the environment setup successfully:

Next, fill in the package name and project path.
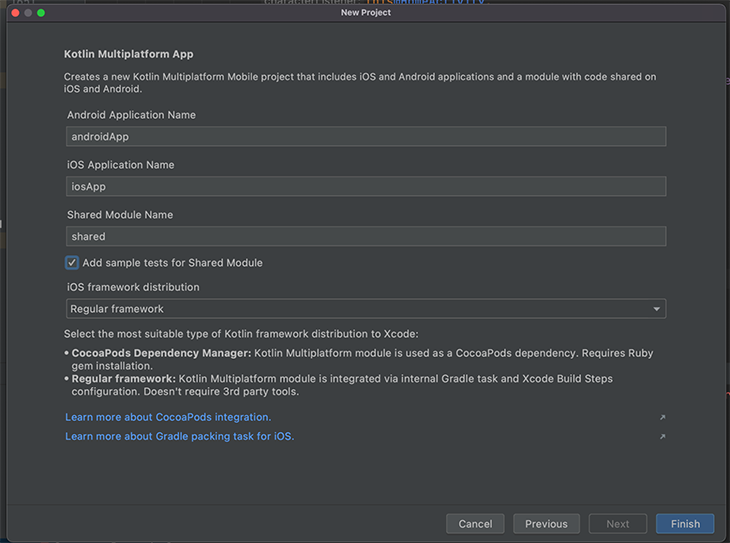
The third step is new, and specific to KMM. Here, we can rename the Android, iOS, or shared module names. Since we are trying out KMM for the first time, let’s keep these options the same.
Enable the checkbox for Add Sample Tests for Shared Module if you want to try out test executions and select Regular Framework for iOS framework distribution. It should look like this:
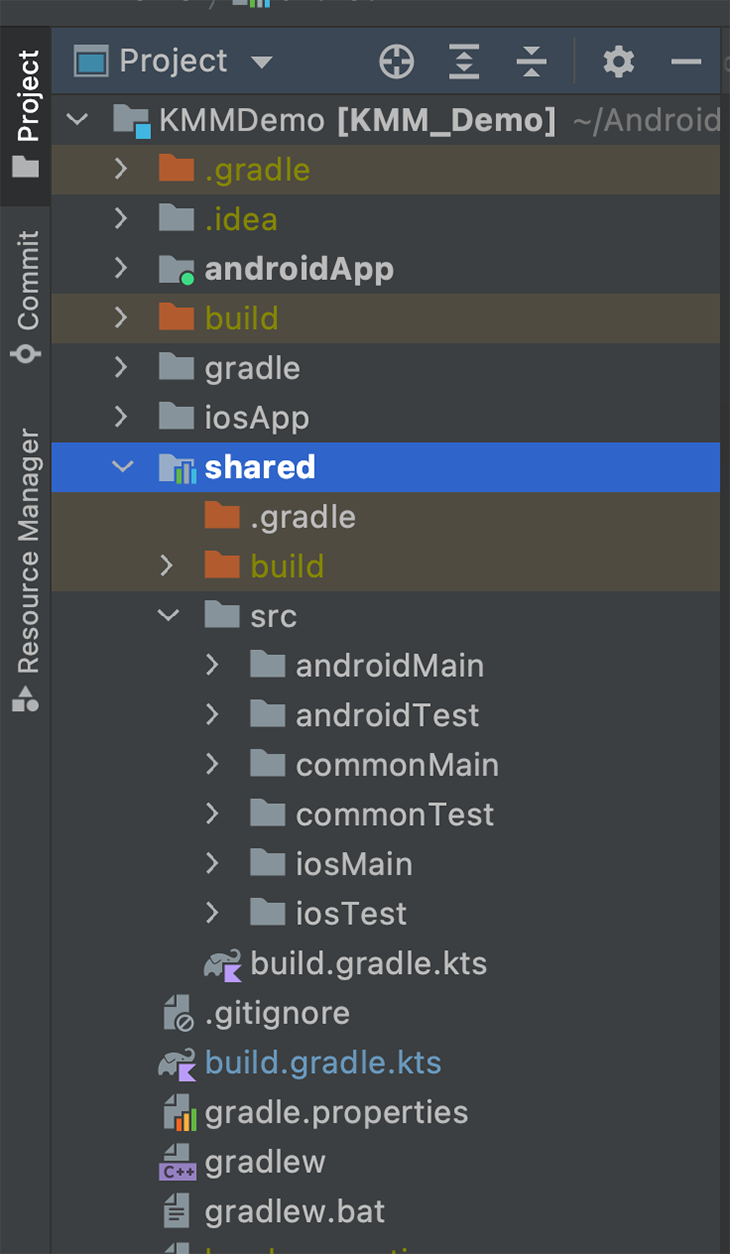
Now, the project will be ready in no time! Once it’s set, we can change the Project Files View from Android to Project and view the complete structure. Please keep in mind that a lot has happened behind the scenes, which we’ll discuss next.
A KMM project has three modules: Android, shared, and iOS.
The Android module is our normal app module that builds into an Android application. In our case, we named it androidApp.
This is a Kotlin Multiplatform module that compiles into an Android library and iOS framework. The shared module holds all the common, reusable code for the app. There are three parts within it: commonMain, androidMain, and iosMain.
commonMain is not platform-specific and holds all the code that can directly run on both platforms. There are Kotlin libraries that are KMM-compatible in certain use cases. For example, we’ll use SQLDelight for databases or Ktor for network calls.
In androidMain, some code in the common module may need a different API or behavior. This module holds the Android-specific code.
iosMain is androidMain’s counterpart. It holds the iOS-specific code of commonMain. Having androidMain and iosMain inside the shared module may seem counterintuitive, but it will become clear once we do some hands-on work.
This module is an Xcode project that builds as an iOS application and consumes our shared KMM module as a framework. If you recall, we selected Regular Framework for iOS in the third step of the previous section.
Please note that although this module is created inside our root project directory, it is not connected to any other part of the project (except for consuming the shared module).
As we just covered, the shared module is compiled into an iOS framework and is then consumed by the iOS app inside the root project. But how does it know about it? Do we need to connect them manually? No!
When you create a new KMM project in Android Studio, it automatically configures the build paths for the framework and other required settings.


There is a gradle task called embedAndSignAppleFrameworkForXcode that executes each time the iOS app is built to generate a new framework.
To solidify the above concepts and see KMM in action, we will build a small application. Specifically, we’ll build an on-device database and perform some operations using common code for both Android and iOS.
Specifically for Android, we’ll have a launch screen with a list of notes retrieved from an on-device database and a CTA for adding new notes, seen below:
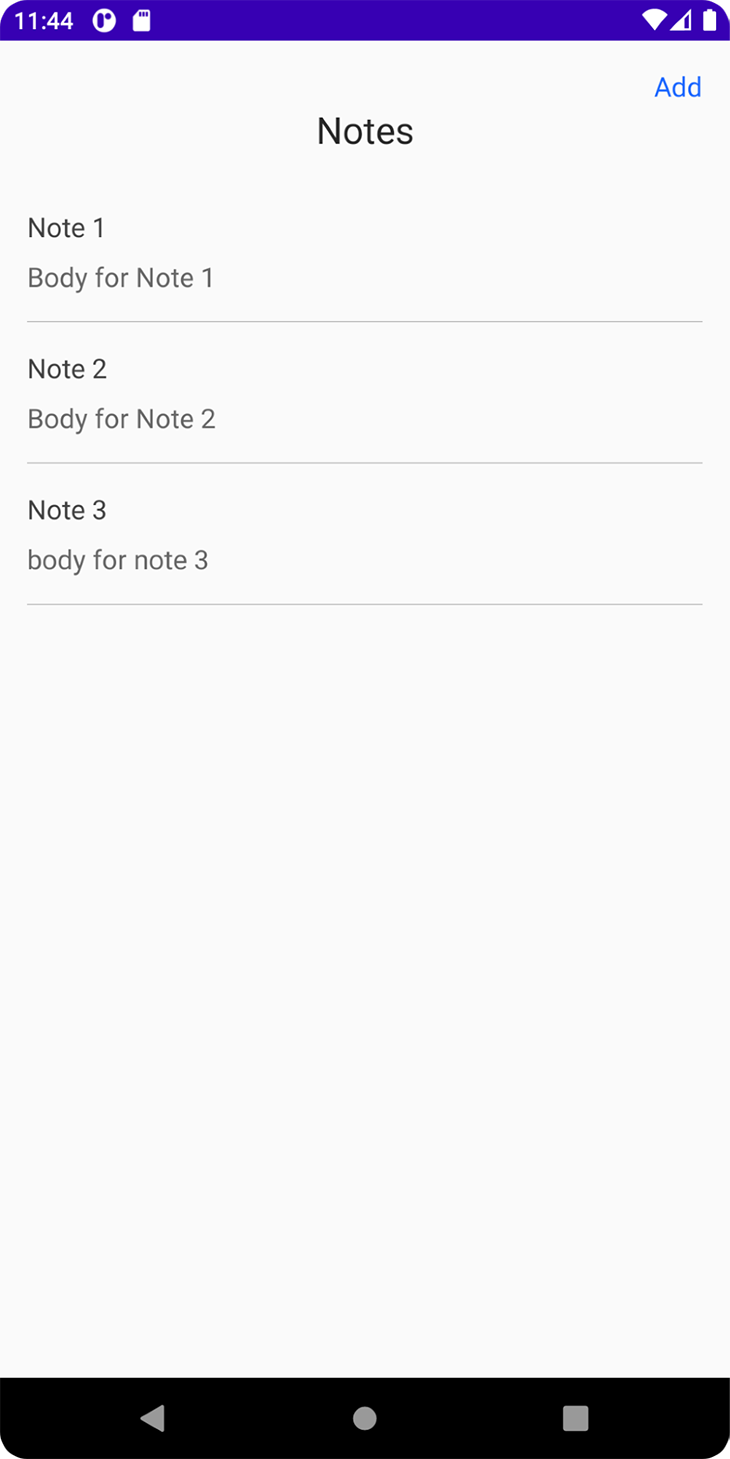
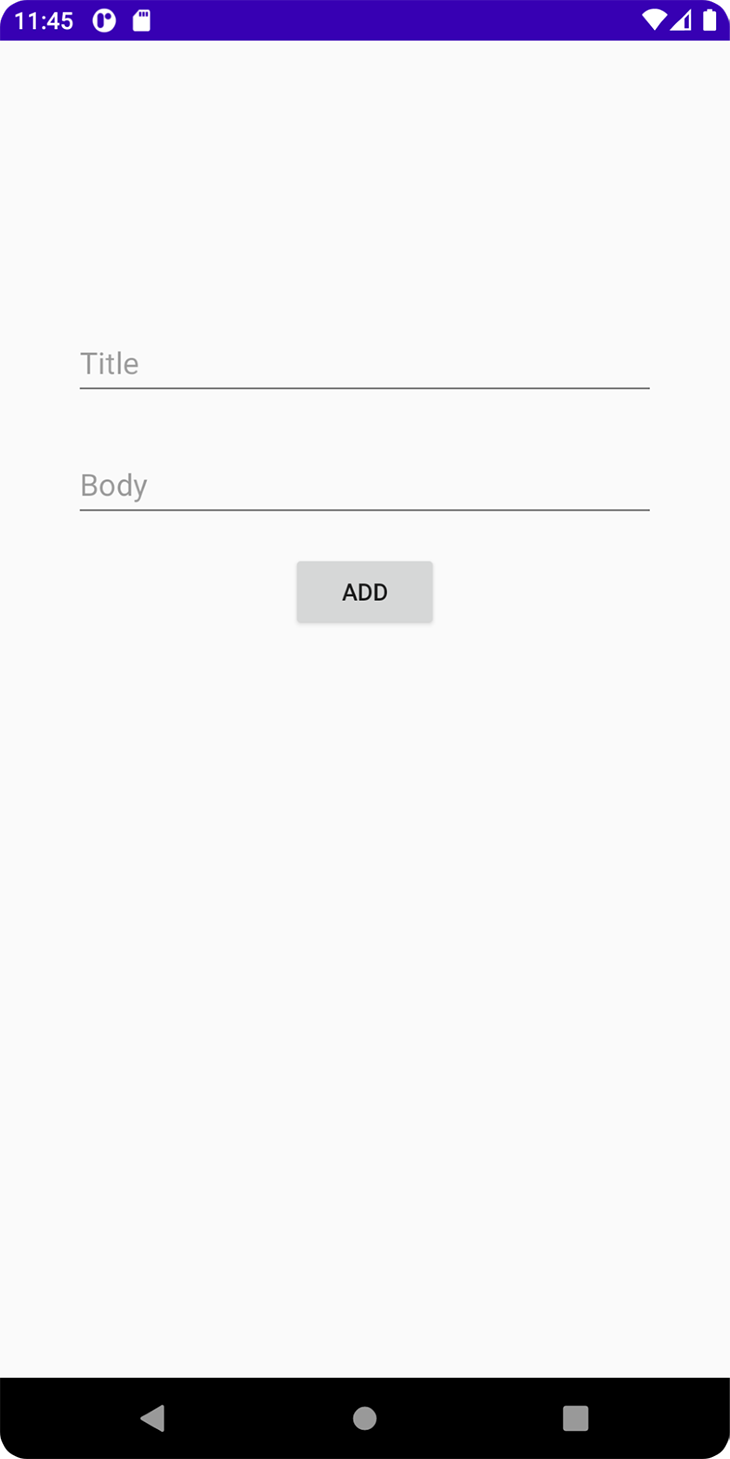
If the user clicks Add, the app will take them to a new screen to add a new note and save it to the database. The app will refresh the first screen with new data, like this:
For iOS, however, we will have only one screen where we will clear the database on each launch, insert new automated notes with timestamp, and fetch and display them on a screen:
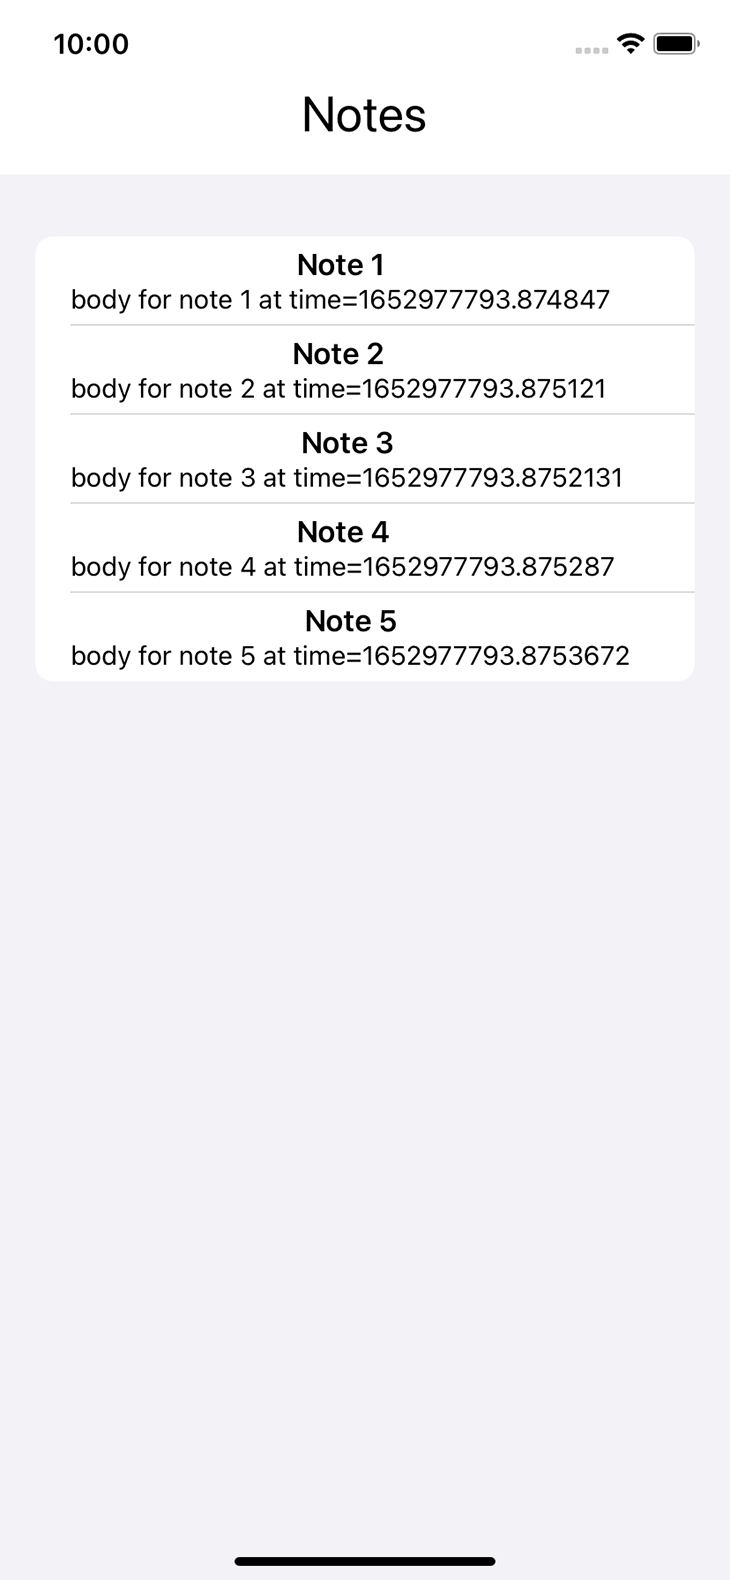
Disclaimer – I am not an iOS developer. Since our goal here is to demonstrate how common business logic code can be executed on both platforms, doing all three operations on iOS should suffice for the purpose of this article.
The project can be cloned from my GitHub repo or you can follow along and build a new project. You can follow the steps in the “Creating a KMM project” section of this article and create a new Android KMM application.
There aren’t many external dependencies for this project, so we can concentrate on how the dependencies are structured.
Starting with project-level build.gradle, this needs the usual gradle-related dependencies along with the SQLDelight-related dependencies.
classpath("org.jetbrains.kotlin:kotlin-gradle-plugin:1.6.21")
classpath("com.android.tools.build:gradle:7.1.3")
classpath("com.squareup.sqldelight:gradle-plugin:$sqlDelightVersion")
App-level build.gradle also has all the standard items, but there’s one additional requirement. We have to add a dependency on the shared module in the dependencies block:
implementation(project(":shared"))
The shared module build.gradle has all the major changes:
plugins {
   kotlin("multiplatform")
   id("com.android.library")
   id("com.squareup.sqldelight")
}

kotlin {
   android()


   listOf(
       iosX64(),
       iosArm64(),
       iosSimulatorArm64()
   ).forEach {
       it.binaries.framework {
           baseName = "shared"
       }
   }

   val coroutinesVersion = "1.6.1"
   val ktorVersion = "1.6.1"
   val sqlDelightVersion: String by project

   sourceSets {
       val commonMain by getting {
           dependencies {
               implementation("com.squareup.sqldelight:runtime:$sqlDelightVersion")
           }
       }
       val commonTest by getting {
           dependencies {
               implementation(kotlin("test"))
           }
       }
       val androidMain by getting {
           dependencies {
               implementation("com.squareup.sqldelight:android-driver:$sqlDelightVersion")
           }
       }
       val androidTest by getting
       val iosX64Main by getting
       val iosArm64Main by getting
       val iosSimulatorArm64Main by getting
       val iosMain by creating {
           dependsOn(commonMain)
           iosX64Main.dependsOn(this)
           iosArm64Main.dependsOn(this)
           iosSimulatorArm64Main.dependsOn(this)
           dependencies {
               implementation("com.squareup.sqldelight:native-driver:$sqlDelightVersion")
           }
       }
       val iosX64Test by getting
       val iosArm64Test by getting
       val iosSimulatorArm64Test by getting
       val iosTest by creating {
           dependsOn(commonTest)
           iosX64Test.dependsOn(this)
           iosArm64Test.dependsOn(this)
           iosSimulatorArm64Test.dependsOn(this)
       }
   }
}

android {
   compileSdk = 31
   sourceSets["main"].manifest.srcFile("src/androidMain/AndroidManifest.xml")
   defaultConfig {
       minSdk = 21
       targetSdk = 31
   }
}

sqldelight {
   database("KmmDemoDB") {
       packageName = "com.outliers.kmmdemo.shared.cache"
   }
}
With the exception of external dependencies declaration, everything else is automatically added while creating a new KMM project. We do, however, need to understand various blocks to know where to add dependencies.
Starting with the plugins block, notice that we have applied the library plugin along with the automatically added multiplatform plugin. The sqldelight plugin is for our database SDK and may not be needed for other projects and, thus, needs to be added manually.
SQLDelight also needs the last block to define the database name and the package/path where queries are defined. The dependencies needed for code written in the androidMain of the shared module are declared in the androidMain block inside sourceSets. The same thing applies for iosMain and commonMain.
Now let’s look at the source code. The crux here is the shared module. We will set up the database SDK, SQLDelight.
First, create a directory path sqldelight/your-package-name/shared/cache inside the commonMain folder of the shared module, where your-package-name is the package name you had defined while creating the project (in this case, the path is sqldelight/com/outliers/kmmdemo/shared/cache).
Here, we need to create a file <your database name>.sq that will hold all our SQL queries, such as insert or select all. For this demo, I named the file KmmDemoDB.sq.
The database name and package name must match with what we have defined in the sqldelight block in shared/build.gradle. SQLDelight uses this file to generate code corresponding to the provided queries at ~/shared/build/generated/sqldelight.
If you find this confusing, please take some time to navigate through the project and identify the files we are discussing. You can take comfort in the fact that this is only specific to the SQLDelight library and thus can be thoroughly learned from their documentation.
To actually execute the SQL queries in Kotlin common code, we need an object named SqlDriver. But this SqlDriver is created using different APIs for Android and iOS platforms.
Here comes the role of androidMain and iosMain. We will first define a class called DatabaseDriverFactory, declaring it as expect in common sourceset (commonMain):
expect class DatabaseDriverFactory {
   fun createDriver(): SqlDriver
}
The expect keyword tells the compiler to look for an actual implementation of this class in the platform-specific sourceset (androidMain and iosMain) in the same package (commonMain/com/outliers/kmmdemo/shared/cache) in all sourcesets.
This enables the use of platform-specific APIs to create SqlDriver, after which everything is the same. Here is what the actual implementations of androidMain and iosMain look like:
actual class DatabaseDriverFactory(private val context: Context) {
   actual fun createDriver(): SqlDriver {
       return AndroidSqliteDriver(KmmDemoDB.Schema, context, "notes.db")
   }
}

actual class DatabaseDriverFactory {
   actual fun createDriver(): SqlDriver {
       return NativeSqliteDriver(KmmDemoDB.Schema, "notes.db")
   }
}
Please note that we use different APIs to create and return an instance of SqlDriver — namely, AndroidSqliteDriver and NativeSqliteDriver. These APIs are available to androidMain and iOSMain through the different dependencies declared for each sourceset in the build.gradle file of the shared module.
Now, we’ll create a wrapper class called Database in the same package that internally creates a SqlDriver object using DatabaseDriverFactory and exposes functions to do database operations.
class Database(databaseDriverFactory: DatabaseDriverFactory) {
   private val database = KmmDemoDB(databaseDriverFactory.createDriver())
   private val dbQuery = database.kmmDemoDBQueries

   internal fun getAllNotes(): List<Note> {
       return dbQuery.selectAllNotes().executeAsList()
   }

   internal fun getLastNote(): Note {
       return dbQuery.selectLastNote().executeAsOne()
   }

   internal fun insertNote(title: String, body: String?) {
       return dbQuery.insertNote(title, body)
   }

   internal fun deleteAll() {
       return dbQuery.deleteAll()
   }
}
Next, let’s create another SDK root class. This creates the Database object and exposes all the operations. This will become our point of entry into the shared library for Android/iOS apps.
class KmmSDK(dbDriverFactory: DatabaseDriverFactory) {
   private val database: Database = Database(dbDriverFactory)

   fun getAllNotes(): List<Note> {
       return database.getAllNotes()
   }

   fun getLastNote(): Note {
       return database.getLastNote()
   }

   fun insertNote(title: String, body: String?) {
       database.insertNote(title, body)
   }

   fun deleteAll() {
       database.deleteAll()
   }
}
This is the class that Android and iOS apps will instantiate and perform core work. This class takes in an instance of DatabseDriverFactory. Thus, when iOS instantiates this class, the compiler will select the implementation from iosMain.
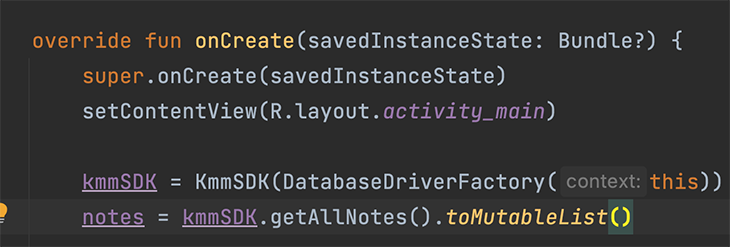
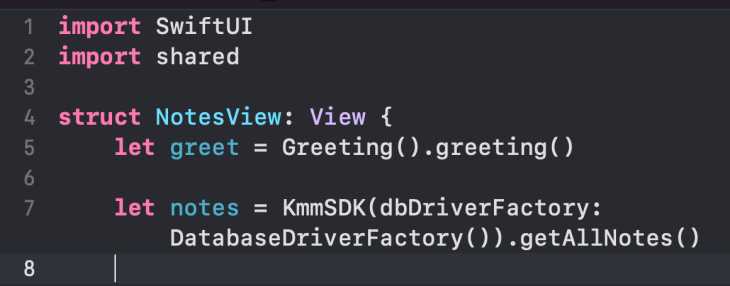
Now, all you have to do is import KmmSDK in Android or shared in iOS and call their methods, as shown above. The rest is all UI development, which we are much too familiar with. Pass the notes list to a RecyclerViewAdapter and display it on screen. Similar logic is implemented for iOS, too.
Phew! We have covered a lot of ground here. But, there is still one thing to mull over: If we have written all of our code in Kotlin, how does iOS understand it?
It’s because of the Kotlin compiler. The Kotlin compiler first converts the Kotlin code to intermediate representation (bytecode for Android JVM), which, in turn, is converted into the platform’s native code.
And that’s it! We have covered most of the things one needs to start working with Kotlin Multiplatform.
Feel free to say hi to me on my LinkedIn and GitHub profiles!
Further references:
LogRocket is an Android monitoring solution that helps you reproduce issues instantly, prioritize bugs, and understand performance in your Android apps.
LogRocket's Galileo AI watches sessions for you, instantly identifying and explaining user struggles with automated monitoring of your entire product experience.
LogRocket also helps you increase conversion rates and product usage by showing you exactly how users are interacting with your app. LogRocket's product analytics features surface the reasons why users don't complete a particular flow or don't adopt a new feature.
Start proactively monitoring your Android apps — try LogRocket for free.

Compare the top AI development tools and models of February 2026. View updated rankings, feature breakdowns, and find the best fit for you.

Broken npm packages often fail due to small packaging mistakes. This guide shows how to use Publint to validate exports, entry points, and module formats before publishing.

Discover what’s new in The Replay, LogRocket’s newsletter for dev and engineering leaders, in the February 11th issue.

Cut React LCP from 28s to ~1s with a four-phase framework covering bundle analysis, React optimizations, SSR, and asset/image tuning.
Hey there, want to help make our blog better?
Join LogRocket’s Content Advisory Board. You’ll help inform the type of content we create and get access to exclusive meetups, social accreditation, and swag.
Sign up now