In this tutorial, we’ll learn how to build a cross-platform app that runs on iOS, Android, and the web using Expo.

Before we get into using Expo, I want to cover how it’s both similar to and different from React Native.
In short, Expo lives as a superset of React Native. Everything React Native does Expo can do, but React Native can’t do everything Expo can (by default).
React Native gives you all the tools and options, whereas Expo makes some decisions for you. These decisions are based on what is commonly needed in React Native apps, and thus, takes a lot of the tedious work and decisions out of the equation.
Also, because it’s a standardized platform to build on, it enables you to leverage a host of amazing tools and services, such as Expo Snack, which allows you to build native apps in the browser.
Now, with that out of the way, let’s build a cross-platform app with Expo.
Expo has some of the best documentation I’ve come across, but I’ll give you a quick rundown of how to install it.
Interestingly enough, despite Expo being a superset of React Native, we don’t actually have to install React Native on our system to build an Expo app. We’ll be leveraging their infrastructure to do the heavy lifting behind the scenes.
Expo has three requirements:
With those on your system, you can install the Expo CLI globally via NPM.
npm install --global expo-cli
Verify installation by running expo whoami. You should see that you’re not logged in.
Because we’ll be leveraging Expo’s infrastructure, we need to create an account. You can do so via expo register or by logging into your existing account with expo login.
Before we start building, let’s figure out how we’re going to run our app. We have three platforms we’ll be working on: iOS, Android, and the web.
The web is the easy one. For iOS and Android, I would suggest downloading the Expo Go app from the app store. This will allow you to access your Expo apps on your device without having to go through the publishing process. Don’t worry, you’ll be able to publish your app under your own branding later on — this just makes development super quick.
Creating a new Expo app is as easy as running the following command line:
expo init MyCrossPlatformApp
When you run this, you should be prompted to choose a template.
An important note on managed vs. bare workflows: “Managed” means you’re leveraging Expo’s infrastructure. “Bare” means you’re using their template, disconnecting from their service, and then managing everything on your own. You can always export from a managed workflow to a bare one, but you can’t go back. I would always suggest starting with a managed workflow.
I’m going to choose the “tabs (TypeScript)” template so we have the biggest bang for our buck (namely, navigation all set up).
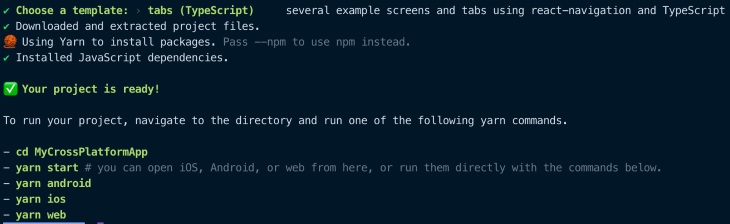
And there we have it! A cross-platform app that will run on iOS, Android, and the web. Run yarn start and it will print out a QR code you can scan from the camera on your iOS or Android device to open the Expo Go app, run it, and get real time refreshes on every file save.
Alternatively, you can run yarn web and it will open up the browser.
If you have the iOS simulator or Android Emulator installed on your machine, you can run those and it will open the respective simulator or emulator, but it isn’t required.
The Expo template we chose scaffolds a good amount for you. There are a variety of files and folders you’ll be interested in:
Let’s jump into some code and create a simple todo list. We’ll be working in screens/TabOneScreen.tsx. Go ahead and delete everything from that file.
First, we have our imports. These are what we’ll use to build our UI and then add functionality to.
import * as React from "react";
import { StyleSheet, TextInput, ScrollView, View, Text } from "react-native";
Notice that the react-native imports actually map to the underlying native view for the platform the app is running on. For example, a View becomes:
UIViewViewGroupdivNext, let’s create a list of tasks.
// ...

export default function TabOneScreen() {
  const tasks = [
    { title: "Delete everything", complete: true },
    { title: "Make a working todo list", complete: false },
  ];

  return (
    <ScrollView
      style={styles.container}
      contentContainerStyle={styles.contentContainer}
    >
      <View style={styles.tasksContainer}>
        {tasks.map((task, index) => {
          const textStyles = [styles.taskText];

          if (task.complete) {
            textStyles.push(styles.taskTextComplete);
          }

          return (
            <Text style={textStyles}>
              {task.title}
            </Text>
          );
        })}
      </View>
    </ScrollView>
  );
}

const styles = StyleSheet.create({
  container: {
    flex: 1,
    backgroundColor: "#fff",
  },
  contentContainer: {
    marginVertical: 10,
    marginHorizontal: 20,
  },
  tasksContainer: {
    marginTop: 15,
  },
  taskText: {
    fontSize: 18,
    marginVertical: 3,
  },
  taskTextComplete: {
    textDecorationLine: "line-through",
    fontSize: 18,
    marginVertical: 3,
  },
});
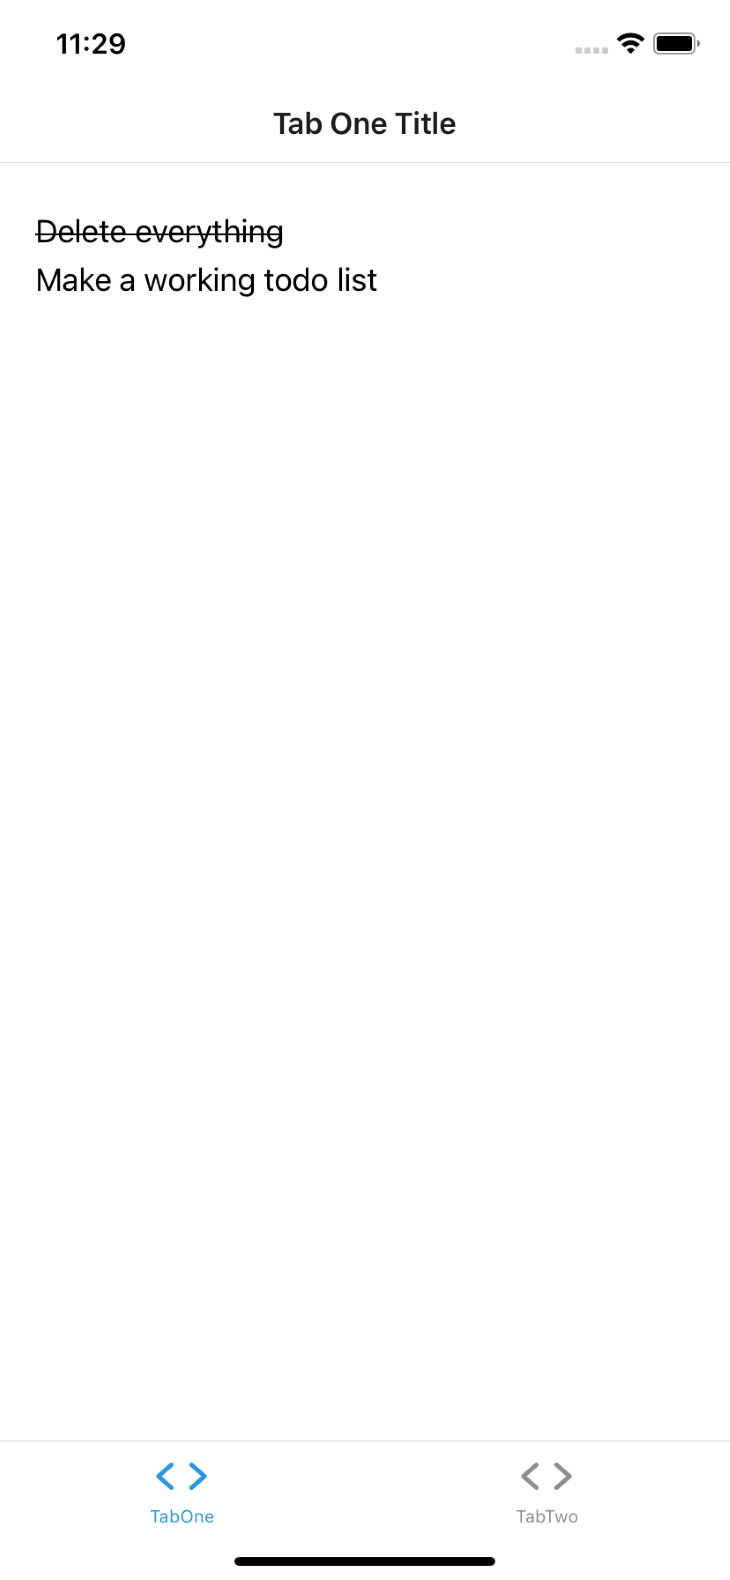
We’ve got an array of tasks that track a title and a complete status, which we iterate over via map and render them to the screen.
What’s unique to Expo/React Native compared to the web is that we need to explicitly state that this view should be scrollable. This is what the ScrollView is for.
Finally, we use StyleSheet to define some styles for our screen. These map over to typical CSS properties but in CSS-in-JS format.
Now let’s capture user input. We’ll use the TextInput and React state to do so.
export default function TabOneScreen() {
  const tasks = [
    { title: "Delete everything", complete: true },
    { title: "Make a working todo list", complete: false },
  ];
  const [inputValue, setInputValue] = React.useState("");

  return (
    <ScrollView
      style={styles.container}
      contentContainerStyle={styles.contentContainer}
    >
      <TextInput
        value={inputValue}
        style={styles.input}
        onChangeText={(text) => setInputValue(text)}
        placeholder="Next task"
        onSubmitEditing={() => {
          setInputValue("");
        }}
      />
      <View style={styles.tasksContainer}>
        {tasks.map((task, index) => {
          const textStyles = [styles.taskText];

          if (task.complete) {
            textStyles.push(styles.taskTextComplete);
          }

          return (
            <Text style={textStyles}>
              {task.title}
            </Text>
          );
        })}
      </View>
    </ScrollView>
  );
}

const styles = StyleSheet.create({
  //...

  input: {
    backgroundColor: "#f3f3f3",
    paddingHorizontal: 10,
    paddingVertical: 5,
    borderRadius: 5,
    width: "80%",
    fontSize: 20,
    borderWidth: 1,
    borderColor: "#dad4d4",
  },
});
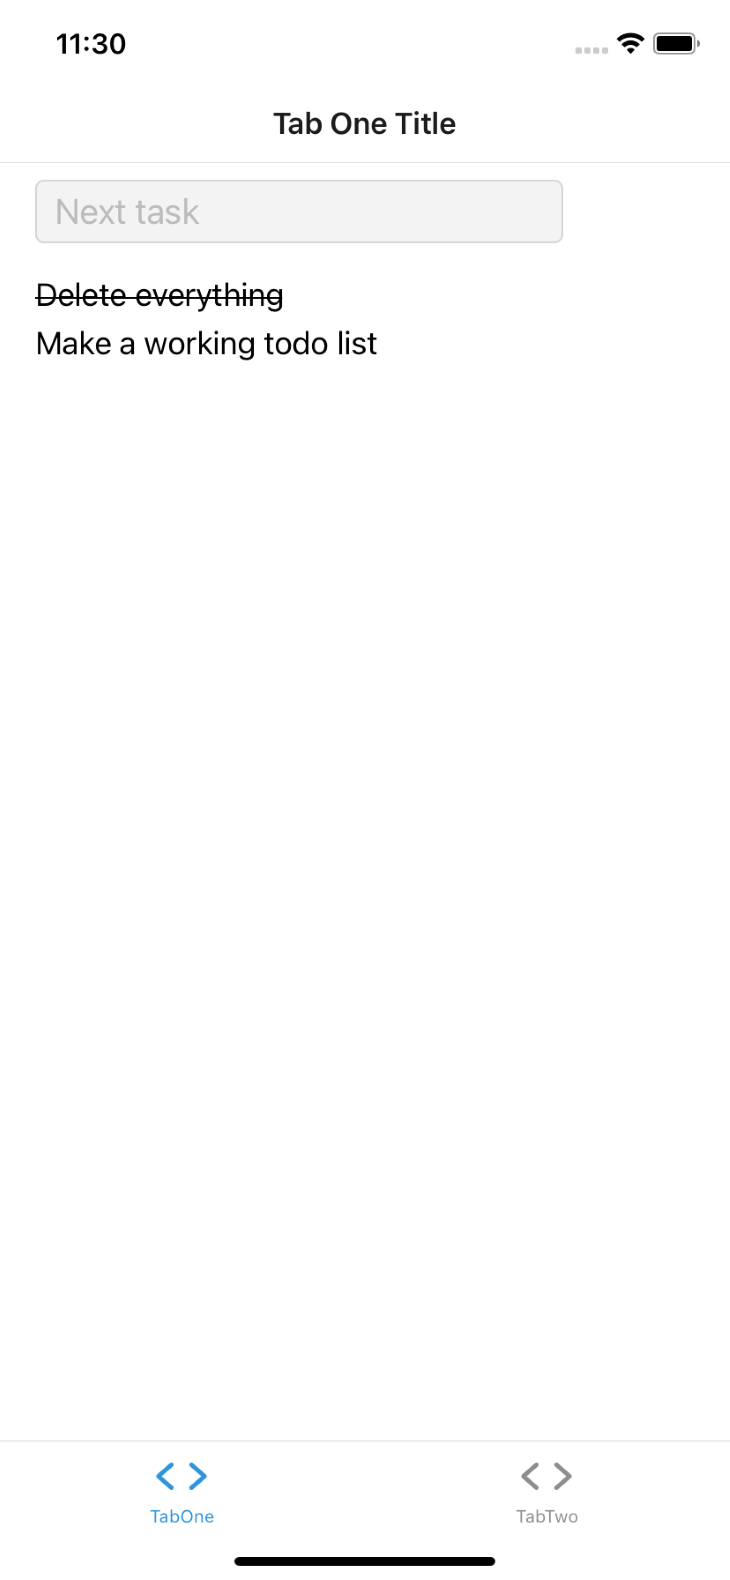
Similar to how a View maps to the underlying native components on each platform, a TextInput does the same. We’ve set it up to capture the value the user has typed in and store that in state via React.useState. Once the enter/done button is pressed, the value is reset.
React.useState is how you’ll want to manage dynamically changing data so that, as it changes, the UI updates.
Currently, when we submit the input, it just resets the input value. Let’s actually store and display their input.
// ...

const useTasks = () => {
  const [tasks, setTasks] = React.useState([
    { title: "Delete everything", complete: true },
    { title: "Make a working todo list", complete: false },
  ]);

  const addTask = (title: string) => {
    setTasks((existingTasks) => [...existingTasks, { title, complete: false }]);
  };

  return {
    tasks,
    addTask,
  };
};

export default function TabOneScreen() {
  const { tasks, addTask } = useTasks();
  const [inputValue, setInputValue] = React.useState("");

  return (
    <ScrollView
      style={styles.container}
      contentContainerStyle={styles.contentContainer}
    >
      <TextInput
        value={inputValue}
        style={styles.input}
        onChangeText={(text) => setInputValue(text)}
        placeholder="Next task"
        onSubmitEditing={() => {
          addTask(inputValue);
          setInputValue("");
        }}
      />
      {/* ... */}
    </ScrollView>
  );
}

// ...
Here, we’ve created a custom hook called useTasks. In it, we track our tasks array using React.useState because it will be dynamically changing, thus, we’ll need to re-render our screen when that data changes.
We’ve also created an addTask function that appends the task, properly formatted, to our list of tasks.
Now, by adding addTask(inputValue), the text a user types and submits in the onSubmitEditing prop will be added to the tasks array and automatically updates on the screen.
Finally, let’s allow a user toggle if a task has been completed or not.
// ...

const useTasks = () => {
  const [tasks, setTasks] = React.useState([
    { title: "Delete everything", complete: true },
    { title: "Make a working todo list", complete: false },
  ]);

  const addTask = (title: string) => {
    setTasks((existingTasks) => [...existingTasks, { title, complete: false }]);
  };

  const toggleTaskStatus = (index: number) => {
    setTasks((existingTasks) => {
      const target = existingTasks[index];
      return [
        ...existingTasks.slice(0, index),
        {
          ...target,
          complete: !target.complete,
        },
        ...existingTasks.slice(index + 1),
      ];
    });
  };

  return {
    tasks,
    addTask,
    toggleTaskStatus,
  };
};

export default function TabOneScreen() {
  const { tasks, addTask, toggleTaskStatus } = useTasks();
  const [inputValue, setInputValue] = React.useState("");

  return (
    <ScrollView
      style={styles.container}
      contentContainerStyle={styles.contentContainer}
    >
      {/* ... */}
      <View style={styles.tasksContainer}>
        {tasks.map((task, index) => {
          const textStyles = [styles.taskText];

          if (task.complete) {
            textStyles.push(styles.taskTextComplete);
          }

          return (
            <Text style={textStyles} onPress={() => toggleTaskStatus(index)}>
              {task.title}
            </Text>
          );
        })}
      </View>
    </ScrollView>
  );
}

// ...
Inside of the custom useTasks hook, we’ve created a toggleTaskStatus function that will find the task at the given index and toggle its complete status, thus changing the styling.
Again, because we’re using React.useState, the UI will re-render with updated data as soon as we call the function.
Here is our finished code for this file:
// screens/TabOneScreen.tsx

import * as React from "react";
import { StyleSheet, TextInput, ScrollView, View, Text } from "react-native";

const useTasks = () => {
  const [tasks, setTasks] = React.useState([
    { title: "Delete everything", complete: true },
    { title: "Make a working todo list", complete: false },
  ]);

  const addTask = (title: string) => {
    setTasks((existingTasks) => [...existingTasks, { title, complete: false }]);
  };

  const toggleTaskStatus = (index: number) => {
    setTasks((existingTasks) => {
      const target = existingTasks[index];
      return [
        ...existingTasks.slice(0, index),
        {
          ...target,
          complete: !target.complete,
        },
        ...existingTasks.slice(index + 1),
      ];
    });
  };

  return {
    tasks,
    addTask,
    toggleTaskStatus,
  };
};

export default function TabOneScreen() {
  const { tasks, addTask, toggleTaskStatus } = useTasks();
  const [inputValue, setInputValue] = React.useState("");

  return (
    <ScrollView
      style={styles.container}
      contentContainerStyle={styles.contentContainer}
    >
      <TextInput
        value={inputValue}
        style={styles.input}
        onChangeText={(text) => setInputValue(text)}
        placeholder="Next task"
        onSubmitEditing={() => {
          addTask(inputValue);
          setInputValue("");
        }}
      />
      <View style={styles.tasksContainer}>
        {tasks.map((task, index) => {
          const textStyles = [styles.taskText];

          if (task.complete) {
            textStyles.push(styles.taskTextComplete);
          }

          return (
            <Text style={textStyles} onPress={() => toggleTaskStatus(index)}>
              {task.title}
            </Text>
          );
        })}
      </View>
    </ScrollView>
  );
}

const styles = StyleSheet.create({
  container: {
    flex: 1,
    backgroundColor: "#fff",
  },
  contentContainer: {
    marginVertical: 10,
    marginHorizontal: 20,
  },
  tasksContainer: {
    marginTop: 15,
  },
  taskText: {
    fontSize: 18,
    marginVertical: 3,
  },
  taskTextComplete: {
    textDecorationLine: "line-through",
    fontSize: 18,
    marginVertical: 3,
  },
  input: {
    backgroundColor: "#f3f3f3",
    paddingHorizontal: 10,
    paddingVertical: 5,
    borderRadius: 5,
    width: "80%",
    fontSize: 20,
    borderWidth: 1,
    borderColor: "#dad4d4",
  },
});
One of the greatest parts of React Native is that we can tap into the extensive NPM ecosystem to use third-party code within our app. Let’s migrate our TextInput to use styled-components.
First, we’ll install the package.
yarn add styled-components
Then, we can replace our TextInput with a styled-components version.
import * as React from "react";
import { StyleSheet, ScrollView, View, Text } from "react-native";
import styled from "styled-components/native";

const Input = styled.TextInput`
  background-color: #f3f3f3;
  border-radius: 5;
  padding-left: 10;
  padding-right: 10;
  padding-top: 5;
  padding-bottom: 5;
  width: 80%;
  font-size: 20;
  border-width: 1;
  border-color: #dad4d4;
`;

// ...

export default function TabOneScreen() {
  const { tasks, addTask, toggleTaskStatus } = useTasks();
  const [inputValue, setInputValue] = React.useState("");

  return (
    <ScrollView
      style={styles.container}
      contentContainerStyle={styles.contentContainer}
    >
      <Input
        value={inputValue}
        onChangeText={(text: string) => setInputValue(text)}
        placeholder="Next task"
        onSubmitEditing={() => {
          addTask(inputValue);
          setInputValue("");
        }}
      />
      {/* ... */}
    </ScrollView>
  );
}

// ...
What’s great here is that, just like using React Native’s core components, Style Components will go ahead and translate our components into the relevant native component for the platform the app is running on. We also get to use traditional CSS here as well.
The completed code using styled-components:
import * as React from "react";
import { StyleSheet, ScrollView, View, Text } from "react-native";
import styled from "styled-components/native";

const Input = styled.TextInput`
  background-color: #f3f3f3;
  border-radius: 5;
  padding-left: 10;
  padding-right: 10;
  padding-top: 5;
  padding-bottom: 5;
  width: 80%;
  font-size: 20;
  border-width: 1;
  border-color: #dad4d4;
`;

const useTasks = () => {
  const [tasks, setTasks] = React.useState([
    { title: "Delete everything", complete: true },
    { title: "Make a working todo list", complete: false },
  ]);

  const addTask = (title: string) => {
    setTasks((existingTasks) => [...existingTasks, { title, complete: false }]);
  };

  const toggleTaskStatus = (index: number) => {
    setTasks((existingTasks) => {
      const target = existingTasks[index];
      return [
        ...existingTasks.slice(0, index),
        {
          ...target,
          complete: !target.complete,
        },
        ...existingTasks.slice(index + 1),
      ];
    });
  };

  return {
    tasks,
    addTask,
    toggleTaskStatus,
  };
};

export default function TabOneScreen() {
  const { tasks, addTask, toggleTaskStatus } = useTasks();
  const [inputValue, setInputValue] = React.useState("");

  return (
    <ScrollView
      style={styles.container}
      contentContainerStyle={styles.contentContainer}
    >
      <Input
        value={inputValue}
        onChangeText={(text: string) => setInputValue(text)}
        placeholder="Next task"
        onSubmitEditing={() => {
          addTask(inputValue);
          setInputValue("");
        }}
      />
      <View style={styles.tasksContainer}>
        {tasks.map((task, index) => {
          const textStyles = [styles.taskText];

          if (task.complete) {
            textStyles.push(styles.taskTextComplete);
          }

          return (
            <Text style={textStyles} onPress={() => toggleTaskStatus(index)}>
              {task.title}
            </Text>
          );
        })}
      </View>
    </ScrollView>
  );
}

const styles = StyleSheet.create({
  container: {
    flex: 1,
    backgroundColor: "#fff",
  },
  contentContainer: {
    marginVertical: 10,
    marginHorizontal: 20,
  },
  tasksContainer: {
    marginTop: 15,
  },
  taskText: {
    fontSize: 18,
    marginVertical: 3,
  },
  taskTextComplete: {
    textDecorationLine: "line-through",
    fontSize: 18,
    marginVertical: 3,
  },
});
And that’s all, folks, for building a cross-platform app that runs on iOS, Android, and the web using Expo! It’s a fantastic workflow, company, and team that will allow you to multiply your development impact while creating truly native experiences.

LogRocket's Galileo AI watches sessions for you and and surfaces the technical and usability issues holding back your React Native apps.
LogRocket also helps you increase conversion rates and product usage by showing you exactly how users are interacting with your app. LogRocket's product analytics features surface the reasons why users don't complete a particular flow or don't adopt a new feature.
Start proactively monitoring your React Native apps — try LogRocket for free.

Learn how to use Fallow to analyze AI-generated code, detect dead code, duplicate logic, and complexity issues, and integrate automated code quality checks into your AI-assisted development workflow.

Learn how to protect full-stack projects from NPM supply chain attacks with a practical security checklist.

Explore 15 essential MCP servers for web developers to enhance AI workflows with tools, data, and automation.

Learn how contrast-color() automatically picks accessible text colors using native CSS, without JavaScript.
Would you be interested in joining LogRocket's developer community?
Join LogRocket’s Content Advisory Board. You’ll help inform the type of content we create and get access to exclusive meetups, social accreditation, and swag.
Sign up now

