Up until a few years ago, developers used traditional content management systems (CMS) to manage everything a certain way. By everything, I mean anything from the backend, like data and content administration, roles, permissions, and administrative tasks, to the frontend, mostly PHP-generated views.

However, with the advent of modern frontend development, a substantial transition is taking place. In the massive ecosystem that has sprung up around content management systems, there is no longer a place for old, monolithic CMS’s. Instead, serverless architectures, API-centric microservices, and static site generators have proven they are here to stay.
In this article, we’ll use Vue as a frontend framework to create a headless WordPress environment with the help of the WordPress API for managing backend content. The source code for this article is available on GitHub. Feel free to fork and clone the repository to get started quickly.
To follow along with this article, you’ll need the following:
node -v && npm -v command to verify that you have them installed, or install themVue is a progressive JavaScript framework for building user interfaces that focuses only on the view layer. It includes an ecosystem of libraries that assist in dealing with complexity in large single-page applications.
Install the Vue CLI by running the following command in the terminal:
npm install -g @vue/cli
# OR
yarn global add @vue/cli
After installing the Vue CLI, we’ll navigate to our preferred directory and create a new project:
vue create <project-name>
Navigate into the project directory and install the required dependencies:
cd <project-name>
npm i axios
Run npm run serve to start a development server at https://localhost:8080/ in your browser. In the code snippet above, <project-name> stands for the name of our app; you can call it whatever you want.
WordPress is a free, open source, monolithic CMS built in PHP and paired with a MySQL or MariaDB database. The WordPress interface is known to have a robust backend that handles data and content management, roles and permissions, and admin tasks. The WordPress frontend focuses primarily on displaying content.
By consuming its REST API into frontend applications, WordPress is decoupled into a lightweight content management system, known as headless WordPress.
A REST API is a type of application programming interface that adheres to the REST architectural style and allows interaction with RESTful web services. REST (representational state transfer) is a set of architectural constraints, not a protocol or a standard.
One of the most popular characteristics of REST architecture is its ability to deliver data in several formats, like plain text, HTML, XML, YAML, and JSON. JSON is the most widely used file format due to its being language-agnostic and easily understandable by both humans and machines.
JSON is a lightweight, human-readable open standard data format that appears like objects in JavaScript. Many programming languages widely support JSON, so you can build WordPress applications in client-side JavaScript, like the block editor, mobile apps, desktop, or command line utilities. The code sample below demonstrates an example of a JSON data format received from an API:
[
  {
    "id": 1,
    "title": "Mollitia voluptatem quia atque facere accusamus facilis beatae doloribus.",
    "slug": "debitis-sed-quasi",
    "content": "Tenetur nesciunt est eligendi reiciendis non qui itaque explicabo. Voluptas id vel saepe...",
    "hit": 828226,
    "category": {
      "id": 26
    },
    "createdAt": "2021-12-22T16:58:37.058Z",
    "publishedAt": "2022-02-17T06:33:56.110Z",
    "image": [
      {
        "url": "http://loremflickr.com/640/480/abstract",
        "name": "f9b496df-63eb-43b4-8769-ffd47fc2f4a3",
        "status": "done",
        "type": "image/jpeg",
        "uid": "4b2e4eb0-a144-4b58-b524-5407f009bd64"
      }
    ],
  },
  {
    "id": 2,
    "title": "Quo praesentium laudantium.",
    "slug": "sed-molestiae-ut",
    "content": "Aut ipsam a aut sit exercitationem sed voluptates eaque. Impedit a est tenetur iste et rem voluptas similique qui...",
    "hit": 658411,
    "category": {
      "id": 45
    },
    "createdAt": "2022-02-26T23:41:57.808Z",
    "publishedAt": "2022-06-01T16:42:06.928Z",
    "image": [
      {
        "url": "http://loremflickr.com/640/480/abstract",
        "name": "cb05d57d-c97d-475e-b602-dad1a611a2a9",
        "status": "done",
        "type": "image/jpeg",
        "uid": "2c8ce7ad-5700-4207-b83c-fac51b37ea0c"
      }
    ],
  },
]
The introduction of the WordPress REST API for modern frontend development offers developers a sense of freedom and great flexibility to build stunning UI’s from scratch.
The WordPress REST API provides REST endpoints, URLs, pages, taxonomies, and other built-in WordPress data types. To query, change, and create content on a WordPress site, the frontend application can send and receive JSON data to through the WordPress REST API.
Let’s begin by setting up our WordPress website with some dummy posts, which will serve as the data source for our frontend application. Head to the Plugins section to activate the WordPress REST API plugin used in our WordPress website. You’ll need to download the zip file of the WP-Rest API plugin from GitHub and upload it into the WordPress plugin folder.
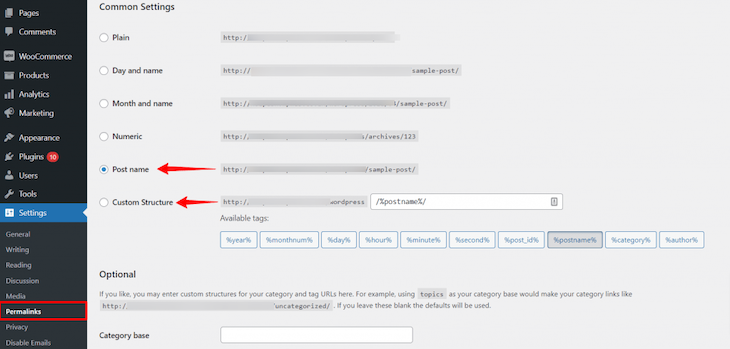
Next, go to Settings, click on Permalinks, then select either the Post name or Custom Structure base slug, as shown below:

The Post name base slug serves as an API endpoint and will look something like the following:
https://example.com/wp-json/wp/v2/posts
Since we’re working with API calls, test the URL on Postman to see the post data format of our WordPress site.
To access our posts in the WordPress REST API, we’ll add the code block below to our App.vue file:
export default {
  data() {
    return {
      post: [],
      isLoading: false,
    };
  },
  methods: {
    getPosts() {
      this.isLoading = true;
      fetch("https://example.com/wp-json/wp/v2/posts")
        .then((response) => response.json())
        .then((data) => {
          this.post = data;
          this.isLoading = false;
        });
    },
  },
  mounted() {
    this.getPosts();
  },
};
</script>
The getPosts() method controls the loading state of our application and makes API calls to our API URL. It then stores the data returned from the API in the post array, which is created in the data property. The mounted() lifecycle Hook invokes the getPosts() method when Vue renders our content in the browser.
Next, we’ll display the content of our API. Using Vue directives in the App.vue file, we’ll display the content of the API as shown below:
<template>
<div class="container">
<p v-if="isLoading">Loading...</p>
<ul v-for="p in post" :key="p.id">
<h1>{{ p.title }}</h1>
<p>{{ p.content }}</p>
<p class="date">{{ p.createdAt }}</p>
</ul>
</div>
</template>
<script>
The v-if directive triggers transitions when its condition changes and handles the loading state of our application. For example, when loading data from a server, we may encounter a circumstance in which the data takes some time to fetch.
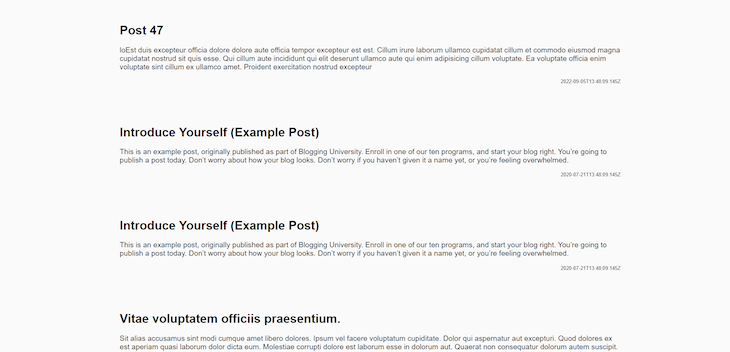
v-for renders the element or template block multiple times based on the source data, displaying our posts by looping through the array of data in our API. After applying the configurations, our application will look like the following image:

Headless WordPress is an out-of-the-box functionality that solves issues faced by most developers and site owners relating to content management systems. In this article, we explored the possibilities of using headless integrations to build, manage, and deliver content using WordPress and Vue.
Debugging Vue.js applications can be difficult, especially when users experience issues that are difficult to reproduce. If you’re interested in monitoring and tracking Vue mutations and actions for all of your users in production, try LogRocket.

LogRocket lets you replay user sessions, eliminating guesswork by showing exactly what users experienced. It captures console logs, errors, network requests, and pixel-perfect DOM recordings — compatible with all frameworks.
With Galileo AI, you can instantly identify and explain user struggles with automated monitoring of your entire product experience.
Modernize how you debug your Vue apps — start monitoring for free.
Hey there, want to help make our blog better?
Join LogRocket’s Content Advisory Board. You’ll help inform the type of content we create and get access to exclusive meetups, social accreditation, and swag.
Sign up now
Discover how to use Gemini CLI, Google’s new open-source AI agent that brings Gemini directly to your terminal.

This article explores several proven patterns for writing safer, cleaner, and more readable code in React and TypeScript.

A breakdown of the wrapper and container CSS classes, how they’re used in real-world code, and when it makes sense to use one over the other.

This guide walks you through creating a web UI for an AI agent that browses, clicks, and extracts info from websites powered by Stagehand and Gemini.