Vite support for Electron is now available. The electron-vite package brings the speed and capabilities of Vite to Electron app development along with some new Electron-specific capabilities.

In this article, we’ll discuss electron-vite and investigate how it improves Electron build performance at development time. Then, we’ll get hands-on with electron-vite by building a simple Electron app with a React frontend.
Jump ahead:
All the code you need for the tutorial portion of this article is included below, but you’ll also need the following to easily follow along:
Electron is a framework that enables the development of cross-platform desktop applications with native integration to the underlying operating system. Electron apps consist of two main components:
Electron enables frontend web developers to use existing web application code, tools, and skills to develop desktop applications that feel like native applications. JavaScript can be used to integrate with native capabilities like windows, menus, dialogs, and notifications.
Vite is a frontend web development tool that improves the frontend development experience. Vite replaces, and in some cases improves upon, capabilities provided by other commonly used web development tools like react-scripts (based on webpack), Rollup, or Parcel.
Vite differentiates itself from other dev tools with its speed when running a local server at development time. Vite splits your application into dependencies (i.e., node_modules) and source code. Dependencies are pre-bundled using esbuild, resulting in an extremely fast build process compared to other tools like webpack.
Vite’s source code is not bundled and is served directly to the browser using native ESM support. Minimal processing of the source code is required before serving it to the browser, resulting in fast cold starts and extremely fast hot reloading when you make source code changes. You can read more about Vite’s dev server approach in this guide.
electron-vite brings Vite capabilities to Electron app development. It uses Vite at its core to build and serve web applications running in the Electron-embedded Chromium browser (renderer process).
electron-vite extends some of Vite’s best features to improve the development experience for Electron application code. For example, this build tool:
It also provides additional features that tend to be required specifically when developing Electron apps. For example, electron-vite enables you to protect your source code by compiling it into V8 bytecode before distributing it to clients
Now, let’s get hands-on and actually build something with Electron, React, and electron-vite.
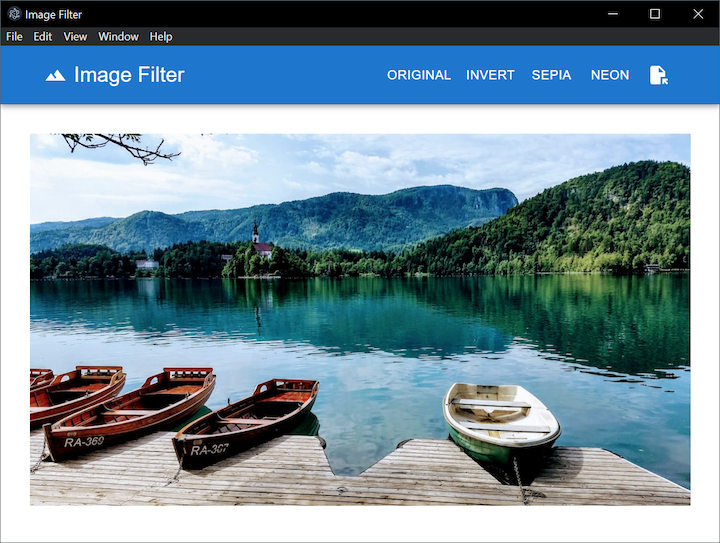
In this tutorial, we’ll build a simple image filter desktop app that can open local image files and apply a few filters to the files.
The instructions below were tested on a Windows device but should also work on Mac or Linux. electron-vite and Electron both provide inbuilt cross-platform support.
Here’s what the final version of our app will look like:

To start our project, we need to create the web app that we will eventually run within Electron’s embedded browser. Let’s use Vite with the React template to generate starter code:
npm create vite@latest image-filter-app -- --template react
cd image-filter-app
Next, install some npm packages to help build the user interface and implement the image filter capability:
# to implement web user interface:
npm install @mui/material @mui/icons-material @emotion/react @emotion/styled

# to implement image filter capability:
npm install react-image-filter
Now, start the Vite dev server:
npm run dev
Vite’s dev server enables lightning-fast cold starts and hot reloading of changes. In the next few steps, you‘ll experience this speed as we implement the user interface. This is a good time to set up your code editor and browser windows side-by-side to appreciate just how fast your changes are reflected in the browser.
Replace the contents of the /src/App.jsx file with this code:
import Button from '@mui/material/Button';
import LandscapeIcon from '@mui/icons-material/Landscape';
import FileOpenIcon from '@mui/icons-material/FileOpen';
import { AppBar, Box, Container, CssBaseline, IconButton, Toolbar, Typography } from '@mui/material';
import ImageFilter from 'react-image-filter';
import { useState } from 'react';

function App() {
  const [imageFilter, setImageFilter] = useState(undefined);
  const [imageUrl, setImageUrl] = useState('https://source.unsplash.com/RZrIJ8C0860');

  async function onOpenFileClick() {
    // TODO
  };

  return (
    <>
      <CssBaseline />
      <Box sx={{
        flexGrow: 1,
        whiteSpace: 'nowrap',
        button: {
          color: 'inherit',
        }
      }}>
        <AppBar position="static">
          <Container>
            <Toolbar>
              <LandscapeIcon sx={{ mr: 1 }} />
              <Typography sx={{
                mr: '0.5em',
                fontSize: '1.4em',
                flexGrow: 1
              }}>Image Filter</Typography>
              <Button onClick={() => setImageFilter(undefined)}>Original</Button>
              <Button onClick={() => setImageFilter('invert')}>Invert</Button>
              <Button onClick={() => setImageFilter('sepia')}>Sepia</Button>
              <Button onClick={() => setImageFilter('duotone')}>Neon</Button>
              <IconButton type='button' color='inherit' onClick={onOpenFileClick}>
                <FileOpenIcon />
              </IconButton>
            </Toolbar>
          </Container>
        </AppBar>
      </Box>
      <Box sx={{ textAlign: 'center' }}>
        <ImageFilter
          image={imageUrl}
          alt="image to be styled"
          filter={imageFilter}
          colorOne={[104, 255, 0]}
          colorTwo={[255, 0, 92]}
          style={{ margin: '2em' }}
        />
      </Box>
    </>
  );
}

export default App;
You don’t need to pay much attention to the code in the App.jsx file. It really just contains some basic UI components and uses the react-image-filter package to apply filters to the loaded image.
You may notice that the onOpenFileClick function is not implemented yet. Don’t worry, we‘ll implement this later with some native operating system integration using the Electron API.
Next, replace contents of the /src/main.jsx file with this code:
import React from 'react'
import ReactDOM from 'react-dom/client'
import App from './App.jsx'

ReactDOM.createRoot(document.getElementById('root')).render(
  <React.StrictMode>
    <App />
  </React.StrictMode>
);
Save all your changes and watch the app reload in the browser in just milliseconds. Try making some changes to the App.jsx file to experience Vite’s speed. Once you’re ready to proceed, stop the Vite dev server.
Now we need to convert our web app into an Electron desktop app built with electron-vite. This may sound challenging, but it is surprisingly simple.
Install the Electron and electron-vite packages as dev dependencies:
npm install electron electron-vite --save-dev
Update the scripts in the package.json file to use electron-vite, instead of Vite, and to run the dev server, build, and preview the production build:
"scripts": {
    "dev": "electron-vite dev -w",
    "build": "electron-vite build",
    "preview": "electron-vite preview"
},
Notice that the dev script includes the -w option, which tells electron-vite to watch for changes to Electron main and preload scripts and reload them automatically. Changes to web application code running on the renderer process will also be reloaded automatically thanks to the underlying Vite dev server included in electron-vite.
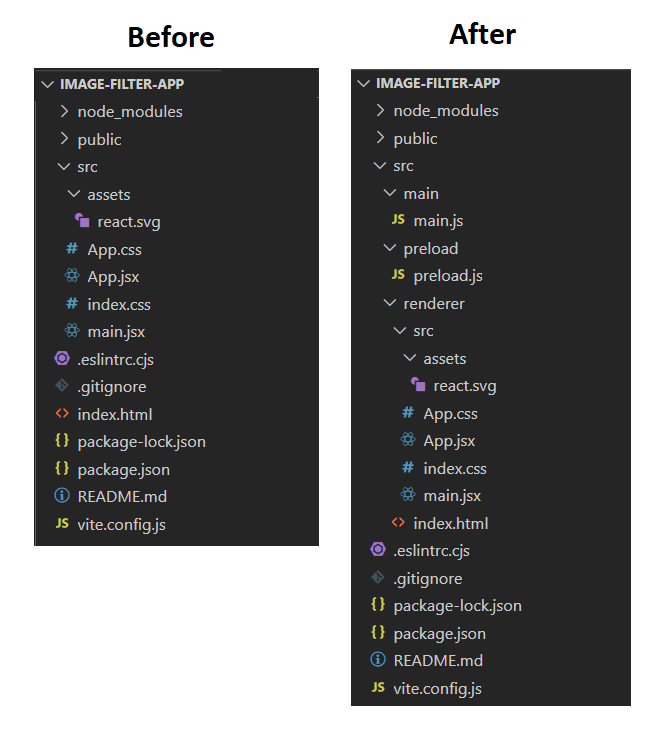
Next, we’ll restructure the source code files and folders in the project. Although this is not absolutely necessary, in order to minimize the amount of configuration required to build the app with electron-vite, we‘ll follow the recommended folder convention documented here.
Make the following changes to the project:
src/renderer/src foldersrc folder to the src/renderer/src folderindex.html file in the root of the project to the src/renderer foldersrc/main foldermain.js file in the src/main foldersrc/preload folderpreload.js file in the src/preload folderHere’s what the project should look like before and after you restructure it:

Now, add an electron.vite.config.js file to the root of the project with this code:
import { defineConfig } from "electron-vite";
import react from '@vitejs/plugin-react';

export default defineConfig({
    publicDir: false,
    main: {},
    preload: {},
    renderer: {
        plugins: [react()]
    }
});
The react plugin is included in the electron-vite renderer configuration so that we can take advantage of React’s Fast Refresh feature at development time. Fast Refresh allows us to edit React components in a running application without losing their state.
Add this code to the /src/main/main.js file:
import { app, BrowserWindow } from 'electron';
import * as path from 'path';

let mainWindow;

function createWindow() {
  mainWindow = new BrowserWindow({});

  // Vite dev server URL
  mainWindow.loadURL('http://localhost:5173');
  mainWindow.on('closed', () => mainWindow = null);
}

app.whenReady().then(() => {
  createWindow();
});

app.on('window-all-closed', () => {
  if (process.platform !== 'darwin') {
    app.quit();
  }
});

app.on('activate', () => {
  if (mainWindow == null) {
    createWindow();
  }
});
The code in the main.js file creates a basic cross-platform window that renders our web app running from the Vite dev server at localhost:5173.
Now, make the following changes to the package.json file:
"type": "module" if present"main": "./out/main/main.js"Our project is ready to run as an Electron app:
npm run dev
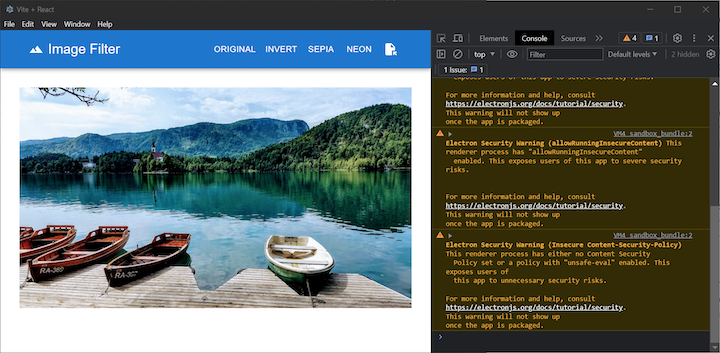
The app will start up in a native window with a default menu and the embedded browser running the web app. You can even open up browser developer tools from the default menu:

So far, we’ve built a normal web application that runs in an embedded browser in Electron. Now, we’ll use Electron’s native integrations to connect the open image button in the web app to a native file selection dialog provided by the underlying operating system.
This will allow the web app to open files directly on the user’s local file system. Normally the image would need to be uploaded to a web server before it can be rendered and manipulated in the browser.
Make the following changes to the Electron main process script at /src/main/main.js:
dialog object from ElectronhandleFileOpen function that handles the output of the file selection dialogwhenReady event handler to connect the new handleFileOpen function to the dialog openFile eventcreateWindow function to hook up a preload script and disable web security on the main BrowserWindow instanceAfter making these changes, your /src/main/main.js script should look like this:
import { app, BrowserWindow, dialog, ipcMain } from 'electron';
import * as path from 'path';

let mainWindow;

async function handleFileOpen() {
  const { canceled, filePaths } = await dialog.showOpenDialog({});
  if (!canceled) {
    return filePaths[0];
  }
}

function createWindow() {
  mainWindow = new BrowserWindow({
    webPreferences: {
      preload: path.join(__dirname, '../preload/preload.js'),
      webSecurity: false
    }
  });

  // Vite DEV server URL
  mainWindow.loadURL('http://localhost:5173');
  mainWindow.on('closed', () => mainWindow = null);
}

app.whenReady().then(() => {
  ipcMain.handle('dialog:openFile', handleFileOpen);
  createWindow();
});

app.on('window-all-closed', () => {
  if (process.platform !== 'darwin') {
    app.quit();
  }
});

app.on('activate', () => {
  if (mainWindow == null) {
    createWindow();
  }
});
N.B., the webSecurity setting is enabled by default but we are disabling it to keep this example simple. When this setting is enabled, the embedded browser is run in isolation and is unable to access the local file system. Disabling web security to gain access to the file system is not the correct approach for a real application. There are other, better ways to do this. Refer to Electron issue 23393 for examples
Now, copy the following code to the /src/preload/preload.js file:
import { contextBridge, ipcRenderer } from 'electron';

contextBridge.exposeInMainWorld('electronAPI', {
    openFile: () => ipcRenderer.invoke('dialog:openFile')
});
The preload script contains the bridge that connects the web app running on the renderer process to native capabilities from the underlying operating system. The exposeInMainWorld function is used to explicitly expose the Electron APIs that the web app can call.
Finally, we need to implement the onOpenFileClick function in the /src/renderer/src/App.jsx file. Replace it with this code to call the Electron API we exposed in the preload script:
async function onOpenFileClick() {
  const filePath = await window.electronAPI.openFile();
  setImageUrl(filePath);
};
Use the npm run dev command to run the app. Then, test the open image button. Now you can open an image on your local file system and apply filters to it.
To experience the electron-vite hot reload, try making the below changes to your app:
Typography tag in the App.js file to something other than “Image Filter”. After saving the change, the embedded browser will load the change nearly instantaneously thanks to Vite’s super-fast dev server with hot module reloadingautoHideMenuBar: true option to the BrowserWindow object in the /src/main/main.js file. This option will hide the native menu bar by default. After saving the change, the whole app will automatically restart with the menu bar hidden thanks to electron-vite hot reload. Press the Alt key (on Windows) to bring the menu bar backN.B., ensure you start the app in dev mode with the npm run dev command before making any changes
  mainWindow = new BrowserWindow({
    webPreferences: {
      preload: path.join(__dirname, '../preload/preload.js'),
      webSecurity: false
    },
    autoHideMenuBar: true
  });
Now that you’ve experienced building and running an Electron app with electron-vite, consider what the developer experience would be like without this build tool.
You could build the React portion of this app using a variety of tools including Vite. You could still take advantage of features like Vite’s hot module reload to make changes to the web app and see them reflected in Electron’s embedded browser quickly while still maintaining app state. This does not require electron-vite.
However, the developer experience begins to degrade as soon as you make changes to the Electron main or preload scripts. Without electron-vite, any change to these would require the entire app to be restarted manually.
This is particularly cumbersome when working on an app that has a lot of native integration or code running on the main process. You would also miss out on all other aforementioned benefits of electron-vite, like source code protection.
Wondering if you should use electron-vite? Absolutely — if you value your time! electron-vite brings the fast, developer-friendly experience that developers have come to expect from Vite plus several other Electron-specific features you will probably eventually need before you ship your app.
I hope you enjoyed this article. The full source code for the image filter app demonstrated in this tutorial is available on GitHub.
Install LogRocket via npm or script tag. LogRocket.init() must be called client-side, not
server-side
$ npm i --save logrocket

// Code:

import LogRocket from 'logrocket';
LogRocket.init('app/id');
// Add to your HTML:

<script src="https://cdn.lr-ingest.com/LogRocket.min.js"></script>
<script>window.LogRocket && window.LogRocket.init('app/id');</script>
Hey there, want to help make our blog better?
Join LogRocket’s Content Advisory Board. You’ll help inform the type of content we create and get access to exclusive meetups, social accreditation, and swag.
Sign up now
Discover how to use Gemini CLI, Google’s new open-source AI agent that brings Gemini directly to your terminal.

This article explores several proven patterns for writing safer, cleaner, and more readable code in React and TypeScript.

A breakdown of the wrapper and container CSS classes, how they’re used in real-world code, and when it makes sense to use one over the other.

This guide walks you through creating a web UI for an AI agent that browses, clicks, and extracts info from websites powered by Stagehand and Gemini.