Currency converters are a key component of any ecommerce website or app that handles international transactions. They assist users in making better decisions and potentially increase sales by converting product prices to local currencies.

In this article, we’ll create a dynamic currency converter in React. We’ll start with a basic converter similar to Google’s online currency converter that gets exchange rates from an API. Then, we’ll improve it using the react-currency-input-field library for better input formatting. Finally, we’ll apply input masking to help ensure users enter values precisely in the required format.
Let’s dive in!
Jump ahead:
To start, we’ll set up an API to get the latest currency exchange rates. Then, we’ll set up a React app that will fetch data from the API and store it.
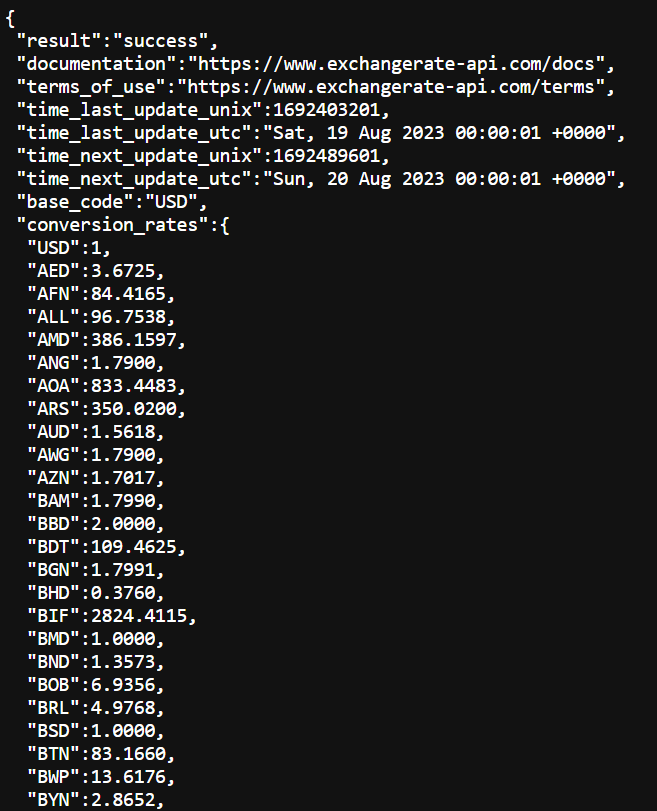
To create the currency converter, we first need to get the most recent exchange rates. For this, we’ll use the free Exchange-Rate API which provides exchange rates for any currency. We simply specify the currency in the API URL and then fetch the rates using a standard fetch request.
First, create an API key from the Exchange-Rate API, then replace YOUR_KEY in the URL below with your actual key:
https://v6.exchangerate-api.com/v6/YOUR_KEY/latest/USD
As you can see in the URL above, the last three characters specify the currency for which exchange rates are requested. In this case, USD. In our converter, we will obtain this information from the user input. The JSON response will look something like this:
Now, let’s create a new React app using:
npx create-react-app currency-converter
Next, in the App.js file, we’ll make a fetch request inside a useEffect Hook with an empty array as the dependency. With the empty array, every time the page or component re-renders we make another fetch request to the API to keep the app up to date.
We also create two empty states: rates and ratesFetched. We use rates to store and update the exchange rates. We use the ratesFetched state to store the values true or false, indicating if the rates have been fetched. Later on, this state will prove to be particularly useful.
Your App.js file should look like this:
import React, { useState, useEffect } from "react";
function App() {
  const [rates, setRates] = useState();
  const [ratesFetched, setRatesFetched] = useState(false);

  const getRates = async () => {
    // fetch the data from API
    const response = await fetch(
      "https://v6.exchangerate-api.com/v6/59d560835c4e8d4f996adc83/latest/USD"
    ).then((response) => response.json());

    // save the rates in the state
    if (response.result === "success") {
      setRates(response.conversion_rates);
      setRatesFetched(true);
    }
  };

  useEffect(() => {
    getRates();
  }, []);

  return (
    <div className="container">
    </div>
  );
}
export default App;
Now let’s move on to the converter itself. Similar to Google’s currency converter, we have three containers each containing a label as well as an input field or a dropdown:
amount: To input the conversion amountfrom: To select the base currencyto: To select the currency to convert toWe also add a container to display the output and a button to run the calculation.
For the dropdowns, we use an inline conditional statement to check if the rates have been fetched and then map out the available currencies. Since rates stores an object of exchange rates, we can use Object.keys() to get an array of the currency codes. Then we can .map() over that array to generate the <option> elements.
Be sure to add a default option in the select elements in the else part of your condition in case the rates do not load. Your return statement should look like this:
return (
  <div className="container">
    <div class="input-amount">
      <label>Amount:</label>
      <input type="number" id="amount" />
    </div>
    <div class="input-from">
      <label>From:</label>
      <select id="from">
        {ratesFetched ? (
          Object.keys(rates).map((currency, index) => (
            <option key={index} value={currency}>
              {currency}
            </option>
          ))
        ) : (
          <option defaultValue>USD</option>
        )}
      </select>
    </div>
    <div class="input-to">
      <label>To:</label>
      <select id="to">
        {ratesFetched ? (
          Object.keys(rates).map((currency, index) => (
            <option key={index} value={currency}>
              {currency}
            </option>
          ))
        ) : (
          <option defaultValue>EUR</option>
        )}
      </select>
    </div>
    <button className="btn">Calculate</button>
    <div className="output">
      <label>Output:</label>
    </div>
  </div>
);
The basic CSS below can be added to the styles.css file although it is not required for making the React converter functional. Be sure to import this file in your App.js file:
.container {
  width: 400px;
  margin: 0 auto;
}
.input-amount,
.input-from,
.input-to {
  margin-bottom: 20px;
}
input,
select {
  width: 100%;
  padding: 10px;
}
label {
  display: block;
  margin-bottom: 5px;
}
select {
  background: #fff;
  border: 1px solid #ccc;
}
.btn {
  background: blue;
  color: white;
  padding: 0.5rem 1rem;
  border: none;
  cursor: pointer;
}
.btn:hover {
  background: lightblue;
}
.output {
  margin-top: 20px;
}
Now that the basic converter layout is set up, we create three more states to store the input amount and selected currencies. Be sure to set the initial currency as USD:
const [amount, setAmount] = useState(0);
const [fromCurrency, setFromCurrency] = useState("USD");
const [toCurrency, setToCurrency] = useState("USD");
We use an onChange event handler to get the current value of the dropdowns and inputs. Be sure to set the value of any input elements to their corresponding state. For example, we can get the user entered amount and save it in the state, like so:
<input
  type="number"
  id="amount"
  onChange={(e) => setAmount(e.target.value)}
  value={amount}
/>
We can use the onChange handler to get the selected to and from currency codes from the dropdowns:
<select
  id="from"
  value={fromCurrency}
  onChange={(e) => setFromCurrency(e.target.value)}
>
For the calculation itself, we create a new function that will run when the calculate button is clicked. Inside the function, we will:
latest/USD in the API endpoint, we will use latest/${fromCurrency} where fromCurrency is the currency code selected in the From dropdownfromCurrency as the base currencytoCurrency and display it to the useroutputTo calculate the converted amount in the toCurrency state we first need to get the exchange rate of the toCurrency from the new fetched rates with the fromCurrency as the base currency. We can do this by accessing the appropriate exchange rate from the API response, like so:
const CurrencyRate = fetchedRates[toCurrency];
Then, to calculate the converted amount, we multiply the input amount by the CurrencyRate. For example, if the input amount is 10 USD, the toCurrency is EUR, and the CurrencyRate is 0.92, then the converted amount will be 10*0.92 = 9.18 EUR.
Next, let’s create a new state, output, in which we will store the calculated amount. Here’s the complete calculateOutput function:
const calculateOutput = async () => {
  // fetch the selected from currency rates
  const response = await fetch(
    `https://v6.exchangerate-api.com/v6/YOUR_API_KEY/latest/${fromCurrency}`
  ).then((response) => response.json());
  const fetchedRates = response.conversion_rates;
 // calculate and store the result
  const CurrencyRate = fetchedRates[toCurrency];
  const output = amount * CurrencyRate;
  setOutput(output);
};
Now, add this function in an onClick event handler on the button:
<button className="btn" onClick={() => calculateOutput()}>
  Calculate
To display the output to the user, call the state in the output label, like so:
<div className="output">
  <label>Output: {output}</label>
</div>
Here’s the complete App.js file code and working example for this simple converter:
<iframe src="https://codesandbox.io/embed/react-currency-converter-ql2x2c?
To improve our currency converter, we can use the react-currency-input-field library to add a currency input field for the amount. This will:
from currencyTo get started, install the library using the following command:
npm install react-currency-input-field
Let’s make a few changes to the basic converter that we just created. First, import the CurrencyInput component from the library using the following command:
import CurrencyInput from 'react-currency-input-field';
Next, replace the amount input field with this CurrencyInput component. Instead of using the onChange event handler, we’ll use the inbuilt onValueChange function. The value will be set using the value prop.
Input masking refers to the technique of formatting user input according to some predefined rules or format. In our case, we’ll format the user’s input with currency symbols, commas, and decimal limits. Input masking offers several benefits:
We can assign the currency symbol or code as a prefix to the entered value in the component using the intlConfig prop. We’ll set the currency inside it to the fromCurrency.
We can use the allowDecimals and allowNegativeValue props or prevent the user from entering decimals and negative numbers, respectively. The new amount input field should look like this:
<CurrencyInput
  value={amount}
  onValueChange={(amount) => setAmount(amount)}
  intlConfig={{ locale: "en-US", currency: fromCurrency }}
  allowDecimals={true}
  allowNegativeValue={false}
/>
We can also limit the length of decimals allowed using the decimalsLimit prop and add custom separators between thousand, million, and billion by using the groupSeparator prop. The maximum length of numbers a user can enter can also be fixed or set using maxLength.
Here’s the working converter with this new component:
Here’s our currency converter in action:
In this article, we demonstrated how to build a React currency converter. We explored how to fetch live exchange rates from an API, how to handle basic UI implementation, and how to use the react-currency-input-field library to enhance the UX of the application. Armed with this knowledge, you can create your own dynamic currency converter for React apps.
Thank you for reading!
Install LogRocket via npm or script tag. LogRocket.init() must be called client-side, not
server-side
$ npm i --save logrocket

// Code:

import LogRocket from 'logrocket';
LogRocket.init('app/id');
// Add to your HTML:

<script src="https://cdn.lr-ingest.com/LogRocket.min.js"></script>
<script>window.LogRocket && window.LogRocket.init('app/id');</script>

Discover how React Fiber works under the hood. Learn how React builds the DOM, handles concurrent rendering, and works alongside React 19 features and the new React Compiler.

Learn how to use Skybridge, an open-source React framework, to build and deploy cross-platform AI apps and interactive UI widgets for ChatGPT, Claude, and MCP clients from a single codebase.

Learn how to set up Meilisearch, index documents, and build keyword, semantic, and hybrid search with AI-powered retrieval.

Compare pnpm and npm across security defaults, disk usage, dependency strictness, and workspace policy to decide which package manager fits your project.
Hey there, want to help make our blog better?
Join LogRocket’s Content Advisory Board. You’ll help inform the type of content we create and get access to exclusive meetups, social accreditation, and swag.
Sign up now

