Nowadays, browsers are evolving, bringing new APIs and ways to connect to other devices and allowing access to more functionality than they ever did before. One such API is the Web Bluetooth API.

This API is still in beta as of this writing, but once this gets released to the public, it will open a whole lot of opportunities for developers who want to use Bluetooth but don’t want to create a native application for each platform.
Even though the Bluetooth API is still in beta, we will try it out and make a simple web page that will pair with our phone and give us basic details such as the battery percentage, name of the device, and basic information provided by the device manufacturer.
We won’t be using styles in this tutorial because we just need to understand how to interact with the Bluetooth API with JavaScript.
Remember, not all browsers support this API, and you won’t be able to test this with every phone. Some phones might not allow fetching device information. In this tutorial, I will be using an Apple iPhone 11, which allows me to fetch my device information through Bluetooth on my browser without any problems.
Please note that not all Chromium-based browsers, such as Brave, support the Bluetooth API. I tried using the API on Brave but discovered that Brave disabled the API on purpose for security reasons.
If you need any help with the code, here’s the GitHub repository.
First, we need to create a folder which we will be using as a workspace. Once you create a folder, open VS Code using the following command:
code .
We will be working with two files in this tutorial; name them index.html and script.js. In index.html we just need the basic layout (just a button), and link the file to our JavaScript file.
Here are the contents of index.html:
<!DOCTYPE html>
<html lang="en">
  <head>
    <meta charset="UTF-8" />
    <meta http-equiv="X-UA-Compatible" content="IE=edge" />
    <meta name="viewport" content="width=device-width, initial-scale=1.0" />
    <title>Document</title>
  </head>
  <body>
    <button id="getDetails">Get device details</button>
    <div id="details"></div>
    <script src="script.js"></script>
  </body>
</html>
Let’s start with the functionality. Go to script.js and store the UI elements in variables so that we can access them later:
const button = document.getElementById("getDetails");
const details = document.getElementById("details");
Now, let’s create a click listener for our button so that we can perform our operations once user clicks the button:
button.addEventListener("click", async () => {
  try {
  } catch(err) {
    console.error(err);
    alert("An error occured while fetching device details");
  }
});
We made the function an async function because it makes things simpler for us and we don’t need to make many callbacks, making our code look more organized. From now on, all of our code will be inside the try block.
Next, let’s work on requesting a Bluetooth device through the browser:
// Request the Bluetooth device through browser
const device = await navigator.bluetooth.requestDevice({
  optionalServices: ["battery_service", "device_information"],
  acceptAllDevices: true,
});
In the above code, we used the Bluetooth API through navigator.bluetooth. Before connecting to a device, we need to provide the device with information about what data we are going to access.
We can access the required data using various services present on the target Bluetooth device. In this case, we are interacting with battery and device information, so we need the battery_service and device_information services.
Once the user selects the Bluetooth device he wants to connect, we establish a connection to the GATT server, which provides us access to the services which we requested earlier, and also stores the device name in a variable for later use:
// Connect to the GATT server
// We also get the name of the Bluetooth device here
let deviceName = device.gatt.device.name;
const server = await device.gatt.connect();
Now, we need to get the services individually from the GATT server so that we can access them individually:
// Getting the services we mentioned before through GATT server
const batteryService = await server.getPrimaryService("battery_service");
const infoService = await server.getPrimaryService("device_information");
First, let’s work on fetching the battery level of the target device.
Every Bluetooth device has various services to interact with. For example, a mobile device can have a battery service for all battery activities. There can also be a phone service that helps make and receive calls. Different devices all have different Bluetooth services.
Each service has characteristics, and each characteristic has a value. This value is a buffer, so we need to convert it into human-readable form.
Battery level is a percentage so we will convert the buffer to integer:
// Getting the current battery level
const batteryLevelCharacteristic = await batteryService.getCharacteristic(
  "battery_level"
);
// Convert recieved buffer to number
const batteryLevel = await batteryLevelCharacteristic.readValue();
const batteryPercent = await batteryLevel.getUint8(0);
The readValue() function returns us a buffer which we need to convert into human readable form.
Now, let’s work on getting more device information. As said before, each service has one or more characteristics. The device_information services may have quite a lot of characteristics depending on the device, and we cannot extract a specific one because every device has different configurations and different unique IDs to access data. So we simply read all the characteristics in this case.
The following code does just that:
// Getting device information
// We will get all characteristics from device_information
const infoCharacteristics = await infoService.getCharacteristics();
console.log(infoCharacteristics);
let infoValues = [];
const promise = new Promise((resolve, reject) => {
  infoCharacteristics.forEach(async (characteristic, index, array) => {
    // Returns a buffer
    const value = await characteristic.readValue();
    console.log(new TextDecoder().decode(value));
    // Convert the buffer to string
    infoValues.push(new TextDecoder().decode(value));
    if (index === array.length - 1) resolve();
  });
});
We wrapped the forEach under a Promise because the parent and the forEach itself is an asynchronous function, so we need to fetch the data before moving on to displaying it.
Here, when we get the value using readValue(), we are using TextDecoder because we know that most of the data in the device_information service is a string type and not an integer.
We then push all the data into an array so that we can render it on the UI, then resolve the Promise once all characteristics are read.
Now, we simply render the data out on the screen:
promise.then(() => {
  // Display all the information on the screen
  // use innerHTML
  details.innerHTML = `
    Device Name - ${deviceName}<br />
    Battery Level - ${batteryPercent}%<br />
    Device Information:
    <ul>
      ${infoValues.map((value) => `<li>${value}</li>`).join("")}
    </ul>
  `;
});
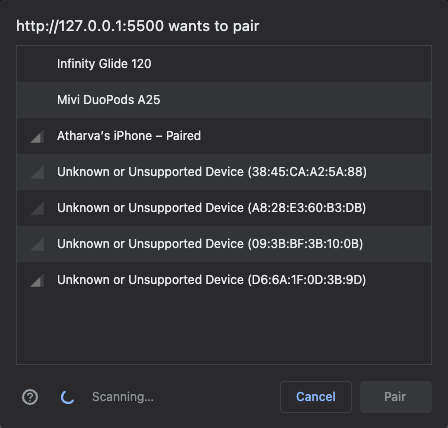
Now when you run our web app on Chrome Beta and click on the button, you should see a prompt to connect to a Bluetooth device just like this:

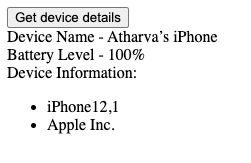
Once you select your phone (in my case it’s Atharva’s iPhone) and hit pair, you should see the information on your screen in a few seconds just like this:

The information is correct, my phone was on 100 percent when I took the screenshot.
One thing to note here is that iPhone 12,1 doesn’t mean I have an iPhone 12. iPhone 12,1 is the code name for iPhone 11. So if you see some weird name for your device, you should know that it might be the codename or something else from the manufacturer.
This is the most important question. This feature is in beta for most browsers, and even when it comes out to the public, there may be some issues, such as the hardware not supporting Bluetooth. If you want to create a service for someone to link their device, you should keep this in mind.
On the other hand, if your organization has custom systems with Bluetooth configured properly, you can definitely create an internal web app for the organization that can interact with Bluetooth devices as per their needs.
I think you should try this API out while it is in beta because it generally gives you an upper hand when it releases to the public. Not many people will be aware about how to use this API, so knowledge of it can help you land more gigs.
Another reason to use this while in beta would be to challenging yourself. When the API gets released, things might get easier. But if you are someone like me who loves to play around with API betas, you might have some fun and learn something new in the process.
Once the API is released to the public, more awareness will be created and, in my opinion, more and more Bluetooth-related services will take place on the web rather than in native applications. This will make this technology more accessible to web developers.
I’d highly recommend reading the target device documentation for help. Not every device has the same services; some might have custom services with custom IDs.
For practice, I recommend figuring out what else can you extract from your phone using the Bluetooth API.
Install LogRocket via npm or script tag. LogRocket.init() must be called client-side, not
server-side
$ npm i --save logrocket

// Code:

import LogRocket from 'logrocket';
LogRocket.init('app/id');
// Add to your HTML:

<script src="https://cdn.lr-ingest.com/LogRocket.min.js"></script>
<script>window.LogRocket && window.LogRocket.init('app/id');</script>
Would you be interested in joining LogRocket's developer community?
Join LogRocket’s Content Advisory Board. You’ll help inform the type of content we create and get access to exclusive meetups, social accreditation, and swag.
Sign up now
This guide walks you through creating a web UI for an AI agent that browses, clicks, and extracts info from websites powered by Stagehand and Gemini.

This guide explores how to use Anthropic’s Claude 4 models, including Opus 4 and Sonnet 4, to build AI-powered applications.

Which AI frontend dev tool reigns supreme in July 2025? Check out our power rankings and use our interactive comparison tool to find out.

Learn how OpenAPI can automate API client generation to save time, reduce bugs, and streamline how your frontend app talks to backend APIs.