I recently tried to develop a Slackbot with the Node Slack SDK but, unfortunately, I ran into some bugs. That was when I stumbled upon the new Bolt API. According to Slack, it’s the “swiftest way to start programming with the Slack Platform in JavaScript.”
There are a number of reasons to try the new Bolt API from Slack to build your next Slack app or bot. For one, it’s a well-documented library that will help you avoid running into weird bugs and issues further down the line. Secondly, the API is developed and maintained by Slack, which ensures that it’ll be updated frequently.
Developing with this API has been a breeze, and I can assure you that the Bolt API library is the way to go when it comes to developing Slack apps. In this tutorial, you’ll learn how to create your own Slackbot with the Bolt API.
To follow along with this tutorial, you’ll need:
To get started, we’ll need a workspace to install our bot in. A Slack workspace is a way to group communication within an organization. Everyone in an organization can belong to one workspace, which is then subdivided into multiple channels.
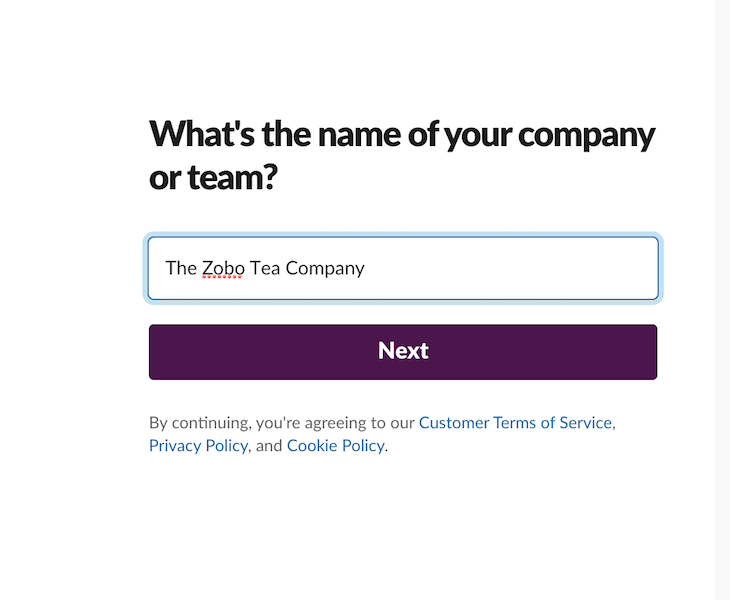
Install Slack on your device and create a new workspace. Slack will then send a 6-digit code to your email that you can use for verification. Now for the fun part! Give your workspace a name; for this tutorial, we’ll create a fictional company called The Zobo Tea Company.
Note: If you’re feeling curious, you can read more about hibiscus teas (also known as Zobo).
Next, Slack will prompt you to enter the name of the project you’re working on. You can call the project whatever you want. You can skip the last step where Slack prompts you to add other team members.
Now, we’ll create a new Slack app. Slack apps are small applications that provide specific functionalities within a workspace. You can install a preexisting Slack application by signing into your Slack workspace and searching for applications within the Slack app directory.
The Slack app we’ll create is a knowledge base that helps employees within our fictional organization quickly find answers to FAQs.
To create a new Slack application, head to the Slack API dashboard. Click the Create New App button on the top right. Give your bot a name, then select what workspace you would like to install the app to. We’ve called ours ask-ztc-bot.
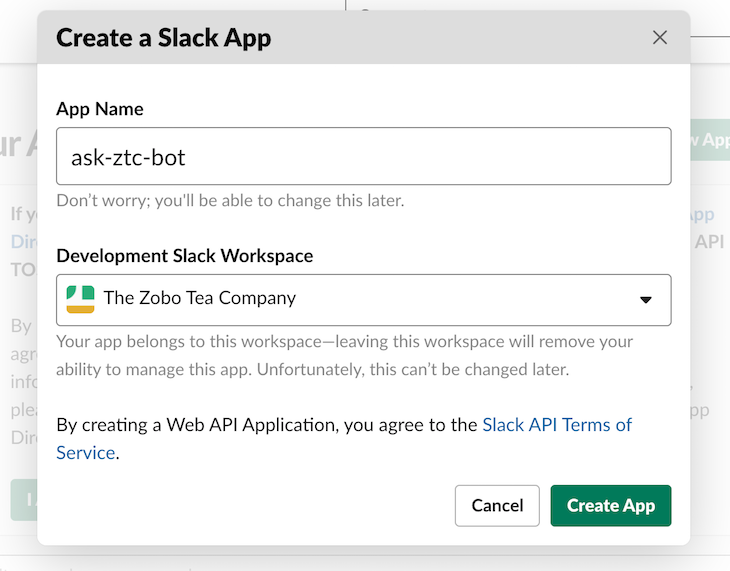
Hit Create App and you’ll be redirected to the dashboard for your new app.
We need to give our new application certain permissions for it to access data and perform actions within our Slack workspace.
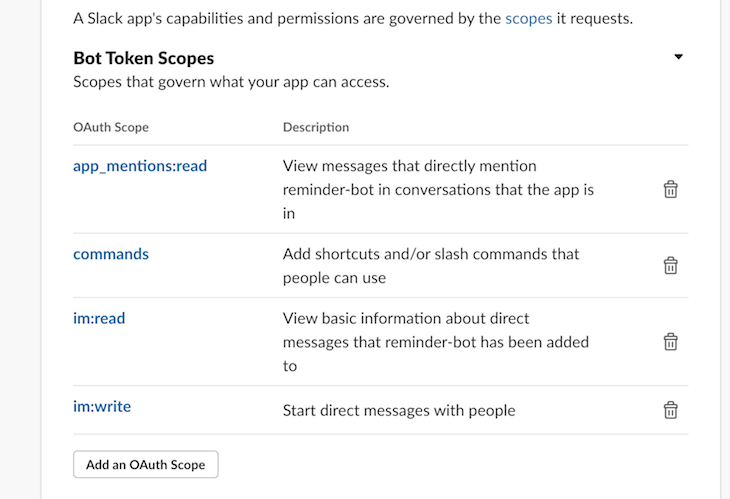
On your Slack dashboard, you’ll find the OAuth and Permissions menu option on the left sidebar. Once you navigate here, scroll down to Scopes. We need our ask-ztc-bot to be able to read instant messages from users and respond to those messages. Here’s a screenshot of the scopes we’ve given our bot:
With that done, we can now install the app to our workspace. From the left sidebar, navigate to Settings > Install Apps > Install to Workspace.
Next, it’s time to write some code. We’ll need to set up a server for our Slackbot that we can send requests to. Let’s get into it!
Create a directory called ask-ztc-bot and initialize npm:
mkdir ask-ztc-bot && cd ask-ztc-bot
npm init -y
Install the following packages in the ask-ztc-bot directory:
.env file into process.envI’ll be using the Yarn package manager to install these packages, but you can also use npm:
yarn add @slack/bolt
yarn add -D nodemon dotenv
We need to make a little tweak to our package.json file. Let’s add a new script called dev that runs nodemon app.js. Your package.json should look something like this:
...
  "main": "index.js",
  "scripts": {
    "dev": "nodemon app.js"
  },
....
The dev script automatically restarts our server in app.js when we make changes to any file within our codebase. Next, create the app.js file that will contain the code for our server:
touch app.js
Slack will need to authenticate our bot to connect it. Slack authenticates apps using a SIGNING_SECRET and a BOT_TOKEN. We’ll need to store both the SLACK_SIGNING_SECRET and SLACK_BOT_TOKEN in a .env file to prevent them from being exposed when using version control.
To find your SLACK_SIGNING_SECRET, navigate to Basic Information > App Credentials > Signing Secret. To get your SLACK_BOT_TOKEN, head to Settings > Install App > Bot User oAuth Token. Your SLACK_BOT_TOKEN should begin with xoxb.
Create a .env in the root directory of your project and assign the SECRET and TOKEN you obtained from the step above:
SLACK_SIGNING_SECRET="YOUR SIGNING SECRET"
SLACK_BOT_TOKEN="YOUR BOT TOKEN"
Head into the app.js file we created earlier and add the code below:
const { App } = require("@slack/bolt");
require("dotenv").config();
// Initializes your app with your bot token and signing secret
const app = new App({
  token: process.env.SLACK_BOT_TOKEN,
  signingSecret: process.env.SLACK_SIGNING_SECRET,
});

(async () => {
  const port = 3000
  // Start your app
  await app.start(process.env.PORT || port);
  console.log(`⚡️ Slack Bolt app is running on port ${port}!`);
})();
Run the yarn run dev script we created earlier to make sure everything works correctly. You should get a message in your terminal reading “⚡️ Slack Bolt app is running on port 3000!”
We need a way for our Slack app/bot to reach the server we’ve created on our localhost. To do this, we can proxy to localhost via a public URL created by a service like ngrok. Once you’ve got ngrok installed, run the following command in the directory:
./ngrok http 3000
This creates a public URL that proxies to your localhost running on port 3000. Now, ensure that your server on localhost:3000 is still running.
Slack also has a feature called Socket Mode, which allows Slack to connect to our application server using WebSockets instead of HTTP like we did with ngrok above. Socket Mode offers us a much faster development experience because we can skip setting up ngrok.
First, navigate to Settings > Basic Information > App-Level Tokens. Once there, click the Generate Token and Scopes button. Give your token a name, and give your app the two available scopes: connections:write and authorizations:read. Hit the generate button. Then, copy the token on the next screen into your .env file.
Next, head to Settings > Socket Mode. Toggle the Enable Socket Mode toggler. Finally, head into your app.js file and update the code that initializes your app with socketMode:true and your appToken:
const app = new App({
  token: process.env.SLACK_BOT_TOKEN,
  signingSecret: process.env.SLACK_SIGNING_SECRET,
  socketMode:true, // enable the following to use socket mode
  appToken: process.env.APP_TOKEN
});
With that completed, all requests to your development server will now happen via WebSockets and not HTTP.
Now that we’ve given our app some permissions and set up a server and a public URL, the next step is to allow it listen for Slash Commands. In Slack, you can trigger an action by sending a command as a message. For example, a Slash Command could be /knowledge to show all the content in our knowledge base.
To enable Slash Commands, click the Slash Commands menu option on the left sidebar. Then click the Create New Command button. Fill out the form using the image below as a guide. The request URL should be the custom URL automatically generated by ngrok for your application.
Make sure to append /slack/events at the end of the ngrok URL:
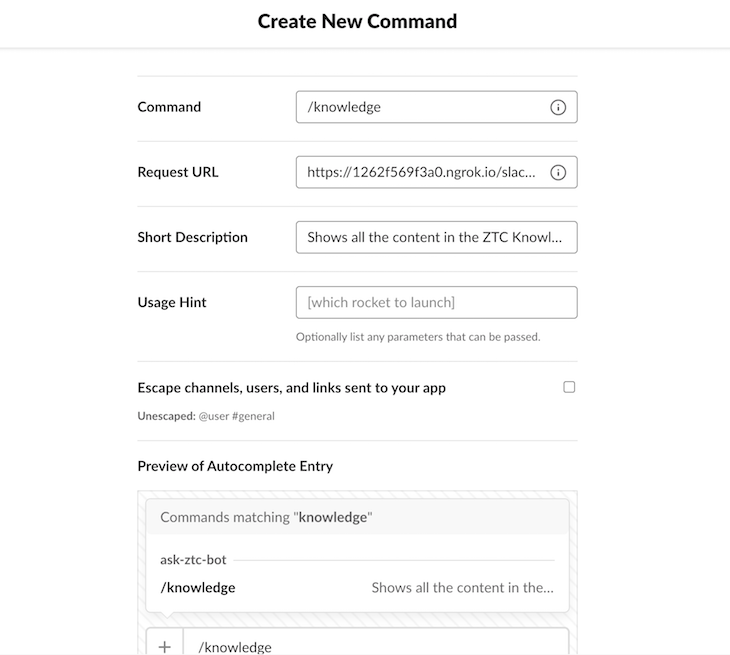
Hit the save button located on the bottom right side of the screen. Slack will prompt you to reinstall the app to your workspace for your changes to take effect. Follow those instructions, and your /knowledge command should now be created!
/knowledge commandNow, we can test the /knowledge command from inside Slack. First, we’ll create a listener to listen for events that include the /knowledge command. In your app.js file, add the following code:
const { App } = require("@slack/bolt");
require("dotenv").config();
// Initializes your app with your bot token and signing secret
const app = new App({
  token: process.env.SLACK_BOT_TOKEN,
  signingSecret: process.env.SLACK_SIGNING_SECRET,
});

app.command("/knowledge", async ({ command, ack, say }) => {
    try {
      await ack();
      say("Yaaay! that command works!");
    } catch (error) {
        console.log("err")
      console.error(error);
    }
});

(async () => {
  const port = 3000
  // Start your app
  await app.start(process.env.PORT || port);
  console.log(`⚡️ Slack Bolt app is running on port ${port}!`);
})();
One last step before we test our bot. You may notice that you’re unable to send a message to your newly created slackbot. When you click on the bot under the Apps tab in Slack, you may see a message reading “Sending messages to this app has been turned off”. Let’s turn it on!
Head back into your App settings page. Under Features, click the App Home menu option. Scroll down, then check Allow users to send Slash commands and messages from the messages tab checkbox.
If you’re on a Mac, you can reload Slack using CMD + R, and if you’re on a PC, run CTRL + R. Now, you should be able to send messages to your bot.
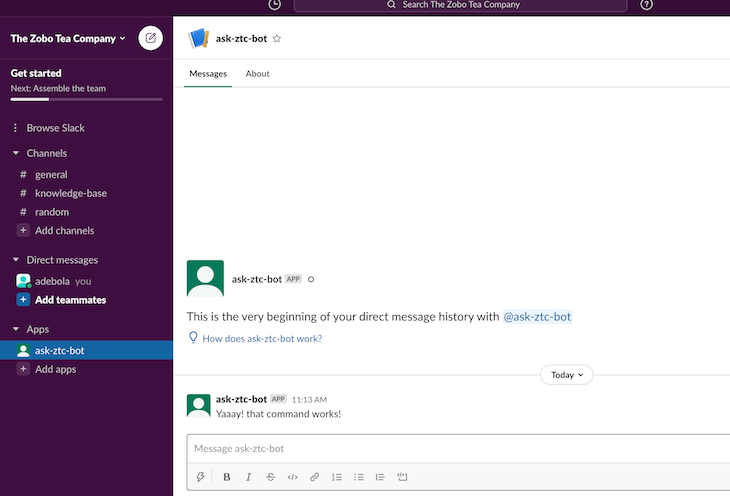
Let’s test our code! In the Slack app, you should see the ask-ztc-bot app just under the Your Apps section. Click that to send messages to the bot. Type /knowledge and hit enter. You should receive a message reading “Yaaay! that command works!”.
We can also mention or @ the bot and include additional text to be sent to the bot as a message.
In Slack, mentioning an app is a type of event. We can also listen for other events like when new users join a channel, a new channel is created, etc. For our bot/app to listen for events, we need to set up event subscriptions.
To enable events, navigate to Features > Event Subscriptions from your Slack app dashboard. Toggle the Enable Events button on.
For Slack to notify our app of events, we’ll need to provide a public URL that Slack can verify. Copy the ngrok URL we created earlier and paste that into the Request URL input field. You’ll need to append /slack/events to the URL because Slack will verify your URL by sending a POST request.
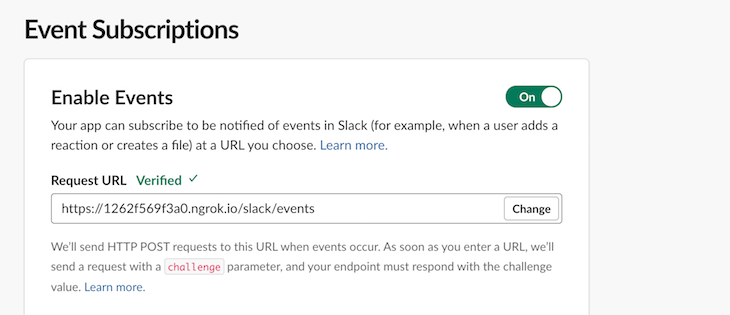
Once you see the green verified text with the tick sign, you know your app has been successfully verified by Slack, and you’re ready to go!
Next, we need to give the app some event permissions. Click the subscribe to bot events dropdown and add the following events. There are four events related to messages:
message.channels: listens for messages in public channelsmessage.groups: listens for messages in private channelsmessage.im: listens for messages in your app’s DMs with usersmessage.mpim: listens for messages in multi-person DMsIn this tutorial, we’ll only subscribe to message.im because we only want users to DM our bot.
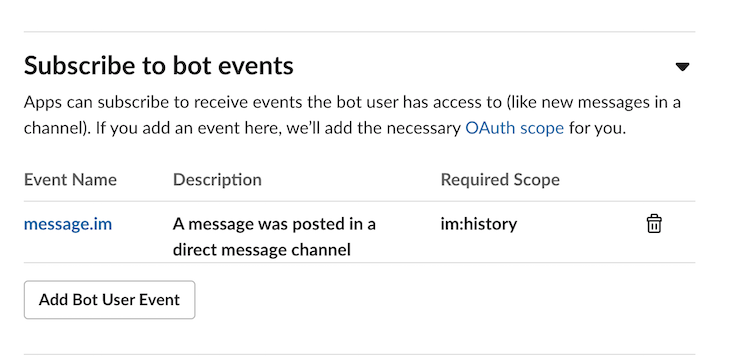
Hit the Save Changes button in the bottom right corner of the screen to save your changes.
Now, we can test our app to make sure it can receive and respond to messages. In your app.js, add the following piece of code:
app.message("hey", async ({ command, say }) => {
    try {
      say("Yaaay! that command works!");
    } catch (error) {
        console.log("err")
      console.error(error);
    }
});
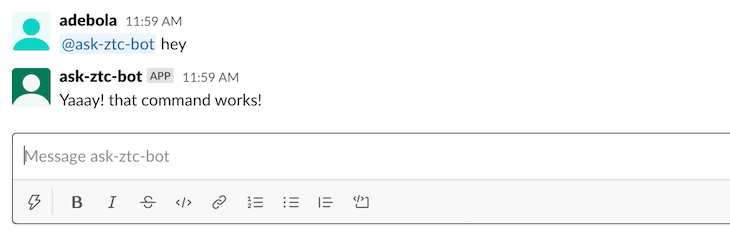
Head back to the azk-ztc-bot app and send it a message like @ask-ztc-bot hey. You should get a response back.
For an app like a knowledge base, we can’t really match exact words. We need a way to check if the message a user is sending to our bot contains a keyword that matches a keyword in our knowledge base. For that, Slack allows us to use regex expressions. For example, let’s update the code block that we used above to look like this:
// matches any string that contains the string hey
app.message(/hey/, async ({ command, say }) => {
    try {
      say("Yaaay! that command works!");
    } catch (error) {
        console.log("err")
      console.error(error);
    }
});
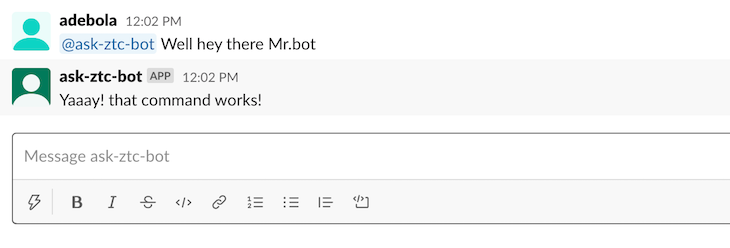
Send a message that includes the string hey in the format Well, hey there Mr.bot!. Our bot will still respond correctly since the message contains the string hey.
Now, we can get into actually creating the knowledge base.
First, we’ll create a mini database to store frequently asked questions and answers. Our database will be a simple JSON file on our server. You may want to consider a DBMS like MongoDB if your data requirements become large and complex.
In the root directory of your project, create a db.json file and add the following data:
{
    "data":[
        {
            "keyword": "products",
            "question": "How many different products do we sell at ZTC?",
            "answer": "ZTC currently has 3 products on the market. Hibiscus tea with a hint of one of Lemon/Pineapple or ginger."
        },
        {
            "keyword": "products",
            "question": "What online stores sell our products?",
            "answer": "Amazon, Macy's and Shoprite."
        },
        {
            "keyword": "people",
            "question": "How many people work at ZTC?",
            "answer": "ZTC currently employs 250 people from 21 different countries."
        },
        {
            "keyword": "reset password",
            "question": "How do I reset my password?",
            "answer": "To reset your company E-mail password, call Ola on ext.8099."
        }

    ]
}
We’ve created a set of four questions with their answers and grouped them under certain keywords for easy reference.
With our JSON database set up, we need a way to read the data in it. We’ll use the built-in fs module from Node.js to read from the db.json file. At the top level of your app.js file, add the following block of code:
// require the fs module that's built into Node.js
const fs = require('fs')
// get the raw data from the db.json file
let raw = fs.readFileSync('db.json');
// parse the raw bytes from the file as JSON
let faqs= JSON.parse(raw);
Now, we can write the code for responding to the /knowledge command. This command will display all the questions and answers in our database to the user:
app.command("/knowledge", async ({ command, ack, say }) => {
  try {
    await ack();
    let message = { blocks: [] };
    faqs.data.map((faq) => {
      message.blocks.push(
        {
          type: "section",
          text: {
            type: "mrkdwn",
            text: "*Question*",
          },
        },
        {
          type: "section",
          text: {
            type: "mrkdwn",
            text: faq.question,
          },
        },
        {
            type: "section",
            text: {
              type: "mrkdwn",
              text: "*Answer*",
            },
          },
          {
            type: "section",
            text: {
              type: "mrkdwn",
              text: faq.answer,
            },
          }
      );
    });
    say(message);
  } catch (error) {
    console.log("err");
    console.error(error);
  }
});
We’re using blocks (provided by the Slack Bolt API) and markdown to format the messages we’ll be displaying to users. To further customize messages from your bot when they’re sent to the user, Slack provides a Block Kit Builder that you can use to get your desired template.
You can test this out by typing the command /knowledge in the private conversation with the ask-ztc-bot.
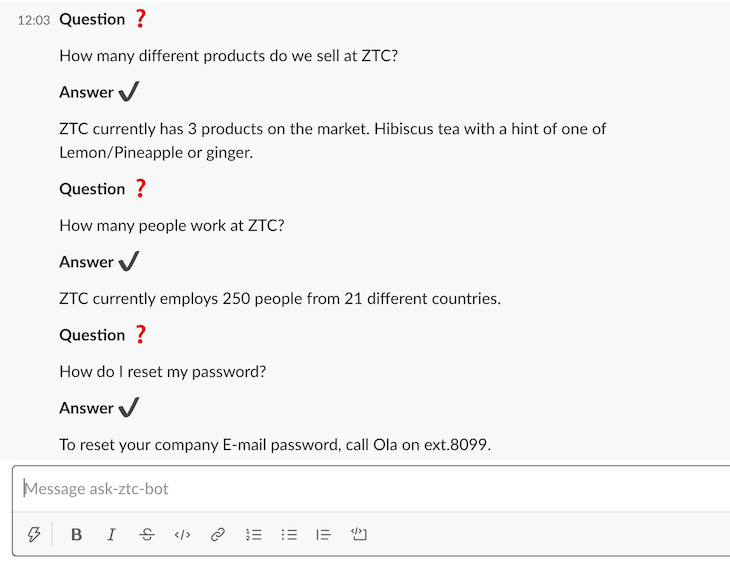
As you can see, it correctly lists all the FAQs in our knowledge base.
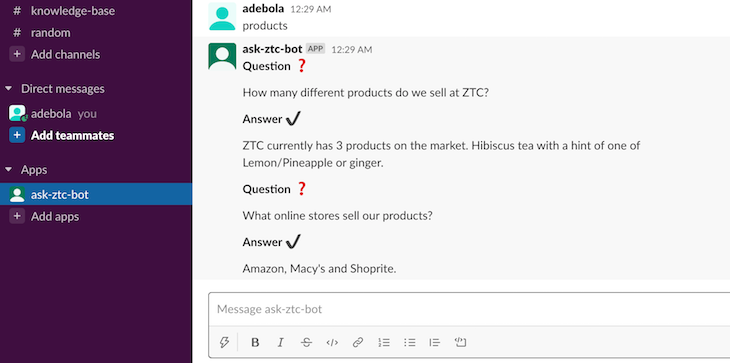
Next, we’ll use a simple regular expression to detect if a user has included the keyword products in their question. If they have, we’ll show them FAQs with the keyword products:
app.message(/products/, async ({ command, say }) => {
  try {
    let message = { blocks: [] };
    const productsFAQs = faqs.data.filter((faq) => faq.keyword === "products");

    productsFAQs.map((faq) => {
      message.blocks.push(
        {
          type: "section",
          text: {
            type: "mrkdwn",
            text: "*Question ❓*",
          },
        },
        {
          type: "section",
          text: {
            type: "mrkdwn",
            text: faq.question,
          },
        },
        {
          type: "section",
          text: {
            type: "mrkdwn",
            text: "*Answer ✔️*",
          },
        },
        {
          type: "section",
          text: {
            type: "mrkdwn",
            text: faq.answer,
          },
        }
      );
    });

    say(message);
  } catch (error) {
    console.log("err");
    console.error(error);
  }
});
To test this out, send a message to the bot that includes the word products, and the bot will respond with all the information that has to do with the products keyword.
Finally, we want to give users the ability to add their own data to the knowledge base.
Create a new Slash Command called /update. This command will be called by users to add new data to our knowledge base.
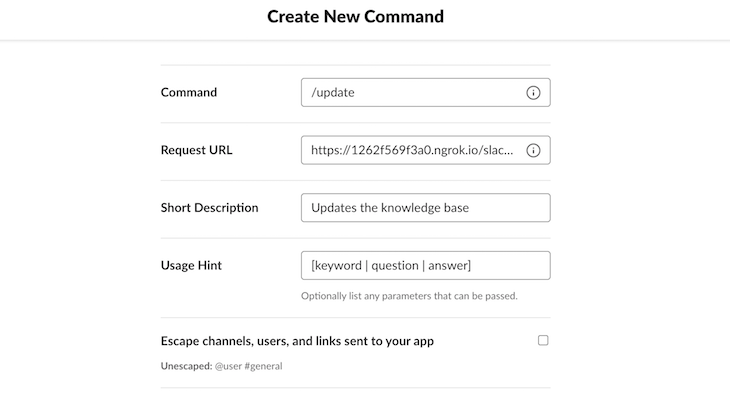
We’ve made a slight change to this command. In the usage hint, we’ve specified that users should separate the different fields using the pipe | character. This way, we can take the input string sent by a user and split it using the pipe character.
Note: If you plan to add your Slackbot to a channel and think that there might be other apps with similar commands to yours, it may be worth creating one command, e.g.,
/ask-ztc, and having users append an additional string to the command. For example, use/ask-ztc knowledgeto display all the FAQs in the knowledge base.
Here’s the code that handles the /update slash command. We update the db.json file by first reading the data in the file and appending the new data sent by the user to it:
app.command("/update", async ({ command, ack, say }) => {
  try {
    await ack();
    const data = command.text.split("|");
    const newFAQ = {
      keyword: data[0].trim(),
      question: data[1].trim(),
      answer: data[2].trim(),
    };
    // save data to db.json
    fs.readFile("db.json", function (err, data) {
      const json = JSON.parse(data);
      json.data.push(newFAQ);
      fs.writeFile("db.json", JSON.stringify(json), function (err) {
        if (err) throw err;
        console.log("Successfully saved to db.json!");
      });
    });
    say(`You've added a new FAQ with the keyword *${newFAQ.keyword}.*`);
  } catch (error) {
    console.log("err");
    console.error(error);
  }
});
Let’s test this out!
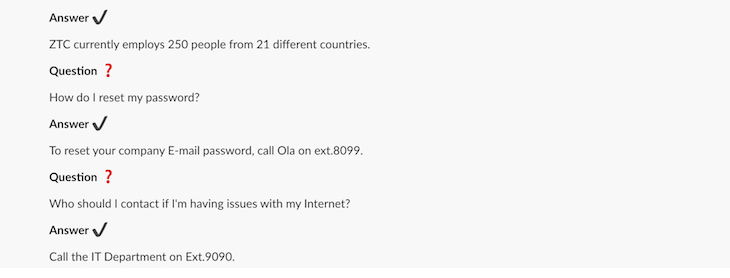
We’ll call the /update command with the following text: “people | Who should I contact if I’m having issues with my Internet? | Call the IT Department on Ext.9090”.
The /update endpoint will respond with the message:

Now, when we call our /knowledge command, we should see our newly added FAQ as part of the FAQs returned from our database.
And there you have it!
You’ve successfully created a Slackbot that can respond to commands and mentions. It can also accept new data from users and store it in the database.
The source code for this example is available on my GitHub.
You can deploy your app to a platform like Heroku in the same way you would deploy a regular Node.js application. Don’t forget to change the URL in the event subscription section to the new one provided by Heroku.
You can visit the Bolt API documentation for your reference.
 Monitor failed and slow network requests in production
Deploying a Node-based web app or website is the easy part. Making sure your Node instance continues to serve resources to your app is where things get tougher. If you’re interested in ensuring requests to the backend or third-party services are successful, try LogRocket.

LogRocket lets you replay user sessions, eliminating guesswork around why bugs happen by showing exactly what users experienced. It captures console logs, errors, network requests, and pixel-perfect DOM recordings — compatible with all frameworks.
LogRocket's Galileo AI watches sessions for you, instantly identifying and explaining user struggles with automated monitoring of your entire product experience.
LogRocket instruments your app to record baseline performance timings such as page load time, time to first byte, slow network requests, and also logs Redux, NgRx, and Vuex actions/state. Start monitoring for free.

Learn how to build smooth staggered animations in CSS using modern features like sibling-index(), complete with practical examples, fallbacks, and accessibility tips.

Compare the top AI development tools and models of July 2026. View updated rankings, feature breakdowns, and find the best fit for you.

Learn how to detect unused and ghost dependencies in JavaScript projects using Knip, a project-level linter that keeps your dependency graph accurate.

Learn how Storybook MCP enables AI agents to understand your component library, generate accurate UI, and validate code using documentation, stories, and automated tests.
Would you be interested in joining LogRocket's developer community?
Join LogRocket’s Content Advisory Board. You’ll help inform the type of content we create and get access to exclusive meetups, social accreditation, and swag.
Sign up now

