
One of the main advantages of Vue is its versatility. Although the library is focused on the view layer only, we can easily integrate it with a wide range of existing JavaScript libraries and/or Vue-based projects to build almost anything we want — from a simple to-do app to complex, large-scale projects.

Today, we’ll see how to use Vue in conjunction with Vuetify and howler.js to create a simple but fully functional music step sequencer.
Vuetify offers a rich collection of customizable, pre-made Vue components, which we’ll use to build the UI of the app. To handle the audio playing, we’ll use howler.js, which wraps the Web Audio API and make its use easier.
The Replay is a weekly newsletter for dev and engineering leaders.
Delivered once a week, it's your curated guide to the most important conversations around frontend dev, emerging AI tools, and the state of modern software.
In this tutorial, as its title suggests, we’re going to build a simple music step sequencer. We’ll be able to create simple beats and save them as presets for future use. In the image below you can see what the music sequencer will look like when it is run for the first time and there are no presets created yet.
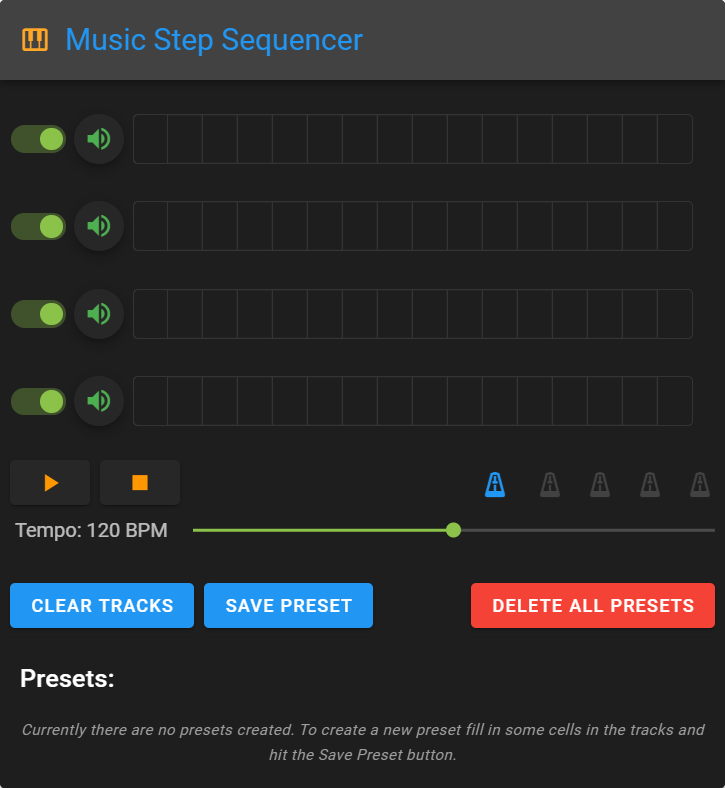
As you can see, there will be four tracks, each one representing a single sound (kick, snare, hi-hat, and shaker). Beats are created by selecting the steps — the cells in the tracks row — which we want to be playable. Each track can be muted separately for finer control. For changing the playback speed we will use the tempo slider. We also have a metronome, which measures each beat. Finally, we have the ability to save the current state of the tracks and tempo value as a reusable preset. If we’re not satisfied with the current outcome, we can start over by clicking the Clear Tracks button, which will deselect all selected steps.
The image below shows the music sequencer with some presets created:
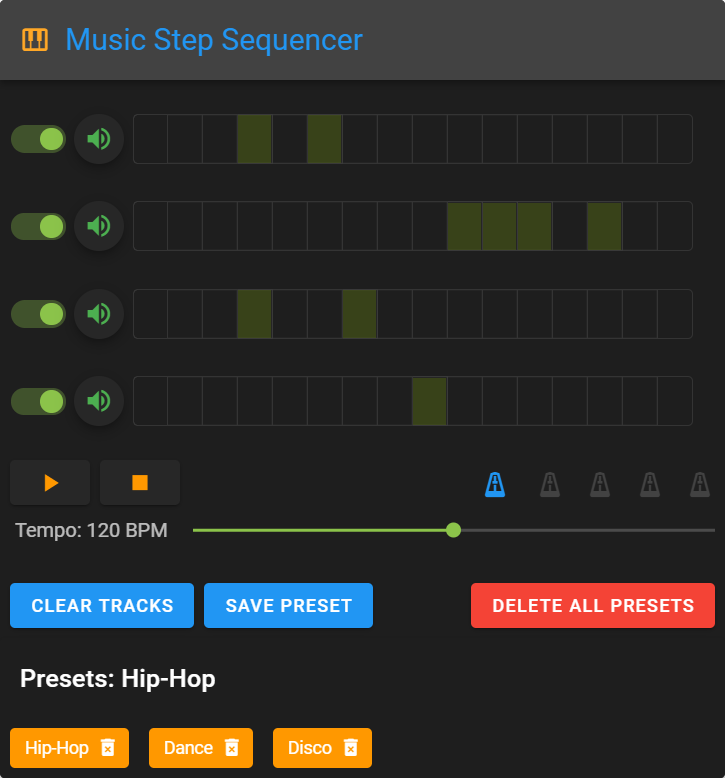
The saved presets are represented as a list of tags. To load a preset, we click the corresponding tag, and to delete it, we click the trash icon. We can also delete all presets at once by clicking the red button. The presets are stored in the user browser via the Web Storage API.
You can find the project’s source files at the GitHub repo and test the app on the demo page.
Note, before we get started, you need to make sure that you have Node.js, Vue, and Vue CLI installed on your machine. To do so, download the Node.js installer for your system and run it. For Vue CLI follow the instructions on its installation page.
To get started, let’s create a new Vue project:
vue create music-step-sequencer
When prompted to pick a preset, just leave the default one (which is already selected) and hit Enter. This will install a basic project with Babel and ESLint support.
The next step is to add Vuetify to the project:
cd music-step-sequencer
vue add vuetify
Vuetify also asks you to select a preset. Again, leave the default preset selected and hit Enter.
And finally, we need to add howler.js:
npm install howler
After we have all the necessary libraries installed, we need to clean up the default Vue project a bit. First, delete the HelloWorld.vue inside the src/components folder. Then, open App.vue and delete everything between <v-app> element. Also, delete the import statement and the registration of HelloWorld.vue component. Now we are ready to start building our new app.
We’ll build the app from top to bottom starting with the title bar which will look like this:

To create it, let’s add the following markup between the <v-app> element:
<v-card dark width="580" max-width="580" class="mx-auto">
  <v-toolbar color="grey darken-3">
    <v-icon class="orange--text text--lighten-1 mr-3">mdi-piano</v-icon>
    <v-toolbar-title class="blue--text headline">Music Step Sequencer</v-toolbar-title>
  </v-toolbar>
  <!-- Add <SoundTracks></SoundTracks> component here-->
  <!-- Add <SoundControls></SoundControls> component here-->
  <!-- Add <SoundPresets></SoundPresets> component here-->
</v-card>
We wrap our app in v-card component, and use the v-toolbar to create the title bar.
Now, it’s time to test what we’ve already done. Use the following command to run the project:
npm run serve
This will start the server and will serve the project at http://localhost:8080/. After you open it in your browser, you should see a blank page with the title bar we’ve just created. If all is good, let’s move on.
Before we start creating the app’s components, we need to set up the base audio functionality needed for the sequencer to work.
The first thing we need to do is to include four sound sample files – kick.mp3, snare.mp3, hihat.mp3, and shaker.mp3. So, let’s do this:
import { Howl } from "howler";
const kick = new Howl({src: ["https://raw.githubusercontent.com/codeknack/music-step-sequencer/master/src/assets/sounds/kick.mp3",],});
const snare = new Howl({src: ["https://raw.githubusercontent.com/codeknack/music-step-sequencer/master/src/assets/sounds/snare.mp3",],});
const hihat = new Howl({src: ["https://raw.githubusercontent.com/codeknack/music-step-sequencer/master/src/assets/sounds/hihat.mp3",],});
const shaker = new Howl({src: ["https://raw.githubusercontent.com/codeknack/music-step-sequencer/master/src/assets/sounds/shaker.mp3",],});
Here, we import the Howl object from howler.js and then use it to set up the sounds. The new Howl() function creates a sound object, which we can play, mute, etc.
Note, the reason I use external sound sources here is that the modern browsers have some restrictions about loading and playing audio files. So, local URLs won’t work. The solution is to use absolute URLs from real servers and also to allow automatic audio playing in your browser. For Chrome, click the icon before the
http://localhost:8080/in the address bar and choose Site settings. Then, navigate to Sound and change the selection from Automatic (default) to Allow.
Unfortunately for each browser the location of this setting and the actual words used to describe it differentiates. So, if you’re not using Chrome, you will need to use your favorite search engine to find the procedure for the browser you work in. To use your own audio files, just swap the URLs before the deployment with the appropriate links pointing to sounds from your project directory.
After we have added the sound samples, below them we create a new instance of the audio context let audioContext = new AudioContext(); . Then, in the Vue instance object we define the following properties:
data() {
  return {
    tempo: 120,
    tracks: {
      kick: [],
      snare: [],
      hihat: [],
      shaker: [],
    },
    futureTickTime: audioContext.currentTime,
    counter: 0,
    timerID: null,
    isPlaying: false,
  };
},
computed: {
  secondsPerBeat() {
    return 60 / this.tempo;
  },
  counterTimeValue() {
    return this.secondsPerBeat / 4;
  },
},
The tempo property defines the speed of audio playing. The tracks object contains the arrays, which will be used to define the selected steps for each track.
The futureTickTime, counter, and timerID will be used to loop through the steps in the soundtracks.
The secondsPerBeat and counterTimeValue computed properties calculate the time of a single step based on the tempo‘s value. For example, at tempo 120 BPM (beats per minute)secondsPerBeat will equals 0.5 (half second for each beat). When we divide this value by four in counterTimeValue, the result will be 0.125 (the duration of one step). So, when we change the tempo, the step’s duration will update accordingly.
Let’s now create the methods for scheduling, playing, and stopping the sounds:
 methods: {
  scheduleSound(trackArray, sound, counter) {
    for (var i = 0; i < trackArray.length; i += 1) {
      if (counter === trackArray[i]) {
        sound.play();
      }
    }
  },
}
The first method takes three parameters:
The method iterates through the track, and when the counter value and an array item match, the sound associated with the track is played.
The next method is to move the playback to the next step in the track:
playTick() {
  this.counter += 1;
  this.futureTickTime += this.counterTimeValue;
  if (this.counter > 15) {
    this.counter = 0;
  }
},
This method increments the counter by one and shifts the futureTickTime by adding the time of one step to it. If the counter becomes greater than 15, it starts over, and in that way, it loops through the 16 steps of the tracks.
The next method schedules the sounds, and loops the playback through the steps:
scheduler() {
  if (this.futureTickTime < audioContext.currentTime + 0.1) {
    this.scheduleSound(this.tracks.kick, kick, this.counter);
    this.scheduleSound(this.tracks.snare, snare, this.counter);
    this.scheduleSound(this.tracks.hihat, hihat, this.counter);
    this.scheduleSound(this.tracks.shaker, shaker, this.counter);
    this.playTick();
  }
  this.timerID = window.setTimeout(this.scheduler, 0);
},
The method checks if the futureTickTime is within a tenth of a second of the audioContext.currentTime, and if it’s true, the scheduleSound() runs for each sound. The playTick() runs once, moving the playback one step further. In the end, a setTimeout() — which runs the scheduler() recursively — is assigned to the timerID.
As we saw earlier, the playTick() increments the futureTickTime with the time of one step. The resulting value remains intact until the audioContext.currentTime catches up with it. Then the futureTickTime is incremented again with one step (in the next run of playTick()). All this “time racing” continues for as long as the scheduler() is allowed to run.
The next two methods are used to play and stop the playback:
play() {
  if (this.isPlaying === false) {
    this.counter = 0;
    this.futureTickTime = audioContext.currentTime;
    this.scheduler();
    this.isPlaying = true;
  }
},
If the sequencer is not playing, this method starts the scheduler() and sets the corresponding properties from the data object:
stop() {
  if (this.isPlaying === true) {
    window.clearTimeout(this.timerID);
    this.isPlaying = false;
  }
},
If the sequencer is playing, this method stops it by clearing the setTimeout() set previously in the timerID.
Now, the base audio functionality is set up. We’re ready to start creating the actual app components.
We’ll start with the component responsible for rendering the tracks. Here is how it will look:
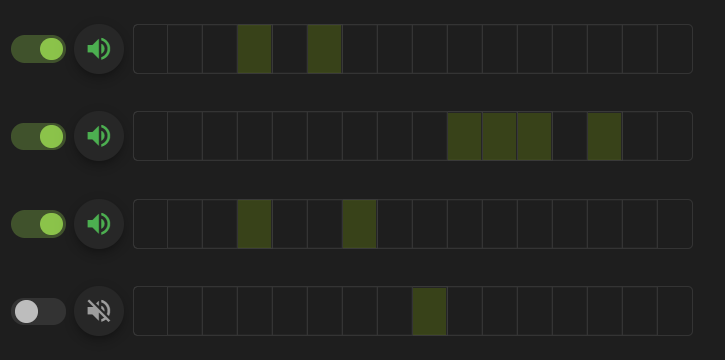
In the components folder, create a new SoundTracks.vue component with the following content:
<template>

</template>
<script>

export default {

}
</script>
Note, this is the starting template for each new component.
Next, let’s add the properties and methods we’ll need:
props: ["tracks"],
data() {
  return {
    toggles: {
      kick: true,
      snare: true,
      hihat: true,
      shaker: true,
    },
  };
},
methods: {
  playSound(sound) {
    this.$emit('playsound', sound);
  },
  muteSound(sound, toggle) {
    this.$emit('mutesound', {sound, toggle});
  }
}
We pass a prop tracks, which we’ll use to render the tracks. The playSound() method emits a playsound custom event and the actual sound — kick, snare, etc. The muteSound() method is similar but here the second argument is an object with the sound we want to mute/unmute and a toggle variable which determines the current state of the sound. As we have four individual sounds, we need four different toggle variables. Otherwise, the sounds will be muted/unmuted all together. That’s why we create the toggles object with a separate property for each track.
Now, let’s create the component’s template. Add the following markup inside the <template> element:
<v-container>
  <template v-for="(track, name) in tracks" >
    <v-row :key="name" align="center" dense>
      <v-col>
        <v-switch inset dense color="light-green"
          v-model="toggles[name]"
          @change="muteSound(name, toggles[name])"
        ></v-switch>
      </v-col>
      <v-col>
        <v-btn fab raised small @click="playSound(name)">
          <v-icon class="green--text" v-show="toggles[name]">mdi-volume-high</v-icon>
          <v-icon class="grey--text" v-show="!toggles[name]">mdi-volume-off</v-icon>
        </v-btn>
      </v-col>
      <v-col>
        <v-btn-toggle  v-model="tracks[name]" multiple>
          <v-btn color="lime accent-4" height="40" small icon
            v-for="n in 16" :key="n"
          ></v-btn>
        </v-btn-toggle>
      </v-col>
    </v-row>
  </template>
</v-container>
Here, we iterate over the tracks using v-for directive and create three columns.
v-switch component), which mute/unmute the sound for the corresponding trackv-button-toggle component to create a group of 16 toggle buttons representing the steps of the trackNow, let’s switch back to App.vue and add the following methods:
playSound(sound) {
  eval(sound).play()
},
muteSound(obj) {
  eval(obj['sound']).mute(!obj['toggle'])
},
The playSound() method plays the sound received from the child component.
The muteSound() method mutes/unmutes the sound received from the child component, depending on the toggle’s value.
The next thing to do is to include the component in the template:
<SoundTracks
  :tracks="tracks"
  @playsound="playSound"
  @mutesound="muteSound"
></SoundTracks>
We bind the tracks prop to the corresponding prop in the data object. We also add listeners to the playsound and mutesound events, which will run the playSound() and the muteSound() methods.
Lastly, we import the component and register it:
import SoundTracks from "./components/SoundTracks.vue";
...
components: {
  SoundTracks,
},
Now, the first component is completed. When we check if everything works properly, we can move on to the next one.
In this component, we’ll create all controls for playing and stopping the sequencer, changing the tempo, and running a metronome. Here is how it will look:

In the components folder, create new SoundControls.vue component and add the following properties and methods:
props: ['tempo', 'counter', 'isPlaying'],
data() {
  return {
    localTempo: this.tempo,
    metronome: 0,
  };
},
watch: {
  counter(val) {
    if (this.isPlaying) {
      if (val >= 0 && val <= 3) {
        this.metronome = 1;
      } else if (val > 3 && val <= 7) {
        this.metronome = 2;
      } else if (val > 7 && val <= 11) {
        this.metronome = 3;
      } else if (val > 11 && val <= 15) {
        this.metronome = 4;
      }
    }
  },
  tempo(val) {
    this.localTempo = val;
  }
},
methods: {
  play() {
    this.$emit("play");
  },
  stop() {
    this.$emit("stop");
    this.metronome = 0;
  },
  updateTempo() {
    this.$emit("update:tempo", this.localTempo);
  },
},
First, we pass three props from the parent, tempo, counter, and isPlaying. Next, we assign the tempo to a new local variable (localTempo), because it’s not recommended to mutate a prop directly from the child. We also add a metronome property needed for the metronome functionality.
We need to add watchers for two variables. We need to watch for the counter, because we need its current value in order to change/update the metronome‘s value. We also watch for the tempo in order to update the localTempo when the tempo in the parent changes.
The play() and stop() methods emit the corresponding events. And the latter also reset the metronome‘s value. TheupdateTempo() method emits an update event for the tempo and the localTempo‘s value.
Now, let’s put the necessary markup in the component’s template:
<div>
  <div class="d-flex justify-space-between">
    <div class="ml-2">
      <v-btn @click="play">
        <v-icon class="orange--text">mdi-play</v-icon>
      </v-btn>
      <v-btn @click="stop" class="ml-2">
        <v-icon class="orange--text">mdi-stop</v-icon>
      </v-btn>
    </div>
    <div class="d-flex align-center">
      <v-icon class="mr-3 blue--text">mdi-metronome-tick</v-icon>
      <v-rating
        full-icon="mdi-metronome"
        empty-icon="mdi-metronome-tick"
        color="green" background-color="grey darken-3"
        length="4" readonly
        v-model="metronome"
      ></v-rating>
    </div>
  </div>
  <div>
    <v-slider
      class="ml-3" color="light-green" dense
      max="180" min="60" step="10"
      v-model="localTempo"
      :label="'Tempo: ' + localTempo + ' BPM'"
      @click="updateTempo"
    ></v-slider>
  </div>
</div>
First, we create the play and stop buttons.
Then, we use the v-rating component to simulate a metronome. We set the length property to 4 because we have four beats in the sequencer. We add the readonly property to disable user interaction. And we bind it with the metronome‘s value.
Finally, we add a v-slider component for changing the tempo’s value. The slider is bound to the localTempo, so we can change the tempo safely without Vue warnings.
Now, let’s add the component in App.vue‘s template:
<SoundControls
  :tempo.sync="tempo"
  :counter="counter"
  :isPlaying="isPlaying"
  @play="play"
  @stop="stop"
></SoundControls>
Here, we bind the child props to the corresponding properties in the parent. We use the .sync modifier for the tempo to create two-way data binding between parent and child. We also set event listeners for running the play() and stop() methods, which we created earlier.
Lastly, we import the component and register it:
import SoundTracks from "./components/SoundTracks.vue";
import SoundControls from "./components/SoundControls.vue";
...
components: {
  SoundTracks,
  SoundControls,
},
Now, we can play with the controls to see if everything works as intended and then move on to the final component.
The last functionality left to create is the ability to save beats presets for later use. The component should look something like this:

The image above shows the component before the presets are created and saved. And the image below shows the component with a list of saved presets:

In the components folder, create a new SoundPresets.vue component and add the following properties and methods:
created() {
  this.userPresets = JSON.parse(localStorage.getItem('userPresets') || '{}');
},
props: ['currentPreset'],
data() {
  return {
    dialog: false,
    presetName: '',
    rules: {
      required: value => !!value || 'Required.',
      counter: value => value.length >= 3 || 'At least 3 characters required',
    },
    userPresets: {},
    selectedPreset: '',
  };
},
Here, we pass a currentPreset prop, which we’ll need to save new presets. We define dialog and presetName props needed for the modal for saving a preset, which we’ll create later. The rules prop will be used for validation of the preset name’s text field. The first rule checks to ensure that the text’s value is not empty and the second rule checks to ensure that it contains more than two characters. In both cases, if the check returns false, the specified error message appears.
We need a userPresets object to temporarily store the presets. We’ll use this object to render the presets. The last property we’ll need is selectedPreset, which is needed for displaying the currently selected preset.
Finally, we use the created() event hook to load previously saved presets if any.
Now, let’s create all necessary methods:
methods: {
  clearTracks() {
    this.$emit('cleartracks');
    this.selectedPreset = '';
  },
  loadPreset(preset) {
    this.$emit('loadpreset', preset);
    this.selectedPreset = preset;
  },
  savePreset() {
      this.dialog = false;
      this.userPresets[this.presetName] = {};
      let tracks = Object.assign({}, this.currentPreset.tracks);
      this.userPresets[this.presetName].tempo = this.currentPreset.tempo;
      this.userPresets[this.presetName].tracks = tracks;
      localStorage.setItem('userPresets', JSON.stringify(this.userPresets));
      this.presetName = '';
  },
  cancelDialog() {
    this.dialog = false;
    this.presetName = '';
  },
  deletePreset(preset) {
    this.$delete(this.userPresets, preset);
    localStorage.setItem('userPresets', JSON.stringify(this.userPresets));
    if (preset == this.selectedPreset) {
      this.selectedPreset = '';
    }
  },
  deleteAllPresets() {
    localStorage.clear();
    this.userPresets = {};
  },
  isEmpty(obj) {
    return Object.entries(obj).length === 0;
  }
}
Let’s explain the above methods one by one:
clearTracks() emits a cleartracks event, and resets the selectedPresetloadPreset() emits a loadpreset event and the current preset’s name. It also assigns the latter to the selectedPresetsavePreset() closes the modal by changing the dialog prop to false. It creates a new empty object for the preset we want to save. Then, it defines a tracks variable and assigns a copy of the tracks object to it. (This is needed because otherwise the same object is referenced which leads to saving one and the same object for each new preset.) Next, we assign the tempo and tracks properties to the new preset object. Then it saves the updated userPresets object in the local storage. Lastly, it resets the presetNamecancelDialog() fires on clicking the Cancel button. It closes the modal and resets the presetNamedeletePreset() deletes a preset and updates the storage. If we delete the currently selected preset, then we reset the selectedPreset property upon deletiondeleteAllPresets() deletes all saved user presets in the storage and empties the userPresets objectisEmpty() is a utility method checking if an object is emptyLet’s now start creating the component’s template:
<div>
  <div class="d-flex ma-2">
    <v-btn color="blue" @click="clearTracks">
      Clear Tracks
    </v-btn>
    <v-btn class="ml-2" color="blue" @click.stop="dialog = true">
      Save Preset
    </v-btn>
    <v-spacer></v-spacer>
    <v-btn color="red" @click="deleteAllPresets">
      Delete All Presets
    </v-btn>
  </div>
  ...
</div>
Here, we create the buttons for clearing the tracks, saving a preset, and deleting all presets. In the Save Preset’s click event listener, we use the .stop modifier to stop the event’s propagation.
Let’s add the next portion of the template:
<v-card>
  <v-card-title>Presets: {{selectedPreset}}</v-card-title>
  <v-slide-y-transition>
  <v-card-text v-show="isEmpty(userPresets)" class="grey--text font-italic text-center text-caption">Currently there are no presets created. To create a new preset fill in some cells in the tracks and hit the Save Preset button.</v-card-text>
  </v-slide-y-transition>
  <v-scroll-y-transition>
    <div v-if="!isEmpty(userPresets)">
      <v-chip
        close close-icon="mdi-delete-forever"
        @click:close="deletePreset(name)"
        class="ma-2" color="orange" label
        v-for="(preset, name) in userPresets" :key="name"
        @click="loadPreset(name)"
      > {{name}}
      </v-chip>
    </div>
  </v-scroll-y-transition>
</v-card>
...
Here, we create a presets list. In the top, we add a title Presets: followed by the name of the currently selected preset, if such exists. Below, we set a message shown if there are no presets. We use the isEmpty() to check if presets exist. If presets exist, the message hides, and the presets are rendered. Each preset is rendered as a v-chip component with a delete icon. Clicking the preset loads it into the tracks. Clicking the trash icon deletes the preset.
And the last part of the template is the markup for the modal dialog:
<v-dialog v-model="dialog" max-width="290" light persistent>
  <v-card light rounded>
    <v-card-title class="headline blue--text">Save preset as:</v-card-title>
      <v-text-field
        class="ma-2" label="Preset Name"
        placeholder="Type preset name here"
        v-model="presetName"
        :rules="[rules.required, rules.counter]"
      ></v-text-field>
    <v-card-actions>
      <v-spacer></v-spacer>
      <v-btn color="green lighten-2" text @click="cancelDialog">
        Cancel
      </v-btn>
      <v-btn color="green darken-2" text @click="savePreset" :disabled="!(presetName.length >=3)">
        Save
      </v-btn>
    </v-card-actions>
  </v-card>
</v-dialog>
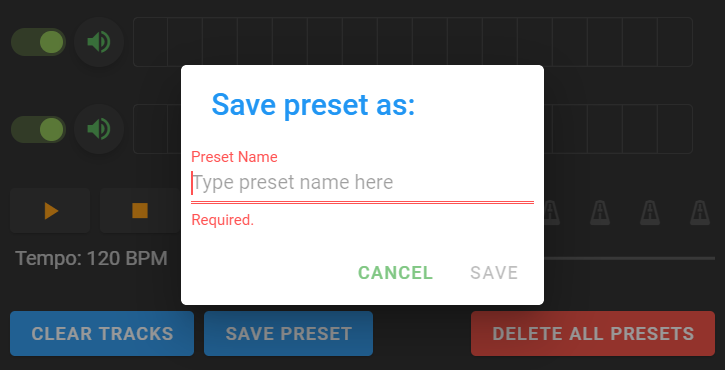
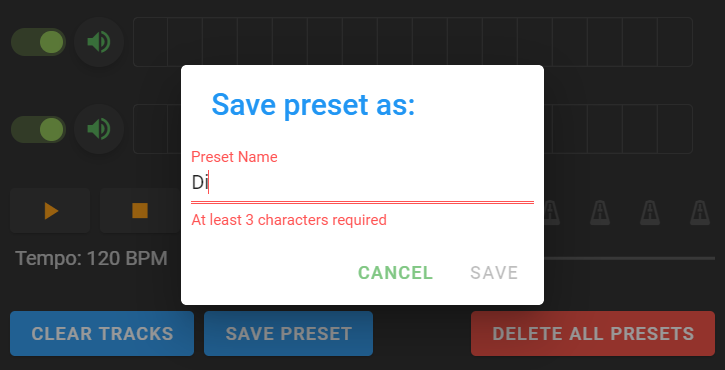
Here, we use the v-text-field component and bind it with the validation rules created before. Then we add Cancel and Save buttons. To prevent saving a preset without a specified name the Save button is disabled when the length of the text field’s value is less than three characters.
Here, you can see the modal with the first validation rule failed:
And here, the modal is with the second validation rule failed:
Now, let’s switch to App.vue and add the currentPreset computed property which represents the current state of the tracks and tempo:
currentPreset() {
  return {
    tempo: this.tempo,
    tracks: this.tracks
  };
}
Next, we need to add the methods for clearing the tracks and loading a preset:
clearTracks() {
  this.tracks =  {
    kick: [],
    snare: [],
    hihat: [],
    shaker: [],
  }
},
loadPreset(preset) {
  let presets = JSON.parse(localStorage.getItem('userPresets'));
  this.tempo = presets[preset].tempo;
  this.tracks = presets[preset].tracks;
},
clearTracks empties the arrays of the tracksloadPreset creates a new presets variable and assigns to it the presets fetched from the local storageuserPresets object because the latter is passed by reference. Then, it updates the tempo and tracks properties with the values of the selected presetNext, we include the component in the template:
<SoundPresets
  :currentPreset="currentPreset"
  @cleartracks="clearTracks"
  @loadpreset="loadPreset"
></SoundPresets>
Lastly, we import the component and register it:
import SoundTracks from "./components/SoundTracks.vue";
import SoundControls from "./components/SoundControls.vue";
import SoundPresets from "./components/SoundPresets.vue";
...
components: {
  SoundTracks,
  SoundControls,
  SoundPresets
},
Et voila! We’ve finished our project successfully.
Congrats! You have just built a fully functional music step sequencer. As you just saw, Vue can be easily combined with both Vue-based projects and vanilla JavaScript libraries to build any functionality we want. This gives you the freedom to create a wide range of projects with ease.
Debugging Vue.js applications can be difficult, especially when users experience issues that are difficult to reproduce. If you’re interested in monitoring and tracking Vue mutations and actions for all of your users in production, try LogRocket.

LogRocket lets you replay user sessions, eliminating guesswork by showing exactly what users experienced. It captures console logs, errors, network requests, and pixel-perfect DOM recordings — compatible with all frameworks.
With Galileo AI, you can instantly identify and explain user struggles with automated monitoring of your entire product experience.
Modernize how you debug your Vue apps — start monitoring for free.

Explore Shadcn UI, a reusable component collection. See its features, pros, cons, and more to determine if you should use it in your project.

Cache components change how rendering decisions are made in Next.js, allowing static and dynamic UI to coexist on the same page without blocking the initial render.

A practical walkthrough of building local-first, privacy-preserving AI agents using small language models.
async/await in TypeScriptTypeScript’s async/await lets you write asynchronous code that reads like synchronous code, making it easier to understand, maintain, and reason about.
Would you be interested in joining LogRocket's developer community?
Join LogRocket’s Content Advisory Board. You’ll help inform the type of content we create and get access to exclusive meetups, social accreditation, and swag.
Sign up now