The Spotify engineering team recently released a new open-source tool called Backstage. While the initial release is still very much a work in progress, the tool has a lot of potential to fill a gap in developer tooling that many engineering teams may not even realize could help them.

The Replay is a weekly newsletter for dev and engineering leaders.
Delivered once a week, it's your curated guide to the most important conversations around frontend dev, emerging AI tools, and the state of modern software.
Developed by the Spotify engineering team, Backstage is an open-source platform used for building developer portals. It is based on an internal tool Spotify uses to help organize development tools, documentation, and processes that new developers need to be aware of when developing a new app or API.
Simply put, Backstage helps you build developer productivity tools. The idea behind Backstage is that it helps reduce the cognitive load on a new developer by pulling together commonly required resources into one browser-based user interface.
Think about all the things you need to familiarize yourself with when you start developing something for a new organization. Is there a standard set of design patterns, frameworks, and programming languages that you are expected to use? Where can you find documentation about the organization’s APIs that you may need to consume? How and where can or should you deploy your solution?
You can help your developers answer these types of questions by building your own custom instance of Backstage, using the growing library of existing plugins or building your own plugins.
Note: Keep in mind that Backstage is still very new. In fact, the initial alpha version was released on 16 March 2020. Don’t expect a full ecosystem of plugins just yet. Do, however, expect a clean solution, fresh UI, thoughtful documentation, and a potential for something great.
Some of the examples in this article could become stale rather quickly, so always refer to the official documentation when in doubt.
Before we get hands-on with Backstage, let’s look at a few tools and frameworks that are fundamental to the Backstage implementation.
Let’s get started with Backstage by creating a new instance of it to explore what is included out of the box. There is a Backstage CLI (an npm package) we can use to quickly create a new Backstage workspace.
Note: You will need Node.js 12 installed to use the Backstage CLI.
Open a terminal and navigate to a folder on your computer where you want to create a new Backstage workspace. Run the following commands to install the CLI and run it. You only need to provide a name for your Backstage instance at this point.
> npm install -g @backstage/cli
> backage-cli create-app
> Enter a name for the app [required] brian-backstage

Creating the app...

 Checking if the directory is available:
  checking      brian-backstage ✔

 Creating a temporary app directory:
  creating      temporary directory ✔

 Preparing files:
 ...

 Moving to final location:
  moving        brian-backstage ✔

 Building the app:
  executing     yarn install ✔
  executing     yarn tsc ✔
  executing     yarn build ✔

Successfully created brian-backstage
The build step may take some time to complete. Once complete, navigate into the folder that was just created and start the app for the first time. For example:
cd brian-backstage
npm start
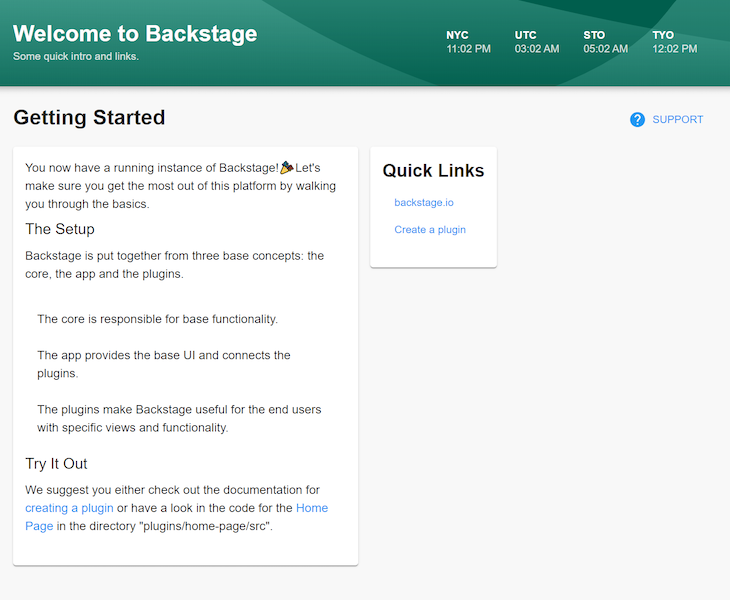
You should now be able to see your Backstage instance in the browser, running at http://localhost:3000. It will look something like this:

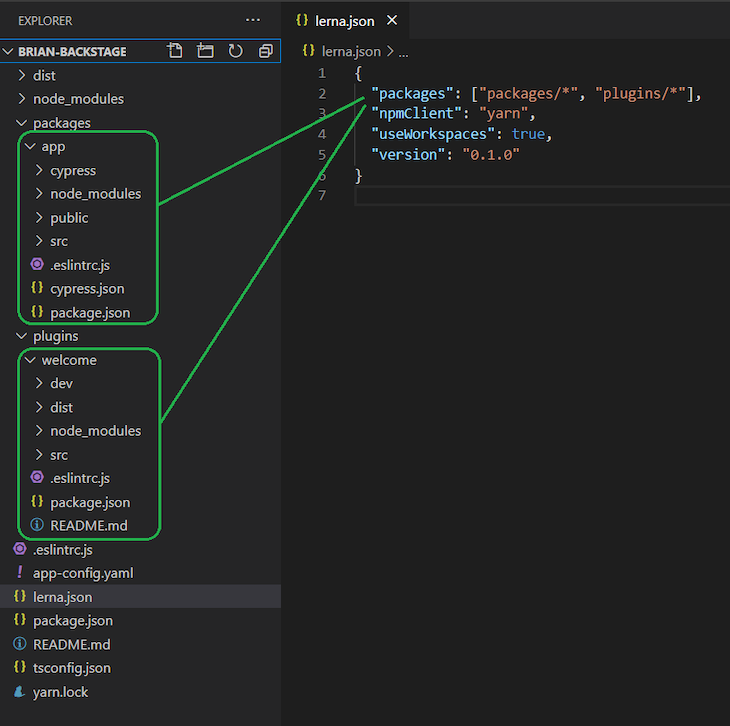
Backstage is structured as a monorepo. Everything you need to build an instance is included in a single repository. This simplifies the developer experience while allowing Backstage to have a plugin architecture where each plugin can be built, tested, and shared independently. Here is what the monorepo structure looks like:

The source for the main Backstage UI is found in the packages/app folder, and plugins can be found in the plugins folder. Notice that the app folder and each of the plugin folders are independent npm packages complete with their own package.json. This structure is possible thanks to Lerna and Yarn. These two tools come together to create a seamless monorepo structure.
Yarn’s workspace feature allows a single repository to contain the source for multiple npm packages. In Yarn terminology, a workspace is a folder containing an npm package. The list of folders considered to be Yarn workspaces is defined in the top-level package.json like this:
  "workspaces": {
    "packages": [
      "packages/*",
      "plugins/*"
    ]
  },
This configuration tells Yarn that any child folders within the packages and plugins folders are separate workspaces containing npm packages. Creating dependencies between these npm packages is as easy as referencing them as a normal npm package. For example:
// packages/app/src/plugins.ts
export { plugin as HelloworldPlugin } from '@backstage/plugin-helloworld-plugin';
Lerna provides the CLI commands to build, test, and lint all of the packages in the monorepo as one unit. Its configuration can be found in lerna.json:
{
  "packages": ["packages/*", "plugins/*"],
  "npmClient": "yarn",
  "useWorkspaces": true,
  "version": "0.1.0"
}
Similar to Yarn, Lerna’s configuration specifies a set of folders that contain npm packages. It also specifies that Yarn should be used as the npm client and the Yarn workspaces feature should be used.
The scripts defined in package.json provide a good demonstration of where Yarn and Lerna fit into the build process:
 "scripts": {
    "start": "yarn workspace app start",
    "bundle": "yarn workspace app bundle",
    "build": "lerna run build",
    "tsc": "tsc",
    "clean": "backstage-cli clean && lerna run clean",
    "diff": "lerna run diff --",
    "test": "lerna run test --since origin/master -- --coverage",
    "test:all": "lerna run test -- --coverage",
    "lint": "lerna run lint --since origin/master --",
    "lint:all": "lerna run lint --",
    "create-plugin": "backstage-cli create-plugin",
    "remove-plugin": "backstage-cli remove-plugin"
 },
Lerna is used for any of the scripts that should be run against the multiple workspaces. For example, when we run npm test, we want to run tests for the app and all of the plugins at the same time:
$ npm test
> [email protected] test D:\brian-backstage
> lerna run test -- --coverage

lerna notice cli v3.22.1
lerna info Executing command in 3 packages: "yarn run test --coverage"
lerna info run Ran npm script 'test' in 'plugin-welcome' in 81.7s:
yarn run v1.22.4
$ backstage-cli test --coverage
...
Note: If you have not pushed your Backstage workspace into a remote repository such as GitHub, then some of the out-of-the-box Lerna scripts will fail.
These scripts are designed to consider whether your local code differs from what is in your remote repository. If you don’t want to push your code to a remote repository, remove the --since origin/master from the script.
The Backstage CLI lets you quickly generate a new plugin. Run the following command within the root of the repository and provide a name for the plugin:
backstage-cli create-plugin
Enter an ID for the plugin [required] helloworld-plugin
The CLI will create a new plugin under the plugins folder. It wires up the plugin into the Backstage app. For example, you will notice a new route has been set up in plugins/helloworld-plugin/src/plugin.tsx:
export const rootRouteRef = createRouteRef({
path: '/helloworld-plugin',
title: 'helloworld-plugin',
});
Your plugin’s main component, ExampleComponent, is available at the /helloworld-plugin path by default. Start your server with npm start and navigate to http://localhost:3000/helloworld-plugin to view your plugin. Try changing the title of the plugin by modifying the ExampleComponent component.
The Spotify engineering team has made several plugins available in the main Backstage GitHub repo already. Some of these plugins consist of frontend and backend packages. Incorporating these plugins is almost as easy as running a Yarn command: yarn add @backstage/plugin-tech-radar.
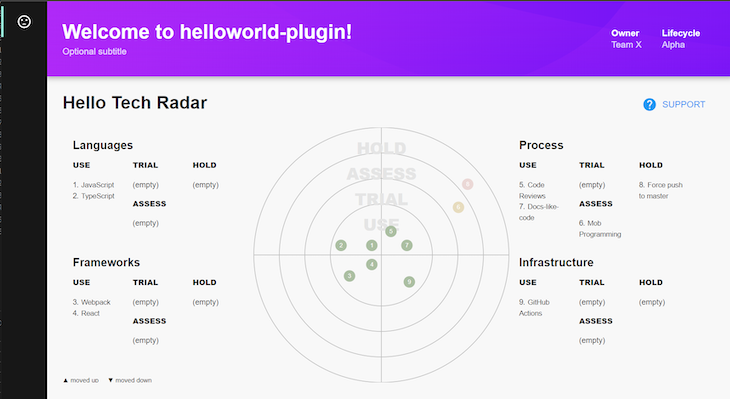
Let’s take a look at how to add the Tech Radar plugin. This plugin renders a visualization of your organization’s standardized technologies. The data that drives the visualization can be provided from an external API, but for this example, we will use the sample data that comes built into the plugin.
There are actually two ways to use the Tech Radar plugin. There is a “simple configuration” that lets you install it as a normal Backstage plugin, and there is an “advanced configuration” that lets you reuse the Tech Radar visualization as a normal React component within your own custom plugin.
Let’s try the advanced configuration option and incorporate the Tech Radar visualization into the hello world plugin that we just created. First you need to add the Tech Radar npm package to the plugin. Navigate into the plugin’s subdirectory and install the package:
cd plugins/helloworld-plugin
yarn add @backstage/plugin-tech-radar
Replace the contents of plugins\helloworld-plugin\src\components\ExampleComponent.tsx with the following code:
import React, { FC } from 'react';
import { Grid } from '@material-ui/core';
import { Header, Page, pageTheme, Content, ContentHeader, HeaderLabel, SupportButton } from '@backstage/core';
import { TechRadarComponent } from '@backstage/plugin-tech-radar';

const ExampleComponent: FC<{}> = () => (
  <Page theme={pageTheme.tool}>
    <Header title="Welcome to helloworld-plugin!" subtitle="Optional subtitle">
      <HeaderLabel label="Owner" value="Team X" />
      <HeaderLabel label="Lifecycle" value="Alpha" />
    </Header>
    <Content>
      <ContentHeader title="Hello Tech Radar">
        <SupportButton>A description of your plugin goes here.</SupportButton>
      </ContentHeader>
      <Grid container spacing={3} direction="column">
        <Grid item>
          <TechRadarComponent width={1000} height={400} />
        </Grid>
      </Grid>
    </Content>
  </Page>
);

export default ExampleComponent;
Line 4 imports the TechRadarComponent React UI component, and line 18 renders it. You will notice that we are specifying minimal props on the component — just width and height. The authors of this component included a rich set of sample data that is shown by default if a data source is not provided. You can provide your own data by specifying your own function on the getData prop. Check out the Tech Radar component API here.
When you run your app and access your hello world plugin, it should look something like this:

We looked at how Backstage is structured, and how to create a new instance of it, build it, and run it. We also looked at how to create a custom plugin and reuse existing plugins.
At this point, you may want to deploy what you have. One deployment option is to containerize and deploy your instance as a Docker container. The Spotify engineering team’s instance of Backstage serves as a great demonstration of how to do this. Check out their Dockerfile to get started and you will be deployed in no time.
Install LogRocket via npm or script tag. LogRocket.init() must be called client-side, not
server-side
$ npm i --save logrocket

// Code:

import LogRocket from 'logrocket';
LogRocket.init('app/id');
// Add to your HTML:

<script src="https://cdn.lr-ingest.com/LogRocket.min.js"></script>
<script>window.LogRocket && window.LogRocket.init('app/id');</script>

Compare the top AI development tools and models of February 2026. View updated rankings, feature breakdowns, and find the best fit for you.

Broken npm packages often fail due to small packaging mistakes. This guide shows how to use Publint to validate exports, entry points, and module formats before publishing.

Discover what’s new in The Replay, LogRocket’s newsletter for dev and engineering leaders, in the February 11th issue.

Cut React LCP from 28s to ~1s with a four-phase framework covering bundle analysis, React optimizations, SSR, and asset/image tuning.
Would you be interested in joining LogRocket's developer community?
Join LogRocket’s Content Advisory Board. You’ll help inform the type of content we create and get access to exclusive meetups, social accreditation, and swag.
Sign up now
One Reply to "Build better developer portals with Spotify’s Backstage"
Great article