Database systems are an integral part of software development. A software developer needs to be skilled in working with databases irrespective of the programming language of choice. Most programming languages have various tools/packages that make working with database management systems easy for developers. Some of these tools are native to the programming language, others are built/maintained by the community of developers around the language and made available for free use.

The lack of a graph-based ORM(Object-relational mapping) for the Go programming language led a team of developers at Facebook to create ent. Ent is an entity framework typically used for modeling data in a graph-based structure. The ent framework prides itself on its ability to model data as Go code unlike many other ORM’s that model data as struct tags. Due to the graph-based structure of the ent framework, querying data stored in the database can be done with ease and takes the form of graph traversal. ent comes with a command-line tool which we can use to automatically generate code schema and get a visual representation of the schema.
In this post, we will explore all the cool features of the ent framework and build a simple CRUD API that leverages the various functionalities of ent.
The Replay is a weekly newsletter for dev and engineering leaders.
Delivered once a week, it's your curated guide to the most important conversations around frontend dev, emerging AI tools, and the state of modern software.
To follow along while reading this article, you will need:
The first step in working with the ent framework is to install it into our project. To install ent, run the following command go get github.com/facebook/ent/cmd/entc. The command will install entc the command-line tool for the ent package.
Throughout this article, we will build a simple CRUD(Create, Read, Update, and Delete) API that leverages ent. The API will contain five endpoints, the purpose of building this API is to show how to perform common create, read, update, and delete operations on a database using ent.
To get started, create the needed files and folders to match the tree structure below:
├── handlers/
│ ├── handler.go
├── database/
│ ├── db.go
└── main.go
main.go file will contain all of the logic related to creating the server for the API. We will be using fiber, the express style framework for Go to quickly wire up our API endpoints. This article is a great start on fiberdb.go file in the database directory will contain code related to creating a database connection and a clienthandler.go file will house the API handlersIn the next section, we will start building the API and explore ent.
To get started with the project, run go mod init in the root directory of the project. This will initialize a new project with Go modules. Next, we have to install fiber, the framework we will use in building the API, by running the following command in the root directory of the project github.com/gofiber/fiber/v2.
In building the API for an imaginary note-taking application, we will need the following endpoints:
In the main.go file, add the following lines of code:
package main

import (
   "fmt"

   "github.com/gofiber/fiber/v2"
)

func Routes(app *fiber.App){
   api := app.Group("/api/v1")

   api.Get("/", func(c *fiber.Ctx) error {
      return c.SendString("Hello, World!")
   })
}

func main() {
   app := fiber.New()

   Routes(app)

   err := app.Listen(":3000")
   if err != nil {
      fmt.Println("Unable to start server")
   }
}
The above code creates a simple web server. At the moment only one endpoint is wired up, in the coming sections we will be working in the handler.go files to ensure that all the API endpoints are functional. For now, you can run the above file and visit localhost:3000/api/v1/ on your browser. If everything went well, you should see “hello world” printed out.
Creating a schema with ent is easy, thanks to entc the command-line tool we installed up above. For our API, we will create a schema called notes, to create the schema run entc init Notes in the root of the project directory. This command will automatically generate our Notes schema. The code related to the schema can be found in ent/schema/notes.go. At this point, the schema is empty and does not contain any fields. For our API, our schema will have four fields:
To define fields in our schema, we use the fields sub package provided by ent, inside the Field function. We invoke the type of the field, passing in the name of the desired schema field like this:
field.String("Title")
For our API, we will specify the title, content, and private fields as properties of our schema. ent currently supports all Go numeric types, string, bool, and time.Time! After adding the fields to the schema our notes.go file should look like this:
package schema

import (
   "time"

   "github.com/facebook/ent"
   "github.com/facebook/ent/schema/field"
)

// Notes holds the schema definition for the Notes entity.
type Notes struct {
   ent.Schema
}

// Fields of the Notes.
func (Notes) Fields() []ent.Field {
   return []ent.Field{
      field.String("Title").
         Unique(),
      field.String("Content"),
      field.Bool("Private").
         Default(false),
      field.Time("created_at").
         Default(time.Now),
   }
}

// Edges of the Notes.
func (Notes) Edges() []ent.Edge {
   return nil
}
The field subpackage also provides helper functions for verifying the field input as seen in the snippet above. A comprehensive list of all the built-in validators can be found here. Now that we have added the necessary fields, we can go ahead and generate some assets for working with the database.
ent automatically generates assets that include CRUD builders, and an entity object. To generate the assets, run the following command in the root of the project directory go generate./ent, You will notice that a bunch of files will be added to the /ent directory of our project. The added files contain code related to the generated assets. In the coming sections, we will learn how to use some of these generated assets to perform CRUD operations and continue building the notes API.
entc, the command-line tool for the ent framework enables us to get a visual representation of the schema right in the terminal. To visualize the schema, simply run the following command entc describe./ent/schema in the root of the project directory, you should see a visual representation of the notes schema similar to the image below.

ent provides us with functionality for connecting to a couple of databases including PostgreSQL. In the database.go file, we create an init function that connects to a database using the ent.Open function and returns a client of type ent.Client. The Open function takes in the name of the database and its connection string.
For the API we are building, we will be using a PostgreSQL database. To get started, we will spin up a docker instance of Postgres and connect to it from our local machine in three easy steps.
To follow along, you must have docker installed on your local machine.
docker run -d -p 5432:5432 --name postgresDB -e POSTGRES_PASSWORD=mysecretpassword postgres
The above command will download the official docker image for Postgres and ensure the container is running.
docker exec -it my-postgres bash
\c and input the passwordNow that we have wired up the database container, the next thing that is needed is to import a driver for PostgreSQL as a side effect into our project. To install the driver, run go get github.com/lib/pq in the root of the project directory. With everything set up, add the following lines of code to the database.go file:
var EntClient *ent.Client
func init() {
//Open a connection to the database
   Client, err := ent.Open("postgres","host=localhost port=5432 user=postgres dbname=notesdb password=mysecretpassword sslmode=disable")
   if err != nil {
      log.Fatal(err)
   }

   fmt.Println("Connected to database successfully")
   defer Client.Close()
// AutoMigration with ENT
   if err := Client.Schema.Create(context.Background()); err != nil {
      log.Fatalf("failed creating schema resources: %v", err)
   }
   EntClient = Client
}
Performing create operations/saving to a database is made easy with the ent framework. In this section, we will add the create note endpoint which will be responsible for saving new notes to the database.
To get started, in the handler.go file we create a function called createNotes that implements fibers handler interface. Inside the createNotes function, we parse the request body using the body parser function provided by fiber.
ent has helper methods that were automatically generated by entc, its command-line tool. We invoke the setTitle and setContent methods, passing in their respective values as type string. Lastly, to ensure the data is saved, we invoke the save method passing in a context value:
func CreateNote(c *fiber.Ctx) error{
//Parse the request body
note := new(struct{
Title string
Content string
Private bool
})
if err := c.BodyParser(¬e); err != nil {
c.Status(400).JSON("Error Parsing Input")
return err
}
//Save to the database
createdNote, err := database.EntClient.Notes.
Create().
SetTitle(note.Title).
SetContent(note.Content).
SetPrivate(note.Private).
Save(context.Background())
if err != nil {
c.Status(500).JSON("Unable to save note")
return err
}
//Send the created note back with the appropriate code.
c.Status(200).JSON(createdNote)
return nil
}
At this point, we are all set and have added the logic for creating a new entity. To register the above handler simply add the following line of code to the routes function we created up above in the main.go file:
api.Post("/createnote", handlers.CreateNote)
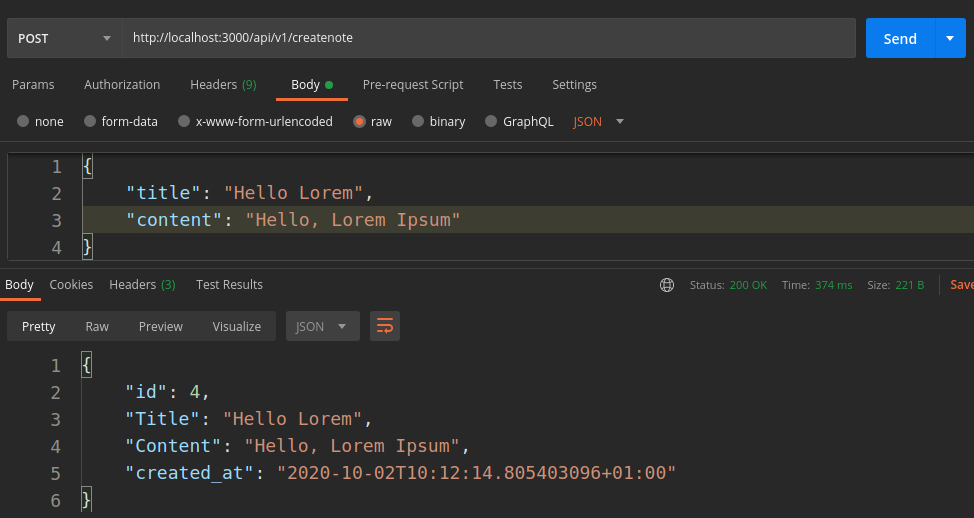
If we start the application and make a post request to localhost:3000/api/v1/createnote, passing in a title and content for a note you should see an output similar to the image below indicating that the note has been successfully created.

Querying the database is made easy with ent. entc generates a package for each schema that contains useful assets for searching the database. On the client for interacting with the automatically generated builders, we invoke the Query function. This function returns a query builder for the schema, part of the builders include Where and Select.
In this section, we will code up the logic for two endpoints:
/api/v1/readnotes/ – This endpoint will enable us to read all the notes in the database/searchnotes/:title – This endpoint enable us to search the database for a specific note by titleWe will get started by building the /api/v1/readnotes/ endpoint. In the handlers.go file, we create a handler function called ReadNotes similar to the createnote function above that implements the fibers handler interface. In the ReadNotes function, we invoke Query on the EntClient variable. To specify that we want all the records that match the query, we invoke All on the query builder. At this point the complete ReadNotes function should look similar to this:
func ReadNote(c *fiber.Ctx) error{
   readNotes, err := database.EntClient.Notes.
      Query().
      All(context.Background())
   if err != nil {
      c.Status(500).JSON("No Notes Found")
      log.Fatal(err)
   }
   c.Status(200).JSON(readNotes)
   return nil
}
The ReadNotes handler function is ready, we can now go ahead and register it on the server by adding the following line to the Routes function in main.go:
api.Get("/readnotes", handlers.ReadNote)
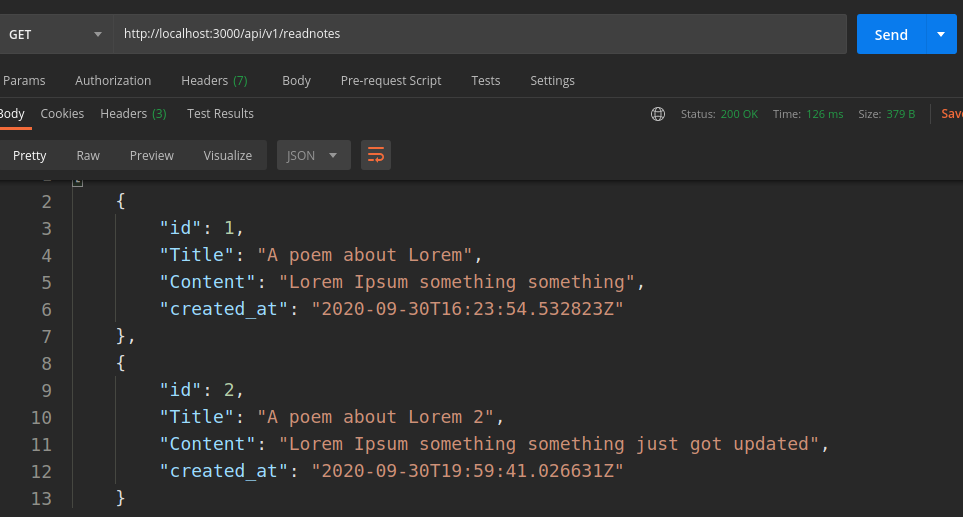
We can now start up our application and visit the route /api/v1/readnotes/ to test it. If everything went well, you should see an array containing all the notes in the database as seen in the image below:

The readnotes endpoint for reading all the notes stored in the database has been wired up, next we will wire up the searchnotes endpoint that will search the database for any notes whose title match up with the search query. Just like we have done for every handler till this point, we create a function called SearchNotes.
In this function, we retrieve the search query which was passed as a request parameter using fibers built-in params method. Next, we invoke the Query builder method on the client as we did for the ReadNotes function. To specify the search query, we invoke another method called where, the where method adds a new predicate to the query builder. As an argument to the where method we can pass in the title predicate which was automatically generated by entc:
func SearchNotes(c *fiber.Ctx) error{
//extract search query
   query := c.Params("title")
   if query == "" {
      c.Status(400).JSON("No Search Query")
   }
 //Search the database
   createdNotes, err := database.EntClient.Notes.
      Query().
      Where(notes.Title(query)).
      All(context.Background())

   if err != nil {
      c.Status(500).JSON("No Notes Found")
      log.Fatal(err)
   }

   c.Status(200).JSON(createdNotes)
   return nil
}
Lastly, we can register the SearchNotes function by adding the following line of code to the main.go file:
api.Get("/searchnotes/:title", handlers.SearchNotes)
We are done with the searchnotes endpoint and can test it by starting up the application and visiting localhost:3000/api/v1/searchnotes/Lorem. If everything went well, you should see a note titled Lorem returned if it exists in the database.
When building an API, it is important to provide functionality for updating a record in a database as it fits your business logic. ent makes updating a record easy, thanks to all the generated assets that contain builder functions. In this section, we will build out the update route for our notes API and learn how to update a record with ent.
To get started, we head over to the handlers.go file and create a function called UpdateNotes. This function, like other functions in the handler.go file implements fiber’s handler interface. In the UpdateNotes function, we parse the request body to ensure that only the content field can be updated. Next, we retrieve the ID of the record to be updated from the query parameter by invoking the params function with the key. Since we retrieve query parameters with fibers as type string, we have to convert the retrieved parameter to Int that corresponds to the type stored in the database using the Atoi function available in the strconv package.
To update the record, we call the function UpdateOneId and pass in the ID we retrieved from the user up above. Calling the UpdateOneId function returns an update builder for the given ID. Next, we call the setContent function. The setContent was automatically generated based on the schema and fields we declared up above. The setContent function takes in the specified update to the content field of our schema. Finally, we can save the updated record by calling the Save function with a context:
func UpdateNote(c *fiber.Ctx) error{
//Parse the request Body
note := new(struct{
Content string
})
if err := c.BodyParser(¬e); err != nil {
c.Status(400).JSON("Error Parsing Input")
return err
}
//Extract & Convert the request parameter
idParam := c.Params("id")
if idParam == "" {
c.Status(400).JSON("No Search Query")
}
id, _ := strconv.Atoi(idParam)
//Update the note in the database
UpdatedNotes, err := database.EntClient.Notes.
UpdateOneID(id).
SetContent(note.Content).
Save(context.Background())
if err != nil {
c.Status(500).JSON("No Notes Found")
log.Fatal(err)
}
c.Status(200).JSON(UpdatedNotes)
return nil
}
With the UpdateNote function looking like this, we are good to go and can register the handler by adding the following line of code to the Routes function:
api.Put("/updatenote/:id", handlers.UpdateNote)
Making a put request to the above route and providing a valid record ID, updates the corresponding record.
Deleting a record is similar to the update operation, however, when deleting a record with ent, different functions are used. To delete a record the DeleteOneId function that receives an ID returns a delete builder for the given user is used. We also invoke the Exec function. Exec takes in a context and executes the delete operation on the database:
func DeleteNotes(c *fiber.Ctx) error{
   idParam := c.Params("id")
   if idParam == "" {
      c.Status(400).JSON("No Search Query")
   }

   id, _ := strconv.Atoi(idParam)
//Delete the Record frm the databse
   err := database.EntClient.Notes.
      DeleteOneID(id).
      Exec(context.Background())

   if err != nil {
      c.Status(500).JSON("Unable to Perform Operation")
   }

   c.Status(200).JSON("Success")

   return nil
}
We can register the above handler function by adding the following line of code to the route function in the handler.go file:
api.Delete("/deletenote/:id", handlers.DeleteNotes)
The deletenote route is all set! You can now delete any note in the database by specifying its ID.
So far, we have built an API for a note-taking application using the ent framework to interact with a PostgreSQL database. We didn’t have to write any SQL queries or worry so much about the logic for performing the CRUD operations, thanks to ent and the assets generated by entc. This article aims to get you up and running with ent. I strongly recommend you check out the official documentation as a reference guide. The complete source code for this project can be found here.
Install LogRocket via npm or script tag. LogRocket.init() must be called client-side, not
server-side
$ npm i --save logrocket

// Code:

import LogRocket from 'logrocket';
LogRocket.init('app/id');
// Add to your HTML:

<script src="https://cdn.lr-ingest.com/LogRocket.min.js"></script>
<script>window.LogRocket && window.LogRocket.init('app/id');</script>

@container scroll-state: Replace JS scroll listeners nowCSS @container scroll-state lets you build sticky headers, snapping carousels, and scroll indicators without JavaScript. Here’s how to replace scroll listeners with clean, declarative state queries.

Explore 10 Web APIs that replace common JavaScript libraries and reduce npm dependencies, bundle size, and performance overhead.

Russ Miles, a software development expert and educator, joins the show to unpack why “developer productivity” platforms so often disappoint.

Discover what’s new in The Replay, LogRocket’s newsletter for dev and engineering leaders, in the February 18th issue.
Would you be interested in joining LogRocket's developer community?
Join LogRocket’s Content Advisory Board. You’ll help inform the type of content we create and get access to exclusive meetups, social accreditation, and swag.
Sign up now