Generally speaking, databases will have a mechanism for migrating, copying/backing up, or, better still, transferring stored data to either a different database or to a file in supported formats. As its name implies, Elasticdump is a tool for importing and exporting data stored in an Elasticsearch index or cluster.

Therefore, for cases where we intend to generally manage data transfer between Elasticsearch (ES) indices, Elasticdump is an awesome tool for the job. It works by sending an input to an output, thereby allowing us to export saved data from one ES server, acting as a source and output, directly to another, acting as the destination.
Additionally, it allows us to export a group of datasets (as well as the mappings) from an ES index/cluster to a file in JSON format, or even gzipped. It also supports exporting multiple indices at the same time to a supported destination.
With Elasticdump, we can export indices into/out of JSON files, or from one cluster to another. In this article, we are going to explore how to use this awesome tool to do just that — to serve as a point of reference for those who intend to do this (and also for my future self).
As an exercise, we will create an Elasticsearch index with some dummy data, then export the same index to JSON. Also, we will show how to move or dump some dummy data from one ES server/cluster to another.
Note: Elasticdump is open-source (Apache-2.0 licensed) and actively maintained. In recent versions, performance updates on the “dump/upload” algorithm have resulted in increased parallel processing speed. This change, however, comes at a cost, as records or datasets are no longer processed in a sequential order.
To follow along with this tutorial, it is advisable to have a basic knowledge of how Elasticsearch works. Also, readers should be sure to have Elasticsearch installed locally on their machines. Instructions to do so can be found here.
Alternatively, we can choose to make use of a cloud-hosted Elasticsearch provider. To learn about how to set it up, we can reference this earlier article on working with Elasticsearch.
It should be noted that whatever method we choose to interact with our Elasticsearch cluster, it will work the same on both our local development environment and in cloud hosted versions.
To begin with, we should have Elasticdump installed on our local machines since we intend to work with it locally. Here, we can either install it per project or globally. To do so globally, we can run the following command:
npm install elasticdump -g
On a per-project basis, we can run:
npm install elasticdump --save
Note: There are other available means of installing and running this tool via docker, and also via the non-standard install.
The usage of this tool is shown below:
elasticdump --input SOURCE --output DESTINATION [OPTIONS]
As we can see from the command above, we have both an input source and an output destination. The options property is used to specify extra parameters needed for the command to run.
Additionally, as we have also mentioned previously, Elasticdump works by sending an input to an output, where the output or input could either be an Elastic URL or a file, or vice versa.
As usual, the format for an Elasticsearch URL is shown below:
{protocol}://{host}:{port}/{index}
Which is equivalent to this URL shown below:
http://localhost:9200/sample_index?pretty
Alternatively, an example file format is shown below:
/Users/retina/Desktop/sample_file.json
Then, we can use the elastic dump tool like so to transfer a backup of the data in our sample index to a file:
elasticdump \
    --input=http://localhost:9200/sample_index \
    --output=/Users/retina/Desktop/sample_file.json \
    --type=data
As we can see from the command above, we are making use of the elasticdump command with the appropriate option flags specifying the --input and --output sources. We are specifying the type with a --type options flag as well. We can also run the same command for our mappings or schema, too:
elasticdump \
    --input=http://localhost:9200/sample_index \
    --output=/Users/retina/Desktop/sample_mapping.json \
    --type=mapping
This above command copies the output from the Elasticsearch URL we input. This specifies the index to an output, which is a file, sample_mapping.json. We can also run other commands. For transferring data from one Elasticsearch server/cluster to another, for example, we can run the following commands below:
elasticdump \
  --input=http://sample-es-url/sample_index \
  --output=http://localhost:9200/sample_index \
  --type=analyzer


elasticdump \
  --input=http://sample-es-url/sample_index \
  --output=http://localhost:9200/sample_index \
  --type=mapping


elasticdump \
  --input=http://sample-es-url/sample_index \
  --output=http://localhost:9200/sample_index \
  --type=data
The above commands would copy the data in the said index and also the mappings and analyzer. Note that we can also run other commands, which include:
--fileSize options flag, and so onMore details about the signature for the above operations and other operations we can run with the help of Elasticdump can be found in the readme file on GitHub.
Note: For cases where we need to create a dump with basic authentication, we can either add basic auth on the URL or we can use a file that contains the auth credentials. More details can be found in this wiki.
For the options parameter we pass to the dump command, only the --input and --output flags are required. The reason for this is obvious: we need a source for the data we are trying to migrate and also a destination. Other options include:
--input-index – we can pass the source index and type (default: all)--output-index – we can pass the destination index and type (default: all)--overwrite – we can pass this optional flag to overwrite the output file if it exists (default: false)--limit – we can also pass a limit flag to specify the number of objects we intend to move in batches per operation (default: 100)--size – we can also pass this flag to specify how many objects to retrieve (default: -1 to no limit)--debug – we can use this flag to display the Elasticsearch command being used (default: false)--searchBody – this flag helps us perform a partial extract based on search results. Note that we can only use this flag when Elasticsearch is our input data source--transform – this flag is useful when we intend to modify documents on the fly before writing it to our destination. Details about this tool’s internals can be found hereDetails about other flags we can pass as options to the elasticdump command, including --headers, --params, --ignore-errors, --timeout, --awsUrlRegex, and so on, can be found here in the docs.
bigintMore details about version changes can be found in this section of the readme document. Also, for gotchas or things to note while using this tool, we can reference this section of the same document.
In this section, we are going to demo how to use this tool to dump data from one index to another, and also to a file. To do so, we would need two separate ES clusters. We will be following the steps outlined in this tutorial to provision a cloud-hosted version of Elasticsearch.
Note that to copy or write sample data to our ES cluster or index, we can reference the script from the earlier article linked in the paragraph above. Also, the sample data can be found here.
elasticdump command on the CLIelasticdump globally by running npm install elasticdump -gelasticdump on the terminal should be:
Mon, 17 Aug 2020 22:39:24 GMT | Error Emitted => {"errors":["input is a required input","output is a required input"]}
Of course, the reason for this is that we have not included the required input and output fields as mentioned earlier. We can include them by running the following command:
elasticdump \
  --input=http://localhost:9200/cars \
  --output=/Users/retina/Desktop/my_index_mapping.json \
  --type=mapping

elasticdump \
  --input=http://localhost:9200/cars \
  --output=/Users/retina/Desktop/my_index.json \
  --type=data
This copies or dumps the data from our local ES cluster to a file in JSON format. Note that the file is created automatically on the specified path if not available and the data written to it. The result of running the command is shown below:
Mon, 17 Aug 2020 22:42:59 GMT | starting dump
Mon, 17 Aug 2020 22:43:00 GMT | got 1 objects from source elasticsearch (offset: 0)
Mon, 17 Aug 2020 22:43:00 GMT | sent 1 objects to destination file, wrote 1
Mon, 17 Aug 2020 22:43:00 GMT | got 0 objects from source elasticsearch (offset: 1)
Mon, 17 Aug 2020 22:43:00 GMT | Total Writes: 1
Mon, 17 Aug 2020 22:43:00 GMT | dump complete
Mon, 17 Aug 2020 22:43:01 GMT | starting dump
Mon, 17 Aug 2020 22:43:02 GMT | got 100 objects from source elasticsearch (offset: 0)
Mon, 17 Aug 2020 22:43:02 GMT | sent 100 objects to destination file, wrote 100
Mon, 17 Aug 2020 22:43:02 GMT | got 100 objects from source elasticsearch (offset: 100)
Mon, 17 Aug 2020 22:43:02 GMT | sent 100 objects to destination file, wrote 100
Mon, 17 Aug 2020 22:43:02 GMT | got 100 objects from source elasticsearch (offset: 200)
Mon, 17 Aug 2020 22:43:02 GMT | sent 100 objects to destination file, wrote 100
Mon, 17 Aug 2020 22:43:02 GMT | got 100 objects from source elasticsearch (offset: 300)
Mon, 17 Aug 2020 22:43:02 GMT | sent 100 objects to destination file, wrote 100
Mon, 17 Aug 2020 22:43:02 GMT | got 6 objects from source elasticsearch (offset: 400)
Mon, 17 Aug 2020 22:43:02 GMT | sent 6 objects to destination file, wrote 6
Mon, 17 Aug 2020 22:43:02 GMT | got 0 objects from source elasticsearch (offset: 406)
Mon, 17 Aug 2020 22:43:02 GMT | Total Writes: 406
Mon, 17 Aug 2020 22:43:02 GMT | dump complete
Writing that dump creates the JSON files on the specified paths. In this case, the files were created on my desktop.
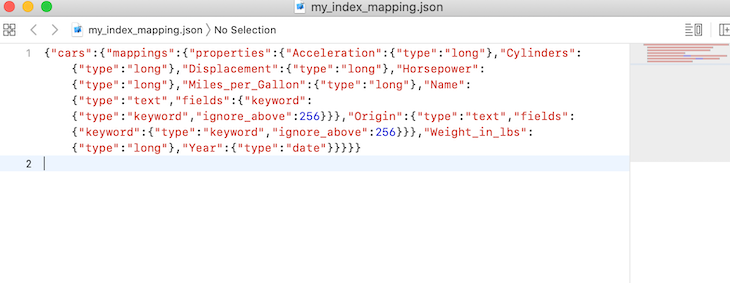

Note: As we can see from the above, the file format generated by the dump tool is not valid JSON; however, each line is valid. As is, the dump file is a line-delimited JSON file. Note that this is done so that dump files can be streamed and appended easily.
Now, let’s attempt to back up data from our local ES cluster to a cluster I recently provisioned on Elastic cloud. Here, we specify the input as our local Elasticsearch and the destination or output to our Elastic cluster in the cloud.
retina@alex ~ % elasticdump \
  --input=http://localhost:9200/cars \
  --output=https://elastic:3e53pNgkCVWHvMoiddtCUvTx@4c94d54df32d4b5b99f37ea248f686e7.eu-central-1.aws.cloud.es.io:9243/car \
  --type=analyzer
elasticdump \
  --input=http://localhost:9200/cars \
  --output=https://elastic:3e53pNgkCVWHvMoiddtCUvTx@4c94d54df32d4b5b99f37ea248f686e7.eu-central-1.aws.cloud.es.io:9243/car \
  --type=mapping
elasticdump \
  --input=http://localhost:9200/cars \
  --output=https://elastic:3e53pNgkCVWHvMoiddtCUvTx@4c94d54df32d4b5b99f37ea248f686e7.eu-central-1.aws.cloud.es.io:9243/cars \
  --type=data
The output is shown below:
Mon, 17 Aug 2020 23:10:26 GMT | starting dump
Mon, 17 Aug 2020 23:10:26 GMT | got 1 objects from source elasticsearch (offset: 0)
Mon, 17 Aug 2020 23:10:34 GMT | sent 1 objects to destination elasticsearch, wrote 1
Mon, 17 Aug 2020 23:10:34 GMT | got 0 objects from source elasticsearch (offset: 1)
Mon, 17 Aug 2020 23:10:34 GMT | Total Writes: 1
Mon, 17 Aug 2020 23:10:34 GMT | dump complete
Mon, 17 Aug 2020 23:10:35 GMT | starting dump
Mon, 17 Aug 2020 23:10:35 GMT | got 1 objects from source elasticsearch (offset: 0)
Mon, 17 Aug 2020 23:10:38 GMT | sent 1 objects to destination elasticsearch, wrote 1
Mon, 17 Aug 2020 23:10:38 GMT | got 0 objects from source elasticsearch (offset: 1)
Mon, 17 Aug 2020 23:10:38 GMT | Total Writes: 1
Mon, 17 Aug 2020 23:10:38 GMT | dump complete
Mon, 17 Aug 2020 23:10:38 GMT | starting dump
Mon, 17 Aug 2020 23:10:38 GMT | got 100 objects from source elasticsearch (offset: 0)
Mon, 17 Aug 2020 23:10:42 GMT | sent 100 objects to destination elasticsearch, wrote 100
Mon, 17 Aug 2020 23:10:43 GMT | got 100 objects from source elasticsearch (offset: 100)
Mon, 17 Aug 2020 23:10:46 GMT | sent 100 objects to destination elasticsearch, wrote 100
Mon, 17 Aug 2020 23:10:46 GMT | got 100 objects from source elasticsearch (offset: 200)
Mon, 17 Aug 2020 23:10:49 GMT | sent 100 objects to destination elasticsearch, wrote 100
Mon, 17 Aug 2020 23:10:49 GMT | got 100 objects from source elasticsearch (offset: 300)
Mon, 17 Aug 2020 23:10:52 GMT | sent 100 objects to destination elasticsearch, wrote 100
Mon, 17 Aug 2020 23:10:52 GMT | got 6 objects from source elasticsearch (offset: 400)
Mon, 17 Aug 2020 23:10:54 GMT | sent 6 objects to destination elasticsearch, wrote 6
Mon, 17 Aug 2020 23:10:54 GMT | got 0 objects from source elasticsearch (offset: 406)
Mon, 17 Aug 2020 23:10:54 GMT | Total Writes: 406
Mon, 17 Aug 2020 23:10:54 GMT | dump complete
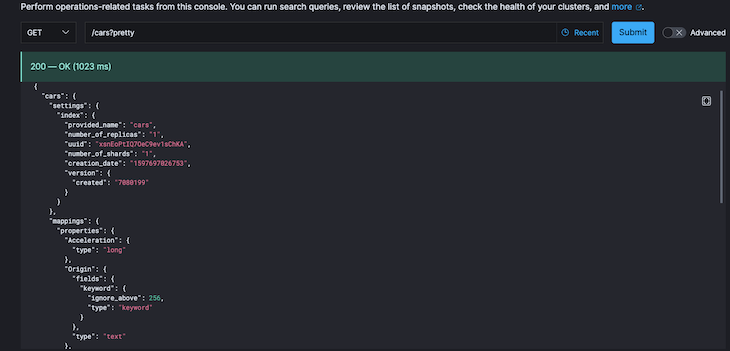
With the dump completed, we can now proceed to check that the index is available in the Elasticsearch service we had initially provisioned.
When we visit the API console on the cloud-hosted version and perform a get request on the car index, we get our index displayed with the correct number of records copied, as seen in the screenshots below.

Next, let’s look at this example of backing up the result of a query to a file. The command is shown below:
retina@alex ~ % elasticdump \
  --input=http://localhost:9200/cars \
  --output=/Users/retina/Desktop/query.json \
  --searchBody="{\"query\":{\"range\":{\"Horsepower\": {\"gte\": "201", \"lte\": "300"}}}}"
The output of running the above command is shown below:
Mon, 17 Aug 2020 23:42:46 GMT | starting dump
Mon, 17 Aug 2020 23:42:47 GMT | got 10 objects from source elasticsearch (offset: 0)
Mon, 17 Aug 2020 23:42:47 GMT | sent 10 objects to destination file, wrote 10
Mon, 17 Aug 2020 23:42:47 GMT | got 0 objects from source elasticsearch (offset: 10)
Mon, 17 Aug 2020 23:42:47 GMT | Total Writes: 10
Mon, 17 Aug 2020 23:42:47 GMT | dump complete
If we check the contents of the file, we can see our query results copied to the file:
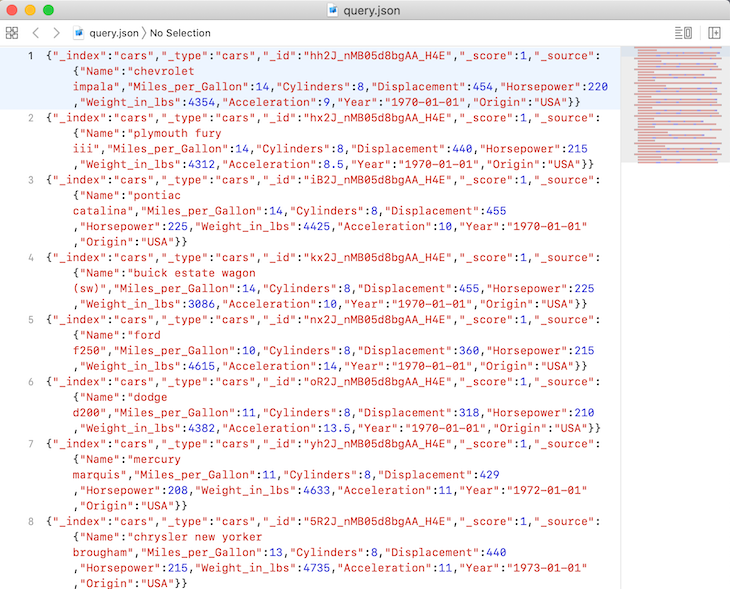
If we check it out, we are doing a range query where the results of the Horsepower field should return values greater than 201 but less than 300, which is what we got!
Finally, our last example would be on splitting files into multiple parts while backing them up. To do so, we run the below command:
retina@alex ~ % elasticdump \
  --input=http://localhost:9200/cars \
  --output=/Users/retina/Desktop/my_index2.json \
  --fileSize=10kb
We will get the output shown below:
Tue, 18 Aug 2020 00:05:01 GMT | starting dump
Tue, 18 Aug 2020 00:05:01 GMT | got 100 objects from source elasticsearch (offset: 0)
Tue, 18 Aug 2020 00:05:02 GMT | sent 100 objects to destination file, wrote 100
Tue, 18 Aug 2020 00:05:02 GMT | got 100 objects from source elasticsearch (offset: 100)
Tue, 18 Aug 2020 00:05:02 GMT | sent 100 objects to destination file, wrote 100
Tue, 18 Aug 2020 00:05:02 GMT | got 100 objects from source elasticsearch (offset: 200)
Tue, 18 Aug 2020 00:05:02 GMT | sent 100 objects to destination file, wrote 100
Tue, 18 Aug 2020 00:05:02 GMT | got 100 objects from source elasticsearch (offset: 300)
Tue, 18 Aug 2020 00:05:02 GMT | sent 100 objects to destination file, wrote 100
Tue, 18 Aug 2020 00:05:02 GMT | got 6 objects from source elasticsearch (offset: 400)
Tue, 18 Aug 2020 00:05:02 GMT | sent 6 objects to destination file, wrote 6
Tue, 18 Aug 2020 00:05:02 GMT | got 0 objects from source elasticsearch (offset: 406)
Tue, 18 Aug 2020 00:05:02 GMT | Total Writes: 406
Tue, 18 Aug 2020 00:05:02 GMT | dump complete
If we check the output path specified, we will discover that the files have been split into eight different paths. A sample screenshot is shown below:
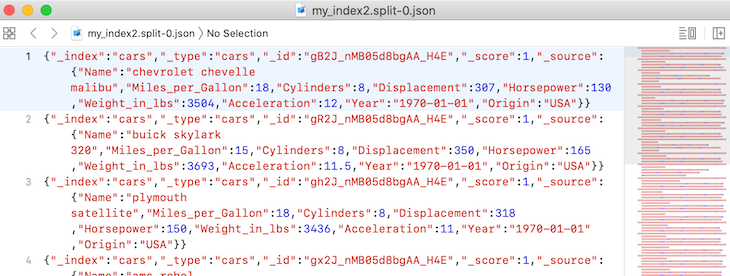
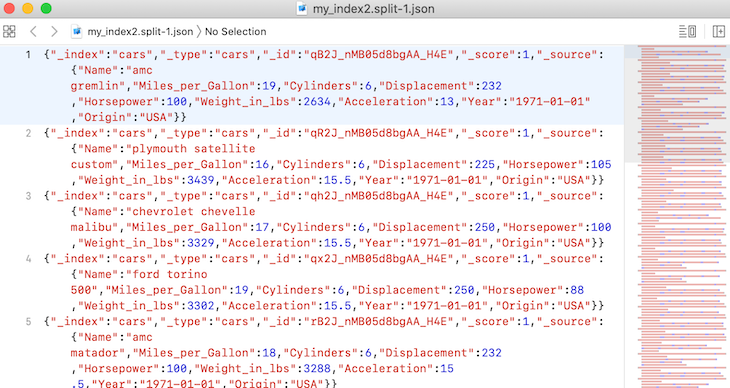
Note that if we check the output file above, we will notice that the file names are labelled accordingly from 1 to 8.
Finally, it should be pointed out that native Elasticsearch comes with snapshot and restore modules that can also help us back up a running ES cluster.
Elasticdump is a tool for moving and saving ES indices. As we have seen from this tutorial, we have explored this awesome tool to play around with about 406 records in our ES cluster, and it was pretty fast.
As an exercise, we can also decide to try out a backup of a larger data dump to validate the performance. We could also decide to explore other things we can do, like performing a data dump on multiple Elasticsearch indices and other available commands, which we mentioned earlier.
Extra details about the usage of this tool can always be found in the readme file, and the source code is also available on GitHub.
Thanks again for coming this far, and I hope you have learned a thing or two about using this awesome tool to perform data migrations or dumps on an ES cluster.
Also, don’t hesitate to drop your comments in case you have any or questions, or you can alternatively reach me on Twitter.
Install LogRocket via npm or script tag. LogRocket.init() must be called client-side, not
server-side
$ npm i --save logrocket

// Code:

import LogRocket from 'logrocket';
LogRocket.init('app/id');
// Add to your HTML:

<script src="https://cdn.lr-ingest.com/LogRocket.min.js"></script>
<script>window.LogRocket && window.LogRocket.init('app/id');</script>
Hey there, want to help make our blog better?
Join LogRocket’s Content Advisory Board. You’ll help inform the type of content we create and get access to exclusive meetups, social accreditation, and swag.
Sign up now
Get to know RxJS features, benefits, and more to help you understand what it is, how it works, and why you should use it.

Explore how to effectively break down a monolithic application into microservices using feature flags and Flagsmith.

Native dialog and popover elements have their own well-defined roles in modern-day frontend web development. Dialog elements are known to […]

LlamaIndex provides tools for ingesting, processing, and implementing complex query workflows that combine data access with LLM prompting.