Claude Code and Codex are excellent AI agents for coding and general tasks, but there comes a time when you’ll need a custom agent for specific workflows. At that point, it makes sense to build your own. It will not only be more efficient, but also save tokens and improve accuracy. There’s just one problem: building a custom harness isn’t the most straightforward thing to do.

A few weeks back, Vercel open-sourced eve, its in-house AI framework for building and running agents. According to Vercel, eve powers more than a hundred of its agents in production today.
Eve was created to improve the process of building, running, and scaling AI agents using familiar patterns from modern frontend frameworks like Next.js and Nuxt, where the building blocks are file-based and modular.
In this guide, we’ll explore how eve differs from the traditional way of building an AI agent and how it works by creating a basic agent. By the end of this article, you’ll understand the building blocks of eve and know how to build your own AI agent with it.
The AI ecosystem is still the Wild West, and building agents from the ground up often means stitching together different pieces until something works. It’s similar to frontend development before libraries and frameworks like React and Next.js came along and standardized how web applications are built. That’s the gap eve aims to fill.
In other words, eve is an agent framework designed to simplify how developers build and deploy production-ready AI agents. It provides a structured architecture with runtime capabilities, deployment options, and production infrastructure for building agentic software out of the box.
The biggest idea behind eve isn’t a new prompting technique or model. It’s that building an agent should feel like building a Next.js app: organize your agent into files and folders, and let the framework handle the tedious parts.
Eve is designed around a filesystem-first architecture where each file represents a component of the agent. Instead of writing complex boilerplate, developers can structure their entire agent using directories and files, where behaviors and skills are defined in .md using Markdown instructions, and tools and specialized subagents are added as TypeScript files.
A basic eve project structure might look like this:
agent/
├── instructions.md
├── agent.ts
├── tools/
│   ├── search.ts
│   └── github.ts
├── skills/
│   └── research.md
├── subagents/
└── channels/
At build time, eve automatically detects these components and exposes them to the model without requiring additional boilerplate to register them. This way, you can focus on what your agent does rather than how it does it.
The framework comes with several production-oriented capabilities right out of the box that eliminate the infrastructure setup usually associated with building AI agents from scratch. These include:
Unlike stateless requests, eve relies on durable execution and state persistence. The framework remembers customer sessions across turns and checkpoints its steps. If a step is expensive or requires human approval, the agent can pause the task, wait for feedback, and resume exactly where it left off without losing context.
AI agents often write or execute code that should not be trusted inside your main application runtime. Eve handles this by giving every agent its own isolated environment. It runs agents in hardware-isolated microVMs on the server and uses Docker locally. If the agent needs to clone a repo, run shell commands, or read and write files, it does so safely within this disposable sandbox without compromising your core system.
Eve allows any action to be set to require approval. This way, the agent pauses and waits indefinitely without wasting compute, and when the request is approved, eve continues from where it left off.
Another capability is support for observability features based on OpenTelemetry, where every model call, tool invocation, and sandbox command is recorded as a trace that can be exported to monitoring platforms or viewed through Vercel’s observability interface.
Eve makes it easy to deploy agents across multiple communication channels such as GitHub, Slack, Salesforce, or Notion without changing the core implementation of your agent. This allows you to use the same agent across different channels.
It also provides built-in support for connecting agents to external services through MCP servers or APIs from services such as Discord, Teams, and Notion. Developers can also add providers through custom adapters.
Before getting started with eve, you need to have Node.js installed on your computer. It must be at least version 24 or higher, and you also need your model credentials, such as API keys.
That said, the quickest way to get started with eve is by running the following command:
npx eve@latest init my-agent
This command will create a new eve project, install the necessary dependencies like Vercel’s ai package and zod, and start the development server.
But before starting the server, eve prompts you to choose how it should authenticate with an AI model provider. You can either use Vercel’s AI Gateway, which provides a unified layer for accessing hundreds of AI models from different providers, or connect directly through other providers.
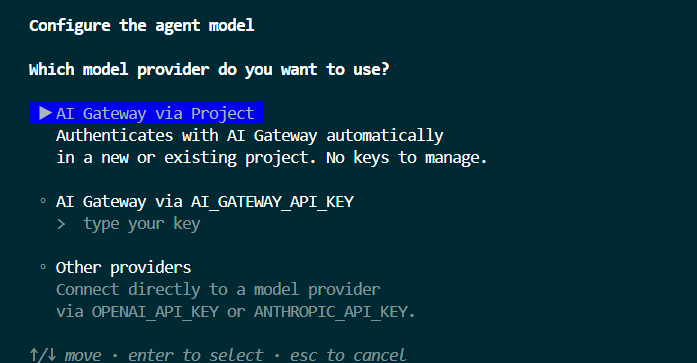
If you choose to authenticate using the first option, which is authenticating with AI Gateway, eve will connect to a Vercel project on your Vercel account and use it to authenticate whichever model you connect with through the gateway.
The second option is almost the same, except eve expects you to already have an AI Gateway API key.
You’ll need to enter something like:
AI_GATEWAY_API_KEY=vg_xxxxxxxxxxxxxxxxx
The last option, other providers, lets you provide your model’s API key and allows eve to connect directly to a provider like OpenAI or Anthropic. However, if you choose this option, you will need to create an environment variable for your provider’s key in the .env.local file.
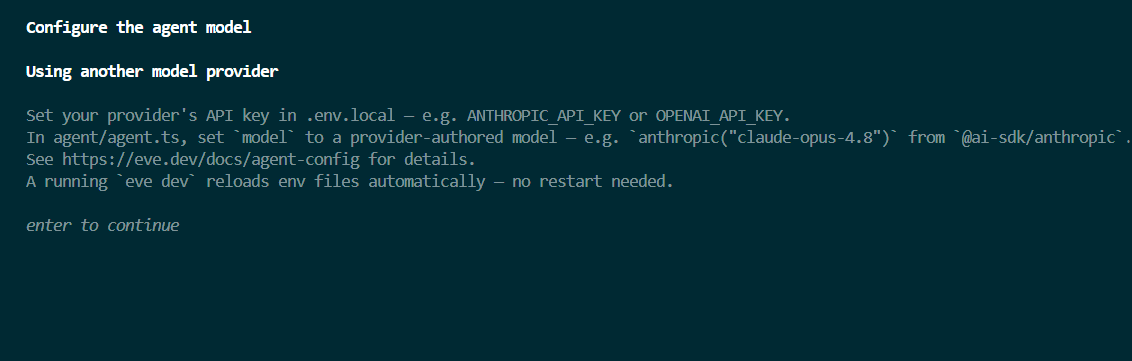
Then, set the model to the provider whose key you provided in the agent.ts file. For example, if you want to use DeepSeek, you would set the model as follows:
import { deepseek } from "@ai-sdk/deepseek";
import { defineAgent } from "eve";


export default defineAgent({
  model: deepseek("deepseek-chat"),
});
By default, models are specified using a string. Typically, this is all you need when using Vercel’s AI Gateway, which supports hundreds of models out of the box and simplifies configuration. However, in this example, we are using a provider-specific SDK package from the Vercel AI SDK.
While the core ai package is installed during the initialization process, it does not include every individual provider package by default. You will need to install the specific provider’s package separately. In this case, we are using DeepSeek, so you must install its corresponding package:
npm install @ai-sdk/deepseek
You can check out Vercel’s AI SDK documentation to see the available AI SDK providers.
Once you have completed the setup, the development server will spin up automatically and launch the interactive terminal UI, where you can prompt your agent right away, as shown in the GIF below.
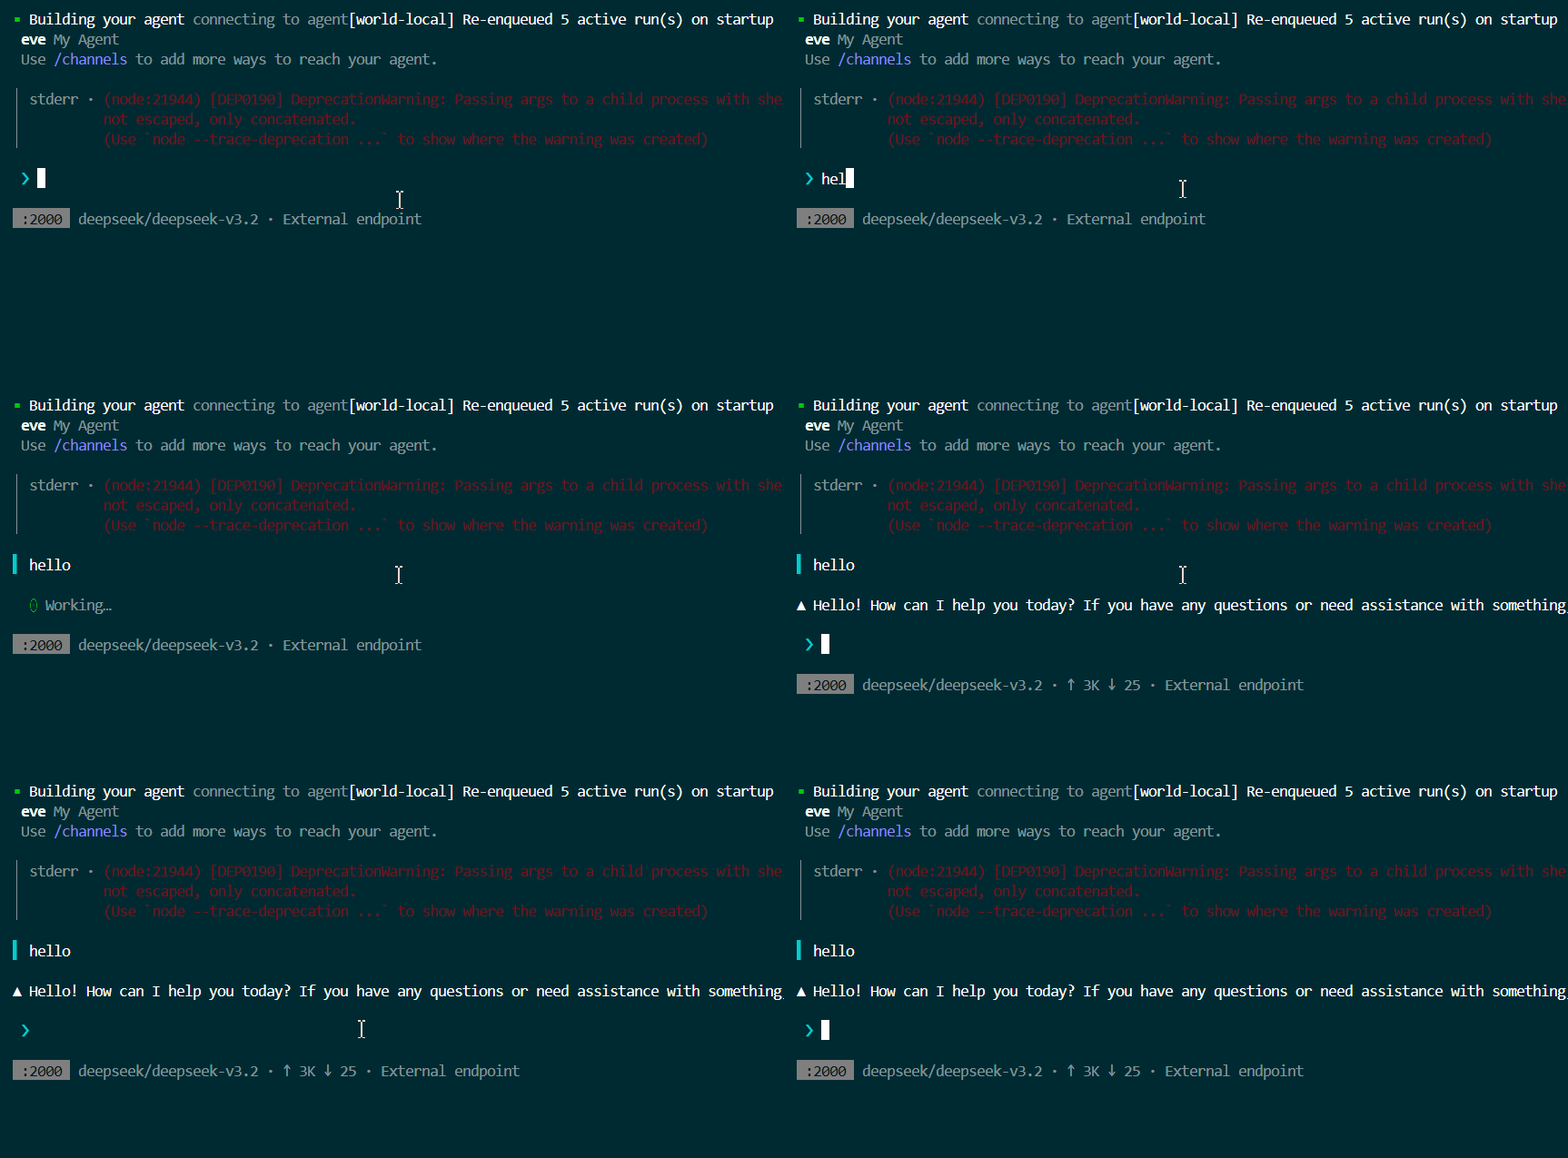
If the development server doesn’t start automatically, you can start it by running the following command:
npm run dev
Getting to this point should take less than 5 minutes. If you’ve built agents before, you know how much work is usually required to get here. With Eve, all it takes is running a command and providing your model keys.
To set up eve in an existing application, you have two options: using the initialization command provided by Vercel or setting it up manually.
To set it up manually, the first thing you need to do is add the following to your project’s package.json file to declare a compatible Node.js runtime:
{
  "engines": {
    "node": "24.x"
  }
}
Then, install eve and its dependencies, the ai and zod packages, using the following command:
npm install eve@latest ai zod
After the installation is complete, you can create an agent/ directory in the root folder of your project and add the necessary project files. We’ll look at these in the next section.
Setting it up manually is useful for understanding how Eve connects to your application, but it is quicker to use the initializer because all you have to do is run the following command:
eve init .
This takes care of everything you would otherwise have to do manually, including creating the agent/directory with a minimal agent configuration.
Now that your eve project is set up, you can begin creating agents. First, however, you need to understand the project structure, since it’s the foundation of eve. In this section, we will examine the function of each folder and file and learn how to use them to build your first eve agent.
agent.tsThe first file you want to work on is the agent.ts file. This is the core of an eve project and where you set the runtime configuration of the agent. It is where you choose an AI model, set system options, and customize the overall agent runtime using the defineEngine function:
import { defineAgent } from "eve";


export default defineAgent({
  model: "anthropic/claude-opus-4.8",
});
The configuration above uses Anthropic’s claude-opus-3.5 model. Note that if you chose a different provider during initialization, such as the DeepSeek integration we demonstrated earlier, your configuration might look a bit different.
However, if you don’t plan to choose a model or add any additional configuration, you can omit the `agent.ts` file, and eve will default to claude-sonnet-5.
For a full list of configuration options, refer to the official documentation
instructions.mdThe next thing you want to do is set a system prompt, which you can do by editing the instructions.md file. This is where you define the instructions for your agent’s overall behavior, rules, and persona. If your agent is designed to function as a research analyst, your instructions might look like this:
You are a startup research analyst.


Your task is to discover companies related to the user's request and summarize them objectively.


Prioritize:


- Recently launched startups
- Funding announcements
- Product launches
- Team size
- Market category
- Unique differentiators
- Target customers


...
Eve automatically injects these instructions into every model call, ensuring your agent maintains its persona and follows your rules consistently.
tools/*.tsThe tools/ folder is where you define your agent’s capabilities and the tools it has at its disposal. You can create a tool by adding a TypeScript (.ts) file to this folder and using eve’s defineTool function to define the tool’s description, inputSchema (validated with Zod), and execute() function.
import { defineTool } from "eve/tools";
import { z } from "zod";


export default defineTool({
  description: "Retrieve information about a GitHub repository.",


  inputSchema: z.object({
    owner: z.string().describe("Repository owner"),
    repo: z.string().describe("Repository name"),
  }),


  async execute({ owner, repo }) {
    const response = await fetch(
      `https://api.github.com/repos/${owner}/${repo}`,
    );


    if (!response.ok) {
      throw new Error("Repository not found.");
    }


    const repository = await response.json();


    return {
      name: repository.name,
      description: repository.description,
      stars: repository.stargazers_count,
      forks: repository.forks_count,
      language: repository.language,
      url: repository.html_url,
    };
  },
});
In the example above, we created a GitHub tool that retrieves information about specific repositories.
Any TypeScript file placed in the tools/ directory is automatically discovered, so no manual registration is required. Eve uses the filename as the tool’s name, which is how the model identifies and invokes it. For example, if you name your file github.ts, the model will recognize it as github when it needs to call it.
├── tools/
│   └── github.ts
This especially showcases the flexibility that eve offers. Most frameworks would require you to register these tools before they can be functional, with a lot of preceding boilerplate code.
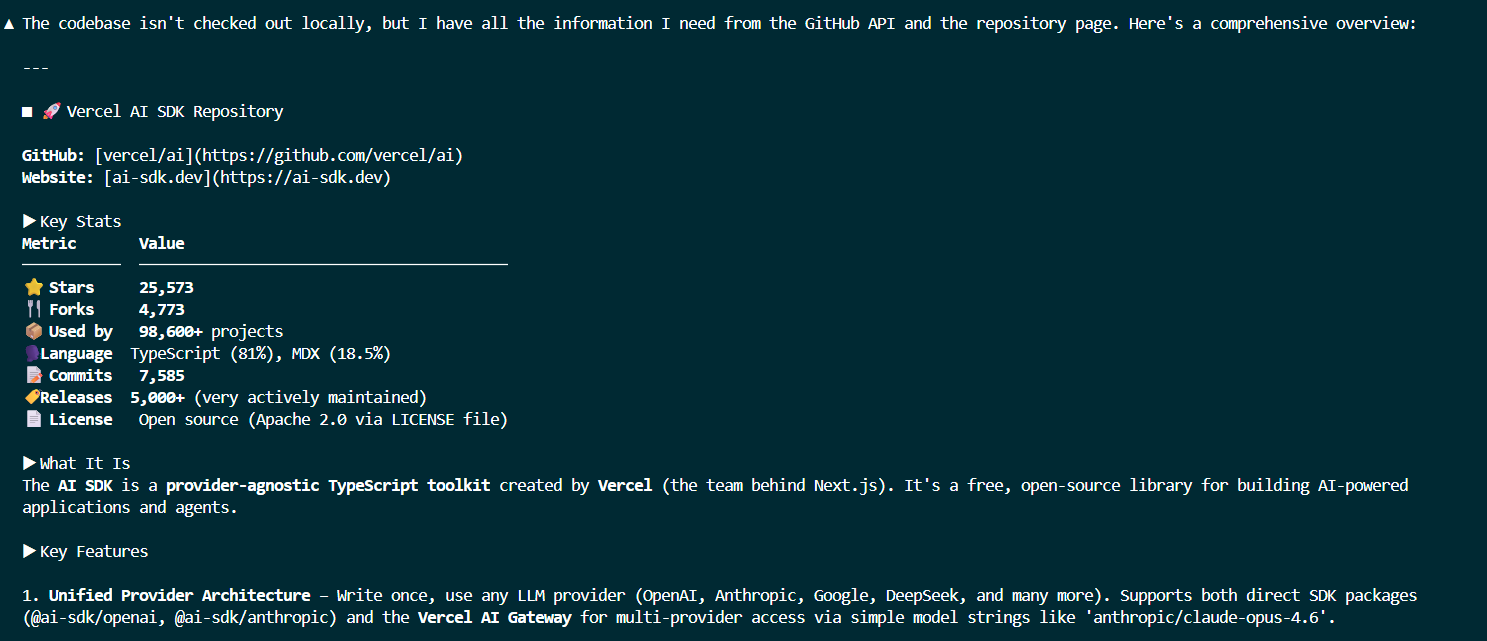
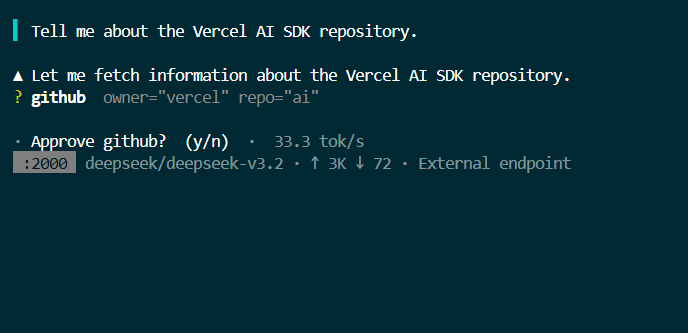
Now, if we ask the agent something like, “Tell me about the Vercel AI SDK repository”, it will return detailed information about the repository on GitHub, as shown in the image below.
If you want to require approval each time the agent attempts to invoke a tool, you can do so by adding an approval field to the tool definition like so:
export default defineTool({
  description: "Retrieve information about a GitHub repository.",


  inputSchema: z.object({
	...
  }),


  approval: always(),


  async execute({ owner, repo }) {
	...
    );


    return {
	...
    };
  },
Now, whenever the agent attempts to invoke the tool, you will see a prompt requesting approval before execution proceeds.
skills/*.mdOne limitation of building an agent from scratch is that the system prompt tends to bloat over time and overload the agent. Eve mitigates this by letting you create Markdown files with specific instructions and workflows in the `skills/` folder. Your agent only loads these files into context when they’re relevant.
For example, if you want to add an SQL skill to your agent’s knowledge base, you simply move the skill’s Markdown file into the `skills/` folder:
agent/skills
└── sql.md
Now, eve automatically knows your agent has SQL expertise. Whenever it needs to work on anything SQL-related, this skill gets loaded into the context.
subagents/*Subagents are independent child agents that your root agent can delegate focused tasks to. They run the task independently, then return the results to the root agent.
So when your agent’s tasks get too large and become prone to errors, you can create subagents in the subagents/ folder to take the workload off your main agent.
Each subfolder inside the subagents/ folder is a subagent with the same structure as the parent directory. This means it has its own instructions, tools, and execution environment.
agent/subagents/researcher/
├── instructions.md
├── agent.ts
├── tools/
The files and folders we’ve covered so far are the core agent definitions, and they’re all you need to build a full-fledged AI agent. The rest, however, handles the production and infrastructure layers. These include:
/channels/*: This is where you configure where you want your agent to be deployed and the channels in which users can interact with your agent (e.g., Slack, Discord, Microsoft Teams, or custom HTTP APIs)/connections/*: This is where you connect your agent to external services via MCP servers or any HTTP API (e.g., Slack, Discord, Microsoft Teams, or custom HTTP APIs)/schedules/: This holds configurations for cron jobs or automated tasks that trigger the agent to run recurring background processes (e.g., daily research or clean-up tasks)/sandbox/: This is where you define eve’s sandbox config when you want to customize the isolated microVM used by the agent to execute code securelyEve is already used internally at Vercel across a range of production use cases that you can build around too.
d0: This is a data analyst agent Vercel used internally to answer thousands of questions monthly, and it scopes every query to the asker’s permissiondraft0: This is a content agent, and it is used throughout the company to review drafts before they reach the content team. It performs an initial editorial pass, identifies obvious issues, and analyzes what an article is about so editors can focus on higher-value feedbackThe Vercel team has shipped even more with Eve, but these examples should give you a solid sense of what’s possible.
There are several ways eve supercharges agent development compared to traditional stacks, but these are the biggest distinctions:
| Traditional agent development | Building with eve |
|---|---|
| Manually configure the project structure. | Start with eve init or install Eve into an existing project. |
| Write and maintain a large system prompt in code. | Store instructions in instructions. md for easier editing and versioning. |
| Register every tool manually with the agent. | Drop a tool into agent/tools/ and Eve discovers it automatically. |
| Load all context into the prompt, regardless of relevance. | Organize knowledge into skills/, and Eve loads only the relevant skills. |
| Execute AI-generated code in your own environment or build a sandbox yourself. | AI-generated code runs in an isolated sandbox by default. |
| Create your own system for coordinating multiple agents. | Organize specialist agents under subagents/ and let Eve handle delegation. |
| You build an agent from low-level building blocks. | You describe your agent’s capabilities, and Eve provides the runtime and infrastructure. |
If you have experience with the Vercel AI SDK and tool calling, you’ll appreciate how eve abstracts away much of the orchestration you currently write manually. It doesn’t try to replace the SDK. Instead, it gives you a higher-level runtime and conventions to ship production-ready agents.
We’ve covered enough here to build your first agent. The examples were basic, but complexity doesn’t change the process with eve. The building steps are the same whether your agent is basic or advanced.
However, there’s a lot more to eve than this article could cover, such as evals and more. I encourage you to check out the documentation to understand the framework better.
Debugging Next applications can be difficult, especially when users experience issues that are difficult to reproduce. If you’re interested in monitoring and tracking state, automatically surfacing JavaScript errors, and tracking slow network requests and component load time, try LogRocket.
LogRocket captures console logs, errors, network requests, and pixel-perfect DOM recordings from user sessions and lets you replay them as users saw it, eliminating guesswork around why bugs happen — compatible with all frameworks.
LogRocket's Galileo AI watches sessions for you, instantly identifying and explaining user struggles with automated monitoring of your entire product experience.
The LogRocket Redux middleware package adds an extra layer of visibility into your user sessions. LogRocket logs all actions and state from your Redux stores.

Modernize how you debug your Next.js apps — start monitoring for free.

Tailwind CSS component libraries provide pre-built components to streamline the process of developing aesthetic, user-friendly interfaces.

Vibe coding makes building apps faster, but speed without engineering can create serious failures. Here are five real-world examples and practical checks to help you ship AI-generated code safely.

Compare React ViewTransition and Motion across four animation patterns. The native build saved ~38.6kB of gzipped JS, but required 179 more lines of CSS.

Learn how to run Cline locally with Ollama to build a secure, private AI coding agent that keeps your proprietary code off cloud servers.
Would you be interested in joining LogRocket's developer community?
Join LogRocket’s Content Advisory Board. You’ll help inform the type of content we create and get access to exclusive meetups, social accreditation, and swag.
Sign up now

 Learn more →