AI models are good at conversation, but by themselves, they can’t take real actions. They can suggest SQL queries or API calls, but they can’t run them on your systems. The Model Context Protocol (MCP) changes that by giving AI models a structured way to interact with your tools, including your database, your files, and your APIs. Instead of generating text about what should happen, the model can call functions that actually make it happen.

In practice, this means you can build things like a chatbot that creates and searches entries in your database, an AI assistant that queries internal tools or triggers workflows, or a coding agent that reads files, runs commands, and returns real results.
In this tutorial, you’ll learn how to build your first MCP server from scratch using Node.js. We’ll start with a simple file-based notes system to understand the core concepts, then upgrade it to MySQL to show how an LLM can drive deterministic operations. By the end, you’ll have a working MCP server you can plug into your AI tool of choice, along with a clear mental model for designing tools that models can use reliably.
The Replay is a weekly newsletter for dev and engineering leaders.
Delivered once a week, it's your curated guide to the most important conversations around frontend dev, emerging AI tools, and the state of modern software.
To follow along with this tutorial, you’ll need:
MCP follows a client-server model in which the AI application acts as the client, and your code runs as the server. In a typical setup, the client (such as Claude Desktop, Claude Code, or your own agent) sits between the user and your server, forwarding requests and returning results. The server, on the other hand, runs as a separate process and exposes the capabilities the model can use. These two components communicate through a transport layer.
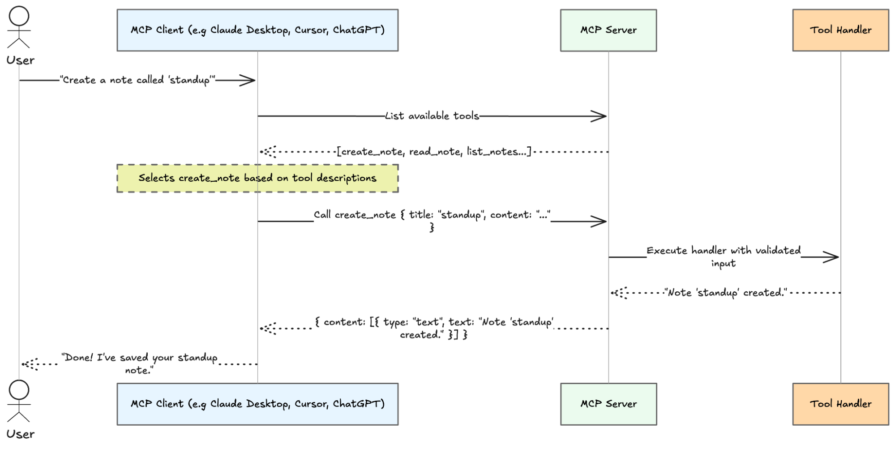
As shown above, the model itself never calls your server directly. When a user sends a message, the client shares your server’s tool list with the model. The model decides which tool (if any) to call and with what arguments. The client executes that call against your server and feeds the result back into the conversation.
Now that you have a picture of how the pieces fit together, let’s build one.
Let’s start by creating a new Node.js project for our MCP server. This will be a simple file-based notes system that helps us understand the core concepts before introducing a database.
First, create a new directory and initialize it:
mkdir mcp-notes && cd mcp-notes
npm init -y
Next, install the dependencies we’ll need. We’ll use the MCP SDK to build the server, Zod for input validation, and TypeScript for type safety:
npm install @modelcontextprotocol/sdk zod
npm install -D typescript @types/node
Now open your package.json file and add "type": "module", since the MCP SDK uses ES modules. While you’re there, also add a build and start script:
{
  "type": "module",
  "scripts": {
    "build": "tsc",
    "start": "node dist/index.js"
  }
}
Next, create a tsconfig.json file at the root of your project and paste the following content into it:
{
  "compilerOptions": {
    "target": "ES2022",
    "module": "Node16",
    "moduleResolution": "Node16",
    "outDir": "./dist",
    "rootDir": "./src",
    "strict": true,
    "esModuleInterop": true,
    "skipLibCheck": true
  },
  "include": ["src/**/*"]
}
This configures how TypeScript compiles your code and ensures ES module imports work correctly in Node.js.
Now let’s build the MCP server itself. Create a new src/index.ts file and paste the following code into it:
import { McpServer } from "@modelcontextprotocol/sdk/server/mcp.js";
import { StdioServerTransport } from "@modelcontextprotocol/sdk/server/stdio.js";
import fs from "fs/promises";
import path from "path";
import { z } from "zod";

const NOTES_DIR = path.join(process.cwd(), "notes");
await fs.mkdir(NOTES_DIR, { recursive: true });

const server = new McpServer({
  name: "mcp-notes",
  version: "1.0.0",
});

// 👉 We'll add our tools here

const transport = new StdioServerTransport();
await server.connect(transport);
This is a complete, runnable MCP server. It sets up a notes directory, initializes the server, and connects it to stdio to communicate with an MCP client.
Now, let’s add our first tool, create_note, inside the server. Paste the code below into the section we marked earlier:
server.tool(
  "create_note",
  "Create a new note with a given title and content",
  {
    title: z.string().min(1).describe("The note title"),
    content: z.string().min(1).describe("The body of the note"),
  },
  async ({ title, content }) => {
    const filename = `${title.replace(/[^a-z0-9_-]/gi, "_")}.txt`;
    const filepath = path.join(NOTES_DIR, filename);

    try {
      await fs.access(filepath);
      return {
        content: [{ type: "text", text: `Error: note "${title}" already exists.` }],
        isError: true,
      };
    } catch {}

    await fs.writeFile(filepath, content, "utf-8");
    return { content: [{ type: "text", text: `Note "${title}" created.` }] };
  }
);
Each tool defines a single action the model can take. It includes a name, a description, an input schema, and a handler function that performs the actual work. In this case, the create_note tool takes a title and content, then writes the note to disk.
The handler function receives validated input and performs the actual work. It generates a filename from the title, checks if a note with that name already exists, and either returns an error or writes the note to disk. When something goes wrong, we return a response with isError: true. This tells the model the operation failed, so it can respond accordingly.
Let’s add two more tools for reading and listing notes. Paste the code below in the same section as before, just below the create_note tool:
server.tool(
  "read_note",
  "Read the content of a note by its title",
  {
    title: z.string().min(1).describe("The title of the note to read"),
  },
  async ({ title }) => {
    const filename = `${title.replace(/[^a-z0-9_-]/gi, "_")}.txt`;
    try {
      const content = await fs.readFile(path.join(NOTES_DIR, filename), "utf-8");
      return { content: [{ type: "text", text: content }] };
    } catch {
      return {
        content: [{ type: "text", text: `Error: note "${title}" not found.` }],
        isError: true,
      };
    }
  }
);

server.tool(
  "list_notes",
  "List all available notes",
  {},
  async () => {
    const files = await fs.readdir(NOTES_DIR);
    const notes = files
      .filter((f) => f.endsWith(".txt"))
      .map((f) => f.replace(".txt", ""));

    if (notes.length === 0) {
      return { content: [{ type: "text", text: "No notes found." }] };
    }

    return { content: [{ type: "text", text: notes.join("\n") }] };
  }
);
The read_note tool retrieves the content of a note by its title, while list_notes scans the directory and returns all available notes. With these in place, your server can now create, read, and list notes.
Once you’ve finished building your MCP server, the next step is to compile it and connect it to an MCP-compatible client. Start by building the project:
npm run build
This runs the TypeScript compiler and outputs the compiled JavaScript into your dist/ directory based on the settings in tsconfig.json. In our case, that gives us a runnable server entry point at dist/index.js. With that done, your server is ready to be loaded by an MCP client.
One of the easiest ways to test a local MCP server is with Claude Desktop. First, make sure you have Claude Desktop installed and updated to the latest version.
Next, open Claude Desktop’s configuration file:
macOS: ~/Library/Application Support/Claude/claude_desktop_config.json
Windows: %APPDATA%\Claude\claude_desktop_config.json
You can also create the file if it does not already exist, then add your server under the mcpServers key (don’t forget to update the paths to match where your project is located):
{
  "mcpServers": {
    "mcp-notes": {
      "command": "node",
      "args": [
        "/path/to/mcp-notes/dist/index.js"
      ],
      "cwd": "/path/to/mcp-notes"
    }
  }
}
This tells Claude Desktop there is an MCP server named mcp-notes, and that it should start it by running your compiled Node.js entry point. After saving the file, restart Claude Desktop.
If the server loads successfully, Claude Desktop will make your tools available during chat. You can then test the server with prompts like:
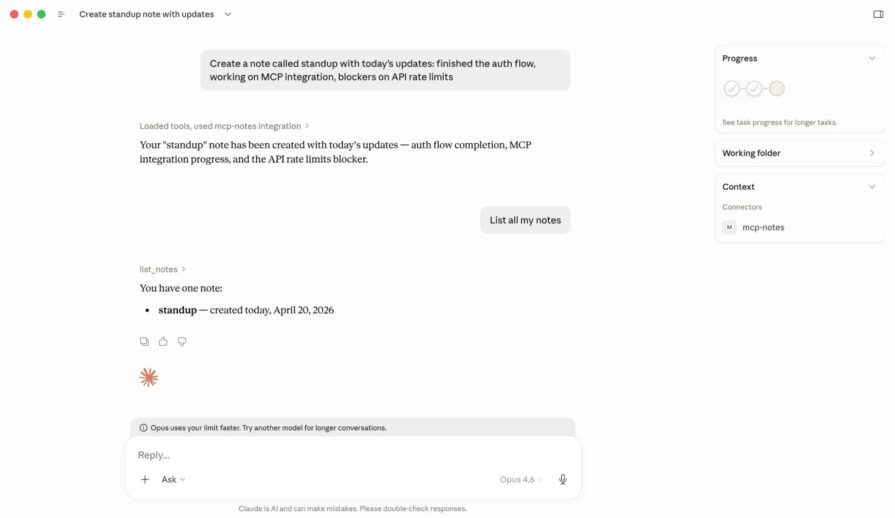
When Claude receives one of these requests, it decides whether to call one of your tools, sends the request to your MCP server, and then uses the result in its response.
Claude Desktop is a good place to start because the setup is simple and easy to verify, but the same server can also be used in other MCP-compatible tools such as Claude Code, ChatGPT integrations, and coding apps that support MCP.
Our file-based server is enough to demonstrate the core ideas behind MCP, but it has clear limits. When you need structured data or efficient lookups, a database is a much better fit.
Moving to MySQL also highlights an important pattern in MCP design: the model decides what action to take, but your code remains responsible for how that action is carried out. When the model calls search_notes, for example, it does not generate or execute SQL itself. Instead, your handler performs that work in a controlled and deterministic way using parameterized queries.
To make that upgrade, start by installing the MySQL driver:
npm install mysql2
Next, create a database and table for your notes. You can do this using your MySQL client of choice:
CREATE DATABASE mcp_notes;

USE mcp_notes;

CREATE TABLE notes (
  id INT AUTO_INCREMENT PRIMARY KEY,
  title VARCHAR(255) UNIQUE NOT NULL,
  content TEXT NOT NULL,
  created_at TIMESTAMP DEFAULT CURRENT_TIMESTAMP
);
This sets up a simple notes table where each note has a unique title, its content, and a creation timestamp.
Now update your server to connect to this database. Replace the contents of src/index.ts with the following:
import { McpServer } from "@modelcontextprotocol/sdk/server/mcp.js";
import { StdioServerTransport } from "@modelcontextprotocol/sdk/server/stdio.js";
import mysql from "mysql2/promise";
import { z } from "zod";

const pool = mysql.createPool({
  host: "localhost",
  user: "root",
  password: "",
  database: "mcp_notes",
});

const server = new McpServer({
  name: "mcp-notes",
  version: "2.0.0",
});

// We'll add our tools here

const transport = new StdioServerTransport();
await server.connect(transport);
The overall structure stays the same as before. We still create an MCP server, register tools, and connect it over stdio. The main difference is that we are now storing notes in MySQL instead of the local filesystem.
create_noteNow, let’s add the MySQL version of create_note. Paste the code below into the section we marked earlier:
server.tool(
  "create_note",
  "Create a new note with a given title and content",
  {
    title: z.string().min(1).describe("Unique title for the note"),
    content: z.string().min(1).describe("Body of the note"),
  },
  async ({ title, content }) => {
    try {
      await pool.execute(
        "INSERT INTO notes (title, content) VALUES (?, ?)",
        [title, content]
      );
      return { content: [{ type: "text", text: `Note "${title}" created.` }] };
    } catch (err: any) {
      if (err.code === "ER_DUP_ENTRY") {
        return {
          content: [{ type: "text", text: `Error: note "${title}" already exists.` }],
          isError: true,
        };
      }
      throw err;
    }
  }
);
This version does the same job as before, but instead of writing a file, it inserts a row into the notes table. It also handles duplicate titles by catching MySQL’s ER_DUP_ENTRY error and returning a clean message to the model.
read_noteNext, add the MySQL version of read_note just below it:
server.tool(
  "read_note",
  "Read a note by its title",
  {
    title: z.string().min(1).describe("Title of the note to read"),
  },
  async ({ title }) => {
    const [rows] = await pool.execute<mysql.RowDataPacket[]>(
      "SELECT content, created_at FROM notes WHERE title = ?",
      [title]
    );

    if (rows.length === 0) {
      return {
        content: [{ type: "text", text: `Error: note "${title}" not found.` }],
        isError: true,
      };
    }

    const { content, created_at } = rows[0];
    return {
      content: [{ type: "text", text: `[Created: ${created_at}]\n\n${content}` }],
    };
  }
);
This tool now reads the note from the database and also returns its created_at timestamp, which gives the model a little more context to work with when presenting the result.
list_notes and search_notesFinally, add the remaining tools below read_note:
server.tool(
  "list_notes",
  "List all notes with their titles and creation dates",
  {},
  async () => {
    const [rows] = await pool.execute<mysql.RowDataPacket[]>(
      "SELECT title, created_at FROM notes ORDER BY created_at DESC"
    );

    if (rows.length === 0) {
      return { content: [{ type: "text", text: "No notes found." }] };
    }

    const list = rows.map((r) => `- ${r.title} (${r.created_at})`).join("\n");
    return { content: [{ type: "text", text: list }] };
  }
);

server.tool(
  "search_notes",
  "Search notes by keyword across titles and content",
  {
    query: z.string().min(1).describe("Keyword or phrase to search for"),
  },
  async ({ query }) => {
    const like = `%${query}%`;
    const [rows] = await pool.execute<mysql.RowDataPacket[]>(
      "SELECT title, created_at FROM notes WHERE title LIKE ? OR content LIKE ? ORDER BY created_at DESC",
      [like, like]
    );

    if (rows.length === 0) {
      return {
        content: [{ type: "text", text: `No notes found matching "${query}".` }],
      };
    }

    const list = rows.map((r) => `- ${r.title} (${r.created_at})`).join("\n");
    return { content: [{ type: "text", text: list }] };
  }
);
The list_notes tool returns every note along with its creation date, while search_notes lets the model search across both titles and note contents. That is where the database version starts to feel meaningfully different from the file-based version, since search is much easier to support once your data is structured.
When you’re done, build the project again:
npm run build
This recompiles your TypeScript code and updates the dist/index.js file your MCP client runs.
If you already have your server connected in a client like Claude Desktop, restart the app so it picks up the changes.
Once it’s back up, try a few prompts to test the new functionality:
You should now see results coming from your MySQL database instead of the local file system. After creating a note, you can also verify it directly in your database. Run a simple SELECT query, for example:
SELECT * FROM notes;
to confirm that the data is actually being stored in MySQL.
An MCP tool that works in testing can still fail in production if the model misunderstands when or how to use it. To build reliable tools, you need to make their purpose obvious, starting with descriptions that clearly explain what the tool does and when to use it. The model relies entirely on this context to decide what to call, which means vague phrases like “Handles notes” often lead to poor choices, while more explicit descriptions guide it toward the correct behavior.
Predictability matters just as much as clarity, which is why each tool should focus on a single responsibility instead of combining multiple actions that force the model to guess intent. When something goes wrong, return actionable errors using isError: true so the model can retry with better input or guide the user appropriately. For example:
return {
 content: [{ type: "text", text: `Error: note "${title}" not found. Use list_notes to see available notes.` }],
 isError: true,
};
Finally, treat execution as a controlled boundary by avoiding direct interpolation of user input into SQL or shell commands, and instead rely on parameterized queries so your tool remains safe, consistent, and deterministic with validated input flowing cleanly into your handler.
This tutorial explored how to build an MCP server from scratch using Node.js, starting with a simple file-based setup and then moving to a MySQL-backed implementation. It serves as a foundation for working with MCP. From here, you can extend the same pattern to integrate APIs, automate workflows, or connect AI models to more complex systems. All the code used throughout this tutorial is available in this GitHub repo.
Thanks for reading!
 Monitor failed and slow network requests in production
Deploying a Node-based web app or website is the easy part. Making sure your Node instance continues to serve resources to your app is where things get tougher. If you’re interested in ensuring requests to the backend or third-party services are successful, try LogRocket.

LogRocket lets you replay user sessions, eliminating guesswork around why bugs happen by showing exactly what users experienced. It captures console logs, errors, network requests, and pixel-perfect DOM recordings — compatible with all frameworks.
LogRocket's Galileo AI watches sessions for you, instantly identifying and explaining user struggles with automated monitoring of your entire product experience.
LogRocket instruments your app to record baseline performance timings such as page load time, time to first byte, slow network requests, and also logs Redux, NgRx, and Vuex actions/state. Start monitoring for free.

Claude Code vs. OpenCode in a real Next.js refactor: benchmark results, mistakes, prompts, and when to use each CLI agent.

Every time you explain your team’s coding standards to Claude, you are doing work that should be reusable. The same […]

Learn how to move beyond one-shot prompting in Claude with structured workflows for AI-assisted coding, debugging, PR reviews, documentation, testing, and automation.

Learn how to build advanced Next.js forms with rule engines, client-side previews, Server Actions, and server-validated form logic.
Hey there, want to help make our blog better?
Join LogRocket’s Content Advisory Board. You’ll help inform the type of content we create and get access to exclusive meetups, social accreditation, and swag.
Sign up now

