Every few months, a new browser feature emerges, promising to speed up page load times without a complete overhaul of your site. One such feature is the Speculation Rules API. Google’s guide makes it seem simple: you just add a JSON script tag, specify which pages to prefetch or prerender, and your navigation should become instant.

To test this out in a real-world setting, I created a small multi-page project, set up the Speculation Rules API, and measured how it affected navigation speed. I used the Navigation Timing API and Chrome DevTools to collect actual data
In this article, I’ll walk you through what I found: where the API is effective, where it falls short, and how to implement it without wasting your users’ bandwidth on pages they won’t visit.
Before discussing the numbers, let’s explain what this API does. It can be confusing because it seems similar to existing features.
Browsers have used resource hints for some time. You’ve likely encountered <link rel="prefetch"> or <link rel="preconnect">. These features are helpful but have limitations. The rel="prefetch" option fetches a resource and saves it, but it doesn’t use it. The page still needs to be processed, displayed, and executed when the user navigates to it.
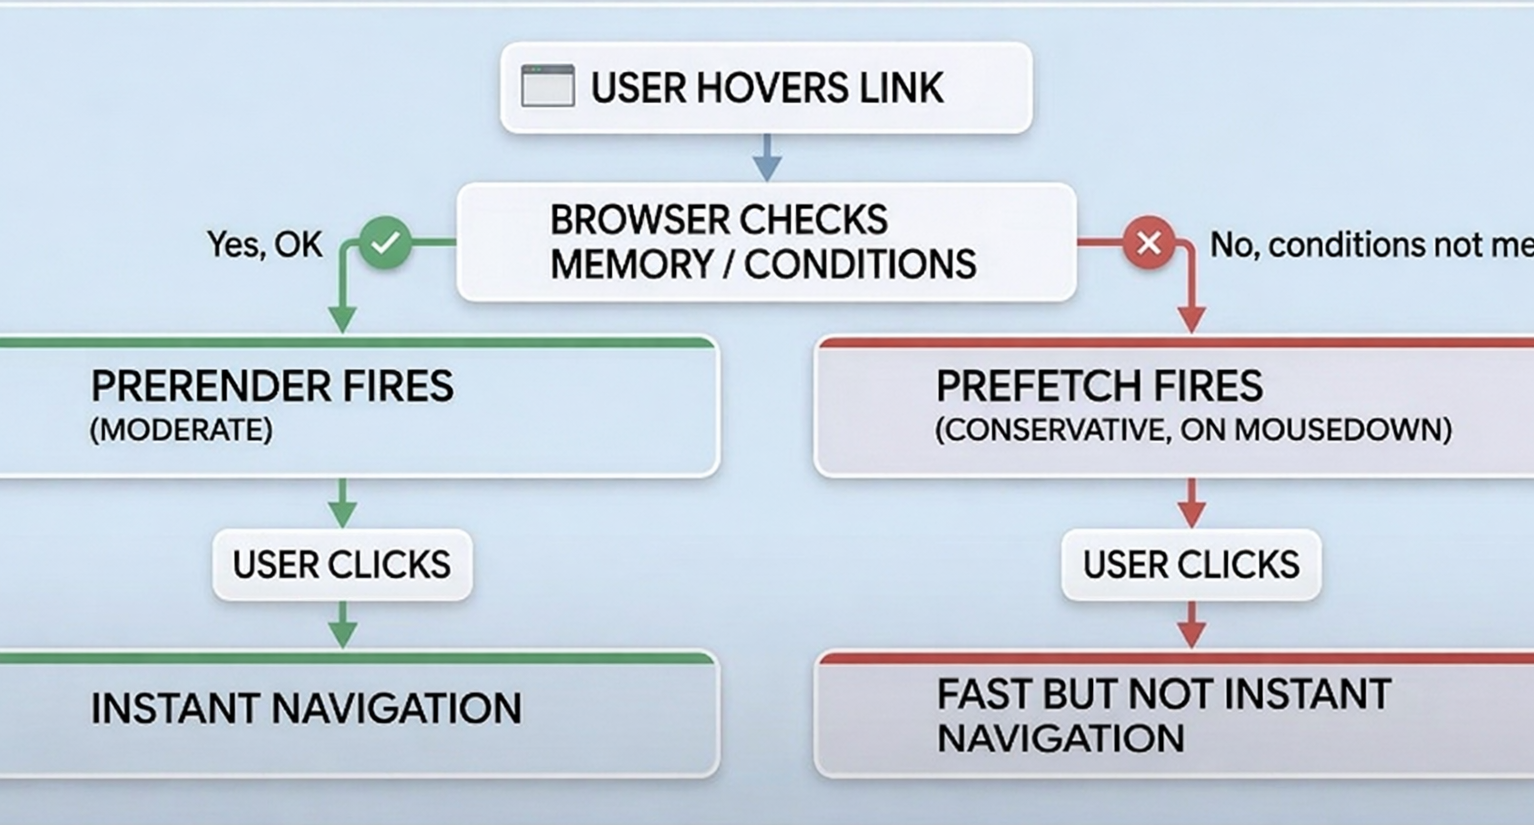
The Speculation Rules API goes a step further. It allows you to tell the browser to either:
Prerender is more aggressive. The browser loads the entire next page running JavaScript, retrieving assets, and building the DOM before the user clicks anything. When they do click, navigation feels instant because the work is already complete.
You set this up using a JSON block within a <script> tag:
<script type="speculationrules">
{
  "prerender": [
    {
      "where": { "href_matches": "/articles/*" },
      "eagerness": "moderate"
    }
  ]
}
</script>
The eagerness field controls when speculation starts:
conservative – Speculation only begins when the user presses the mouse button, indicating they are about to clickmoderate – Speculation starts when the user hovers over an item after a short delayeager – Speculation occurs for everything that fits the rule as soon as the page loads
One thing worth noting upfront is that this feature currently only works with Chromium-based browsers. It is supported by Chrome, Edge, and Opera, but not by Firefox or Safari. If many of your users use those browsers, keep in mind they will not see this feature, but it won’t cause any problems for them.
Now, let’s examine whether prerender really meets expectations.
To get accurate results, I needed a controlled environment, something simple enough to see how the API works, but realistic enough to matter.
The demo is a basic multi-page site made with HTML, CSS, and JavaScript. It has six pages: one homepage and five article pages. I didn’t use a framework or build tool. I kept it simple on purpose because I wanted clear results without optimization from frameworks.
The project structure looks like this:
speculation-rules-demo/
├── index.html
├── articles/
│   ├── article-1.html
│   ├── article-2.html
│   ├── article-3.html
│   ├── article-4.html
│   └── article-5.html
├── with-speculation.html      # homepage with rules enabled
├── without-speculation.html   # homepage with rules disabled
├── perf-logger.js             # captures Navigation Timing data
└── styles.css
Each article page has a realistic amount of content — some text, a few images, and a small script. The content is not too heavy, but it is enough that navigating the page takes some time.
The homepage exists in two versions: one with the Speculation Rules script and one without it. Both versions are the same in every other way; they have the same links, the same assets, and are on the same server.
Here is the block for the Speculation Rules used in the with-speculation.html version:
<script type="speculationrules">
{
  "prerender": [
    {
      "where": { "href_matches": "/articles/*" },
      "eagerness": "moderate"
    }
  ],
  "prefetch": [
    {
      "where": { "href_matches": "/articles/*" },
      "eagerness": "conservative"
    }
  ]
}
</script>
I used a moderate eagerness for prerendering so that it activates when you hover over elements. For prefetching, I used conservative as a fallback for cases when the browser skips prerendering.
To measure performance, I used two tools together. I relied on the Navigation Timing API, which I accessed through a script called perf-logger.js. On each page load, the script reads performance.getEntriesByType("navigation")[0] and logs key metrics to a visible on-page dashboard so you can see the numbers live as you navigate.
window.addEventListener("load", () => {
  const [nav] = performance.getEntriesByType("navigation");

  const metrics = {
    "DNS Lookup": nav.domainLookupEnd - nav.domainLookupStart,
    "TCP Connect": nav.connectEnd - nav.connectStart,
    "Time to First Byte (TTFB)": nav.responseStart - nav.requestStart,
    "DOM Content Loaded": nav.domContentLoadedEventEnd - nav.startTime,
    "Page Load Complete": nav.loadEventEnd - nav.startTime,
  };

  // render to dashboard...
});
I used the Performance panel in Chrome DevTools to manually capture the Largest Contentful Paint (LCP) for each navigation scenario and check the timing that the API reported.
I ran each scenario 10 times and averaged the results to reduce noise. The tests were done on localhost using Chrome 122, with the CPU throttled to 4 times slower and the network set to Fast 3G. These conditions helped make any differences easier to see.


You can find the full project on GitHub. Clone it, run it on a local server, and you’ll see the perf dashboard update in real time as you navigate between pages.
All tests were run on localhost using Chrome 122, network throttled to Fast 3G, CPU throttled to 4x slowdown. Each scenario was run 10 times and averaged. The three conditions I measured:
Here’s what came back:
| Metric | No Speculation | Prefetch | Prerender |
|---|---|---|---|
| TTFB | 9.6ms | 0.0ms | 7.3ms |
| DOM Content Loaded | 4,433ms | 2,369ms | 6,357ms |
| Page Load Complete | 10,644ms | 8,174ms | 14,420ms |
| Perceived Load* | 10,644ms8 | 174ms | 5,679ms |
Perceived Load =
loadEventEnd - activationStart. This is the number that reflects what the user actually experiences.


TTFB (Time To First Byte) is almost the same for all three tests because we’re using localhost, and the server responds quickly. On a real remote server, the difference would be more noticeable, with prerender making TTFB nearly zero.
The key number is Perceived Load. Prerender reduces this by 47% compared to a new page load, going from 10,644ms to 5,679ms. This means the browser is doing almost half the work before the user clicks anything.
Prefetch is in the middle, making the load about 23% faster than without it. It avoids fetching data over the network, but the browser still has to start from scratch for parsing and rendering after the click, so the improvements are real but limited.
The raw Page Load time for prerender is 14,420ms, which looks worse than the others, but that’s misleading. This number counts the time since the browser began prerendering in the background, which is 8,741ms before the click. The user doesn’t wait for any of that time. Perceived Load is the true measure.
When a page is prerendered, Chrome starts loading it before the user clicks on it. The activationStart value in the Navigation Timing API shows the time when the user actually navigated to the page. For prerendered pages, this time difference can be several hundred milliseconds or more, which means the browser had a head start in loading the page.
const [nav] = performance.getEntriesByType('navigation');

// activationStart > 0 means this page was prerendered
console.log('Was prerendered:', nav.activationStart > 0);
console.log('Head start:', nav.activationStart.toFixed(1) + 'ms');

// Perceived load = how long load took from the user's perspective
const perceivedLoad = Math.max(0, nav.loadEventEnd - nav.activationStart);
console.log('Perceived load:', perceivedLoad.toFixed(1) + 'ms');
In my tests, the activation offset on moderate eagerness averaged around 340ms, meaning the In my tests, the average activation time for moderate eagerness was about 340 milliseconds. This means the browser began to prerender about 340 milliseconds before I clicked, which is roughly how long I hovered before clicking. This timing is ideal for moderate eagerness.
Prefetch still has its benefits. It addresses a different issue. If prerendering is skipped due to low memory, data saver mode, or too many candidates, prefetch serves as a backup by preventing network fetches. Running both strategies together, like in the demo, is the best approach:
<script type="speculationrules">
{
  "prerender": [
    {
      "where": { "href_matches": "/articles/*" },
      "eagerness": "moderate"
    }
  ],
  "prefetch": [
    {
      "where": { "href_matches": "/articles/*" },
      "eagerness": "conservative"
    }
  ]
}
</script>
Prerender fires on hover. Prefetch fires on mousedown as a safety net. The user gets the best available option depending on what the browser can afford.
This is the best use for the API. For things like checkout funnels, onboarding steps, article series, or paginated content, if you can confidently say, “if the user is on step 2, they’ll go to step 3,” then prerendering the next step is usually a good idea.
For example, in an e-commerce checkout, going from the cart to shipping to payment, users don’t skip steps. Prerendering the next page makes that transition feel instant. This perceived speed can directly impact whether people complete their purchase at these important moments.
The more complex and heavy a page is, the more prerendering helps. Long articles with many images, dashboards with charts, or product pages with intricate layouts all benefit more than lighter pages. If your page takes 300ms to load, prerendering saves you 300ms. If it takes 2,000ms, prerendering saves you 2,000ms.
Navigation menus, sidebar article links, “next post” buttons — elements where hover intent is a reliable signal. eagerness: "moderate" is designed for exactly this: the user pauses on a link, the browser uses that pause as a signal to start prerendering, and by the time they click, the work is done.
When users can go anywhere on a page, like search results or menus with many links, prerendering might waste resources. If there are 20 possible pages, but the user only visits one, you end up prerendering the other 19 pages unnecessarily. This consumes memory and bandwidth, which is especially problematic on mobile devices.
eagerness: "eager" on a broad URL pattern is the mistake I see most often. It prerenders every matching link on page load, whether the user looks at them or not. On a page with 10 article cards, that’s 10 pages loaded in the background simultaneously. Don’t do this.
This is an easy issue to overlook. Prerendering runs JavaScript, so if your page collects analytics data, counts views, or performs other noticeable actions on load, this will happen during prerendering, even before the user sees the page. This can inflate analytics data or create incorrect counts.
To fix this, check if the page is being prerendered before running code that has side effects:
// Don't fire analytics until the page is actually visible
if (document.prerendering) {
  document.addEventListener('prerenderingchange', () => {
    fireAnalytics(); // now the user has actually landed
  });
} else {
  fireAnalytics();
}
It’s important to note that the prerendering API only works with Chromium browsers. As of late 2025, Firefox and Safari ignore <script type="speculationrules">. Since Chrome has the largest market share, you might still reach most users, but if many of your audience use Safari, which is common with premium products, the impact will be less than expected.
While browsers should skip prerendering under unsuitable conditions, they aren’t perfect. On devices with little RAM, trying to prerender a complex page can compete for memory with the current page. Browsers usually skip prerendering in these cases, so check how it performs on low-end devices if your audience uses them.
The actual implementation is the easy part. A single <script> tag in your <head> is all it takes to get started. The harder part is writing rules that are specific enough to be useful without being so broad that you’re prerendering pages nobody visits.
<script type="speculationrules">
{
  "prerender": [
    {
      "where": { "href_matches": "/articles/*" },
      "eagerness": "moderate"
    }
  ]
}
</script>
Drop this in your <head>, and you’re done. Chrome will start prerendering any link matching /articles/* when the user hovers over it for a moment.
This decision is very important. If you make the wrong choice, you might miss out on better performance or use up unnecessary resources.
conservative – This option activates when the user clicks down, right when they are about to make a choice. It provides the most accurate signal with minimal delay. Use this for prefetching when you want to ensure accuracy without wasting resourcesmoderate – This option activates when the user hovers over a link after a short delay of about 200 milliseconds. This is usually the best choice for prerendering. It gives the browser time to process while only activating when there is real user interesteager – This option activates as soon as the rules are set, regardless of user action. It prerenders every link that matches on page load. While it might seem appealing, it is often a mistake on pages with many links. Reserve this for clear situations, like a single “Continue” button during a checkout process<script type="speculationrules">
{
"prerender": [
{
"where": { "href_matches": "/checkout/shipping" },
"eagerness": "eager"
}
]
}
</script>
That’s a case where eager makes sense; there’s one next page, and almost every user goes there.
The where clause supports a few different matchers:
<script type="speculationrules">
{
  "prerender": [
    {
      "where": { "href_matches": "/blog/*" },
      "eagerness": "moderate"
    }
  ],
  "prefetch": [
    {
      "where": { "and": [
        { "href_matches": "/*" },
        { "not": { "href_matches": "/admin/*" } }
      ]},
      "eagerness": "conservative"
    }
  ]
}
</script>
The and / not operators help you be specific. Load everything except admin routes, and only prerender blog posts. This combination is exactly what you want for production. You won’t have to pay the prerender cost for pages that don’t need it.
You can also target specific link elements using selector_matches:
<script type="speculationrules">
{
  "prerender": [
    {
      "where": { "selector_matches": ".next-article-btn" },
      "eagerness": "moderate"
    }
  ]
}
</script>
This is useful when URL patterns alone aren’t specific enough; you can target the “Next” button in a reading flow without accidentally prerendering every link that happens to match the path pattern.
If you’re in a framework context or you need rules to change based on page state, you can inject them with JavaScript:
const rules = {
  prerender: [
    {
      where: { href_matches: '/articles/*' },
      eagerness: 'moderate',
    },
  ],
};

const script = document.createElement('script');
script.type = 'speculationrules';
script.textContent = JSON.stringify(rules);
document.head.appendChild(script);
This works the same as the static version. The browser picks up the rules as soon as the script tag is added to the DOM. You can also remove and replace the script tag to update rules dynamically useful if your navigation context changes after a user action.
As mentioned in the previous section, prerendering runs your JavaScript before the user has actually landed. If you have any code that fires on page load with side effects, guard it:
function trackPageView() {
  // your analytics call here
}

if (document.prerendering) {
  // page is being prerendered — wait until activation
  document.addEventListener('prerenderingchange', trackPageView);
} else {
  // normal navigation — fire immediately
  trackPageView();
}
Most major analytics libraries Google Analytics 4, Segment, and PostHog, handle this automatically now. But if you’re using a custom setup or a smaller library, check the docs or add the guard yourself.
Open Chrome DevTools, go to the Application tab, and look for Speculation Rules in the left sidebar under the Background Services section.

This panel shows you exactly which URLs were speculated on, which rules triggered them, and whether they succeeded or were skipped by the browser. If you’re seeing “Skipped” on everything, that’s usually a signal that your eagerness setting isn’t getting triggered — try moderate instead of conservative and hover deliberately over links before checking.
You can also verify in the Network tab that prerendered pages will show up as fetched before you clicked, with the initiator listed as the speculation rules script.
The Speculation Rules API can improve performance if used the right way. Prefetching is a helpful feature that slightly speeds things up by reducing network delays, saving a few hundred milliseconds during navigation. Prerendering, on the other hand, can enhance user experience.
The API is not a one-size-fits-all solution. It works best in situations where navigation is predictable. Using it too much can waste resources on pages that users might not visit. Its true strength is in helping developers better guess what users want, using hover signals and set rules.
In short, the Speculation Rules API can greatly improve perceived performance when used strategically, especially in predictable situations. Combining prerendering with prefetching yields the best results.

Learn how to build smooth staggered animations in CSS using modern features like sibling-index(), complete with practical examples, fallbacks, and accessibility tips.

Compare the top AI development tools and models of July 2026. View updated rankings, feature breakdowns, and find the best fit for you.

Learn how to detect unused and ghost dependencies in JavaScript projects using Knip, a project-level linter that keeps your dependency graph accurate.

Learn how Storybook MCP enables AI agents to understand your component library, generate accurate UI, and validate code using documentation, stories, and automated tests.
Would you be interested in joining LogRocket's developer community?
Join LogRocket’s Content Advisory Board. You’ll help inform the type of content we create and get access to exclusive meetups, social accreditation, and swag.
Sign up now

