Certain mistakes have become pretty common among developers working on React applications. These mistakes may be the result of an oversight, pressure to meet a deadline, or a lack of experience with React/JavaScript.

In this post, I’ll outline 10 mistakes developers frequently make when building React applications. While we use React in this tutorial, most of the techniques we’ll talk about here can be applied to other frameworks.
Note: This post assumes you understand and have used React in the past. If you don’t have any experience using React, you can refer to the documentation here to get started.
One mistake React developers often make is that they don’t create enough components.
Generally, there are two ways of writing applications: putting everything in one place (monolith), or splitting everything into smaller pieces (micro-services).
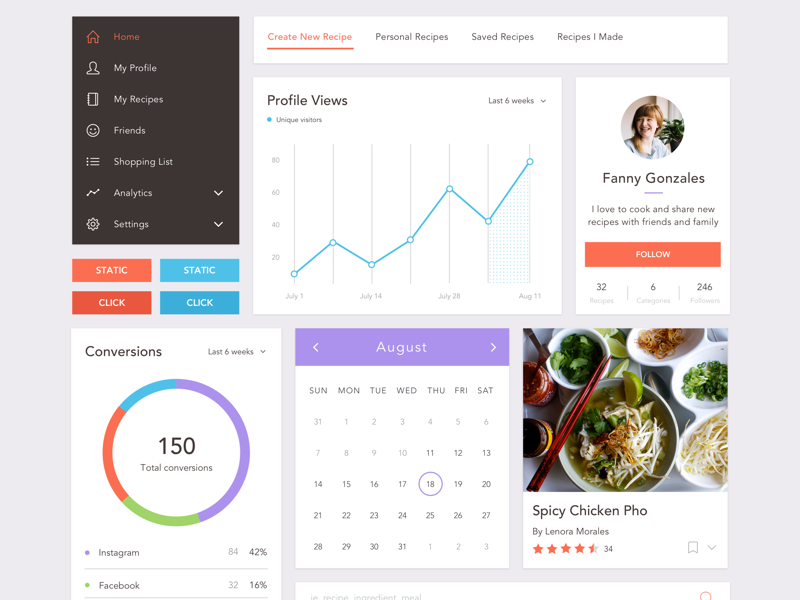
By design, React applications are meant to be componentized. Consider the following mockup:

To build this dashboard correctly using React, we would have to think of it as a set of components that form a page rather than a complete page itself.
That way, we can create different sets of components that — when put together — make up the whole page.
This technique not only saves you time, but it also saves you a lot of stress when debugging since you’ll instantly know which component is associated with each error.
When searching for a proper way to create components for reusability, the presentational and container component creation pattern is often one of the first to show up.
Presentational components are associated with how things look, while container components are associated with how things work.
A common mistake you’ll see in React applications is that presentation markup and app logic are fused into one component.
The downside of this approach is that you cannot easily reuse any of the components or logic without copying and pasting.

The Replay is a weekly newsletter for dev and engineering leaders.
Delivered once a week, it's your curated guide to the most important conversations around frontend dev, emerging AI tools, and the state of modern software.
If you use the presentational and creation pattern, you can achieve reusability of both the markup and logic more easily. You can also make UI changes without messing up the behavior.
Consider the components below:
This is a books component that is only designed to receive data from props and display it. It is a presentational component.
const Books = props => (
  <ul>
    {props.books.map(book => (
      <li>{book}</li>
    ))}
  </ul>
)
This books component manages and stores its own data, and uses the presentational component books above to display it.
class BooksContainer extends React.Component {
  constructor() {
    this.state = {
      books: []
    }
  }

  componentDidMount() {
    axios.get('/books').then(books =>
      this.setState({ books: books }))
    )
  }

  render() {
    return <Books books={this.state.books} />
  }
}
Mutation is the ability to change something. Consider the following state:
const person = {
   name : "John",
   sex  : "Male",
}
If you create a new variable in your application at some point and assign the person object to it with the intention of changing it, you may be surprised by the outcome:
const newPerson = person

newPerson.name = "Jane"
newPerson.sex  = "Female"
If you try to log both the person and newPerson object, you’ll notice that both now reflect the latest value that was set.
This often explains unusual component behavior. To solve this, you can use the .slice() method or the ES6 spread operator.
However, the best approach is immutability. You can either implement it yourself, or use Immutable.js and immutability-helper, which is recommended by the React team.
If you have ever worked on a React application that has many components, images, CSS files, and other files, you’ll agree that importing files from different directories can be tedious. Many times, we’ll import files like this:
../../../importone.js
../../../importtwo.js
We can already see that it isn’t neat, and changing the directory of a file will cause the import to fail. With the release of Create React App 3, we can now use absolute import paths.
To do this, create a jsconfig.json file in your root directory with the following:
// jsconfig.json
{
  "compilerOptions": {
    "baseUrl": "src"
  },
  "include": ["src"]
}
Now, you can import your files like this:
import React from 'react';
import { LINKS } from 'helpers/constants';
import Button from 'components/Button/Button';

function App() {
  return (
    <>
      <Button>
        This is my button
      </Button>

      <a href={LINKS.ABOUT}>About Us</a>
    </>
  );
}
export default App;
Not only is this cleaner, but it also means you don’t need to update the path in your code after changing the location of a file. Learn more about CRA V3 here.
key on a listing componentWe often run into situations where we would need to render a list of items. The code looks similar to this:
const lists = ['one', 'two', 'three'];

render() {
  return (
    <ul>
      {lists.map(listNo =>
        <li>{listNo}</li>)}
    </ul>
  );
}
For smaller applications, this may work. But when working with large lists, you’ll run into render issues when you try to modify or delete an item from the list.
React keeps track of each of the list elements on the DOM. Without it, it would not know what has changed in the list item. To fix that, you need to add a key to all your list elements like this:
<ul>
  {lists.map(listNo =>
    <li key={listNo}>{listNo}</li>)}
</ul>
Note: It’s always good practice to map an array of objects with IDs or any unique property and use the ID as a key. Keys in React should be unique. Even though our example works, it’s only because the elements in our sample array are unique.
This is one of the most common mistakes out there. It’s frequently overlooked because applications can still technically work without unit tests. A unit test allows you to test parts of your application independently to ensure a certain functionality works as expected.
For instance, you can write a unit test to check if a prop passed to a component was rendered on the browser.
You may wonder why you’d write such a small test. Sometimes you expect your prop to display properly after writing your components, but occasionally a conflicting CSS style may block it from displaying.
Writing a unit test saves you the time you’d spend tracking down that bug by pointing it out immediately (failing). They help you debug quickly across your application.
I often see incorrect data types being passed around in applications.
For example, say you want to pass a number 2 via props to another component. Often, you’d see it done like this:
<MyComponent value="2" />
This sends the value 2 to MyComponent as a string instead of a number. To send it as a number, write it like this:
<MyComponent value={2}/>
Defining the types via the prop-types package is the most reliable way of making sure you send the right props.
Prop-types are used to document the intended types of properties passed to components. React will check props passed to your components against those definitions, and warn in development if they don’t match.
You can learn more about prop-types here.
This is a common mistake I’ve seen in many React applications.
In addition to reusable components, we also have reusable functionalities in our applications.
This functionality is often hardcoded on a component-to-component basis, which leads to inefficient and inconsistent behavior between similar components.
All container components contain logic to grab a resource, save it to state, and manage errors.
Most times, this behavior is the same from one container component to another, but it can behave inconsistently when not written properly.
Consider the example above where we make an API call to grab a resource, set the state, and also handle errors.
If we extract that behavior to a helper class or function, we can reuse the same logic for API calls, setting state, and error handling.
In bigger React applications, a lot of developers use Redux or Flux to manage global state. This is very useful, especially when various parts of the application will benefit from having a shared state.
However, it’s inadvisable to use Redux or Flux to manage every state in your application.
Take, for example, a form component. If we want the state of a check button to always be checked whenever we visit it, the best approach is to manage it using local state method or useState (for Hooks) rather than using Redux or Flux.
Applications always get buggy after a while. Debugging is often a lot of work, since most of the time many components are involved.
With React dev tools, you can inspect the rendered tree of React elements, which is incredibly useful for seeing how various components build up a page.
The Redux dev tools also come with a host of features that let you see every action that has happened, view the state changes these actions caused, and travel back to before certain actions occurred.
You can add React dev tools as either a dev dependency or as a browser extension. Using them will save you a lot of development time.
Debugging React applications can be difficult, especially when there is complex state. If you’re interested in monitoring and tracking Redux state for all of your users in production, try LogRocket. 
 https://logrocket.com/signup/
LogRocket is like a DVR for web apps, recording literally everything that happens on your site. Instead of guessing why problems happen, you can aggregate and report on what state your application was in when an issue occurred.
The LogRocket Redux middleware package adds an extra layer of visibility into your user sessions. LogRocket logs all actions and state from your Redux stores.
Modernize how you debug your React apps – Start monitoring for free.
In this tutorial, we talked about some common mistakes React developers make when creating applications. We also discussed approaches and tools that may make the process more efficient and less painful.
Do you have any tips for common mistakes made during React development? Be sure to drop a comment.

@container scroll-state: Replace JS scroll listeners nowCSS @container scroll-state lets you build sticky headers, snapping carousels, and scroll indicators without JavaScript. Here’s how to replace scroll listeners with clean, declarative state queries.

Explore 10 Web APIs that replace common JavaScript libraries and reduce npm dependencies, bundle size, and performance overhead.

Russ Miles, a software development expert and educator, joins the show to unpack why “developer productivity” platforms so often disappoint.

Discover what’s new in The Replay, LogRocket’s newsletter for dev and engineering leaders, in the February 18th issue.
Would you be interested in joining LogRocket's developer community?
Join LogRocket’s Content Advisory Board. You’ll help inform the type of content we create and get access to exclusive meetups, social accreditation, and swag.
Sign up now
One Reply to "10 mistakes React developers make"
Good article, Ogundipe. The article explains the mistakes made while developing applications using React. If you follow the right methods to develop the applications then you can avoid such mistakes and write efficient code. Very helpful information for React developers. They can read this and avoid mistakes in the future.