Editor’s note: This article was last updated on 24 July 2023 to explain why multiple entry points are beneficial for modularity and scalability, and to add a section on why to to avoid ejecting.

I was recently tasked with building two applications in parallel. The first was a commercial web application, and the second acted as a platform to A/B test content messaging, page layouts, etc.
To be efficient, I wanted to reuse the majority of the core components and styles for both applications and interchange any branded assets (images, fonts, color palette, etc.) with a dummy brand using styled-components’ theming capabilities.
The challenge, then, was to create multiple applications from a single Create React App (CRA) application that shared common components and styles but with no trace of the other’s branded assets in their bundled build files. Thankfully, there are a number of ways to achieve this, ranging in complexity and development effort. In this article, we’ll explore why and how to add multiple entry points to a CRA application without ejecting.
Jump ahead:
There are a number of benefits to adding multiple entry points to a React application:
Not all React applications need multiple entry points. However, if your application meets any of the following criteria, you may want to consider adding multiple entry points:
Ejecting is a process that allows you to customize the underlying webpack configuration of a CRA application. It removes the single build dependency from your project and copies all the configuration files and the transitive dependencies (webpack, Babel, ESLint, etc.) into your project as dependencies in package.json.
This can be useful if you need to make changes to the build process that are not supported by the default CRA configuration. However, ejecting also has some drawbacks, which we’ll discuss next.
Ejecting has some drawbacks that you should consider before doing it:
Therefore, you should avoid ejecting unless you have a specific need or preference that cannot be satisfied by the default configuration of Create React App. Ejecting is not a requirement for building React apps, and it may cause more problems than it solves. You should only eject if you are confident and comfortable with managing your own build tooling.
Lerna is a popular tool that maintains multiple packages under a single repository (commonly referred to as a monorepo). It achieves this by linking identical dependencies across its packages, with the ability to publish them either collectively or individually.
Lerna can allow us to create a package for each application, and one for the core components to share between them. This solves the use case, but requires us to redesign the codebase and increase the complexity of the build process. Given that there are no immediate plans to add any other containers to the codebase, and that the testing application will likely not be required beyond the initial development phases, we decided that the associated overhead for this scenario was overkill.
A leaner approach would be to rewire the codebase with react-app-rewired, which tweaks the CRA build scripts without having to eject. In our case, we would use rewired to alter the application’s entry point at build time.
A major drawback here is that in doing so, we’d break the guarantees that CRA provides by hiding the configuration files from us, and the software itself is only lightly maintained by the community at the time of writing (customize-cra is a popular package built on top of rewired that supports CRA v2). This solution could be viable on a personal project, but it wasn’t something we were willing to depend on for a commercial application.
Ejecting is a one-way operation that cannot be undone. It allows us complete control of the project’s infrastructure by converting the codebase into a standard React application at the cost of transferring the responsibility of maintaining the exposed configuration to our team. This option is viable in some scenarios, but it’s usually considered a last resort due to the increased complexity and associated maintenance cost.
Each of these — and plenty more — are all viable solutions that come with their own set of benefits and drawbacks. However, for this particular scenario, we wanted to investigate a simple solution that allows us to work from a single codebase, not rely on third-party dependencies, and not eject from the safety net of CRA.
Let’s look at the default entry point in a CRA application. The src/index.js file imports the App container and renders it inside the div#root element defined in public/index.html:
/* src/index.js */
import React from 'react';
import ReactDOM from 'react-dom';
import App from './App';

ReactDOM.render(<App />, document.getElementById('root'));
/* public/index.html */
<body>
  <noscript>You need to enable JavaScript to run this app</noscript>
  <div id="root"></div>
</body>
We can introduce multiple points of entry by importing both containers into the index.js file and conditionally render them based on a constant variable. This allows us to switch between the containers, but it comes with a few caveats.
In order to switch between the builds, we’d need to manually update the isTestEnv variable. The variable always needs to be correctly set when each of the sites are deployed, otherwise the wrong code would be deployed to the production environment:
/* src/index.js */
import React from "react";
import ReactDOM from "react-dom";
import App from "./app";
import Test from './test';

const isTestEnv = true;

if (isTestEnv) {
        ReactDOM.render(<Test />, document.getElementById("root"));
} else {
        ReactDOM.render(<App />, document.getElementById("root"));
}
Let’s tighten this up by creating a .env file with a custom environment variable. Now we have the ability to choose the build target before running the local development script, and also permanently assign a value to each of our production environments:
/* .env */
REACT_APP_BUILD_TARGET=
/* index.js */
import React from "react";
import ReactDOM from "react-dom";
import { App } from "./App";
import { Test } from './Test';

if (process.env.REACT_APP_BUILD_TARGET === 'test')
        ReactDOM.render(<Test />, document.getElementById("root"));
} else {
        ReactDOM.render(<App />, document.getElementById("root"));
}
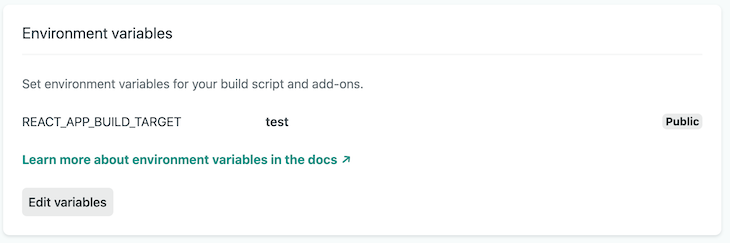
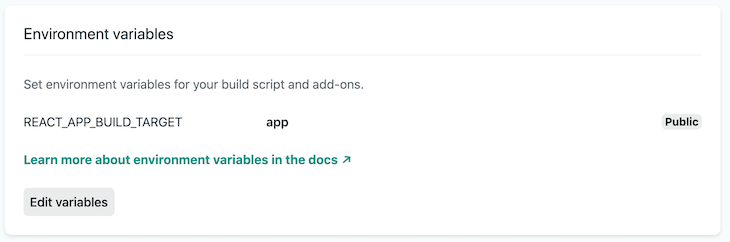
We used Netlify to create a production environment for each application. Both sites will be virtually identical. They’ll both point to the same GitHub repository and have master set as the production branch. The only difference will be their respective BUILD_TARGET environment variable: test is assigned to the testing site, and app for the main application:
We now have two production environments with the correct build target and free from human error. All that’s left is to ensure that only the code from the defined container appears in the bundled build.
Due to the nature of tree shaking, all of the imported containers in the application’s current index.js file would appear in the production build files, regardless of our build target. To remedy this, we can use CommonJS to conditionally require the desired container based on the BUILD_TARGET environment variable:
/* index.js */
require(process.env.REACT_APP_BUILD_TARGET === "test"
  ? "./test"
  : "./app"
);
This works, but setting the environment variable to anything other than test will import the main application. We can fix this with an if/else statement and further refine the solution with ES6 dynamic imports.
The importBuildTarget() function below will return a promise for each entry point and a fallback error in the event that the specified build target is not found. Once the import promise has resolved, it will render the requested build target with none of the other entry point files in the bundled build:
/* index.js */
import React from "react";
import ReactDOM from "react-dom";

function importBuildTarget() {
  if (process.env.REACT_APP_BUILD_TARGET === "app") {
    return import("./app.js");
  } else if (process.env.REACT_APP_BUILD_TARGET === "test") {
    return import("./test.js");
  } else {
    return Promise.reject(
      new Error("No such build target: " + process.env.REACT_APP_BUILD_TARGET)
    );
  }
}

// Import the entry point and render it's default export
importBuildTarget().then(({ default: Environment }) =>
  ReactDOM.render(
    <React.StrictMode>
      <Environment />
    </React.StrictMode>
  , document.getElementById("root")
  )
);
You can create multiple entry points in a CRA application without ejecting by using an environment variable to conditionally import container files. Doing this prevents code from the other containers appearing in the desired bundled build.
Special thanks to Stephen Taylor and Robin Weston for their valuable input, and to Jonathan Hawkes for his solution to all build target files appearing in the bundled build. Like the article? Let me know on Twitter.
Install LogRocket via npm or script tag. LogRocket.init() must be called client-side, not
server-side
$ npm i --save logrocket

// Code:

import LogRocket from 'logrocket';
LogRocket.init('app/id');
// Add to your HTML:

<script src="https://cdn.lr-ingest.com/LogRocket.min.js"></script>
<script>window.LogRocket && window.LogRocket.init('app/id');</script>

I migrated 20 production-style components from Tailwind to StyleX. Here’s what the data showed about LOC, CSS bundle size, build time, and type safety.

A guide for using JWT authentication to prevent basic security issues while understanding the shortcomings of JWTs.

Discover how to build, render, and automate product demo videos with Remotion, replacing traditional screen recordings with reusable React code.

Chrome’s Modern Web Guidance embeds modern web platform skills into AI coding agents, helping them choose native HTML, CSS, and browser APIs over legacy patterns.
Hey there, want to help make our blog better?
Join LogRocket’s Content Advisory Board. You’ll help inform the type of content we create and get access to exclusive meetups, social accreditation, and swag.
Sign up now

