Angular v18 introduced an experimental feature called zoneless change detection. This technology removes the need for Zone.js, a library that was previously used for change detection in Angular from the beginning. By eliminating Zone.js, we will see improvements in faster initial renders, smaller bundle sizes, and simpler debugging.

In the article, we will dive into Angular change detection, the new Zoneless feature, and how this new feature will benefit Angular developers.
Imagine we’re building a web app with Angular. Every time a user interacts with buttons or other elements in the app, the webpage needs to reflect these interactions in real time. This is where change detection kicks in: the mechanism ensures the user interface always mirrors the latest change in the app data. When a change occurs, change detection identifies the specific parts of our Angular app that need to be refreshed. This ensures users can see the most up-to-date information and interact with a reactive application.
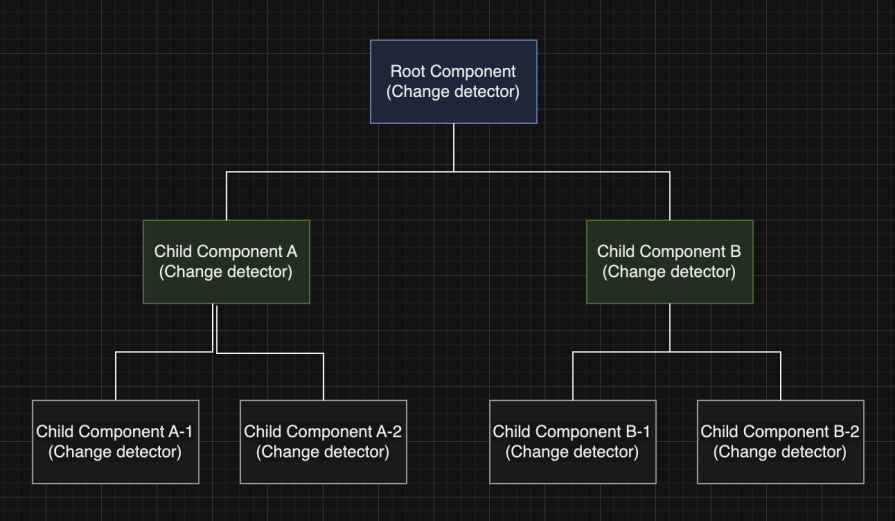
The diagram below illustrates that an Angular application is structured as a component tree, where the root component branches into child components. Each component acts like a building block with its internal change detector. These components connect to form a tree structure.
Because every component has a change detector, you can also think of this component tree as a change detector tree, mirroring the component structure:

Angular begins change detection at the bottom of the component tree. It iterates upwards through the tree, checking each component for changes. If a change is detected, Angular then evaluates the parent components of the changed component to see if it also affects them. This ensures that updates only occur in the necessary components and their children.
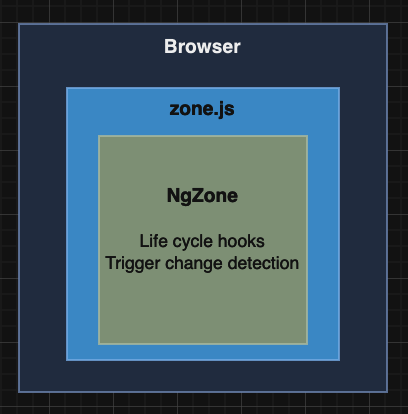
Under the hood, Angular leverages NgZone, a wrapper service around Zone.js. NgZone creates a special zone that encompasses the entire Angular application, providing lifecycle hooks and detecting application changes. This zone allows Angular to track all asynchronous operations triggered within the application. It abstracts some of the complexities of the underlying Zone.js functionality, enabling developers to focus on application logic rather than low-level zone manipulation:

The above diagram highlights the core interactions between NgZone, Zone.js, and the browser. The browser initiates asynchronous operations, Zone.js tracks their completion, and NgZone, built on Zone.js, triggers Angular’s change detection to update the view accordingly.
In Angular, Zone.js uses a technique called “monkey patching” to manipulate the browser’s native asynchronous APIs, such as timers, XHR requests, and DOM events. Instead of directly replacing these functions, Zone.js creates wrappers around them. These wrappers intercept the original behavior and inject additional logic. This allows Zone.js to track the start and finish of these asynchronous operations and inform Angular’s change detection mechanism when the asynchronous task is completed.
The current change detection mechanism based on Zone.js reveals some challenges when the application grows, including:
To address the above issues of Zone.js, the experimental “zoneless change detection” feature is introduced in Angular 18. This approach aims to achieve change detection without relying on Zone.js, potentially leading to performance improvements and a simpler development experience.
In zoneless change detection, when a component’s data or state changes, the component itself must inform Angular’s change detection mechanism. This eliminates the need for Zone.js as a middleman.
Zoneless change detection in Angular pinpoints the specific component that reported the change. Instead of scanning the entire component tree, Angular can update only the affected component and its direct descendants, making the process more efficient.
Below are the advantages of zoneless change detection, which make it one of the most exciting features in Angular 18:
Let’s explore using the Zoneless feature with a new Angular app. Before we begin, ensure you have Node.js and npm installed on your system.
Another prerequisite is Angular CLI. Run the following command to install the Angular CLI globally if you don’t already have it:
npm install -g @angular/cli
Then, let’s create a new Angular app named zoneless-app using the command below:
ng new zoneless-app --no-standalone
Once the project is generated, open the app.module.ts file in your code editor. Add the following provider in app.module.ts:
import { NgModule, provideExperimentalZonelessChangeDetection } from '@angular/core';
...
@NgModule({
  declarations: [
  ...
  ],
  imports: [
   ...
  ],
  providers: [
    provideExperimentalZonelessChangeDetection()
  ],
  ...
})
export class AppModule { }
provideExperimentalZonelessChangeDetection is a new function that enables the experimental zoneless change detection mode.
Next, we need to remove the Zone.js reference in the Angular.json file:
       "polyfills": [
             "zone.js" // remove this reference
           ],
That’s it, the Zoneless support for Angular is ready.
Now, we can test the change detection with Zoneless using the ChildCompoent below:
import { Component, Input } from '@angular/core';

@Component({
  selector: 'app-count',
  template: `
  <h3>Count in child component: {{Counter}}</h3>
  `
})
export class ChildComponent {
  @Input() Counter: any;
  constructor() { }
}
The ChildComponent is part of the AppComponent:
import { Component } from "@angular/core";

@Component({
  selector: 'app-root',
  template:`
  <h2>Zoneless Change Detection</h2>
  <app-count [Counter]='Counter'></app-count>
  <button (click)='CountIncrement()'>Add Count</button>`
})
export class AppComponent{

  Counter = 1;

  CountIncrement(){
    this.Counter = this.Counter + 1;
  }
}
When clicking the button in AppComponent, the counter value in ChildComponent increases. As the screenshot below shows, Angular detects this change and updates the view of ChildComponent to reflect the new value:

In Zone.js-based change detection, a timer event like setInterval/setTimeout is auto-detected. Does that work with zoneless change detection? Let’s find out with the following AppComponent example:
import { Component, OnInit, inject } from "@angular/core";

@Component({
  selector: 'app-root',
  template:`
  <h2>Zoneless: Async Change Detection</h2>
  <div>Counter 2: {{ counter2 }}</div>
  `
})
export class AppComponent implements OnInit{

  counter2 = 0;

  ngOnInit() {
    setInterval(() => {
      this.counter2 += 1;
    },1000);
  }
}
In the above code, when the AppComponent is initiated, the counter2 property is incremented within the timer function of setInterval. However, the counter2 value change is not reflected in the view.
The zoneless change detection mechanism isn’t automatically triggered when the value changes inside the timer function. To ensure updates are reflected in the view, we must tell Angular that something has changed explicitly. One common approach is to use ChangeDetectorRef.markForCheck() as the code below:
 cdr = inject(ChangeDetectorRef);

 setInterval(() => {
      this.counter2 += 1;
      this.cdr.markForCheck();
    },1000);
Here, we inject the ChangeDetectorRef service into the component and call its markForCheck() method inside the callback function. This informs Angular that the component needs to be re-evaluated for potential changes. This applies to asynchronous events like API calls in Angular as well.
Besides the markForCheck method, there are a few other approaches to inform Angular that change occurs:
It is important to note that the Angular team has committed to continue supporting Zone.js because many existing Angular applications rely on it. Zone.js will continue to receive critical bug fixes and security patches. This ensures existing applications using Zone.js remain stable and secure.
At the moment, the Zoneless feature is still experimental. That means there can be significant changes in APIs and behavior, and it isn’t ready for production.
The Angular team also committed to a smooth migration path for developers to move the Zone.js app to Zoneless. They have enabled Zoneless support in the Angular CDK and Angular Material in Angular 18. More details can be found in the Zoneless official documentation here.
Currently, the zoneless change detection in Angular is an optional experimental feature. However, In the Angular roadmap, making Zoneless the default is part of the goal of improving the Angular developer experience. Another goal in the Angular roadmap is to support streamed server-side rendering for Zoneless applications in the future release.
While its future is not yet set in stone, Zoneless is promising and aligns with modern web development trends to improve performance and developer experience. As Angular continues to evolve, zoneless change detection will likely become a more prominent and default option for Angular developers.
I hope you find this post useful. You can find the related source code in this GitHub repository.
Debugging Angular applications can be difficult, especially when users experience issues that are difficult to reproduce. If you’re interested in monitoring and tracking Angular state and actions for all of your users in production, try LogRocket.

LogRocket lets you replay user sessions, eliminating guesswork by showing exactly what users experienced. It captures console logs, errors, network requests, and pixel-perfect DOM recordings—compatible with all frameworks.
With Galileo AI, you can instantly identify and explain user struggles with automated monitoring of your entire product experience.
The LogRocket NgRx plugin logs Angular state and actions to the LogRocket console, giving you context around what led to an error, and what state the application was in when an issue occurred.
Modernize how you debug your Angular apps — start monitoring for free.
Hey there, want to help make our blog better?
Join LogRocket’s Content Advisory Board. You’ll help inform the type of content we create and get access to exclusive meetups, social accreditation, and swag.
Sign up now
A breakdown of the wrapper and container CSS classes, how they’re used in real-world code, and when it makes sense to use one over the other.

This guide walks you through creating a web UI for an AI agent that browses, clicks, and extracts info from websites powered by Stagehand and Gemini.

This guide explores how to use Anthropic’s Claude 4 models, including Opus 4 and Sonnet 4, to build AI-powered applications.

Which AI frontend dev tool reigns supreme in July 2025? Check out our power rankings and use our interactive comparison tool to find out.