WordPress is currently the world’s most popular content management system and is used by 39 percent of all websites. It’s a great solution for clients who would like to manage their own content. As a developer, you’re responsible for the installation and setup.

Tools such as Softaculous scripts make basic installation much easier, but there are still many tedious post-install jobs that are much faster on the command line. Anything typed on the command line can be turned into a script, so you can automate everything you do. Once you learn the basics you’ll be able to save a lot of time, especially if you need to install and setup WordPress on a regular basis.
In this tutorial, we’ll explain how to install and set up WordPress on a remote, shared server using WP-CLI. It’s primarily geared toward frontend developers who have limited knowledge of Linux and servers.
We’ll cover the following in detail:
To follow along, you’ll need:
SSH secure shell software on your local computer. This allows you to securely log in and execute commands on the serverWP-CLI is the official command-line interface for WordPress. It enables you to perform myriad WordPress development tasks, such as updating plugins, configuring multisite installations, etc., from within the command line, without using a web browser.
The primary benefit of WP-CLI is that it saves you time because it enables you to perform simple tasks that only require a few lines of code without leaving the command line. This helps boost your efficiency because you can access many of the features from the WordPress Admin panel without logging into the site.
The WP-CLI handbook includes reference guides, tutorials, and everything you need to get started using the tool.
SSH uses encryption to allow you to log into a remote server and run commands securely. It is possible to log on using just a password, but the best practice is to use a public and private key. The private key is stored on your machine, and the public key only on the server:

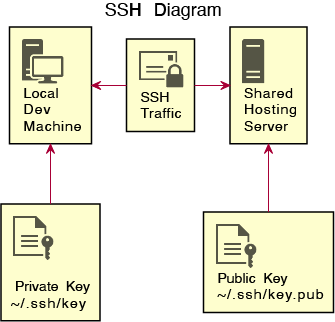
Once this is set up, you can access the server through your terminal as if it were your own local machine.
OpenSSH is an open-source implementation of the SSH protocol supplied with most Linux distributions, macOS, and Windows 10.
To check you have OpenSSH installed on your local computer, type ssh-V. You should get a result similar to:
OpenSSH_8.0p1, OpenSSL 1.1.1c FIPS 28 May 2019
This version seems old but has updated security backports.
To use SSH, you need to acquire the following information from/about the server:
HostName — The name used to identify the server on a networkUser — Your user name on the serverPort — An address on the server associated with the protocol type for the communication (SSH in this case)IdentityFile — The private key that matches the public key on the serverWe are assuming, for the sake of simplicity, that the server has the public and private keys we are going to use. Often, they’re both created on the local computer and the public one is uploaded to the server.
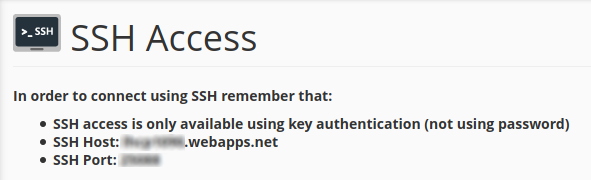
We’ll use the popular cPanel GUI to locate the information we need. If you don’t have cPanel, you’ll need to contact your hosting provider to get the required information. I suggest you send the following as a support ticket:
I would like to log onto my server using SSH and require the following information:
HostName,User,Port,IdentityFile(with info on where to download the public and private key). Thanks.
HostName and PortIn cPanel, the information you need is under security > ssh:

HostName is displayed as SSH Host, and Port is displayed as SSH Port:
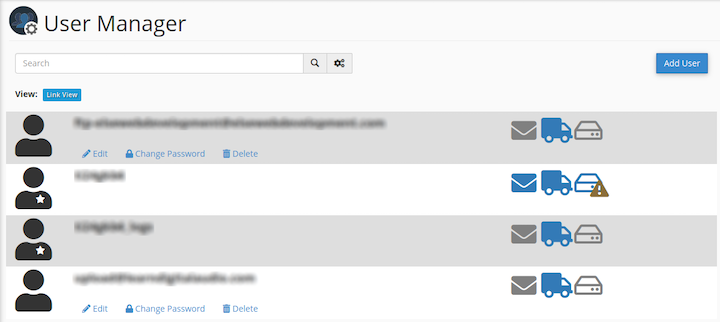
UserThis is your user name on the server. Navigate to preferences > user manager:

In user manager, you’ll see all users, possibly including strange-looking ones set-up by your hosting company that seem to serve no purpose. Hopefully, it will be obvious which user is you — copy and paste it somewhere safe.
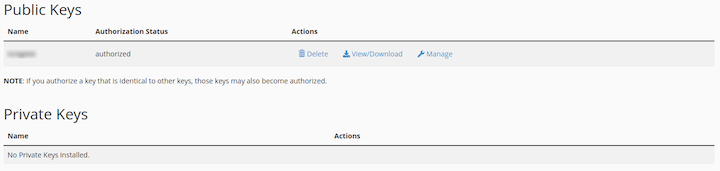
IdentityFilesecurity > ssh

Press the manage SSH keys button and you’ll be greeted by a page that includes all the current public and private keys available. Download the public and private keys and copy them to your ~/.ssh directory.
In the image below, there’s no private key; it was deleted because it was no longer needed on the server.
If you want to generate and use your own keys, check out this guide to setting up SSH keys.
config fileThe fastest way to log on to your server using SSH is to create a file called config in the ~/.ssh directory. Copy and paste this template and fill in your own details:
Host any-alias-you-like
    HostName xxxxxxxx.xxxxxxx.xxx
    User xxxxxxxx
    Port xxxxx
    IdentityFile ~/.ssh/private-key-file
Now you can log on at any time with:
ssh any-alias-you-like
Follow the steps below to install WP-CLI on your server.
Linux is a multiuser operating system. You’re potentially just one of many users. The system administrator is a special user who has root privileges. They can do anything they want. Also, the root of the file system is /, which is a separate but related concept.
A typical shared server file system looks like the diagram below. Since you’re logging in as a normal user, the only area that concerns you is within your home directory.
/                       < type `cd /` to go to the root of file system
├── tmp
├── etc
├── run
├── root
├── dev
├── sys
├── proc
├── mnt
├── boot
├── var
├── home
│   ├── user1           < type `cd` to go to your home directory
│   │    └── www        < root directory of your webserver
│   │        └── blog   < subdirectory
│   └── user2           < other users you can't see unless you are the root user
├── usr
├── lost+found
├── srv
├── sbin -> usr/sbin
├── opt
├── media
├── lib64 -> usr/lib64
├── lib -> usr/lib
└── bin -> usr/bin
When you’re successfully logged into your server, the shell command prompt will change to username@host. It’s assumed that you’ll be using a shared server and will have no root access.
To go to your home directory, type cd. You can type ls to view the contents or ls -la to see the hidden files and use the long listing format.
You’ll need a directory we have permission to use and that is in your $PATH. To view your $PATH type echo $PATH. Each location is separated by a :. It looks a mess, so if we replace : with a new line \n using the tr command, we can see the results more clearly:
echo $PATH | tr ':' '\n'
Since we’re looking for a place in our home directory, we can filter the results using grep:
echo $PATH | tr ':' '\n' | grep "home"
On a fresh Centos install, you would see:
/home/user-name/.local/bin
/home/user-name/bin
/home/user-name/.local/bin
/home/user-name/bin
Don’t worry if you see multiple entries; it just means they were added multiple times by someone or some random script. If you have /home/username/bin, then use that. If not, you’ll need to create it and add it to the $PATH yourself.
Execute the following commands to install WP-CLI onto your server into the ~/bin/ directory:
curl -O https://raw.githubusercontent.com/wp-cli/builds/gh-pages/phar/wp-cli.phar # download
chmod +x wp-cli.phar # make executable
mv wp-cli.phar ~/bin/wp # move and rename
To test that it is installed and working:
wp --info
You can update to the latest version easily at any time:
wp cli update
Note: If help is required with a WP-CLI command, use wp [name of command] --help.
To install WordPress, follow the steps below.
Every server will be set up in a slightly different way. In general, if you’re in your home directory, you should see a directory called www. That’s where your websites live; it’s the root directory of your web server. If you were to install here, the site would live at the root location — e.g., http://example.com/. If you want the site to appear in a subdirectory, you would make one and install it into that:
cd www
mkdir blog
# Install into the blog directory
Now WordPress will appear at http://example.com/blog/
You may also see directories in your home directory with the names of websites like examplesite.com. This is just how your hosting is set up. If you’re unsure about where to install, consider asking your hosting’s tech support.
WordPress needs a MySQL database to operate. You need to create this database and add a user that can access it. If you don’t have cPanel you will probably have phpMyAdmin and can use that, or ask your hosting tech support to create a database for you.
In cPanel, it’s simple to create the database. Just follow along with the wizard and give the user ALL PRIVILEGES.
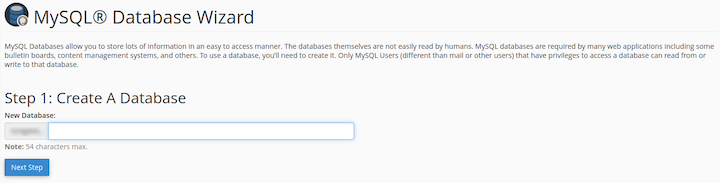

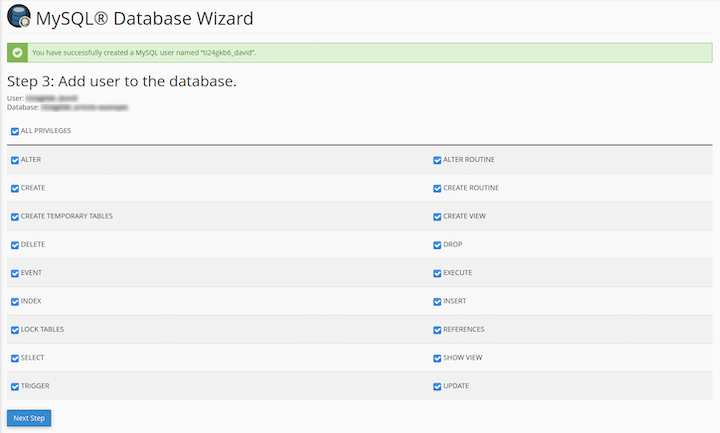
If you’re extremely security-conscious, you might want to remove all excess privileges after installation.
The first step is to cd into the directory you want to install WordPress in, then download the latest WordPress in the right language. In our example, we use en_GB:
cd www
wp core download --locale=en_GB

Downloading WordPress 5.5.3 (en_GB)...
md5 hash verified: 1c2c3d7bde057d99a869cd33331b2114
Success: WordPress downloaded.

# and look inside the directory with `ls`

user@host [~/www]$ ls

index.php    readme.html      wp-admin            wp-comments-post.php  wp-content   wp-includes        wp-load.php   wp-mail.php      wp-signup.php     xmlrpc.php
license.txt  wp-activate.php  wp-blog-header.php  wp-config-sample.php  wp-cron.php  wp-links-opml.php  wp-login.php  wp-settings.php  wp-trackback.php
wp-config.php by adding the database detailsNext, set up the wp-config.php file. We will add details of the database we created:
wp config create --dbname=exampledb --dbuser=exampledbuser --dbpass='securepswd'
dbname rather than, for example ti8jhjsdf_dbname, if need beThis is the final stage. Here we add the rest of the details needed, including:
--url=The address of the new site, start with https:// and end with /subdirectory if needed
--title=The title of the new site
--admin_user=The name of the admin user, don't pick 'admin' for security reasons
[--admin_password=] The password for the admin user. Defaults to randomly generated string.
--admin_email=The email address for the admin user

wp core install --url=https://example.com --title="My Site" --admin_user=exampleAdmin --admin_password=securepass [email protected]
Now you can log in as admin at https://example.com/wp-admin.
Now that we have a basic WordPress install, let’s customize it.
This is good for SEO. It means the URL will be your post name with no extra, such as the date it was published.
wp rewrite structure '/%postname%/' --hard
WP comes with a couple of plugins you probably don’t want. To delete them:
wp plugin delete akismet hello
You will have a large list of plugins you want. Add them to this list:
wp plugin install antispam-bee --activate
You can list your current plugins with:
wp plugin list
To install themes in WordPress:
wp theme install twentytwenty --activate
wp theme install ../my-theme.zip
The following commands within WP-CLI can help save you a ton of time.
wp plugin verify-checksums --all
This can be made part of a backup script to automate backing up your entire WP site:
wp db export
Remember to delete it after — you don’t want it in a public folder.
This is very handy for when you’re cropping images for use on your site:
wp media image-size
I hope you can now appreciate the huge advantages available to people using WP-CLI over SSH. It may seem like a lot to learn if you’re not familiar with the command line, but once you know the basics, you possess a developer superpower!
WP-CLI has many commands, and we only scratched the surface in this tutorial. Don’t forget to look at the WP-CLI handbook to learn more about this fantastic software.
The big advantage that may not seem obvious at first is that all of these commands can be automated by placing them in scripts. Once you have installed and set up a site, you can paste all the commands in a script and do it all again with the push of a button.
For example, here are the commands we used in this article in a script:
Install LogRocket via npm or script tag. LogRocket.init() must be called client-side, not
server-side
$ npm i --save logrocket

// Code:

import LogRocket from 'logrocket';
LogRocket.init('app/id');
// Add to your HTML:

<script src="https://cdn.lr-ingest.com/LogRocket.min.js"></script>
<script>window.LogRocket && window.LogRocket.init('app/id');</script>
#!/bin/bash

wp core download --locale=en_GB
wp config create --dbname=exampledb --dbuser=exampledbuser --dbpass='securepswd'
wp core install --url=https://example.com --title="My Site" --admin_user=davidAdmin --admin_password=securepass [email protected]

wp rewrite structure '/%postname%/' --hard
wp plugin delete akismet hello
wp plugin install antispam-bee --activate

A guide for using JWT authentication to prevent basic security issues while understanding the shortcomings of JWTs.

Discover how to build, render, and automate product demo videos with Remotion, replacing traditional screen recordings with reusable React code.

Chrome’s Modern Web Guidance embeds modern web platform skills into AI coding agents, helping them choose native HTML, CSS, and browser APIs over legacy patterns.

Learn how to use Fallow to analyze AI-generated code, detect dead code, duplicate logic, and complexity issues, and integrate automated code quality checks into your AI-assisted development workflow.
Would you be interested in joining LogRocket's developer community?
Join LogRocket’s Content Advisory Board. You’ll help inform the type of content we create and get access to exclusive meetups, social accreditation, and swag.
Sign up now

