The InterPlanetary File System, or IPFS, is a peer-to-peer hypermedia protocol. To put it simply, IPFS allows you to store assets in decentralized storage.

Blockchains like Ethereum allow you to deploy smart contracts to the blockchain network, but if you store your assets or static files in the Ethereum network itself, it won’t be efficient. This will increase cost, as well as provide a slower solution for accessing files. IPFS was introduced to solve this issue.
Cloudflare Pages allows you to host your dynamic pages in the cloud from your Git hosting providers, like GitHub or GitLab. You can deploy a complete full-stack application to the cloud using Cloudflare Pages with Cloudflare Workers.
You can quickly deploy a site built with Hugo, Jekyll, or Next.js to Cloudflare Pages. Cloudflare also allows a gateway to the IPFS network and you can access files hosted on IPFS using these gateways. You can also publish your site to the IPFS network from Cloudflare Pages.
In this article, we’ll set up a basic Next.js application, publish it using Cloudflare Pages, and then serve it to the IPFS network.
N.B. Cloudflare hasn’t introduced this service to everyone yet. The service might be available to the public by the end of 2022.
As we mentioned, IPFS is an abbreviation of “InterPlanetary File System.” The name kind of sounds like technology from a Sci-Fi movie.
In a blockchain, everything happens on the nodes. These nodes can communicate with each other and exchange files.

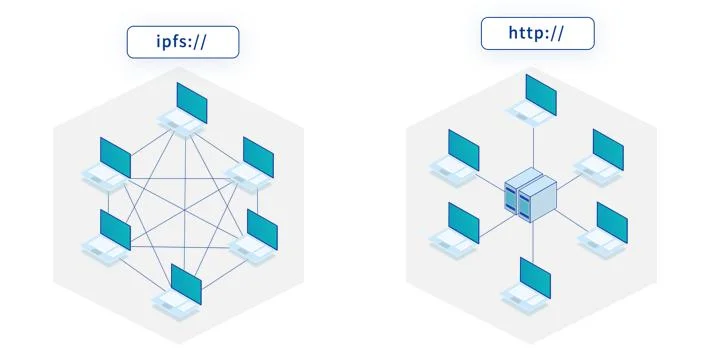
The picture above demonstrates the IPFS network beautifully. The image on the right represents a centralized storage system where all the data is stored on a centralized server and all other computers request the centralized server for accessing the data.
In IPFS, the data is distributed among nodes. It is similar to a blockchain in that it uses nodes to contribute computing power for verifying transactions. IPFS has thousands of individual nodes that are connected to the IPFS network and share their bandwidths for storing files from the IPFS network.
IPFS solves some significant issues that centralized systems have. For example, a centralized system is more prone to attacks and data leaks. As all the information is stored in one place, attacking a single point can leak essential information.
Additionally, if somehow the central entity fails, you’ll no longer be able to access your files. Such an incident happened in 2021 when Facebook, Instagram, and WhatsApp servers went down for hours. People could not access their chats or media stored on these platforms. But this is not the case with IPFS.
Centralized systems can also be censored quickly. Many websites in particular countries are banned because they depend on a centralized system. However, when using IPFS, your websites or assets cannot be censored.
The working of IPFS is very interesting. In traditional Web2 storage systems, we visit the location of the file we want to access.
When accessing a specific file using http:// or https://, a particular file is queried using its location. The file can be an image, webpage, media file, etc. The link is an identifier that maps to a specific server or a set of servers.
The owner of the server controls the assets stored within the server. If the location still holds the file, it’ll send it to the user and the browser will load it. If the server goes down or the owner decides to remove the files, you’ll no longer be able to access them.
To resolve these issues, IPFS uses content addressing. Content addressing uses a fingerprint of the file to address it. Content stored in the IPFS gets its content identifier, or CID.
The CID is nothing but a hash. The hash value will never change, so whenever you try to access the content using the same CID, you’ll always get the same thing.
You can learn more about how IPFS works here.
Cloudflare Pages is a JAMStack platform for deploying websites. It is developer-focused and easily integrates with any Git provider. It also deploys websites into the Cloudflare edge network, helping websites load faster.
You can also use Cloudflare Workers for integrating dynamic functionalities. You can write server-side codes with Cloudflare Workers without running a dedicated server.
Cloudflare Pages supports most of the popular frameworks and has dedicated guides for different frameworks. It provides a simple interface, with which you can quickly deploy your JAMStack website to the cloud. Cloudflare offers many more tools to integrate with Pages to make it a full-stack application. You can write your serverless code and integrate it with Cloudflare Pages as well.
Cloudflare also offers services like R2 which offers object storage for storage management.
Cloudflare has started providing services for building and accessing Web3 products. It provides services to deploy your site to Cloudflare Pages and serve it to the IPFS network. Let’s briefly discuss how it’s providing this service.
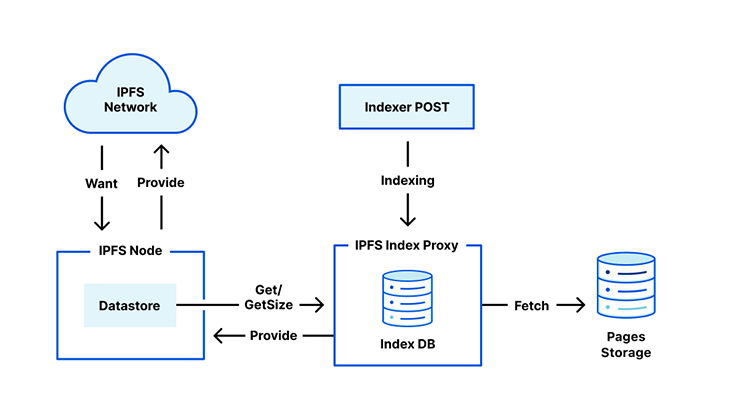
Opting for service in Cloudflare will make a call to the IPFS index proxy. The primary purpose of this call is to fetch your website’s files and convert them to CIDs. Then, an IndexDB is used for associating the CIDs with the files.
Once this step is completed, the call tells the Cloudflare IPFS nodes that the CIDs are available for the files. Now, you can access the files using the CID.

Let’s deploy a React application to Cloudflare Pages. Though we are deploying a React app, you may choose any other popular framework. You can check out the Cloudflare framework guides to get an idea of deploying a site built with your favorite framework.
In this article, we’ll use create-react-app to generate a React application. You can run the following command in your terminal:
npx create-react-app demo-app
Here, demo-app is the application name you want to generate. Once the scaffolding is complete, cd into the folder and run npm run start. This will start your React application on port 3000. You can access your application from the localhost:3000 URL.
Our basic Next.js application consists of a single-page index.js file. This file renders as the homepage. You can customize the page as you want. For this example, let’s add a simple heading.
The final code for index.js will be like the following snippet:
import Head from 'next/head';
import Image from 'next/image';
import styles from '../styles/Home.module.css';

export default function Home() {
  return (
    <div className={styles.container}>
      <Head>
        <title>Create Next App</title>
        <meta name='description' content='Generated by create next app' />
        <link rel='icon' href='/favicon.ico' />
      </Head>
      <main className={styles.main}>
        <h1 className={styles.title}>Hello World!</h1>
      </main>
    </div>
  );
}
Now, push this application to a GitHub repository. You can either use the command line or the Git VS Code Git extension if you are using VS Code.
Once the repository is pushed to GitHub, open Cloudflare Pages from the Cloudflare dashboard ( you’ll have to create a new account if you don’t have one). From the Cloudflare Pages menu, click on the Create a Project dropdown.

Here, you’ll have three options. The first option is to use a Git hosting provider for deploying. The second option is to directly upload the files, and the third is the link to their Wrangler CLI guide.
You can use Cloudflare’s Wrangler CLI for writing Cloudflare Workers. For this article, choose the first option.
Currently, Cloudflare supports GitHub and GitLab. You can select your preferred Git hosting provider from the next window and give the necessary permissions to Cloudflare. Once you successfully configure GitHub or GitLab, you’ll be able to see the repositories here.
Select the repository you want to deploy and click on Begin Setup. You can change your project’s name from the next screen or choose the branch you want to deploy. This window might seem similar to other services like Netlify or Vercel if you’re familiar with them.
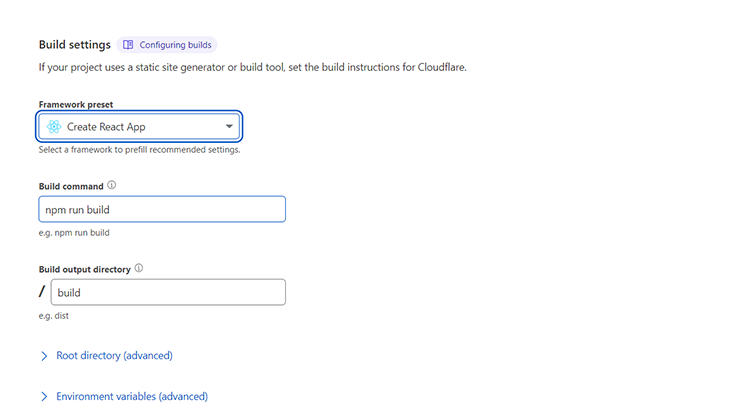
Select Create React App as the framework preset from the Build settings option, since we’ll be deploying a React site here.

You can choose the framework preset depending on your framework. For Create React App, the rest of the options stay the same.
Once the deployment is complete and successful, you’ll be given a URL from which you can access your deployed website. You can also set up a custom URL for your application from your project’s dashboard page.
Now that you’ve set up your application, you can serve your application to IPFS. Opt-in for Cloudflare Pages integration with IPFS from your dashboard (remember, this option is not yet available to everyone).
Once you opt for the service, Cloudflare will index the contents of your application. Once the indexing is complete and successful, Cloudflare will provide you with a CID of your indexed contents. Using this CID, you can access your website using any IPFS gateway provider like cf-ipfs.com or choose one from this list.
Your IPFS CID will look something like QmU1NvrJgDEBJieYKzjGEYUm6K8xb3uSUREfhaSzF5Gkgi.
With an IPFS gateway like ipfs.co, your website’s IPFS link will look like https://ipfs.io/ipfs/QmU1NvrJgDEBJieYKzjGEYUm6K8xb3uSUREfhaSzF5Gkgi\. Your website is now hosted on the IPFS network.
You can also set up a single domain instead of the whole CID to access your website through HTTP or IPFS protocol. Once you set up a custom domain for your website from Cloudflare, you can use DNSLink to use a single URL to access your website via IPFS or the standard protocol, depending on the client. You just need to create a new TXT record on your domain management settings with the record dnslink=/ipfs/FOLLOWED_BY_YOUR_CID.
You can now access your website with ipns://YOUR_DOMAIN.com.
This article discussed IPFS, Cloudflare Pages, and how websites can be deployed to Cloudflare Pages using GitHub. We also discussed how IPFS with Cloudflare works. Cloudflare also provides other Web3 services like custom IPFS gateways.
This article also gave you a brief idea of how you can leverage Cloudflare Pages to deploy your application to the IPFS network. Even though the Cloudflare Pages integration with IPFS is not yet available to everyone to try, we can expect to be it live for the public by the end of 2022.
Client-side issues that impact users’ ability to activate and transact in your apps can drastically affect your bottom line. If you’re interested in monitoring UX issues, automatically surfacing JavaScript errors, and tracking slow network requests and component load time, try LogRocket.

LogRocket lets you replay user sessions, eliminating guesswork around why bugs happen by showing exactly what users experienced. It captures console logs, errors, network requests, and pixel-perfect DOM recordings — compatible with all frameworks.
LogRocket's Galileo AI watches sessions for you, instantly identifying and explaining user struggles with automated monitoring of your entire product experience.
Modernize how you debug web and mobile apps — start monitoring for free.
Hey there, want to help make our blog better?
Join LogRocket’s Content Advisory Board. You’ll help inform the type of content we create and get access to exclusive meetups, social accreditation, and swag.
Sign up now
A breakdown of the wrapper and container CSS classes, how they’re used in real-world code, and when it makes sense to use one over the other.

This guide walks you through creating a web UI for an AI agent that browses, clicks, and extracts info from websites powered by Stagehand and Gemini.

This guide explores how to use Anthropic’s Claude 4 models, including Opus 4 and Sonnet 4, to build AI-powered applications.

Which AI frontend dev tool reigns supreme in July 2025? Check out our power rankings and use our interactive comparison tool to find out.