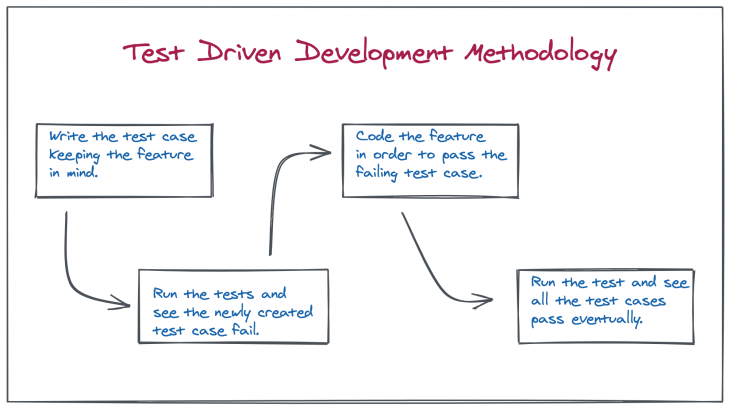
We all know how important it is to make sure that we are not only writing good quality, concise, maintainable code but also creating features that are well aligned with all the product requirements that don’t break at the onset of a novel scenario that slipped past the developer. That is where the TDD (Test-Driven Development) methodology has gained quite a name for itself in the last two decades. To summarize TDD to the uninitiated, it is where we follow these steps while developing any new feature:

While this works out pretty well with respect to developing REST APIs (which have a strong, predefined contract), it does not work so well when we try to apply it to UI development. There are several reasons for it, though the most prominent one is that UI tests primarily fall under 2 categories:
QA Wolf is a tool that promises to simplify your UI testing process. As discussed earlier, the hard part of writing a UI test is simulating the user actions to reach a state that we actually want to assert and that is exactly the part which QA wolf simplifies for us. As per the QA Wolf home page, it converts our actions to playright/Jest code without the need to write any boilerplate. That is because QA Wolf uses the chromium browser instance and puppeteer to actually run our UI code as well as capture UI interactions in order to generate tests automatically. The framework also has a lot of safety nets in place that takes care of all the necessary housekeeping tasks like:
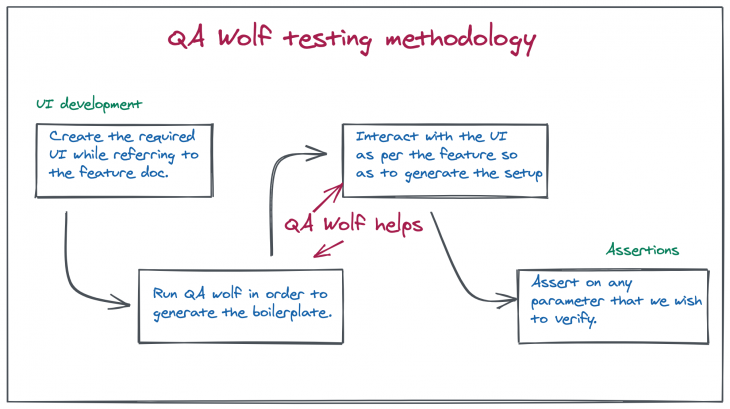
It also allows for a higher level of customization by using the interactive REPL to try out assertions, selectors, and custom code. Not only that, but QA Wolf also helps with CI integration of test cases as well as cross-browser testing which is another pain point when it comes to working with UI testing.
Let’s get started and integrate QA Wolf into a React project to check out actually how easy it is. You can check out this repository on GitHub and work with it for playing around with QA Wolf. It’s a web socket based chat client/server project. We will be using the client developed using React in order to test the framework. So, here are steps in order to get started. Make sure to have started the client and server first by following the steps mentioned on the Github page.
npm init qawolf command. You will be asked to specify the directory where tests will be created. chose .qawolfnpx qawolf create url first in order to create your first test. Where the URL should be replaced with the client URL, i.e. http://localhost:1992, so that the command becomes npx qawolf create http://localhost:1992 firstQA Wolf is ready to create code! with the option Save and Exit selected. Just press enter and the test case will be created
You will notice a .qawolf folder getting created inside the webSocketClient directory. Inside the directory, look for a file named first.test.js. It should have the following function:
test("first", async () => {
  await page.goto("http://localhost:1992");
  await qawolf.create();
});
And there you go! We have created our very first test.
npx qawolf test and that’s it. Your first test case is executed. And even though we did not technically assert anything, it’s still a test case nevertheless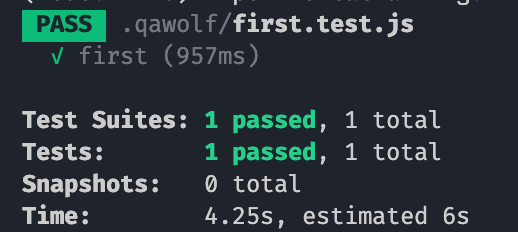
Congratulations! Our first QA Wolf test has passed.
Now that we are comfortable with the way QA Wolf works, let us get into our first meaningful test setup. Here is a scenario that we wish to test:
As evident from the QA Wolf testing methodology, we know that QA wolf will take care of the first two steps for us and we only need to worry about the third. So let’s create a new test with the command:
npx qawolf create http://localhost:1992 verify_username
Once the test starts, we enter the text “Bob” in the input field and press enter. And on the next screen, we see WebSocket Chat: Bob, where Bob is the username we entered. Once that happens, close the browser, and Save and Exit the test.
We see a new file gets created with the name verify_username.test.js with the test created with these steps:
test("verify_username", async () => {
  await page.goto("http://localhost:1992/");
  await page.click(".ant-input");
  await page.fill(".ant-input", "Bob");
  await page.press(".ant-input", "Enter");
});
Now, let’s add the step that verifies whether the username got added to the heading, and for that, add this line to the test await qawolf.assertElementText(page, '#main-heading', 'Bob', { timeout: 3000 }). The qawolf.assertElementText API checks whether the element with the supplied selector contains the text (Websocket Chat: Bob contains the text Bob) and our test case passes.
test("verify_username", async () => {
  await page.goto("http://localhost:1992/");
  await page.click(".ant-input");
  await page.fill(".ant-input", "Bob");
  await page.press(".ant-input", "Enter");
  await qawolf.assertElementText(page, '#main-heading', 'Bob', { timeout: 3000 });
});
To check whether the test is working, run the test with the command
npx qawolf test verify_username , and the test passes. To make the test fail, just change the text Bob in the assertElementText to Alice and run the test again. Evidently, it fails.
Also note that, in the verify_username.test.js file that got created, the browser as well as the page instances are similar to their puppeteer equivalents as QA Wolf internally works on top of puppeteer. So, you can refer to this documentation for browser and page and try out the different possible APIs that are available. For example, taking a screenshot of a rendered page is as easy as adding this line of code await page.screenshot({path: 'screenshot.png'}) and you get a screenshot.png saved in your project folder.
That was about the behavioral/unit testing part of it. But, in our use case, we want something like:
The use case listed above is called snapshot testing which is also one of the common techniques employed while testing UI. Let us see how the same can be achieved using QA Wolf.
Create a new test and perform these steps:
npx qawolf create http://localhost:1992 snapshotYou can see that a new file got created as snapshot.test.js with the following content:
test("snapshot", async () => {
  await page.goto("http://localhost:1992/");
  await page.click(".ant-input");
  await page.fill(".ant-input", "Bob");
  await page.press(".ant-input", "Enter");
  await page.click(".ant-input");
  await page.fill(".ant-input", "Hey!");
  await page.press(".ant-input", "Enter");
  await page.fill(".ant-input", "Hi there!");
  await page.press(".ant-input", "Enter");
}
Add these 2 lines at the very end to capture a snapshot:
const hits = await page.$('#messages');
expect(await hits.evaluate((node) => node.outerHTML)).toMatchSnapshot();
What these lines are doing is pretty straightforward. We are first getting the element with the ID of messages from the page and making a snapshot out of the content of that node.
Run this snapshot test using the command npx qawolf test snapshot and you should see a __snapshots__ folder gets created with the required snapshot.
Next time we run the test again, QA Wolf performs the exact same steps of sending those messages, takes a snapshot again, and warns us if the rendered output is different.
If we want to test that, we can easily do so by just adding a colon (:) at line number 65 in src/index.js , like this:
title={message.user+":"}
Run the test again with npx qawolf test snapshot. This time around, the snapshot fails, while highlighting that a colon got added to the username displayed in both the messages.
As seen previously, we created a test case to verify whether the logged-in user’s name was getting appended to the heading. In the second line for that test case, we simulate a click on the Input Field with the line of code await page.click(".ant-input");
The code is just asking to click the element of the page with a class name of ant-input which turns out to be the Search (Text Input) field. But, what if we had applied a CSS ID to the input field? Let’s try that. Open src/index.js and navigate to the Search component on line number 84. Just add an ID to the component so that it looks something like this:
<Search
   id="username"
   placeholder="Enter Username"
   enterButton="Login"
   size="large"
   onSearch={value => this.setState({ isLoggedIn: true, userName: value })}
/>
Now, run the command to create a new test case:
npx qawolf create http://localhost:1992 test_add_id
and follow the steps to create a test. This time, the test_add_id.test.js inside the .qawolf folder looks like this:
test("test_add_id", async () => {
  await page.goto("http://localhost:1992/");
  await page.click("#username");
  await page.fill("#username", "Bob");
  await page.press("#username", "Enter");
});
Observe that the generated code on line 2 got replaced with await page.click("#username"); which is now checking for a more specific identifier (a CSS id) rather than a generic one (a CSS class). That is what QA Wolf does for us by default. It picks out the most suitable, specific identifier in order for our tests to run properly.
In addition to the selector specificity and the assertion with text comparison and snapshotting, there are a few other notable features that help us navigate day to day scenarios that one encounters during development. This API page lists all of them. They include:
saveState which lets us save the current state of the page (cookies, localStorage, sessionStorage) into a specified JSON filesetState which lets us set the current state of a page by reading it from the specified JSON file. saveState and setState together let us handle things like session management while running tests, here’s howcreate API call that lets us add to an already existing test case if we want to modify the setup for that test casewaitForPage that lets us wait for any other page based on its indexscroll which helps us simulate a scroll on a certain element by specifying the x value and the y valueQA Wolf is a tool that helps us ease the anxiety associated with setting up a UI test, by doing it for us by internally running Chromium and Puppeteer. Creating the test case setup by just interacting with the UI and then asserting on any portion of the generated user interface sounds like a natural methodology to go about UI testing. If you have worked with intricate UI testing frameworks in the past and are now looking for a more seamless experience, QA Wolf is something that is definitely worth giving a shot.
Install LogRocket via npm or script tag. LogRocket.init() must be called client-side, not
server-side
$ npm i --save logrocket

// Code:

import LogRocket from 'logrocket';
LogRocket.init('app/id');
// Add to your HTML:

<script src="https://cdn.lr-ingest.com/LogRocket.min.js"></script>
<script>window.LogRocket && window.LogRocket.init('app/id');</script>

Discover how React Fiber works under the hood. Learn how React builds the DOM, handles concurrent rendering, and works alongside React 19 features and the new React Compiler.

Learn how to use Skybridge, an open-source React framework, to build and deploy cross-platform AI apps and interactive UI widgets for ChatGPT, Claude, and MCP clients from a single codebase.

Learn how to set up Meilisearch, index documents, and build keyword, semantic, and hybrid search with AI-powered retrieval.

Compare pnpm and npm across security defaults, disk usage, dependency strictness, and workspace policy to decide which package manager fits your project.
Hey there, want to help make our blog better?
Join LogRocket’s Content Advisory Board. You’ll help inform the type of content we create and get access to exclusive meetups, social accreditation, and swag.
Sign up now

