Half the fun of developing a game is building complex animations to breathe life into your game and engage your users. You could spend countless hours mining through game engines for motions, physics engines for dynamics, audio engines for sounds — the list goes on and on, and the options and possible combinations are limited only by your imagination, time, and resources.

But let’s say you’d rather spend all that effort on what really gets users hooked on your game — namely, the gameplay. A rendering engine can help you create stunning, elaborate graphics in a fraction of the time, freeing you to focus on what makes your game truly unique and compelling.
In this guide, we’ll zoom in on four of the best and most popular 3D rendering engines the JavaScript community has to offer:
We’ll highlight some notable features and explore the pros and cons associated with each engine.
The Replay is a weekly newsletter for dev and engineering leaders.
Delivered once a week, it's your curated guide to the most important conversations around frontend dev, emerging AI tools, and the state of modern software.
Cannon.js is a one of the best physics and rendering engines available for JavaScript. Inspired by Three.js and Ammo.js, it’s known for being particularly lightweight. Best of all, it’s free and open-source.
To get started with Cannon.js, create a simple getting scene and print the result to the console.
Install Cannon.js using either of the following methods.
<script src="cannon.min.js"></script>

// OR

npm install --save cannon
Now let’s create our world.
const world = new CANNON.World();
world.gravity.set(0, 0, -9.82); // m/s²
Create a sphere and add it to the world.
const radius = 1; // m
const sphereBody = new CANNON.Body({
   mass: 5, // kg
   position: new CANNON.Vec3(0, 0, 10), // m
   shape: new CANNON.Sphere(radius)
});
world.addBody(sphereBody);
Next, create the floor or plane and add it to the world.
// Create a plane
const groundBody = new CANNON.Body({
    mass: 0 // mass == 0 makes the body static
});
const groundShape = new CANNON.Plane();
groundBody.addShape(groundShape);
world.addBody(groundBody);

const fixedTimeStep = 1.0 / 60.0; // seconds
const maxSubSteps = 3;
Create an initialized function to set up everything and print out the sphere Z position to the console.
var lastTime;
(function simloop(time){
  requestAnimationFrame(simloop);
  if(lastTime !== undefined){
     const dt = (time - lastTime) / 1000;
     world.step(fixedTimeStep, dt, maxSubSteps);
  }
  console.log("Sphere z position: " + sphereBody.position.z);
  lastTime = time;
})();
This function creates the animation itself.
function animate() {
      init();
      requestAnimationFrame( animate );

      mesh.rotation.x += 0.01;
      mesh.rotation.y += 0.02;

      renderer.render( scene, camera );
}
You can run the code and open your console to see the Z position’s values. Click here for more examples to help you get started.
Phoria is a JavaScript library and rendering engine for creating simple 3D on a Canvas 2D renderer. Since Phoria does not use WebGL, it works on any device that can render HTML Canvas.
There are so many examples and well-commented sample codes to help you get started with Phoria.js.
First, install the library.
<!DOCTYPE html>
<html>
<head>
    <script src="scripts/gl-matrix.js"></script>
    <script src="scripts/phoria-util.js"></script>
    <script src="scripts/phoria-entity.js"></script>
    <script src="scripts/phoria-scene.js"></script>
    <script src="scripts/phoria-renderer.js"></script>
    <script src="scripts/dat.gui.min.js"></script>
</head>
<body>
  // Create a Canvas element
  <canvas id="canvas" width="768" height="512" style="background-color: #eee"></canvas>
  <script>
      // Render animation on page load
      window.addEventListener('load', loadAnimation, false);
  </script>
</body>
</html>
Next, create the loadAnimation function to load the animation and the code below.
function loadAnimation(){
  const canvas = document.getElementById('canvas');

  // Add all script below here
  // ........
}
Establish your scene and camera and set them up.
 const scene = new Phoria.Scene();
 scene.camera.position = {x:0.0, y:5.0, z:-15.0};
 scene.perspective.aspect = canvas.width / canvas.height;
 scene.viewport.width = canvas.width;
 scene.viewport.height = canvas.height;
Create a renderer and render the canvas you created above.
const renderer = new Phoria.CanvasRenderer(canvas);
Next, build some utilities and grids, then add them to the scene you created above.
  const plane = Phoria.Util.generateTesselatedPlane(8,8,0,20);
   scene.graph.push(Phoria.Entity.create({
      points: plane.points,
      edges: plane.edges,
      polygons: plane.polygons,
      style: {
         drawmode: "wireframe",
         shademode: "plain",
         linewidth: 0.5,
         objectsortmode: "back"
      }
   }));
   const c = Phoria.Util.generateUnitCube();
   const cube = Phoria.Entity.create({
      points: c.points,
      edges: c.edges,
      polygons: c.polygons
   });
   scene.graph.push(cube);
   scene.graph.push(new Phoria.DistantLight());
Let’s wrap finish up the animation and also start it.
   const pause = false;
   const fnAnimate = function() {
      if (!pause)
      {
         // rotate local matrix of the cube
         cube.rotateY(0.5*Phoria.RADIANS);

         // execute the model view 3D pipeline and render the scene
         scene.modelView();
         renderer.render(scene);
      }
      requestAnimFrame(fnAnimate);
   };

   // key binding
   document.addEventListener('keydown', function(e) {
      switch (e.keyCode)
      {
         case 27: // ESC
            pause = !pause;
            break;
      }
   }, false);

   // start animation
   requestAnimFrame(fnAnimate);
The final result should look something like this:

D3 is a JavaScript library designed for manipulating and rendering data and data visualization. With D3, you can bring data to life by adding amazing and powerful transformations using HTML.
This library is remarkably easy to get started with, even when dealing with more complex data visualization enhancements, thanks in large part to its thriving community. It’s also highly customizable, enabling you to tweak existing visualizations and extend functionality.
Getting started with D3 is very simple. Just add the script tag to your HTML document.
<script src="https://d3js.org/d3.v6.min.js"></script>
For example, you can simply add transitions to your game like so:
d3.selectAll("transPage").transition()
    .duration(750)
    .delay(function(d, i) { return i * 10; })
    .attr("r", function(d) { return Math.sqrt(d * scale); });
Here, we simply selected all tags with transPage and added transitions to them.
Xeogl.js is an open-source JavaScript library for creating 3D visualization on WebGL. It was designed with a focus on creating interactive 3D animations and graphics.
To get started with Xeogl.js, first add the CDN library to your project.
<script src="https://github.com/xeolabs/xeogl/blob/master/build/xeogl.js"></script>
Next, create your 3D objects. Then, create a geometry variable with the following.
const geometry = new xeogl.TorusGeometry({
    radius: 1.0,
    tube: 0.3
});
Create some metallicMaterial using the following code.
const material = new xeogl.MetallicMaterial({
    baseColorMap: new xeogl.Texture({
        src: "textures/diffuse/uvGrid2.jpg"
    }),
    roughnessMap: new xeogl.Texture({
        src: "textures/roughness/goldRoughness.jpg"
    })
});
Finally, create some Mesh and add the above objects.
const mesh = new xeogl.Mesh({
    geometry: geometry,
    material: material,
    position: [0, 0, 10]
});
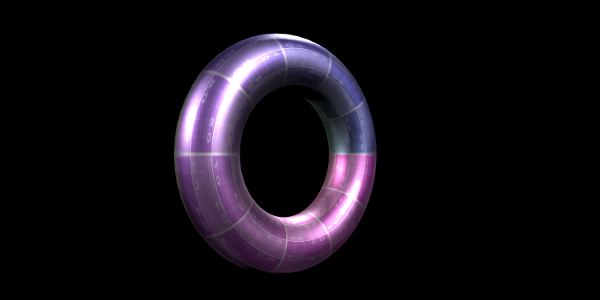
If all goes according to plan, you should see something like this:

As with any project, the best tools will depend on your unique goals, needs, and requirements. Hopefully, this overview will help you make the right selection to help bring your game to life.
In most cases, in my opinion, you can’t go wrong with Cannon.js. It’s especially useful if you’re building intricate graphics; since many functionalities that would otherwise require an external library are built in, Cannon is smaller in size, making it a great choice if fast processing is a priority.
Phoria.js, on the other hand, is a great library if you just want to create simple graphics. Because it does not support WebGL, it is difficult to create complex 3D graphics with Phoria.
If you fancy yourself a web data scientist and are looking to create stunning data visualizations, D3 is a solid choice.
Finally, Xeogl.js is an interesting alternative if your goal is to create CAD-like graphics on the web or model visualizations.
Which rendering engine is your favorite? Did we miss any? Feel free to drop a line!
Debugging code is always a tedious task. But the more you understand your errors, the easier it is to fix them.
LogRocket allows you to understand these errors in new and unique ways. Our frontend monitoring solution tracks user engagement with your JavaScript frontends to give you the ability to see exactly what the user did that led to an error.

LogRocket records console logs, page load times, stack traces, slow network requests/responses with headers + bodies, browser metadata, and custom logs. Understanding the impact of your JavaScript code will never be easier!

@container scroll-state: Replace JS scroll listeners nowCSS @container scroll-state lets you build sticky headers, snapping carousels, and scroll indicators without JavaScript. Here’s how to replace scroll listeners with clean, declarative state queries.

Explore 10 Web APIs that replace common JavaScript libraries and reduce npm dependencies, bundle size, and performance overhead.

Russ Miles, a software development expert and educator, joins the show to unpack why “developer productivity” platforms so often disappoint.

Discover what’s new in The Replay, LogRocket’s newsletter for dev and engineering leaders, in the February 18th issue.
Hey there, want to help make our blog better?
Join LogRocket’s Content Advisory Board. You’ll help inform the type of content we create and get access to exclusive meetups, social accreditation, and swag.
Sign up now