Slack, a messaging program originally designed to be used in an office space, has also been adopted for personal use. According to an official statement by the company, Slack has ten million daily users with over 85,000 paying customers.

Over the years, the Slack community has been building a powerful app directory. The collection of apps contains hundreds to thousands of integrations that provide a great amount of flexibility to boost companies’ efficiency.
The Slack Machine is a robust and extendable framework that helps you develop your Slack workspace into a ChatOps powerhouse. In this guide, we will go over how to set up the Slack Machine and implement some of its features.
To jump ahead:
The current Slack Machine project folder contains one file: local_settings.py. This file will hold all of the configuration settings for the Slack Machine:
SlackMachine(Project-folder)
|__local_settings.py
Two tokens are needed to connect our app and the Slack Machine: the app-level token and bot token. To generate these tokens, Navigate to https://api.slack.com/apps. Once there, click on Create an App.
In the pop-up window, select From an app manifest: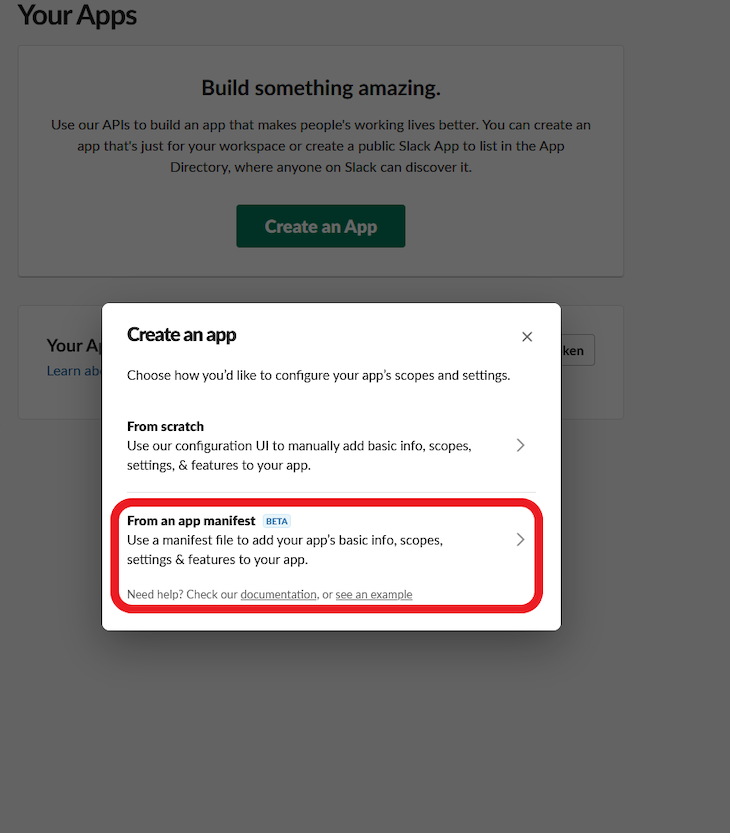
Choose the Slack workspace where you will install the Slack bot. Then, we need to define a manifest. A manifest is a configuration that dictates how the Slack app will work. Read more on the meaning of each field here. Add the following code block to the manifest:
display_information:
  name: Wamaitha Slack Machine
features:
  bot_user:
    display_name: Wamaitha Slack Machine
    always_online: false
oauth_config:
  scopes:
    bot:
    - app_mentions:read
    - channels:history
    - channels:join
    - channels:read
    - chat:write
    - chat:write.public
    - emoji:read
    - groups:history
    - groups:read
    - groups:write
    - im:history
    - im:read
    - im:write
    - mpim:history
    - mpim:read
    - mpim:write
    - pins:read
    - pins:write
    - reactions:read
    - reactions:write
    - users:read
    - users:read.email
    - channels:manage
    - chat:write.customize
    - dnd:read
    - files:read
    - files:write
    - links:read
    - links:write
    - metadata.message:read
    - usergroups:read
    - usergroups:write
    - users.profile:read
    - users:write
settings:
  event_subscriptions:
    bot_events:
    - app_mention
    - channel_archive
    - channel_created
    - channel_deleted
    - channel_id_changed
    - channel_left
    - channel_rename
    - channel_unarchive
    - group_archive
    - group_deleted
    - group_left
    - group_rename
    - group_unarchive
    - member_joined_channel
    - member_left_channel
    - message.channels
    - message.groups
    - message.im
    - message.mpim
    - reaction_added
    - reaction_removed
    - team_join
    - user_change
    - user_profile_changed
    - user_status_changed
  interactivity:
    is_enabled: true
  org_deploy_enabled: false
  socket_mode_enabled: true
  token_rotation_enabled: false
In the Review summary & create your app pop-up, click Create:
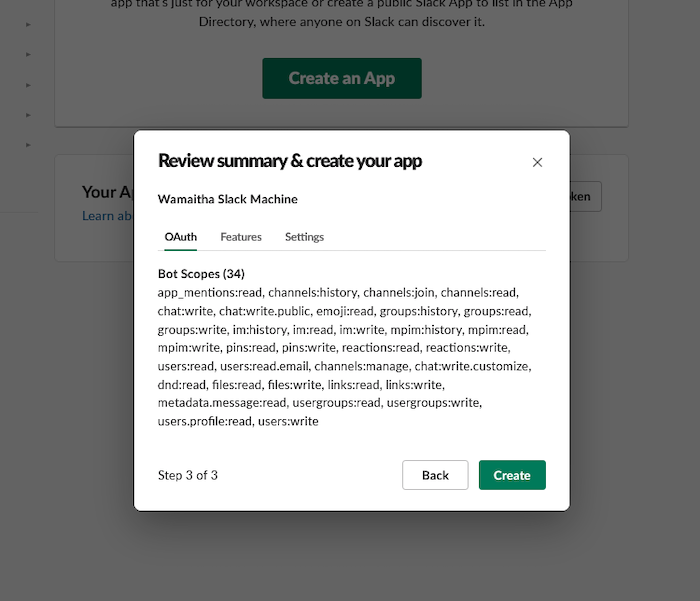
Once the creation is done, in the Basic Information settings tab, click on Install to Workspace. Allow permissions to the Slack app.
The first token we need is the SLACK_BOT_TOKEN. Navigate to OAuth & Permissions and copy the Bot User OAuth Token to the local_settings.py: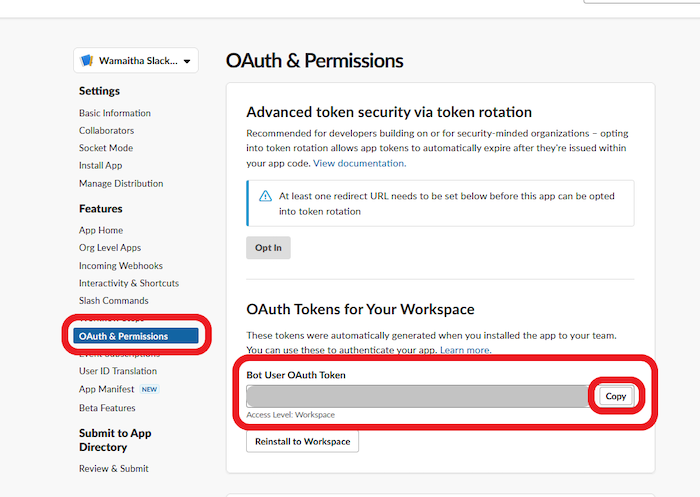
To generate the app-level token, navigate to Basic Information, scroll down to App-Level Tokens and click on Generate Token and Scopes.
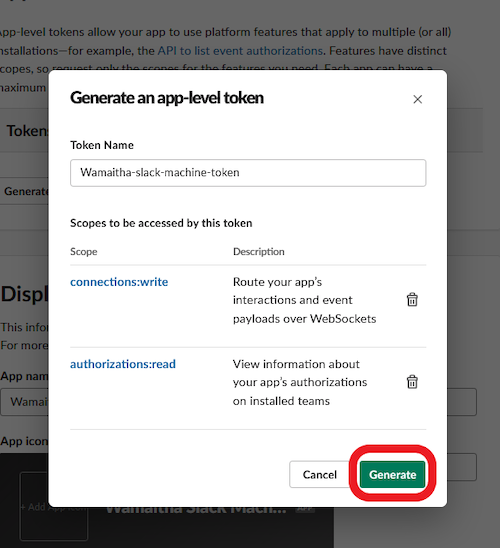
In the pop-up window, give the token a name, click on the Scope dropdown, and add both scopes: connections:write and authorizations:read:
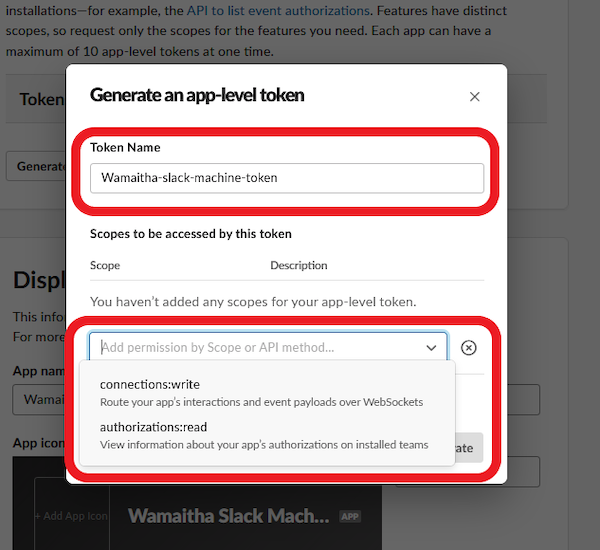
Once both scopes are selected, click on Generate. The pop-up should be as shown below:
Copy the generated token and save it to the local_settings.py file as SLACK_APP_TOKEN
The local_settings.py file should now contain the following:
SLACK_BOT_TOKEN="add_the_token_here"
SLACK_APP_TOKEN="add_token_here"
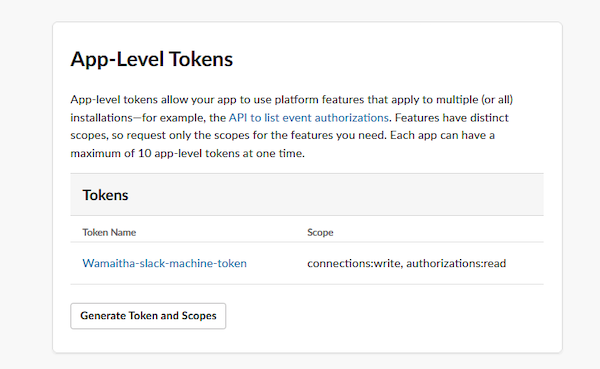
If everything went well, the App-Level Tokens tab should look like this:
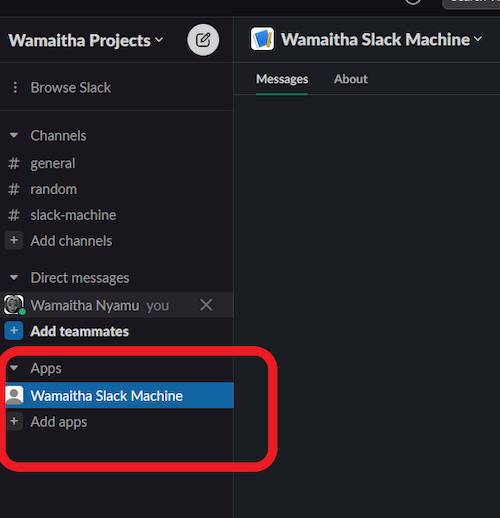
Now, head over to the workspace on Slack. You should find the Slack Machine added under the Apps tab:
It is recommended to use the Slack Machine in a virtual environment. A virtual environment secludes the dependencies used for the app without conflicting with those installed globally on the system.
We will use the venv Python module to create a virtual environment. The command for this follows this structure:
python -m venv name_of_environment
In this case, our virtual environment name will be venv. We create it using the command below:
python -m venv venv
N.B., If you have more than one version of Python installed, you may need to specify which Python version venv should use. More about this can be found in the venv documentation.
At this point, the project folder structure becomes:
SlackMachine(Project-folder)
      |__local_settings.py
      |__venv
To activate the virtual environment, you need to run the following commands.
On Windows, run:
venv\Scripts\activate.bat

On Linux and macOS, run:
source tutorial-env/bin/activate
Now, we will install the Slack Machine module using pip. The module allows us to interact with the Slack API from Python.
Install the Slack Machine using:
pip install slack-machine
Run the bot on the root folder using the Slack Machine as shown below:
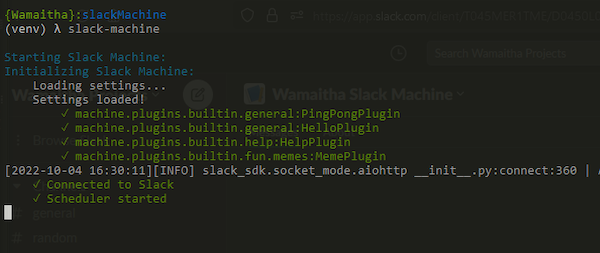
Once the connection succeeds, return to Slack. Right-click on the Slack Machine app and click on View app details:
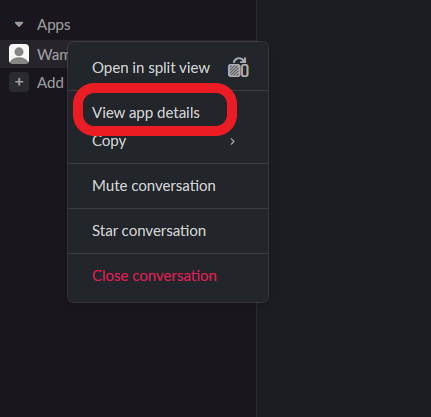
In the pop-up, add the app to a channel.
You can add it to any channel of your choice. For this example, I added it to the #slack-machine channel. Navigate to the channel and send the bot a hello message:
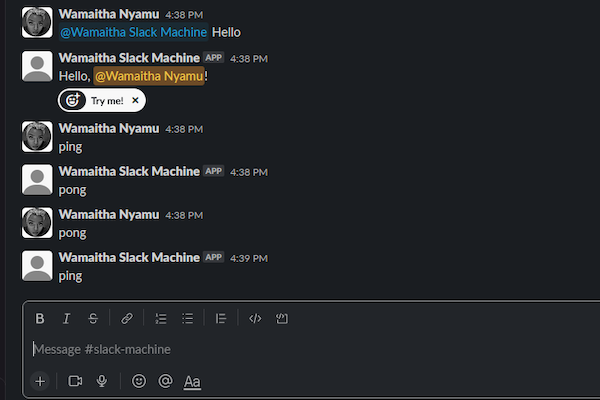
By default, the Slack Machine loads the HelloPlugin and the PingPongPlugin. The HelloPlugin responds with a “hello” or “hi” when the bot is greeted. The PingPongPlugin responds with “ping” or “pong” regardless of mention.
Because of the flexible nature of the Slack Machine, we can build our own custom plugins. For this, we need to create a plugin package. Create a new plugins folder and, in it, create a customPlugin.py file.
The updated project folder structure is as shown below:
SlackMachine(Project-folder)
      |__local_settings.py
      |__venv
      |__plugins
           |__customPlugin.py
In customPlugin.py, we create a class that will contain all of our custom plugin functionalities. Our first functionality instructs the Slack app to generate a dad joke. The full code for this is:
from machine.plugins.base import MachineBasePlugin
from machine.plugins.decorators import respond_to
import requests
import json

class OurCustomPluginClass(MachineBasePlugin):
    """
    Custom plugin class for interacting with the slack-machine
    """

    # tells a dad joke
    @respond_to(r"^Make me laugh")
    async def dad_jokes(self, msg):
        """
        Returns a dad joke and replies the joke to the user
        """
        random_dad_joke = requests.get("https://icanhazdadjoke.com/",
                                       headers={"Accept": "application/json"})
        random_dad_joke = json.loads(random_dad_joke.text)["joke"]

        await msg.reply(random_dad_joke)
OurCustomPluginClass extends the MachineBasePlugin from the Slack Machine. Our dad_joke function has the respond_to decorator. The respond_to decorator acts on messages that have the Slack bot mentioned, with the specific keywords passed as a regex to the decorator.
The requests module will make an HTTP request to the dad_joke API. The JSON module comes installed with Python and is used to transform the API response into a JSON format.
The requests library can be installed using pip on the terminal:
pip install requests
The custom plugin needs to be included in the local_settings.py to run the Slack Machine.
In local_settings.py, add the code as shown:
SLACK_APP_TOKEN = "xapp-"
SLACK_BOT_TOKEN = "xoxb-"

PLUGINS = ["plugins.customPlugin.OurCustomPluginClass"]
Then re-run Slack Machine on the terminal in the root folder:

The output should show that the plugin class has been loaded.
The respond_to decorator requires the user to mention the bot on Slack with the specified keywords. In our case, we need to mention the bot, followed by “Make me laugh” to trigger the dad_joke function:
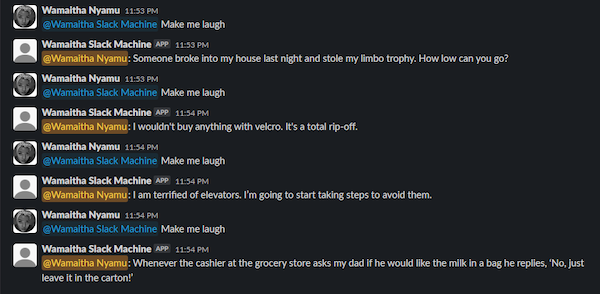
The respond_to decorator can also be used to emit custom events. Events are a way to exchange data between plugins or expose API endpoints other plugins can use. Events are emitted using self.emit(). Our custom event will collect user emails and send them to an email channel.
First, create an email channel: #registration-emails:
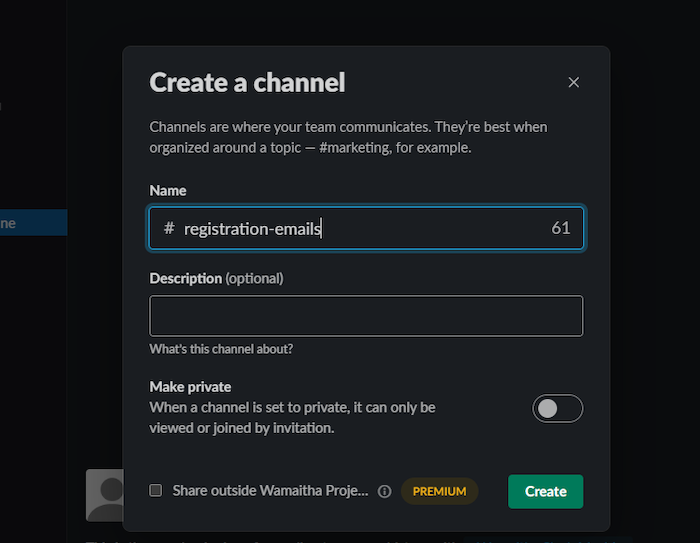
The code for collecting emails is as shown below:
from machine.plugins.base import MachineBasePlugin
from machine.plugins.decorators import respond_to, on,
import requests
import json
import re


class OurCustomPluginClass(MachineBasePlugin):
   """
   Custom plugin class for interacting with the slack-machine
   """


   @respond_to(r"register (?P<email>.*)")
   async def register_emails(self, msg, email):
       """
       Collect registration email from user
       """

       email = email.split("|")[1][:-1]
       email_regex = "^[a-z0-9]+[\._]?[a-z0-9]+[@]\w+[.]\w{2,3}$"
       user = msg.at_sender
       if re.search(email_regex, email):
           self.emit('new_registration', email=email, user=user)
       else:
           await msg.reply_dm(f'Hey {user}, your registration email address {email} is                invalid.')

   @on("new_registration")
   async def collect_emails(self, **kwargs):
       """
         Listen for new emails
      """

       await self.say("registration-emails", f"{kwargs['user']} - {kwargs['email']}")
                      ]}")
The register_emails function emits an event that forwards emails to the #registration-emails channel. The event also emits the user’s ID and the specific email as part of the arguments:


The event emitted has a unique name, in our case new-registrations. To listen to the new-registrations event, we need the @on decorator.
The decorator needs the event name to look out for. When the new-registrations event is emitted, the collect_emails function is triggered. This function forwards the user’s name and email to the #registration-emails channel.
If the user provides an invalid email address, the Slack app sends the user a direct message:

The Slack Machine also provides storage capabilities. Data is stored in key-value pairs in-memory or using external databases. To demonstrate in-memory capabilities, we will generate tokens and have the user retrieve and delete them at will.
The code for this can be seen below:
from machine.plugins.base import MachineBasePlugin
from machine.plugins.decorators import respond_to, on
import requests
import json
import re
import random


class OurCustomPluginClass(MachineBasePlugin):
   """
   Custom plugin class for interacting with the slack-machine
   """

   @respond_to(r"generate")
   async def gen_token(self, msg):
       """
       Generate random token
       """
       user = msg.at_sender
       token = random.randint(1, 1000)
       await self.storage.set(user, token)
       await msg.reply_dm(f"Hey {user} your generated token is {token}")

   @respond_to(r"retrieve")
   async def retrieve_token(self, msg):
       """
       Retrieve the stored token
       """
       user = msg.at_sender
       token = await self.storage.get(user)
       if token:21
           await msg.reply_dm(f"Hey {user} your token is {token}")
       else:
           await msg.say("Key not found! Generate a new token")

   @respond_to(r"delete")
   async def delete_token(self, msg):
       """
       delete tokens
       """
       user =msg.at_sender
       await self.storage.delete(user)
       await msg.say(f"data in <{user}> deleted!")
The in-memory storage capabilities come built into the MachineBasePlugin class. Still using the respond_to decorator, we have three functions:
set method. The set method takes in two arguments: the key and the value. We’ve set the user’s sender ID as the key and the generated token as the value:


The listen_to decorator works the same as the respond_to decorator with the key difference being that the user does not need to mention the Slack app.
For example, we can make the app listen to help messages using the code below:
from machine.plugins.base import MachineBasePlugin
from machine.plugins.decorators import respond_to, on, listen_to,process
import requests
import json
import re
import random


class OurCustomPluginClass(MachineBasePlugin):
   """
   Custom plugin class for interacting with the slack-machine
   """
   @listen_to(r"^help")
   async def help_details(self, msg):
       """
       something
       """
       await msg.say("Refer to the #help-channel for help")

Slack treats most interactions with the user as events. Every time the user performs an action on Slack, the Slack events API is fired. We can listen to specific events using the @process decorator. The decorator takes in the specific event we want to listen to.
In the code below, the Slack app will send a notification to the #random channel when a user creates a new channel. The whole list of events can be found here:
from machine.plugins.base import MachineBasePlugin
from machine.plugins.decorators import respond_to, on, listen_to,process
import requests
import json
import re
import random


class OurCustomPluginClass(MachineBasePlugin):
   """
   Custom plugin class for interacting with the slack-machine
   """
   @process("channel_created")
   async def check_channel_created(self):
       """
       something
       """
       await self.say("random", "We have a new channel")

In this article, we reviewed how to build a Slack bot using the Slack Machine. The Slack Machine is jam-packed with more functionality in the API documentation. Its flexibility and customization abilities help users make more apps for specific business use cases.
Install LogRocket via npm or script tag. LogRocket.init() must be called client-side, not
server-side
$ npm i --save logrocket

// Code:

import LogRocket from 'logrocket';
LogRocket.init('app/id');
// Add to your HTML:

<script src="https://cdn.lr-ingest.com/LogRocket.min.js"></script>
<script>window.LogRocket && window.LogRocket.init('app/id');</script>
Would you be interested in joining LogRocket's developer community?
Join LogRocket’s Content Advisory Board. You’ll help inform the type of content we create and get access to exclusive meetups, social accreditation, and swag.
Sign up now
Not sure if low-code is right for your next project? This guide breaks down when to use it, when to avoid it, and how to make the right call.

Compare Firebase Studio, Lovable, and Replit for AI-powered app building. Find the best tool for your project needs.

Discover how to use Gemini CLI, Google’s new open-source AI agent that brings Gemini directly to your terminal.

This article explores several proven patterns for writing safer, cleaner, and more readable code in React and TypeScript.