Gutenberg is the React-based WordPress editor. It comes in two versions: the Gutenberg plugin, which has a fast development cycle, churning out new features every two weeks; and the integration to WordPress core (called simply the WordPress editor), which consolidates the new features every three to four months.

Gutenberg is based on blocks, which are high-level components intended to provide a single piece of functionality accessible via the editor, currently to create content — but, in the not-so-distant future, to build the site, too. Blocks make it easy to save the content into the database and, being based in React, enable rich user interactions.
Since functionality is provided via plugins, WordPress has seen the emergence of plugins bundling several blocks together. However, since its latest release (version 8.4, from end of June 2020), Gutenberg integrates a block directory within the editor, which enables us to install a block on the fly while editing the blog post:
The block directory works with single-block plugins only. Hence, producing our plugins providing only one block improves the chances of its being installed by the user:
In this article, we will learn how to create a new project for single-block plugins and for multiple-block plugins, and how to set up the development environment effortlessly.
There are several tools to automate the process of setting up the project. These come with a predefined configuration that works for the majority of cases, and it can be customized for the exceptional cases, involving webpack (to bundle the JavaScript files for distribution), Babel (to compile modern JavaScript code into legacy code that can run in older browsers), ESLint (to analyze the JavaScript code), and a few others dependencies.
The available tools are:
scaffold commandcreate-guten-block package@wordpress/create-block package@wordpress/create-block is the official solution, maintained by the team developing Gutenberg. As such, we can expect that it will always be up to date with the project’s requirements. For instance, at the same time Gutenberg 8.4 was released, @wordpress/create-block was updated to generate the required metadata to support the block directory.
This tool is largely inspired by create-react-app: it is a Node.js process that leverages npm to install the required dependencies. To scaffold the new block, we execute in the command line:
npm init @wordpress/block [options] [slug]
The slug is the block slug used for identification, and it will also give the name to the plugin. Options are, well, optional, but it is recommended to provide the following ones (otherwise, it uses default generic options):
--namespace <value> – internal namespace for the block name--title <value> – display title for the block--short-description <value> – short description for the block--category <name> – under what category the block is displayedRunning the command creates a new directory with the slug as its name (in this case, todo-list):
The directory will contain all the files required by the plugin and the block:
todo-list/
├──build/
│ ├── index.asset.php
│ ├── style.css
│ ├── style-index.css
│ └── index.js
├── src/
│ └── index.js
├── .gitignore
├── .editorconfig
├── block.json
├── package.json
├── package-lock.json
├── todo-list.php
└── readme.txt
block.json contains the metadata required by the block directoryreadme.txt contains the information required by the plugin directorytodo-list.php (following the provided slug) is the plugin’s main filepackage.json defines all the JavaScript dependencies by the blocksrc/index.js is the entry to the blockbuild/index.js is the compiled JavaScript codebuild/style.css and build/style-index.css are the compiled CSS files, containing the styles extracted from Sass filesWith the project created, we can step on the directory in the terminal, and execute the following commands:
npm start – starts the build for developmentnpm run build – builds the code for productionnpm run format:js – formats JavaScript filesnpm run lint:css – lints CSS filesnpm run lint:js – lints JavaScript filesnpm run packages-update – updates WordPress packages to the latest versionEven though Gutenberg is largely based on blocks, there are a few areas where functionality is provided through standard components, not blocks. That is the case, for instance, for adding a panel on the Document TabPanel:
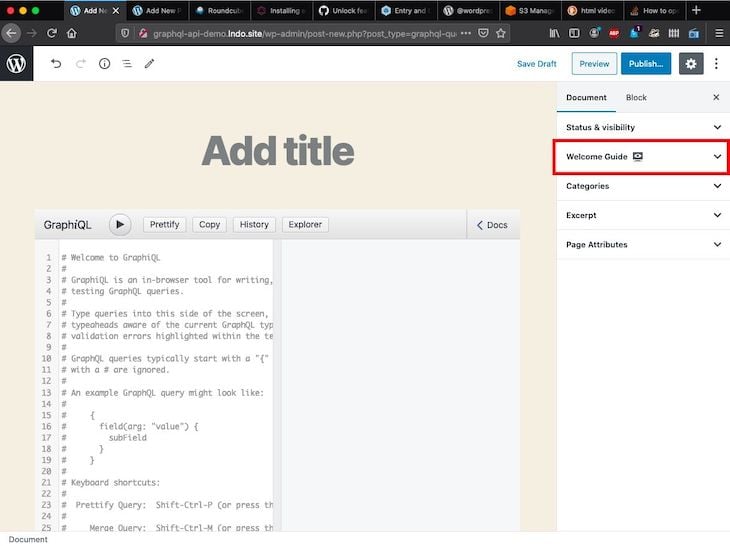
The code below demonstrates an example panel component:
import { registerPlugin } from '@wordpress/plugins';
import { PluginDocumentSettingPanel } from '@wordpress/edit-post';

const WelcomeGuidePluginDocumentSettingPanel = () => (
  <PluginDocumentSettingPanel
    name="welcome-guide"
    title="Welcome Guide"
    className="welcome-guide"
  >
    ... (Welcome Guide Contents)
  </PluginDocumentSettingPanel>
);

registerPlugin( 'welcome-guide-plugin-document-setting-panel', {
  render: WelcomeGuidePluginDocumentSettingPanel,
  icon: 'welcome-view-site',
} );
Currently, there is no scaffolding tool to generate non-blocks (there is a feature request to implement it). Thus, for the time being, the best strategy is to still leverage @wordpress/create-block to generate a single-block plugin, and then adapt it to handle a regular script by modifying the PHP file as described here.
There are situations when a single-block plugin is not suitable. For instance, if our plugin provides a custom post type that is operated through its own custom blocks, then it makes sense to already include all blocks within the same plugin.
@wordpress/create-block deals with creating single-block plugins, though. Then, in order to create a multi-block plugin, we can use the following strategy.
Create the folder for the WordPress plugin, my-plugin; its main file, my-plugin.php, containing the standard plugin information; the readme.txt; and a subfolder, blocks/:
my-plugin/
├──blocks/
├── my-plugin.php
└── readme.txt
Inside blocks/, run the npm init @wordpress/block [options] [slug] command several times, once per block (in this case, block1 and block2). This way, all blocks are independent from each other; each has its own package.json and can have its own webpack configuration. Then, delete files readme.txt and block.json from each block, and edit the main file to remove the plugin information:
my-plugin/
├──blocks/
│ ├──block1/
│ │ ├── build/
│ │ │ ├── index.asset.php
│ │ │ ├── style.css
│ │ │ ├── style-index.css
│ │ │ └── index.js
│ │ ├── src/
│ │ │ └── index.js
│ │ ├── .gitignore
│ │ ├── .editorconfig
│ │ ├── package.json
│ │ ├── package-lock.json
│ │ └── block1.php
│ └──block2/
│   ├── build/
│   │ ├── index.asset.php
│   │ ├── style.css
│   │ ├── style-index.css
│   │ └── index.js
│   ├── src/
│   │ └── index.js
│   ├── .gitignore
│   ├── .editorconfig
│   ├── package.json
│   ├── package-lock.json
│   └── block2.php
├── my-plugin.php
└── readme.txt
Finally, from the main plugin file (my-plugin.php), require all the block main files:
require 'blocks1/block1.php';
require 'blocks2/block2.php';
If we want to have the different blocks hosted on their own repository, we can import them to the plugin through Composer, as described here.
wp-env is a Docker-based, no-configuration tool to set up a local WordPress environment for building and testing plugins and themes.
To install it globally, run:
npm -g i @wordpress/env
Then, to initialize a new WordPress environment, make sure Docker is running, browse to the plugin’s folder in terminal, and execute:
wp-env start
And that’s it — a new WordPress instance will be created under localhost:8888 with our plugin installed and activated. It really couldn’t be easier. The process provides a fully working instance that saves data to an attached database, so if we wp-env stop the service, and then wp-env start it again, there is no data loss.
Behind the scenes, the Docker script installs an instance of the MariaDB database, downloads the latest version of WordPress, installs it, and configures it. The first time the environment is created, it may take quite some time for all files to download (even half an hour or more). From then on, though, creating additional WordPress environments should only take a couple of minutes.
It is a good idea to execute the command with the --debug option to see what is going on while the process is running:
wp-env start --debug
WP-CLI comes installed by default. Through the wp-env run [container] [command] command, we can use WP-CLI to interact with WordPress and to query data from the database. For instance, this command retrieves the list of users:
wp-env run cli wp user list
The WordPress environment is configurable through the file .wp-env.json, located at the root of the project. We can define the following properties:
8888)wp-config.phpwp-env can help lower the barriers of entry for contributing to open-source projects: by adding the file .wp-env.json in the repository, contributors can start hacking away on the code almost immediately.
For instance, the following .wp-env.json file for an open-source WordPress plugin makes the site accessible under localhost:6375 (useful to make sure our instance doesn’t conflict with some other instance), installs the plugin and Gutenberg, and prints the errors on the screen for debugging:
{
  "plugins": [
    "https://downloads.wordpress.org/plugin/gutenberg.zip",
    "."
  ],
  "port": 6375,
  "testsPort": 6376,
  "config": {
    "WP_DEBUG_DISPLAY": true
  }
}
webpack’s Hot Module Replacement (HMR) can significantly speed up development by exchanging, adding, or removing modules while an application is running, without a full reload. Until now, Gutenberg could only support live reload, a slower version of HMR that does reload the page when changes are observed.
However, wp-env makes it possible to provide support for HMR when developing the site. HMR will be extremely useful when building sites through the upcoming full site editor (planned for WordPress 5.6, December 2020).
This pull request (yet to be merged) adds the following command:
npm run dev:edit-site
After executing it on the root of the project, any change on the code will immediately take effect without reloading the page.
Gutenberg imposes the need to learn React and JavaScript. Moreover, the overall Gutenberg project involves technologies (webpack, Babel, ESLint, Docker) that, until a short time ago, developers did not need to master — or even be aware of — in order to create a WordPress plugin. All that was needed was some knowledge of PHP.
Fortunately, even though complexity has gone up, new tools are being created to help manage this complexity, pushing back the amount of knowledge required to start a new Gutenberg project. In this article, we explored @wordpress/create-block for automating the creation of a new plugin, wp-env for setting-up the development environment effortlessly, and new tools that will make the process even easier and better.
Install LogRocket via npm or script tag. LogRocket.init() must be called client-side, not
server-side
$ npm i --save logrocket

// Code:

import LogRocket from 'logrocket';
LogRocket.init('app/id');
// Add to your HTML:

<script src="https://cdn.lr-ingest.com/LogRocket.min.js"></script>
<script>window.LogRocket && window.LogRocket.init('app/id');</script>

Learn how to set up Meilisearch, index documents, and build keyword, semantic, and hybrid search with AI-powered retrieval.

Compare pnpm and npm across security defaults, disk usage, dependency strictness, and workspace policy to decide which package manager fits your project.

I migrated 20 production-style components from Tailwind to StyleX. Here’s what the data showed about LOC, CSS bundle size, build time, and type safety.

A guide for using JWT authentication to prevent basic security issues while understanding the shortcomings of JWTs.
Would you be interested in joining LogRocket's developer community?
Join LogRocket’s Content Advisory Board. You’ll help inform the type of content we create and get access to exclusive meetups, social accreditation, and swag.
Sign up now
