The Replay is a weekly newsletter for dev and engineering leaders.
Delivered once a week, it's your curated guide to the most important conversations around frontend dev, emerging AI tools, and the state of modern software.
Traditionally, Node.js does not let you parse and manipulate markups because it executes code outside of the browser. In this article, we will be exploring Cheerio, an open source JavaScript library designed specifically for this purpose.

Cheerio provides a flexible and lean implementation of jQuery, but it’s designed for the server. Manipulating and rendering markup with Cheerio is incredibly fast because it works with a concise and simple markup (similar to jQuery). And apart from parsing HTML, Cheerio works excellently well with XML documents, too.
This tutorial assumes no prior knowledge of Cheerio, and will cover the following areas:
To complete this tutorial, you will need:
Cheerio can be used on any ES6+, TypeScript, and Node.js project, but for this article, we will focus on Node.js.
To get started, we need to run the npm init -y command, which will generate a new package.json file with its contents like below:
{
  "name": "cheerio-sample",
  "version": "1.0.0",
  "description": "",
  "main": "index.js",
  "scripts": {
    "test": "echo \"Error: no test specified\" && exit 1"
  },
  "keywords": [],
  "author": "",
  "license": "ISC"
}
Once that is done, let us proceed to install Cheerio:
npm install cheerio
One way to verify that the installation was successful is by checking the package.json file. You should see a new entry called dependencies added like below:
...
"dependencies": {
    "cheerio": "^1.0.0-rc.10"
  }
The first step in working with Cheerio is to load in the HTML/XML file that we want to parse or manipulate. We have to do this because we are working with Node.js, which does not have direct access to our application markup unless it was downloaded in some way.
Loading can be achieved with the cheerio.load() method, and this requires an important argument — the HTML/XML document you want to load.
Below is an example:
const cheerio = require("cheerio");
const markup = `<ul id="js-frameworks">
                    <li class="vue">Vue.js ⚡</li>
                    <li class="react">React</li>
                    <li class="svelte">Svelte</li>
                    <li class="angular">Angular</li>
                </ul>`;
/* Note - variable name is declared as '$' to bring the familiarity of JQuery to cheerio */
const $ = cheerio.load(markup);
Similar to a web browser, using the cheerio.load() method will automatically include the <html>, <head>, and <body> tags respectively if they are not already present in our markup.
You can disable this feature by setting the .load() method third argument to false:
const $ = cheerio.load(markup, null, false);
This could be handy in a case where you are working with XML documents rather than HTML.
We use selectors to tell Cheerio what element we want to work on. As mentioned earlier, selector implementation in Cheerio is similar to jQuery, which also follows CSS style, but with a few additions.
Some of the most commonly used selectors in Cheerio include:
$("*") — The asterisk sign (*) is used as a wildcard selector, which will select every element on the provided markup$("div") — Tag selector: selects every instance of the tag provided. In this case, it will select every instance of the <div> tag$(".foo") — Class: selects every element that has the foo class applied to it$("#bar") — Id: selects every element that has the unique bar id$(":focus") — selects the element that currently has focus$("input[type='text']") — Attribute: selects any input element with an input type of text$('.bar, '#foo) — Selects all child elements with class bar, under an element with foo classSimilar to JQuery, Cheerio is shipped with a bunch of DOM-related methods for accessing and manipulating HTML elements and their attributes.
Some of the most commonly used methods include:
.text() — Sets or returns the innerText content of the selected element. Using our previous markup as an example, we can get the text content of an element with class vue with the code below:
$(".vue").text();

// output => Vue.js ⚡
.html() — Sets or returns the innerHTML content of the selected element.append() — Will insert provided content as the last child of each of the selected elements.prepend() — Unlike append, this will insert provided content as the first child of each of the selected elements.addClass() and .removeClass() — Will remove or add provided classes to all matched elements.hasClass() — Returns a Boolean value (true/false) if the selected element has the provided class name.toggleClass() — Will check if the provided class is present in the selected element. If present, the provided class will be removed, else it will be added to the selected element class listOnce you’re done with parsing and manipulating your markup, you can access its root content with:
$.root().html();
By default, when you’re parsing HTML content in Cheerio, some tags will be open, and in a case where you’re working with XML content, the XML file will be invalid this way.
To render a valid XML document, you can use Cheerio’s XML utility function:
// Loading XML content
const $ = cheerio.load(
  '<media:thumbnail url="http://www.foo.com/keyframe.jpg" width="75" height="50" time="12:05:01.123"/>'
);

// Rendering xml content
$.xml();
// Output => <media:thumbnail url="http://www.foo.com/keyframe.jpg" width="75" height="50" time="12:05:01.123"/>
Now that we have a basic understanding of how Cheerio works, let’s go ahead and build a sample project.
We will be building FeatRocket, a CLI application that will scrape all featured articles on the LogRocket blog and log them to our console.
Here is how we will achieve this:
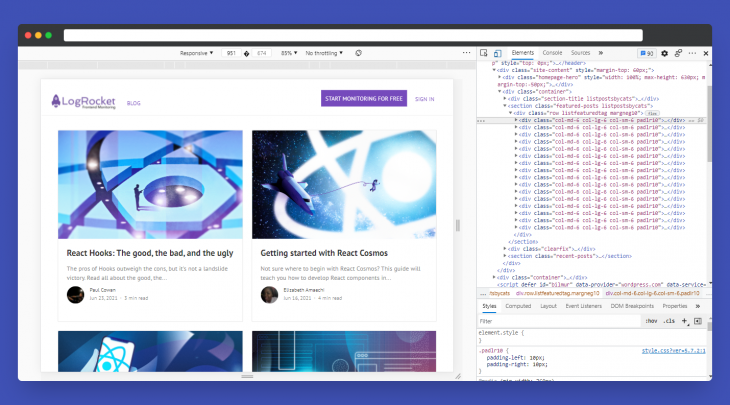
The first step in web scraping is to understand how the content of the website is arranged, i.e., what attribute (class, id, href) is assigned to the element you want to access, and so on.

In our case, we could notice that our targeted content is arranged like below:
<div class="listfeaturedtag">
    <!-- first article -->
    <div class="col.. padlr10"></div>
    ...
    <!-- second article -->
    <div class="col.. padlr10"></div>
    ...
</div>
Where the div with class listfeaturedtag is a wrapper for all of our targeted articles and the divs with class col.. padlr10 are cards for each featured article.
We now understand the website structure alongside our targeted content. Next create a new file scrapper.js then proceed to install Axios — we will be using Axios to download the website content.
npm install axios
And we can grab the website source code with:
const axios = require("axios");

axios
  .get("https://blog.logrocket.com/")
  .then((response) => {
    console.log(response)
  })
  .catch((err) => console.log("Fetch error " + err));
Paste the code above to the newly created scrapper.js file, and run it with this:
node scrapper.js
You will notice that the whole HTML content of the website is logged to the console.
The next step is to load the downloaded markup into a new Cheerio:
const axios = require("axios");
const cheerio = require("cheerio");
axios
  .get("https://blog.logrocket.com/")
  .then((response) => {
    const $ = cheerio.load(response.data);
  })
  .catch((err) => console.log("Fetch error " + err));
Next, we want to filter out only the needed content. We already know the attributes for our targeted divs (.listfeaturedtag and .padlr10). We’ll just have to loop through each of these and log them to the console, so that our full code will look like this:
const axios = require("axios");
const cheerio = require("cheerio");

axios
  .get("https://blog.logrocket.com/")
  .then((response) => {
    const $ = cheerio.load(response.data);

    const featuredArticles = $(".listfeaturedtag .padlr10");

    for (let i = 0; i < featuredArticles.length; i++) {
      let postTitleWrapper = $(featuredArticles[i]).find(".card-title")[0],
        postTitle = $(postTitleWrapper).text();

      let authorWrapper = $(featuredArticles[i]).find(".post-name a")[0],
        author = $(authorWrapper).text();

      let postDescWrapper = $(featuredArticles[i]).find(".card-text")[0],
        postDesc = $(postDescWrapper).text();

      let postLinkWrapper = $(featuredArticles[i]).find(".card-title > a")[0],
        postLink = $(postLinkWrapper).attr("href");

      // console.log("\n++++++");
      console.log(`${postTitle} by [${author}]`);
      console.log(`${postDesc}`);
      console.log("\n" + `Read More - ${postLink}`);
      console.log("\n----\n\n");
    }
  })
  .catch((err) => console.log("Fetch error " + err));
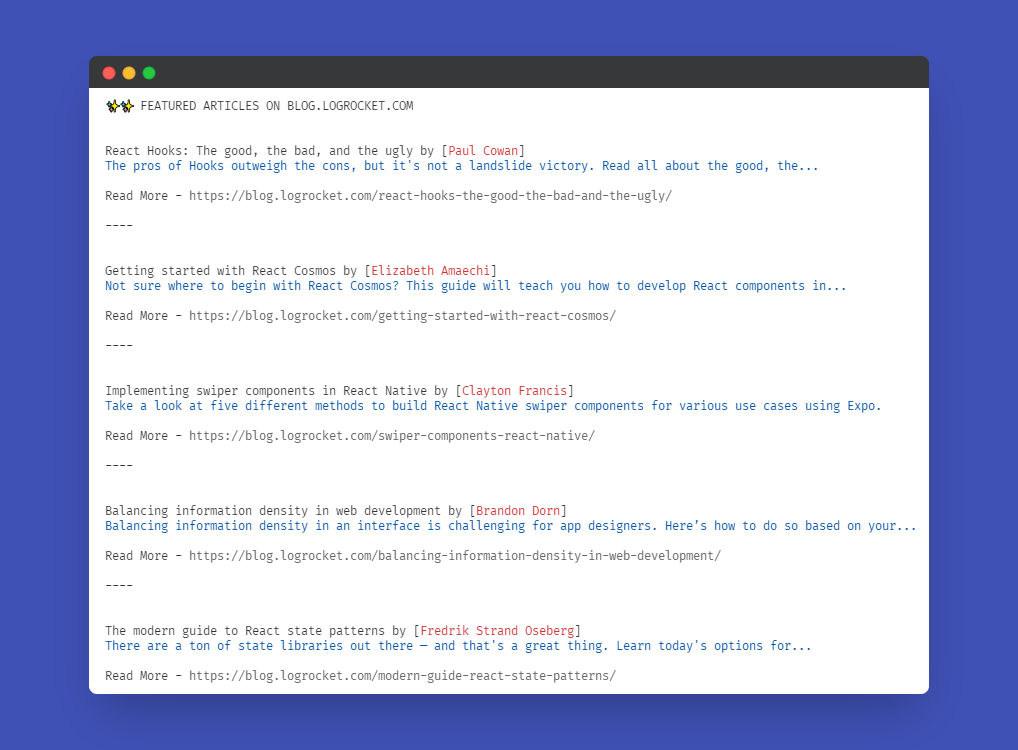
Now, if we run node scrapper.js, you should see an output that looks like the below in your console:

Cheerio is an excellent framework for manipulating and scraping markup contents on the server-side, plus it is lightweight and implements a familiar syntax.
This tutorial has provided an in-depth guide on how to get started using Cheerio in a real-life project.
For further reference, you can also check out the FeatRocket source code on GitHub.
Thanks for reading!
 Monitor failed and slow network requests in production
Deploying a Node-based web app or website is the easy part. Making sure your Node instance continues to serve resources to your app is where things get tougher. If you’re interested in ensuring requests to the backend or third-party services are successful, try LogRocket.

LogRocket lets you replay user sessions, eliminating guesswork around why bugs happen by showing exactly what users experienced. It captures console logs, errors, network requests, and pixel-perfect DOM recordings — compatible with all frameworks.
LogRocket's Galileo AI watches sessions for you, instantly identifying and explaining user struggles with automated monitoring of your entire product experience.
LogRocket instruments your app to record baseline performance timings such as page load time, time to first byte, slow network requests, and also logs Redux, NgRx, and Vuex actions/state. Start monitoring for free.

@container scroll-state: Replace JS scroll listeners nowCSS @container scroll-state lets you build sticky headers, snapping carousels, and scroll indicators without JavaScript. Here’s how to replace scroll listeners with clean, declarative state queries.

Explore 10 Web APIs that replace common JavaScript libraries and reduce npm dependencies, bundle size, and performance overhead.

Russ Miles, a software development expert and educator, joins the show to unpack why “developer productivity” platforms so often disappoint.

Discover what’s new in The Replay, LogRocket’s newsletter for dev and engineering leaders, in the February 18th issue.
Hey there, want to help make our blog better?
Join LogRocket’s Content Advisory Board. You’ll help inform the type of content we create and get access to exclusive meetups, social accreditation, and swag.
Sign up now