
React projects can easily become a mess. Losing track of where files are located is extremely common, which can lead to significant inefficiencies during development. So how can you improve and organize your React projects? By organizing all of your project’s files in a multi-layered architecture.

As a result, you will always know how to place — and find — each file. This is a game-changer. It will not only make you a more efficient developer, but it will also make your project much more maintainable.
Plus, by turning projects into organized architectures, your entire team could benefit as well. This is because different people could work at different layers, avoiding overlap and potential overhead.
Let’s look at why you’ll want to use multi-layered structures in React.
The Replay is a weekly newsletter for dev and engineering leaders.
Delivered once a week, it's your curated guide to the most important conversations around frontend dev, emerging AI tools, and the state of modern software.
Imagine all of your React projects sharing the same multi-layered file structure, allowing you to maximize your time. Instead of adapting components or files imported from other codebases to your target project, this shared file structure allows you to import any kind of file or code snippet from one project to another like a simple copy-and-paste operation. This encourages code reuse, making it easier and less time-consuming for you to build your app.
For example, let’s say you have several mathematical problems in one of your projects. By using this file structure, you aren’t tempted to spread all the required utility functions throughout your codebase.
Instead, it incentivizes you to define a math-utils.js file where you can store all of your math utilities. Plus, by externalizing elements serving the same purpose in the same file, you are making them more reusable. In fact, if you face similar issues in a future project, you can simply copy the math-utils.js file defined previously and paste it into your utils layer.
The consequence of imposing a multi-layered structure is that every file, function, or piece of code belongs in a particular place. This means that before writing something new, you should look in its assumed folder first, which discourages code duplication and a reduction of the build size.
A bundle with a lot more code than is needed will obviously be larger than needed. This is not good for browsers, which have to download and then render the code.
So, avoiding code duplication makes your application cleaner, easier to build, and faster when it’s rendered. For example, whenever you need to retrieve the data returned from a particular API, you may be tented to follow this approach:
function FooComponent1(props) {
      // ...

      // retrieving data
      fetch(`/api/v1/foo`)
      .then((resp) => resp.json())
      .then(function(data) {
          const results = data.results;
          // handling data ...
        })
        .catch(function(error) {
          console.log(error);
        });

      // component logic ...
}

export default FooComponent1
function FooComponent2(props) {
      // ...

      // retrieving data
      fetch(`/api/v1/foo`)
      .then((resp) => resp.json())
      .then(function(data) {
          const results = data.results;
          // handling data in a different way than FooComponent1 ...
        })
        .catch(function(error) {
          console.log(error);
        });

      // different component logic from FooComponent1 ...
}

export default FooComponent2
As you can see, FooComponent1 and FooComponent2 are affected by a code duplication issue. In particular, the API endpoint is being duplicated, forcing you to update it every time it changes.
This is not a good habit. Instead, you should map the API into the API layer as follows:
export const FooAPI = {

    // ...

    // mapping the API of interest
    get: function() {
        return axiosInstance.request({
            method: "GET",
            url: `/api/v1/foo`
        });
    },

    // ...

}
And then use it in where needed to avoid code duplication:
import React from "react";
import {FooAPI} from "../../api/foo";
//...

function FooComponent1(props) {
      // ...

      // retrieving data
      FooAPI
      .get()
      .then(function(response) {
          const results = response.data.results;
          // handling data ...
        })
        .catch(function(error) {
          console.log(error);
        });

      // component logic ...
}

export default FooComponent1
import React from "react";
import {FooAPI} from "../../api/foo";
//...

function FooComponent2(props) {
      // ...

      // retrieving data
      FooAPI
      .get()
      .then(function(response) {
          const results = response.data.results;
          // handling data in a different way than FooComponent1 ...
        })
        .catch(function(error) {
          console.log(error);
        });

      // different component logic from FooComponent1 ...
}

export default FooComponent2
Now, the API endpoint is saved in only one place, as it should always be.
Working with a well-known file structure means that development teams member are all on the same page and use it the same way.
Whenever a team member maps a new API, or creates a new utils file or a new component, for example, any team member will be able to use it immediately. And, because each file is logically placed in a particular folder that everyone knows how (and where) to access, communication overhead is reduced or completely eliminated, thus streamlining the company’s development processes.
There’s one potential downside to having such an organized file architecture: the files are spread across many folders, which forces you to uses relative imports intensively. This represents a well-known problem when creating npm modules.
Relative imports are prone to breaking, especially when trying to encapsulate part of your codebase to make it publishable as stand-alone modules. On one hand, this can certainly represent an additional challenge when trying to create an npm package.
On the other, this can easily be avoided by turning relative imports into non-breakable absolute imports as described here. Such a technique allows you to turn this:
import UserComponent from "../../components/UserComponent";
import userDefaultImage from "../../../assets/images/user-default-image.png";
import {UserAPI} from "../../apis/user";
Into this:
importUserComponentfrom "@components/UserComponent";
import userDefaultImage from "@assets/images/user-default-image.png";
import {UserAPI} from "@apis/user";
So, using many relative imports should not be seen as a real problem.
Now, let’s see how to design an efficient multi-layered architecture for your projects in React and JavaScript.
First, let’s take a look at the final result of multi-layer architecture. Keep in mind that each layer of our architecture should be enclosed in a specific folder. As expected, giving these folders the same names as the layers the architecture consists of is highly recommended. This way, retrieving a file becomes intuitive and fast. You will also always know where to place a new file, which is a great plus.
This is what the final structure looks like:
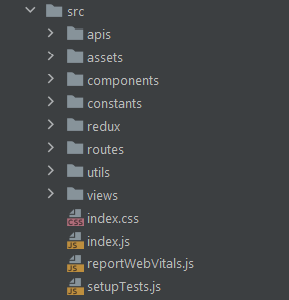
Now, let’s dive into each of the layers the presented architecture consists of.
By harnessing a promise-based HTTP client such as Axios, you can define a function for each API your application depends on, encapsulating all the logic required to call it. This way, you can divide where API requests are defined from where they are actually used. Let’s see how such a layer can be built with a simple example:
const axiosInstance = axios.create({
   baseURL: 'https://yourdomain.org'
});

export const UserAPI = {
    getAll: function() {
        return axiosInstance.request({
            method: "GET",
            url: `/api/v1/users`
        });
    },
    getById: function(userId) {
        return axiosInstance.request({
            method: "GET",
            url: `/api/v1/users/${userId}`
        });
    },
    create: function(user) {
        return axiosInstance.request({
            method: "POST",
            url: `/api/v1/users`,
            data: user
        });
    },
    update: function(userId, user) {
        return axiosInstance.request({
            method: "PUT",
            url: `/api/v1/users/${userId}`,
            data: user,
        });
    },
}
Now, you can import the UserAPI object to make the call where you need, just like this:
import React, {useEffect, useState} from "react";
import {UserAPI} from "../../api/user";
//...

function UserComponent(props) {
    const { userId } = props;

    // ...

    const [user, setUser] = useState(undefined)

    // ...

    useEffect(() => {
        UserAPI.getById(userId).then(
            function (response) {
                // response handling
                setUser(response.data.user)
            }
        ).catch(function (error) {
            // error handling
        });
    }, []);

    // ...
}

export default UserComponent;
By employing Promise technology, you can collect all your API requests definition in the same place. But let’s not lose sight of the goal. This article is not meant to show what you can achieve with the API layer, and you can follow this and this for further reading.
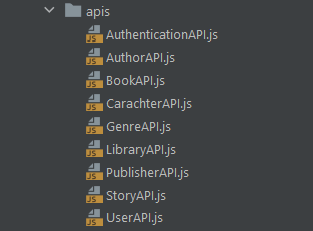
Instead, we’ll focus on the fact that with this approach, you will be able to define a completely dedicated layer to API requests. This will have all the logic to deal with API requests saved in just one place, as opposed to duplicating the entire logic to call an API every time you need it.
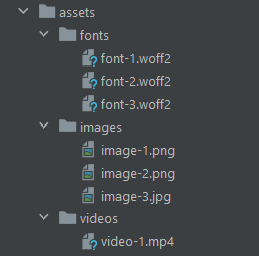
Your React project may depend on files that are not strictly part of your codebase, such as multimedia files. Having a place to store them all is best practice, as you should clearly divide them from your code. Please note that such a layer can be organized in sub-folders based on types or extensions to keep it organized:
Furthermore, this is a good place to store all your translation files required in an international application employing an internationalization framework, such as i18next.
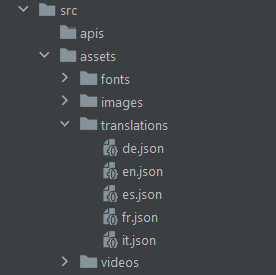
i18next translation files in the translations folder.This is where you should put all your components. You should have one folder per component, named in the same way as the component itself. Such a folder usually contains only two files: index.js and index.css. They represent where the React component is defined and where its styling is contained, respectively.
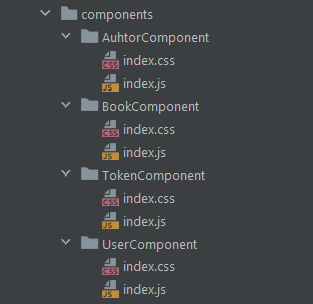
Because your components might be large, you should think about organizing them in a nested structure. Finding a good criterion for allocating them into sub-folders is not always a simple task.
At the same time, keep in mind that you can always change it on the fly, rearranging the structure in which your components are stored as you wish.
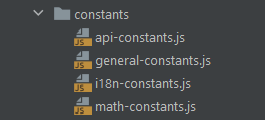
A common practice is to define all the constants used in your application in a single constans.js file. In a small project, this approach might seem like the best solution. Inevitably, as your file becomes larger, it’ll slowly turn into a mess.
This is why you should split your constants across multiple files. For example, in an international application, you could think about storing all the custom-defined keys used by i18next in a specific file.
This way, all the constants related to i18n would be in the same file, making them easier to be managed. Similarly, you can follow the latter approach in other circumstances, as in the example below:
This is an optional layer, and you should define it only if your application uses Redux. As stated in the official documentation, Redux is a predictable state container for JavaScript applications. If you have ever worked with Redux, you should know how many files it requires.
Getting lost in the multitude of Redux reducers and Redux actions is common, especially for the latter. Plus, defining actions involves boilerplate code. This is why using a library, such as redux-actions, to manage all your actions is recommended. Then, you will be able to simply obtain an organized structure by arranging your files as follows:
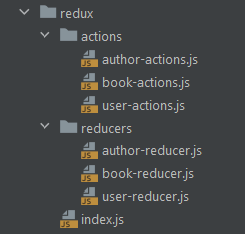
As shown above, you can put all your Redux reducers in the reducers folder, your Redux actions into the actions folder, and define a top-level index.js file containing your store and persist logic. If required, you can even organize the files contained in the aforementioned two folders in subfolders.
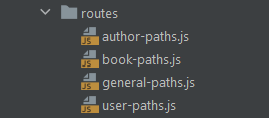
Your project may already have all your routes covered by your application stored in a routes.js file. Defining a file containing all your routes to gather them in one place and separate them from when they are actually used.
Again, for small projects, this approach might be enough. The problem lies in the fact that you cannot predict how big your application will grow. This is why you should define a layer designed to contain all your routing files and logic. A trick to easily split your routes.js file into many files is to create one for each of the level routing paths used by your application.
This is the place to store all of the custom-defined utility functions your entire codebase depends on. While you may have your functions stored in a single utilis.js file, as the size of your project grows, you could be forced to split it into multiple files.
This is why having a dedicated layered for this may become unavoidable. Instead of waiting for this to occur, get ahead of the game and build a new layer as follows:

utils.js file into two different files.This is the top layer where you’ll store all the pages your applications consist of. Please note that this is the only layer that may require files imported from any other layer mentioned before.
In case your project has a large amount of pages, you should organize them into sub-folders. A good criterion to achieve this is to replicate the routing structure, just as you would do in a PHP project. For instance, all the pages sharing the https://yourdomain.dom/users/ base path should be placed into the Users folder.
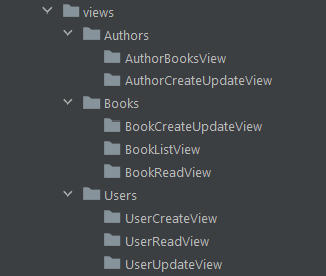
Keep in mind that such an architecture may not be enough to cover all the files that make up your codebase. This is why there will always be additional files that you might not know where to place.
Following such an organized structure allows you to reduce them to a few places. A good rule of thumb is that if you have fewer than three files, you should leave them in the top-level folder of your project, or where you think they belong. Otherwise, you can always design new layers meeting your needs.
In this article, we looked at how to (and why you should) organize a React project to make it more efficient. By placing your files in folders representing a multi-layered architecture, you can turn your project into a much more organized structure.
With such an approach, each file will have its own place. This will enable you and your team to set architecture standards, make your entire codebase more robust and maintainable, and streamline your development process.
Thanks for reading! I hope that you found this article helpful. Feel free to reach out to me with any questions, comments, or suggestions.
Install LogRocket via npm or script tag. LogRocket.init() must be called client-side, not
server-side
$ npm i --save logrocket

// Code:

import LogRocket from 'logrocket';
LogRocket.init('app/id');
// Add to your HTML:

<script src="https://cdn.lr-ingest.com/LogRocket.min.js"></script>
<script>window.LogRocket && window.LogRocket.init('app/id');</script>

@container scroll-state: Replace JS scroll listeners nowCSS @container scroll-state lets you build sticky headers, snapping carousels, and scroll indicators without JavaScript. Here’s how to replace scroll listeners with clean, declarative state queries.

Explore 10 Web APIs that replace common JavaScript libraries and reduce npm dependencies, bundle size, and performance overhead.

Russ Miles, a software development expert and educator, joins the show to unpack why “developer productivity” platforms so often disappoint.

Discover what’s new in The Replay, LogRocket’s newsletter for dev and engineering leaders, in the February 18th issue.
Hey there, want to help make our blog better?
Join LogRocket’s Content Advisory Board. You’ll help inform the type of content we create and get access to exclusive meetups, social accreditation, and swag.
Sign up now
5 Replies to "Optimize React apps using a multi-layered structure"
I think I disagree with some of the structures shown. I’ve always found feature focused layers to be much easier to work on (vs type based layers).
The reason being, most units of work tends to be feature focused. If I am working on Foo, I don’t want to open 5 different layers for reducers, actions, views, blah, blah. This encourages commits to have wide surface area.
By organizing by feature, commits will have low surface area. You would modify foo/action.js, foo/reducer.js, foo/view.js, foo/blah.js. Everything is in 1 layer.
This is much easier for both the reader and writer.
You assume that only view layer should use other layers? Let’s look on this example. I have component with user details and it is in component layer. I want to use it on many views and I don’t want to duplicate code so I want to pass only user ID to component, but in this case I have to use API request inside component and finally I use other layer in component layer. Where I should use a API request? Each time I want to use user details component and pass result to component?
Agree with u Jarek , its really practical to use API or other general logic into Component . But its also worth attention that we may abuse business logic into Component too much. So I guess author could give more example on how to minify the business logic pollution.
Hi, I am the author. Thanks for your feedback!
I would like to add that the best architecture depends on what you are working on. Based on my experience, such a structure works quite well, but it is not the only one possible. The one you presented is a very good alternative, for sure. I have worked with this file structure in many projects, with other team members, and we are all satisfied.
At the same time, I don’t exclude the possibility that other architectures and file structures might be better than this one, especially in contexts other than those that helped me conceive it.
Hi, I am the author. Thanks for your feedback!
The view layer is the only one that might need to import files from all other layers. For example, the component layer should depend on the view layer, while the other way around is feasible. I hope that’s clear now!