SEO is a critical aspect of marketing that helps websites rank more effectively in search engine results pages (SERPs). A higher rank in the SERPs increases organic traffic and leads to greater business opportunities, so you can see why it’s vital to keep it in mind!

Because of this, it’s crucial for us as developers to ensure our projects’ website SEO is managed correctly without missing any properties.
In this article, we will be using Next SEO to manage search engine optimization in our Next.js applications.
Next.js has static site generation (SSG) support, which delivers better SEO capability than client-side rendering. It also has an in-built head component to manage SEO meta information like title, description, canonical, and Open Graph tags.
When there are more pages on a website, there are also more meta tags to account for. As a site grows, managing these can become a daunting process.
To simplify this, we can use a package called next-seo. Next SEO makes managing SEO easier in your Next.js projects.
By using Next SEO, we can pass SEO properties as an object and the package automatically adds the properties to the page head.
You can add this to every page individually or use the DefaultSeo component and overwrite it onto other pages.
Let’s get started and see it in action.
First, install the next-seo package in your Next.js project using the following command:
yarn add next-seo
Let’s import the next-seo package into the page component with SEO properties. To do this, add the following code to the home component:
//home.js

import { NextSeo } from 'next-seo';

const Home = () => (
    <>
        <NextSeo
            title="Home Page Title"
            description="Home page description of the page"
        />
        <p>Simple Usage</p>
    </>
);

export default Home;
This will render a <head> tag with a title and description for your page. You can verify it by inspecting it, as shown here:

You can see that the tag includes og:title and og:description by default, using the title and description properties.
This is a simple configuration; let’s explore the other options available to us in Next SEO.
To add default properties to all of our pages, we can use the DefaultSeo component, instead of manually adding the properties individually to each page. We can also override any property on a page, if needed.
Add the DefaultSeo component to _app.js and add the following code:
//_app.js

import '../styles/globals.css'
import {DefaultSeo} from 'next-seo';

function MyApp({Component, pageProps}) {
    return (
        <>
            <DefaultSeo
                title="Next SEO Example"
                description="Next SEO is a plug in that makes managing your SEO easier in Next.js projects."
                openGraph={{
                    type: 'website',
                    locale: 'en_IE',
                    url: 'https://www.url.ie/',
                    siteName: 'SiteName',
                }}
                twitter={{
                    handle: '@handle',
                    site: '@site',
                    cardType: 'summary_large_image',
                }}
            />
            <Component {...pageProps} />
        </>
    )
}

export default MyApp
Now, the SEO properties added to the default component will be rendered on all pages. You can verify this by once again inspecting the page, as shown here:

Now, let’s override the default SEO properties on our Blog page, as each blog will have an individual title and description. Add the following code to the page:
//blog.js

import {NextSeo} from 'next-seo';

const Blog = () => (
    <>
        <NextSeo
            title="Manage SEO in NextJS with Next SEO"
            description="Next SEO packages simplifies the SEO management in Next Apps with less configurations"
            canonical="www.example.com/next-seo-blog"
            openGraph={{
                type: 'article',
                article: {
                    publishedTime: '2022-06-21T23:04:13Z',
                    modifiedTime: '2022-01-21T18:04:43Z',
                    authors: [
                        'https://www.example.com/authors/@firstnameA-lastnameA',
                        'https://www.example.com/authors/@firstnameB-lastnameB',
                    ],
                    tags: ['Tag A', 'Tag B', 'Tag C'],
                },
                url: 'www.example.com/next-seo-blog',
                images: {
                    url: 'https://www.test.ie/images/cover.jpg',
                    width: 850,
                    height: 650,
                    alt: 'Photo of text',
                },
                site_name: 'Next Blog'
            }}
        />
        <p>Manage SEO in NextJS with Next SEO - Blog</p>
    </>
);

export default Blog;
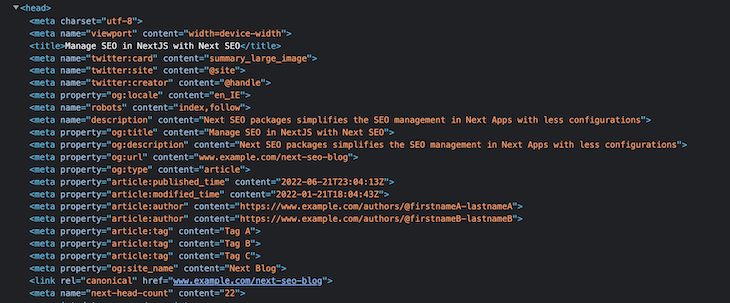
Here, we have overridden the title, description, and other properties. You can also see a few new properties specifically related to our blog posts:
publishedTime: Blog published datemodifiedTime: Blog updated datetags: Tags associated with the blog postauthors : Author of the blogYou can verify these by inspecting the page:

As you can see, there is some meta info related to Twitter cards, but we didn’t include those in the blog page — it was added by Next SEO, which we added earlier using the DefaultSeo Component.
You can see with this example how it supports blog-related SEO properties out of the box for ease of use.
The Open Graph protocol controls what content should be displayed when sharing links on social media. Using Open Graph tags in web pages enables them to become rich objects in a social graph.
For instance, the OG protocol allows you to control what title, image, and description are displayed when sharing links on social media platforms. If you share without OG tags, social media platforms will choose a random title, image, and description.
Platforms like Twitter, LinkedIn, and Facebook recognize Open Graph tags — however, Twitter also has meta tags called Twitter Cards, but will use OG tags when there is no need to use Twitter Card tags.
Next SEO supports the following OG properties:
The following configuration enables audio Open Graph support with multiple audio files:
//Podcast.js

import { NextSeo } from 'next-seo';
const Podcast = () => (
  <>
    <NextSeo
      title="Podcast Page Title"
      description="Next SEO PodCast"
      openGraph={{
        title: 'Open Graph Audio',
        description: 'Description of open graph audio',
        url: 'https://www.example.com/audio/audio',
        audio: [
          {
            url: 'http://examples.opengraphprotocol.us/media/audio/1khz.mp3',
            secureUrl: 'https://d72cgtgi6hvvl.cloudfront.net/media/audio/1khz.mp3',
            type: "audio/mpeg"
          },
          {
            url: 'http://examples.opengraphprotocol.us/media/audio/250hz.mp3',
            secureUrl: 'https://d72cgtgi6hvvl.cloudfront.net/media/audio/250hz.mp3',
            type: "audio/mpeg"
          },
        ]
        site_name: 'SiteName',
      }}
    />
    <h1>Audio Page SEO</h1>
  </>
);
export default Podcast;
You can take a look at other examples for other OG types to learn more.
Structured data is a standardized format for providing information about a page and classifying the page’s content. This helps search engines understand the web page and display the most relevant titles, descriptions, images, and other information to end users.
Next SEO also supports structured data with limited configuration necessary, supporting multiple JSON-LD types like article, blog, FAQ, and course.
Let’s see this in action with an example.
The ArticleJsonLd component is used to add structured data to a page. Add the following code to add structured data to our blogs:
//blog.js

import {ArticleJsonLd, NextSeo} from 'next-seo';

const Blog = () => (
    <>
        <NextSeo
            title="Manage SEO in NextJS with Next SEO"
            description="Next SEO packages simplifies the SEO management in Next Apps with less configurations"
            canonical="www.example.com/next-seo-blog"
            openGraph={{
                type: 'article',
                article: {
                    publishedTime: '2022-06-21T23:04:13Z',
                    modifiedTime: '2022-01-21T18:04:43Z',
                    authors: [
                        'https://www.example.com/authors/@firstnameA-lastnameA',
                        'https://www.example.com/authors/@firstnameB-lastnameB',
                    ],
                    tags: ['Tag A', 'Tag B', 'Tag C'],
                },
                url: 'www.example.com/next-seo-blog',
                images: {
                    url: 'https://www.test.ie/images/cover.jpg',
                    width: 850,
                    height: 650,
                    alt: 'Photo of text',
                },
                site_name: 'Next Blog'
            }}
        />
        <ArticleJsonLd
            type="BlogPosting"
            url="https://example.com/blog"
            title="Manage SEO in NextJS with Next SEO"
            images={[
                'https://example.com/photos/1x1/photo.jpg',
                'https://example.com/photos/4x3/photo.jpg',
                'https://example.com/photos/16x9/photo.jpg',
            ]}
            datePublished="2022-06-21T23:04:13Z"
            dateModified="2022-06-21T23:04:13Z"
            authorName="Author Name"
            description="Next SEO packages simplifies the SEO management in Next Apps with less configurations"
        />
        <p>Manage SEO in NextJS with Next SEO - Blog</p>
    </>
);

export default Blog;
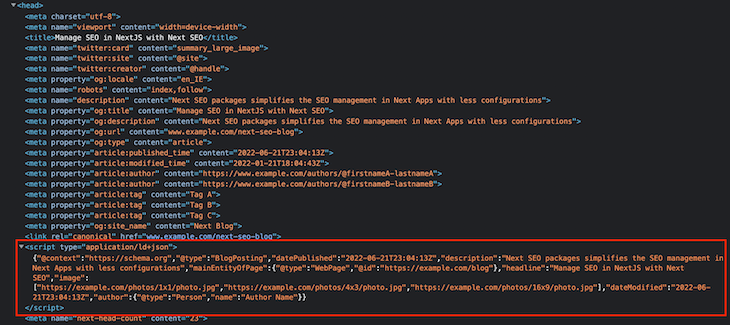
We have now added a few SEO properties to the JsonLd, which will be rendered like so:

The JSON data is rendered in the <script> tag. You can check all the available JSON-LD types for more information on this.
The following are the properties for the NextSeo component, which we can use to handle different meta tag properties. Some of the most used properties are:
defaultTitle: If no title is set on a page, this string will be used instead of an empty titlenoindex: Option to set whether the page should be indexed or notnofollow: Option to set whether the page should be followed or notcanonical: Set the page’s canonical URLfacebook.appId: Add Facebook app ID to your page to receive Facebook Insights dataadditionalMetaTags: Additional meta tags like title and contentadditionalLinkTags: Additional meta links like faviconsNext.js 13 introduced a beta feature to the app directory for routing alongside the pages directory.
Due to this change, the usage and configuration of next-seo also changes, as the new app directory brings the following changes to the existing flow:
DefaultSeo component for global SEOapp directory includes the head.js file to include <head> tags, but it doesn’t support synchronous inline script. As a result, JSON-LD components can’t be added in head.js, so it needs to be added in page.js, which adds to the <body/> of the documentAs per the new app directory, DefaultSeo meta tags can’t be overwritten on other pages.
Because of this, we need to identify common tags and place them in the root layout (/app/layout.js), as demonstrated here:
// app/layout.js
import { NextSeo } from 'next-seo';

export default function RootLayout({ children }) {
  return (
    <html>
      <head>
        {/* Used to be added by default, now we need to add manually */}
        <meta charSet="utf-8" />
        <meta name="viewport" content="width=device-width" />
        {/*
          Anything we add in layout will appear on EVERY PAGE. At present it can not be overridden lower down the tree.
          This can be useful for things like favicons, or other meta tags that are the same on every page.
        */}
        <NextSeo
          useAppDir={true}
          facebook={{ appId: '1234567890' }}
          themeColor="#73fa97"
          titleTemplate="%s | Next SEO"
        />
      </head>
      <body>{children}</body>
    </html>
  );
}
N.B., the new prop
useAppDirforces next-seo to use theappdirectory that is a compatible version.
The following are the rendered meta tags from the above example:

To use common meta tags like og, image, title, and description, start by adding the next-seo-config.js file with common meta tags and importing it into the required pages. Here’s an example of what I mean:
// next-seo-config.js
export const NEXT_SEO_DEFAULT = {
  title: 'Page Title',
  description: 'Page Description',
  openGraph: {
    type: 'website',
    locale: 'en_IE',
    url: 'https://www.url.ie/a',
    title: 'OG Title',
    description: 'OG Decription',
    siteName: 'Example',
  },
};
Now, import the next-seo-config.js file into head.js, as shown here:
// app/head.js
import { NextSeo } from 'next-seo';

import { NEXT_SEO_DEFAULT } from './next-seo-config'; // your path will vary

export default async function Head() {
  return <NextSeo {...NEXT_SEO_DEFAULT} useAppDir={true} />;
}
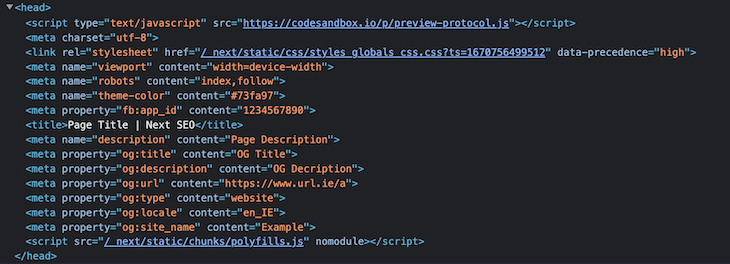
Here’s our output for the above example:

You can override the default next-seo-config meta tags on other pages if necessary — take a look at the following example to see how it’s done:
 // app/profile/head.js
import { NextSeo } from 'next-seo';

import { NEXT_SEO_DEFAULT } from '../next-seo-config'; // your path may vary

export default async function Head() {
  const updateMeta = {
    ...NEXT_SEO_DEFAULT,
    title: 'Profile',
    description: 'User Profile',
  };
  return <NextSeo {...updateMeta} useAppDir={true} />;
}
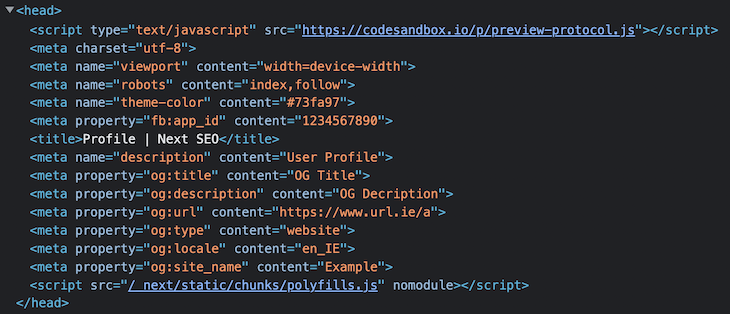
Here, we are updating the title and description of the default SEO meta tags to our own specifications.
Here’s the output for the above example:

As we saw earlier, the new app directory head.js does not support an inline <script>. We can add the JSON-LD to page.js file, which adds the JSON-LD structured data into the document body.
Check out the following example:
// app/blog/page.js
import { ArticleJsonLd } from 'next-seo';

const Article = () => (
  <>
    <h1>Article</h1>
    <p>Inspect page for output.</p>
    <ArticleJsonLd
      useAppDir={true}
      type="BlogPosting"
      url="https://example.com/blog"
      title="Blog headline"
      images={[
        'https://example.com/photos/1x1/photo.jpg',
        'https://example.com/photos/4x3/photo.jpg',
        'https://example.com/photos/16x9/photo.jpg',
      ]}
      datePublished="2015-02-05T08:00:00+08:00"
      dateModified="2015-02-05T09:00:00+08:00"
      authorName="Jane Blogs"
      description="This is a mighty good description of this blog."
    />
  </>
);

export default Article;
Here’s the output for the above example:

SEO is essential for web pages that need to be discovered organically. To have high page rankings, sites need to be organized so that they can be easily crawled by search engines.
Next SEO makes the management of search engine optimization in Next.js projects very simple and is easy to implement — it helps devs add SEO properties efficiently without missing any important meta tags, while avoiding the occurrence of duplicates.
You can find other properties and examples in the official docs.
Let me know of your own experiences using Next SEO in the comments below and thanks for reading!
Debugging Next applications can be difficult, especially when users experience issues that are difficult to reproduce. If you’re interested in monitoring and tracking state, automatically surfacing JavaScript errors, and tracking slow network requests and component load time, try LogRocket.
LogRocket captures console logs, errors, network requests, and pixel-perfect DOM recordings from user sessions and lets you replay them as users saw it, eliminating guesswork around why bugs happen — compatible with all frameworks.
LogRocket's Galileo AI watches sessions for you, instantly identifying and explaining user struggles with automated monitoring of your entire product experience.
The LogRocket Redux middleware package adds an extra layer of visibility into your user sessions. LogRocket logs all actions and state from your Redux stores.


Modernize how you debug your Next.js apps — start monitoring for free.
Hey there, want to help make our blog better?
Join LogRocket’s Content Advisory Board. You’ll help inform the type of content we create and get access to exclusive meetups, social accreditation, and swag.
Sign up now
Discover how to use Gemini CLI, Google’s new open-source AI agent that brings Gemini directly to your terminal.

This article explores several proven patterns for writing safer, cleaner, and more readable code in React and TypeScript.

A breakdown of the wrapper and container CSS classes, how they’re used in real-world code, and when it makes sense to use one over the other.

This guide walks you through creating a web UI for an AI agent that browses, clicks, and extracts info from websites powered by Stagehand and Gemini.