The Replay is a weekly newsletter for dev and engineering leaders.
Delivered once a week, it's your curated guide to the most important conversations around frontend dev, emerging AI tools, and the state of modern software.
Today, people are using the internet to connect with friends and family, manage their finances, invest, attend classes, and more. At the backbone of this are services that have traditionally required standard methods of authorization mostly a username and password.

As technology has become more advanced and complex the traditional methods of securing your personal information are no longer acceptable. This has led to the development of alternatives to help ensure the security of your data. One of these developments is two-factor authentication also known as 2FA. Two-factor authentication provides an additional layer of security on top of your standard authentication process. The two-factor authentication layer requires you to enter additional data to access your account. This data can come from different sources:
The most common forms of two-factor authentication involve entering a code sent to your mobile phone or entering a code retrieved from an authentication app.
These are general pros and cons and each type of two-factor authentication has advantages and disadvantages unique to it.
In this article, we will be focusing on implementing a time-based one-time password(TOTP) using the Speakeasy library. The scope of the article will cover the backend implementation of two-factor authentication and therefore we will not build a user interface for it.
We will mainly focus on the backend implementation of two-factor authentication. To demonstrate the implementation, we will build a simple Node.js server. Familiarity with Node.js and Express is beneficial but not necessary. Before we begin building the server, ensure that you have Node, Yarn, or npm installed on your machine. I have linked the sites for each one of them where you can find instructions to install them if you haven’t already.
The first thing we want to do is create a folder that will contain our project:
$ mkdir two-fa-example
$ cd two-fa-example
Once we have created the project folder, we will use npm init to initialize our project:
$ npm init -y
This will generate a package.json file with the following contents:
{
  "name": "two-fa-example",
  "version": "1.0.0",
  "description": "",
  "main": "app.js",
  "scripts": {
    "test": "echo \"Error: no test specified\" && exit 1"
  },
  "keywords": [],
  "author": "",
  "license": "ISC"
}
Now that we are done with the initial setup, we install all the dependencies that we will need.
Run the following command to install the necessary dependencies:
$ yarn add express body-parser node-json-db uuid speakeasy
Express is a simple Node.js web application server framework that we’ll use to create our server. The body-parser package, on the other hand, is middleware that parses the JSON, buffer, string, and URL encoded data of incoming HTTP POST requests and exposes them as req.body before they reach your handlers. I would like to keep this article simple and focus on the concepts of two-factor authentication. For this reason, I will avoid setting up a fully-fledged server with a database, models, and controllers. Since we still need to store some data for demonstration purposes, we will use node-json-db for storage. It uses a JSON file for storage.
We now have all the necessary parts to create our server. In our project folder, create an index.js file and add the following code to it:
const express = require("express");
const bodyParser = require('body-parser');
const JsonDB = require('node-json-db').JsonDB;
const Config = require('node-json-db/dist/lib/JsonDBConfig').Config;
const uuid = require("uuid");
const speakeasy = require("speakeasy");

const app = express();

/**
 * Creates a node-json-db database config
 * @param {string} name - name of the JSON storage file
 * @param {boolean} Tells the to save on each push otherwise the save() mthod has to be called.
 * @param {boolean} Instructs JsonDB to save the database in human readable format
 * @param {string} separator - the separator to use when accessing database values
 */
const dbConfig = new Config("myDataBase", true, false, '/')

/**
 * Creates a Node-json-db JSON storage file
 * @param {instance} dbConfig - Node-json-db configuration
 */
const db = new JsonDB(dbConfig);

app.use(bodyParser.json());
app.use(bodyParser.urlencoded({ extended: true }));
app.get("/api", (req,res) => {
  res.json({ message: "Welcome to the two factor authentication exmaple" })
});

const port = 9000;
app.listen(port, () => {
  console.log(`App is running on PORT: ${port}.`);
});
In the terminal at the root of your project, run the app to make sure everything is working alright:
$ node index.js


The first step in enabling two-factor authentication is creating a key to link the server and the application that will generate the two-factor authentication codes. We need to add a route that creates a user and sends back the user ID as well as a key to set up two-factor authentication. To do this we will use Speakeasy’s generateSecret function. This returns an object that has the secret in ascii, hex,base32, and otpauth_url formats. Otpauth_url is a QR code that has secrets encoded in it as a URL with the format, otpauth://TYPE/LABEL?PARAMETERS. The otpauth_url can be used to create a QR code that the user can scan to set up 2FA. Since we won’t be building a frontend app, we will only use the base32 string to set up 2FA. The route to do the initial work will look something like this:
app.post("/api/register", (req, res) => {
  const id = uuid.v4();
  try {
    const path = `/user/${id}`;
    // Create temporary secret until it it verified
    const temp_secret = speakeasy.generateSecret();
    // Create user in the database
    db.push(path, { id, temp_secret });
    // Send user id and base32 key to user
    res.json({ id, secret: temp_secret.base32 })
  } catch(e) {
    console.log(e);
    res.status(500).json({ message: 'Error generating secret key'})
  }
})
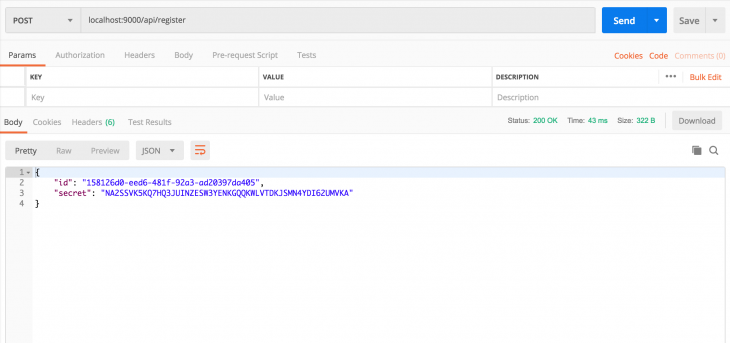
After adding this code we can make a request to this endpoint from Postman to generate a secret. We should get a response like this:

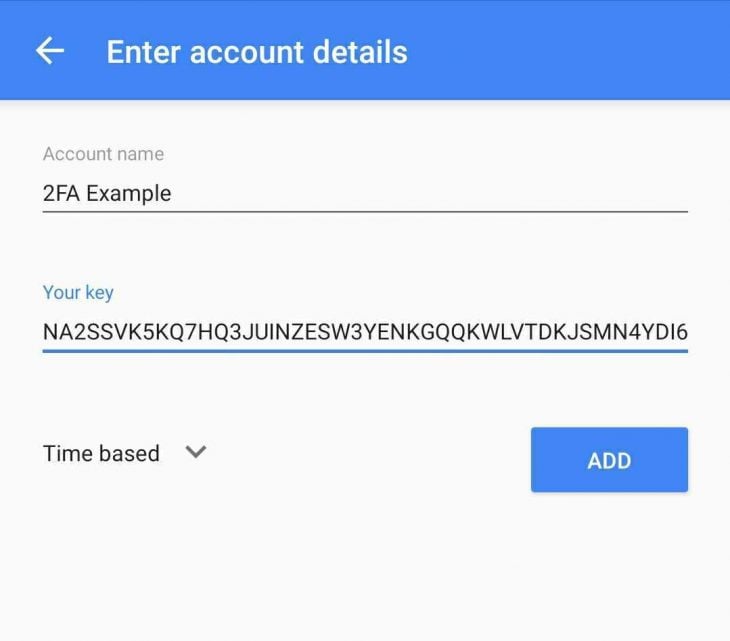
Open your Google authenticator app(this can be installed on your phone from Google Play Store for Android and App Store for iOS) and enter the key you just received.

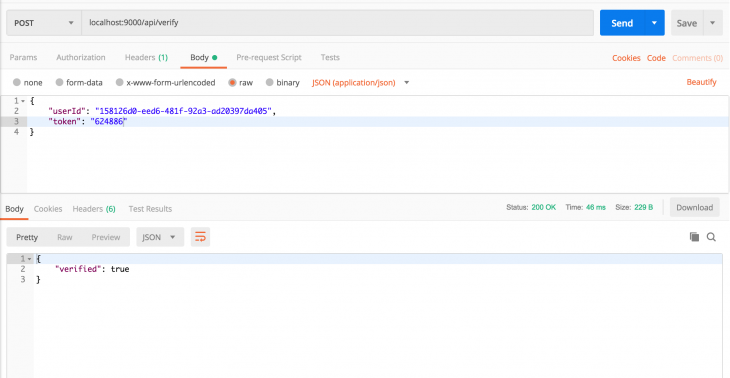
After we have entered the secret key in the authenticator app, we need to verify it so we can use it to generate codes. You will notice that we stored the secret as a temporary secret. After confirmation, we can go ahead and store it permanently. To perform the verification, we need to create an endpoint that receives the user ID and a code from the authenticator app. The endpoint then verifies them against the stored temporary secret and if everything checkouts out, we store the secret permanently:
app.post("/api/verify", (req,res) => {
  const { userId, token } = req.body;
  try {
    // Retrieve user from database
    const path = `/user/${userId}`;
    const user = db.getData(path);
    console.log({ user })
    const { base32: secret } = user.temp_secret;
    const verified = speakeasy.totp.verify({
      secret,
      encoding: 'base32',
      token
    });
    if (verified) {
      // Update user data
      db.push(path, { id: userId, secret: user.temp_secret });
      res.json({ verified: true })
    } else {
      res.json({ verified: false})
    }
  } catch(error) {
    console.error(error);
    res.status(500).json({ message: 'Error retrieving user'})
  };
})
Go to your two-factor authentication app and retrieve the code so we can verify the secret using a Postman request.

After verification, the secret key is stored permanently and is used to verify future codes.
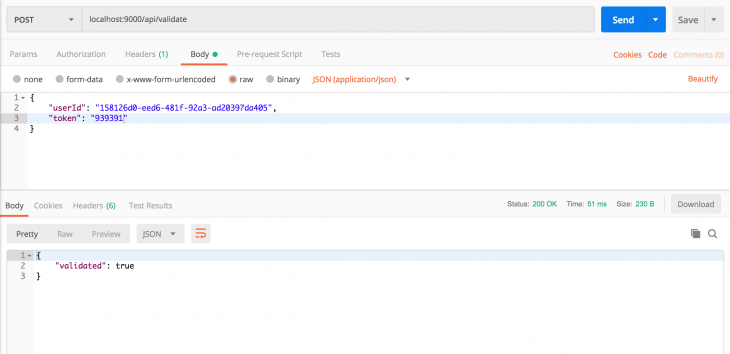
The final step in two-factor authentication is verifying codes that the user enters from their authenticator app. We need to add another route that will confirm that the tokens entered by the user are valid. This endpoint will receive the user ID and the token and then it will verify the token against the permanently stored secret. The verification is handled by the Speakeasy totp(Time Based One Time Password) verify function.
This receives an object that contains the secret, the encoding to use to verify the token, the token, and a window option. A window refers to the period of time that a token is valid. This is usually 30 seconds but can vary depending on the time selected by the developer of the two-factor process. During verification, the window options specify how many windows from the current one both before and after to crosscheck the token against. Increasing the number of windows can enable the user to still be verified if they enter the token a few seconds late. You want to be careful not to give a window allowance that is too large as this means the verification process becomes less secure. Let’s add the endpoint for validate tokens:
app.post("/api/validate", (req,res) => {
  const { userId, token } = req.body;
  try {
    // Retrieve user from database
    const path = `/user/${userId}`;
    const user = db.getData(path);
    console.log({ user })
    const { base32: secret } = user.secret;
    // Returns true if the token matches
    const tokenValidates = speakeasy.totp.verify({
      secret,
      encoding: 'base32',
      token,
      window: 1
    });
    if (tokenValidates) {
      res.json({ validated: true })
    } else {
      res.json({ validated: false})
    }
  } catch(error) {
    console.error(error);
    res.status(500).json({ message: 'Error retrieving user'})
  };
})
Let’s get another code from the authenticator app that we can verify with Postman.

That is it! We have successfully created two-factor authentication. In this article, we saw how to create a secret shared between your server and an authenticator app, verifying the secret and using it to validate tokens. The complete index.js file should look something like this:
const express = require("express");
const bodyParser = require('body-parser');
const JsonDB = require('node-json-db').JsonDB;
const Config = require('node-json-db/dist/lib/JsonDBConfig').Config;
const uuid = require("uuid");
const speakeasy = require("speakeasy");

const app = express();

/**
 * Creates a node-json-db database config
 * @param {string} name - name of the JSON storage file
 * @param {boolean} Tells the to save on each push otherwise the save() mthod has to be called.
 * @param {boolean} Instructs JsonDB to save the database in human readable format
 * @param {string} separator - the separator to use when accessing database values
 */
const dbConfig = new Config("myDataBase", true, false, '/')

/**
 * Creates a Node-json-db JSON storage file
 * @param {instance} dbConfig - Node-json-db configuration
 */
const db = new JsonDB(dbConfig);

app.use(bodyParser.json());
app.use(bodyParser.urlencoded({ extended: true }));

app.get("/api", (req,res) => {
  res.json({ message: "Welcome to the two factor authentication exmaple" })
});

app.post("/api/register", (req, res) => {
  const id = uuid.v4();
  try {
    const path = `/user/${id}`;
    // Create temporary secret until it it verified
    const temp_secret = speakeasy.generateSecret();
    // Create user in the database
    db.push(path, { id, temp_secret });
    // Send user id and base32 key to user
    res.json({ id, secret: temp_secret.base32 })
  } catch(e) {
    console.log(e);
    res.status(500).json({ message: 'Error generating secret key'})
  }
})

app.post("/api/verify", (req,res) => {
  const { userId, token } = req.body;
  try {
    // Retrieve user from database
    const path = `/user/${userId}`;
    const user = db.getData(path);
    console.log({ user })
    const { base32: secret } = user.temp_secret;
    const verified = speakeasy.totp.verify({
      secret,
      encoding: 'base32',
      token
    });
    if (verified) {
      // Update user data
      db.push(path, { id: userId, secret: user.temp_secret });
      res.json({ verified: true })
    } else {
      res.json({ verified: false})
    }
  } catch(error) {
    console.error(error);
    res.status(500).json({ message: 'Error retrieving user'})
  };
})

app.post("/api/validate", (req,res) => {
  const { userId, token } = req.body;
  try {
    // Retrieve user from database
    const path = `/user/${userId}`;
    const user = db.getData(path);
    console.log({ user })
    const { base32: secret } = user.secret;
    // Returns true if the token matches
    const tokenValidates = speakeasy.totp.verify({
      secret,
      encoding: 'base32',
      token,
      window: 1
    });
    if (tokenValidates) {
      res.json({ validated: true })
    } else {
      res.json({ validated: false})
    }
  } catch(error) {
    console.error(error);
    res.status(500).json({ message: 'Error retrieving user'})
  };
})

const port = 9000;

app.listen(port, () => {
  console.log(`App is running on PORT: ${port}.`);
});
The focus of this article was on implementing the two-factor authentication functionality, mostly on the backend. The entire process is, however, more complex than this. In a normal application, the user would register and choose whether to enable two-factor authentication or not. The next time they log in, we sent their main login identifier, e.g username, to the server to check whether they have two-factor authentication enabled. If they don’t have it enabled, we submit the username and password and sign them in.
If they have two-factor authentication enabled, we show them an input to enter a code that we send to the server together with their login credentials for validation. While we looked at two-factor authentication using an authenticator app, you can also use Speakeasy to generate codes and send them by SMS to the user for verification. Speakeasy makes it really easy to add two-factor authentication to your applications. You can challenge yourself by building a user interface that enables the user to sign up with a username and password and the option to enable two-factor authentication and scan a QR code to connect it to a two-factor authentication app. The code for this article can be found on GitHub. Let me know what you think about the article as well as any suggestions in the comments.
Install LogRocket via npm or script tag. LogRocket.init() must be called client-side, not
server-side
$ npm i --save logrocket

// Code:

import LogRocket from 'logrocket';
LogRocket.init('app/id');
// Add to your HTML:

<script src="https://cdn.lr-ingest.com/LogRocket.min.js"></script>
<script>window.LogRocket && window.LogRocket.init('app/id');</script>

@container scroll-state: Replace JS scroll listeners nowCSS @container scroll-state lets you build sticky headers, snapping carousels, and scroll indicators without JavaScript. Here’s how to replace scroll listeners with clean, declarative state queries.

Explore 10 Web APIs that replace common JavaScript libraries and reduce npm dependencies, bundle size, and performance overhead.

Russ Miles, a software development expert and educator, joins the show to unpack why “developer productivity” platforms so often disappoint.

Discover what’s new in The Replay, LogRocket’s newsletter for dev and engineering leaders, in the February 18th issue.
Hey there, want to help make our blog better?
Join LogRocket’s Content Advisory Board. You’ll help inform the type of content we create and get access to exclusive meetups, social accreditation, and swag.
Sign up now
3 Replies to "Implementing two-factor authentication using Speakeasy"
Hi Jeremy,
I just had one question regarding the Speakeasy library, which is that the project looks like it’s not maintained anymore, so would that be an issue in security terms? The most recent commit seems to be in 2017. What do you think? Nevertheless, this was a great article!
Thanks!
Thank you for the very interesting and educational post. I was wondering, how would we use it as a middle ware in our application? that would have made it a cherry on the top. I can think of some ways to implement it, however, I was wondering what is the best practice to do it in your opinion
Hi Pratik, did you ever find an answer to this?