
In-app purchases are a way for mobile apps to receive payments from users. It can either be in the form of subscription or a one-time payment to unlock a specific feature or content in the app.
In this tutorial, we’ll look at how we can implement in-app purchases in React Native. Aside from the frontend, we’re also going to implement the backend so that we can verify the purchases and update user data accordingly.
The Replay is a weekly newsletter for dev and engineering leaders.
Delivered once a week, it's your curated guide to the most important conversations around frontend dev, emerging AI tools, and the state of modern software.
Knowledge of React, React Native, and any programming language is required to follow this tutorial. We’re specifically going to use PHP and Laravel for the backend portion of this tutorial, but it should easily be translatable to another backend language as well.
For the software side, you need to have the React Native development environment and PHP development environment setup on your machine. If your primary backend language is different, you can simply translate the code to your programming language of choice.
If you’re planning to use in-app purchases in Android, you need to have a Google Play developer account. You also need to have a Google Cloud Platform account.
If you’re planning to use in-app purchases in iOS, you need to have an Apple developer account. This can be your own personal Apple account or as part of a team.
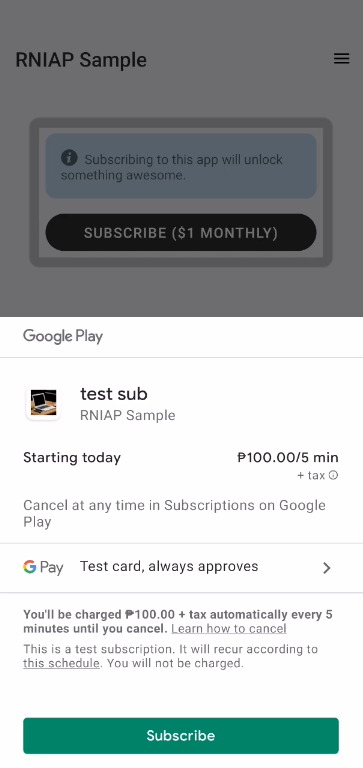
The app we’re going to build is a subscription-based app. Basically, the user has to subscribe using in-app purchases to unlock a paid feature of the app. Here’s what it’s going to look like on Android:
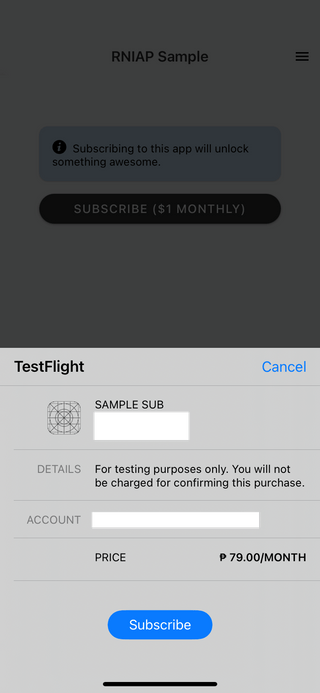
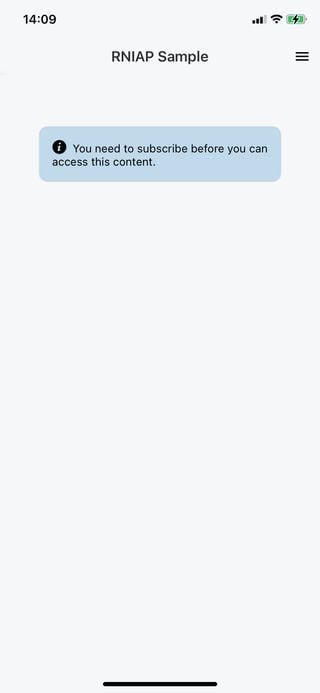
And here’s what it’s going to look like in iOS:
Once the user is subscribed, the content in the locked page will be available to the user.
You can find the code on the GitHub repo for both the React Native app and the server.
Create a new bare Expo project and set its name to RNIAPSample:
expo init --template bare-minimum
Once the project is created, install all the dependencies:
npm install --save [email protected] react-native-restart react-native-simple-toast react-native-paper axios
Note, at the time of writing this tutorial, the most recent version of Expo in-app purchases is 10.1.0. But there’s an issue with it, and the only recent version that’s working is 9.1.0. When you read this, try installing the most recent version first as the issue might already be solved at that time.
Next, install the React Navigation prerequisites:
expo install react-native-gesture-handler react-native-reanimated react-native-screens react-native-safe-area-context @react-native-community/masked-view
Then install React Navigation along with a couple of its navigators — stack and drawer navigation:
npm install --save @react-navigation/native @react-navigation/stack @react-navigation/drawer
Next, install expo-secure-store:
expo install expo-secure-store
Optionally, you can install expo-device to determine the user’s device name. We’re not going to use this in the project, we’re simply going to use a hard-coded value:
expo install expo-device
Finally, install all the corresponding iOS dependencies:
npx pod-install
Here’s a break down of all the packages we just installed:
expo-in-app-purchases — For implementing in-app purchasesreact-native-start — For reloading the app after the purchase is finishedreact-native-simple-toast — For notifying the user with a toast notification after the purchase is finishedreact-native-paper — For implementing Material UI designaxios — For submitting HTTP requests to the server@react-navigation/native — For implementing navigation within the appexpo-secure-store — For storing sensitive information in the appexpo-device — For determining the device info such as device name or manufacturerLet’s proceed with setting up the server. First, create a new Laravel project. This will install the most recent version of Laravel. At the time of writing, it’s Laravel 8:
composer create-project laravel/laravel rniapserver
Once that’s done, navigate inside the project directory. This will now serve as the root directory for all the commands we’ll be executing:
cd rniapserver
Next, install the dependencies. First, we have Laravel Sanctum. This provides an authentication system for mobile app users and SPAs:
composer require laravel/sanctum
If that fails due to memory issue, set PHP’s memory limit to unlimited:
php -d memory_limit=-1 /usr/local/bin/composer require laravel/sanctum
Once Sanctum is installed, publish its config file. This will create a config/sanctum.php file:
php artisan vendor:publish --provider="Laravel\Sanctum\SanctumServiceProvider"
Next, install the Google Cloud PubSub library. This will allow the server to consume PubSub subscription notifications. We’ll get those notifications every time a user subscribes in the Android version of the app:
composer require google/cloud-pubsub
Next, create the database. We will use this database to store users and their subscription info:
mysql -u root -p
CREATE DATABASE rniap;
Update the .env file at the root directory of the project to include your database credentials:
DB_DATABASE=rniap
DB_USERNAME=your_db_user
DB_PASSWORD=your_db_password
Migrate the database:
php artisan migrate
Next, install the frontend dependencies and compile them:
npm install
npm run production
At this point, you can now try running the server to make sure it works. If you’re on a Mac, you can use Laravel Valet to quickly serve the project. Once Valet is installed, all you have to do is execute the following commands on the root directory of the project:
valet link
valet secure
This will assign it to a local domain rnniapserver.test and secure it with HTTPS.
If you’re not on a Mac, you can simply use artisan to serve the project:
php artisan serve
If you get the default Laravel welcome screen once it’s served then you’re good to go. Otherwise, make sure the storage directory has the correct permissions as that’s usually the cause for the project to not work.
In this section, we’ll be setting up in-app purchases for Android.
This section assumes the following:
On the Google Play Console, go to Monetise → Product → Subscriptions. You can also search for “In-app products”, click the first result and in the page, it navigates to, click the Subscriptions link right below the In-app products menu:
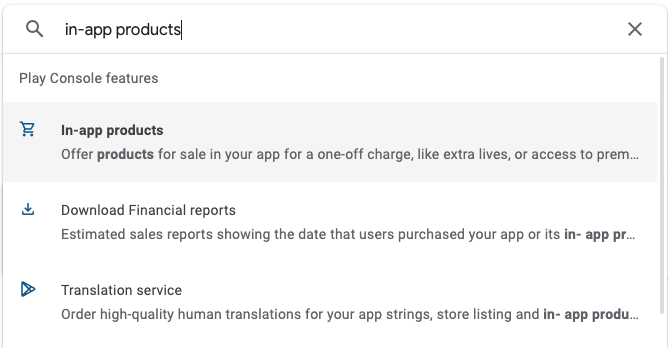
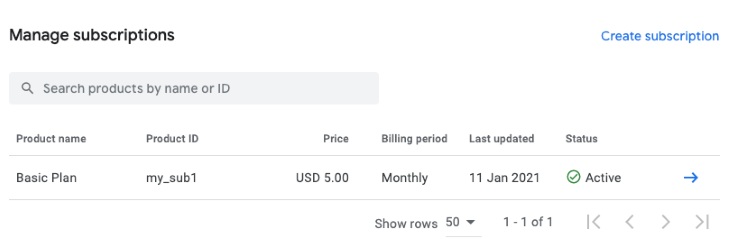
From there, click on Create Subscription. Supply a value for the following fields:
Once that’s done, it should list out the subscription you just created. Take note of the Product ID as we’re going to need it later when we create the app:
The next step is to set up notifications for subscriptions. This is where we use Google Cloud PubSub so your server can receive notifications when a user subscribes to your app. This section assumes that you already have an existing Google Cloud project. If not, you can simply click the currently selected Google Cloud project on the upper left. This will open the modal that allows you to create a new one.
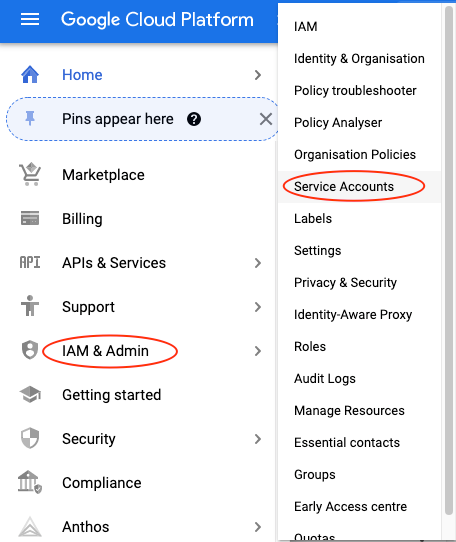
Once you have a Google Cloud project, the first step is to create a new service account. Go to the service accounts page by clicking on IAM & Admin → Service Accounts:
Enter a name and a unique ID for the service account:
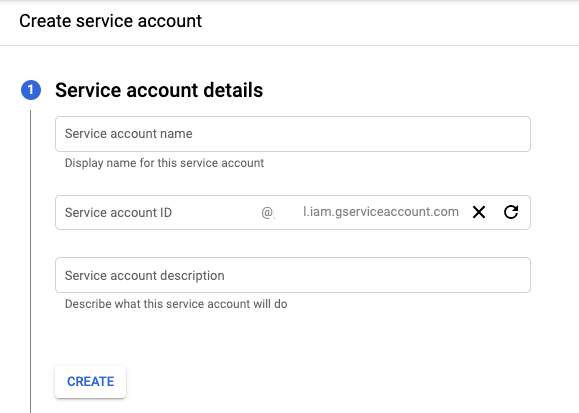
It will also ask you to add a role. We don’t really need it so just click on Continue. Next, it will ask to grant user access. Grant it and click on Finish.
Once the service account is created, select it, and create a new key. Select JSON as the key type. This will download a JSON file. This will serve as the authentication method for your server to connect to your Google Cloud project:
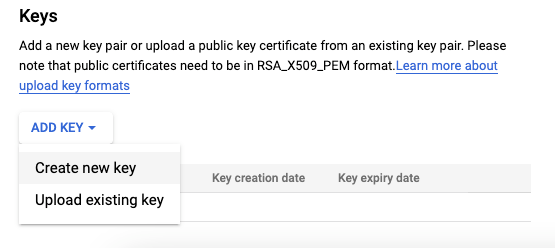
Copy the downloaded file over to the storage/app directory in the server. We will use it later so we can connect to Google Cloud PubSub.
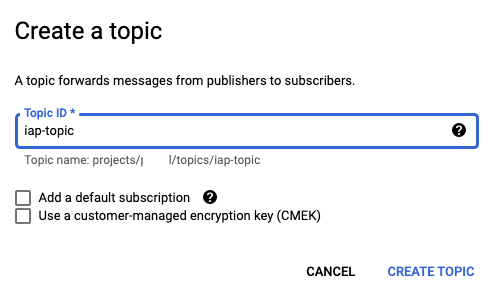
Next, search for “pubsub”. Once you’re there, click on Create Topic and supply a unique topic name. This will serve as the container for the subscription you’re going to create:
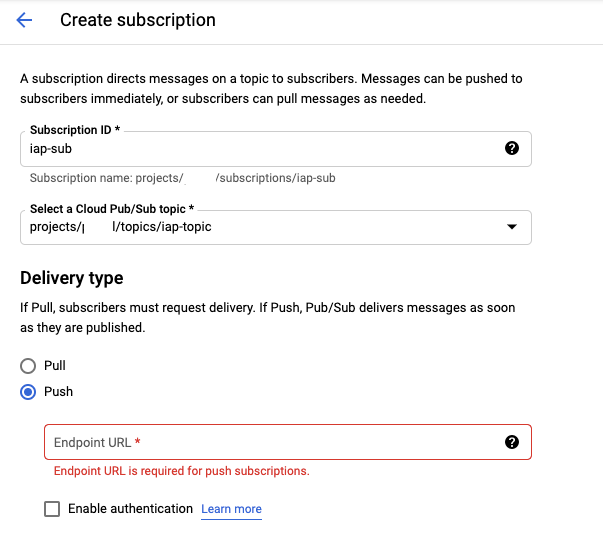
Next, create a subscription. Supply a unique ID and select the topic you just created. The delivery type is Push because we want the PubSub service to automatically notify our server whenever someone subscribes to the app. Enter the URL endpoint where the notification is going to be sent. You can leave all the other options to their defaults:
Next, go to the topics page and click on the triple dot next to the topic you created earlier and select View Permissions:
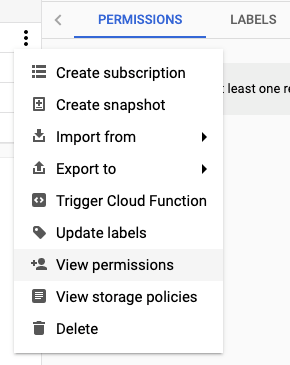
Add the service account [email protected] and grant it the role of Pub/Sub Publisher. Be sure to save the changes:
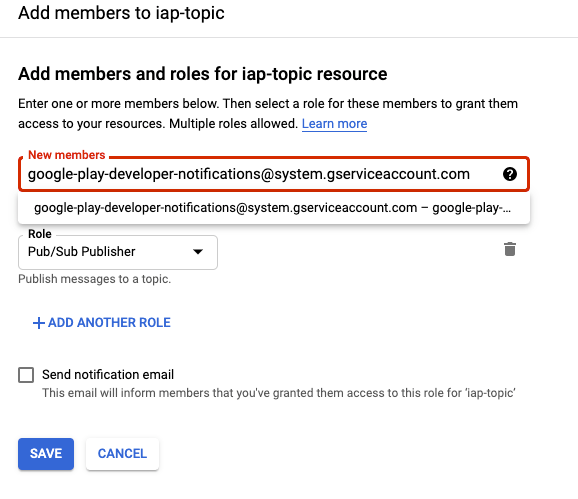
Once that’s done, go back to the Google Play console, search for “monetization setup” and click the first result. You can also scroll to the very bottom of the side menu and look for the same text.
In the topic name field, enter the topic name in the format projects/{project_id}/topics/{topic_id}. You can see the project_id when you click on the currently selected project. While the topic_id is the one you entered earlier.
To test it out, click on the Send test notification button to send a sample notification. If you don’t get any error, it means it works. Note that sending a test notification from Google Play console won’t send a request to the push URL you specified on your Google Cloud PubSub settings. As that will only get triggered if it’s a real notification triggered from the app. Basically, the way it works is this:
POST request to the URL endpoint you specifiedIf it doesn’t work, make sure you haven’t missed any step. If it still doesn’t work after that, you can read the full documentation here — configure real-time developer notifications.
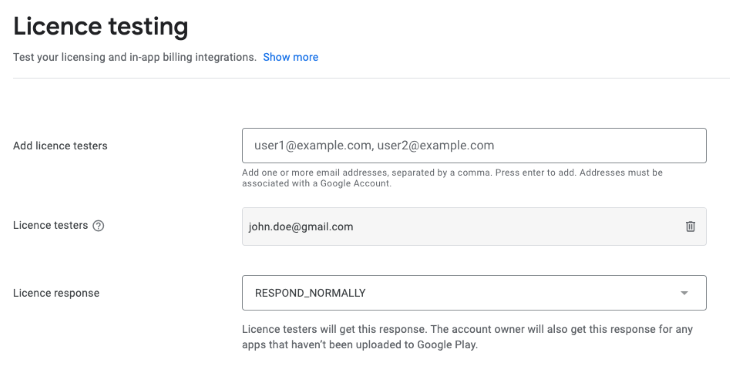
The last step is to add license testers. This allows you to test out in-app purchases in the test version of your app without having to pay the subscription or one-time fee you added earlier.
To do that, go back to Google Play Console and search for “License testing” or look for it in the side menu. Note that this menu is not inside a particular app so you have to click on the Google Play Console logo on the upper left corner then look for “License testing” near the very bottom.
On that page, simply add the emails of the Google accounts you use for testing:
This section assumes that you have the following:
Once you are on your app’s dashboard, click on the Manage link under the In-App Purchases menu.
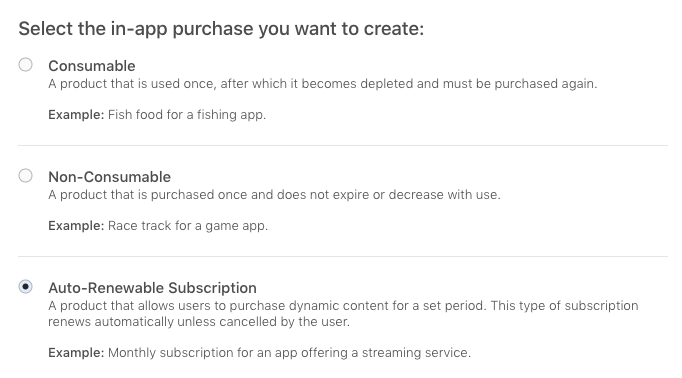
Scroll to the bottom of the page until you find the in-app purchases section. Click on the add button and the following modal will show. Select the type you want. In this case, we want the user to have a monthly subscription so we select Auto-Renewable subscription:
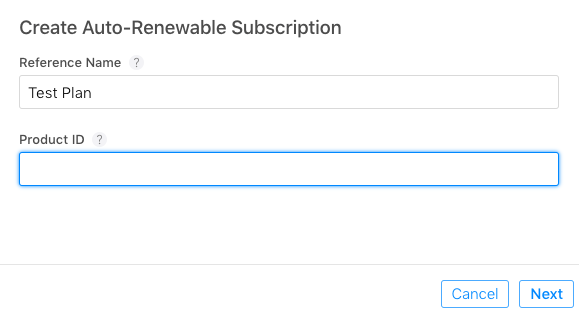
Next, enter a descriptive name for the subscription plan and its unique ID. Take note of this ID as we will refer to it later in the app:
It may also ask you to put the plan in a group. This way, all related plans can be grouped together. Just enter a descriptive name for the group.
Once created, you still can’t use it when it’s saying “Missing Metadata” as its status. To make that disappear, you need to enter the following details:
Once you’ve filled up the above, the status of the in-app purchase will update to “ready to submit”. You should now be able to use it for testing.
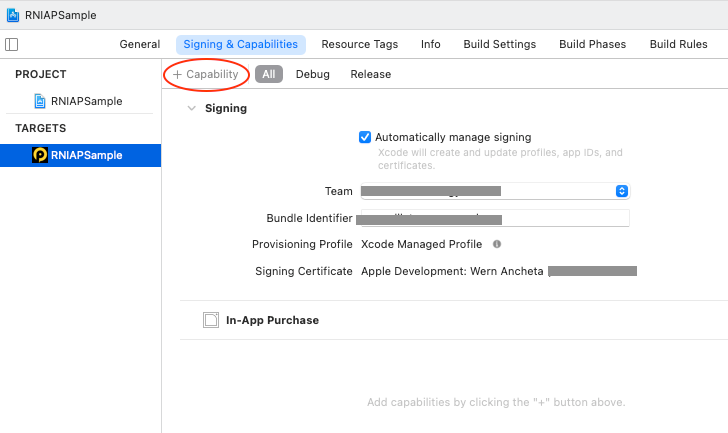
The last step is to open the ios/RNIAPSample.xcworkspace file on Xcode and add the In-App purchases capability. To do that, just click on the project navigator (located right below the close button on the upper left side of the screen. Click on the project then select the Signing & Capabilities tab. Then click on the + Capability button. On the modal window that shows up, search for “in-app purchases” and double-click on it. It should be listed as a capability once added:
Now that we’re done with all the in-app purchase setup, it’s time to proceed with some more server setup. This time, we’re setting up the database and data seeder.
Update the default user migration file to remove all unnecessary fields and add the fields that we will be using:
// database/migrations/<timestamp>_create_users_table.php
Schema::create('users', function (Blueprint $table) {
    $table->id();
    $table->string('name');
    $table->string('email')->unique();
    $table->string('password');

    // $table->timestamp('email_verified_at')->nullable(); // remove this

    // add these:
    $table->string('gplay_order_token')->nullable();
    $table->string('gplay_order_id')->nullable();
    $table->string('apple_order_id')->nullable();

    $table->dateTime('datetime_subscribed')->nullable();
    $table->dateTime('lastpayment_datetime')->nullable();

    $table->rememberToken();
    $table->timestamps();
});
Run the migrations:
php artisan migrate
This should create the users table and personal_access_tokens table. The latter is where we store the access tokens for mobile authentication. There is no concept of sessions in a mobile app, that’s why we use tokens instead to authenticate the user:
Note, we won’t be needing the password resets table and failed jobs table in this tutorial. We’re just leaving them as they are because they’re default migrations.
Now let’s update the user model to include the new fields we added earlier. While we’re here, you can also add the trait from Sanctum that allows us to create user tokens. We’ll see this in action later, but basically what it does is add the createToken() method to the user model:
// app/Models/User.php
<?php
// ..

use Illuminate\Notifications\Notifiable;
use Laravel\Sanctum\HasApiTokens;

class User extends Authenticatable
{
  use HasFactory, Notifiable, HasApiTokens; // add HasApiTokens trait

  protected $fillable = [
    // ...

    // add these:
    'gplay_order_token',
    'gplay_order_id',
    'apple_order_id',
    'datetime_subscribed',
    'lastpayment_datetime',
  ];

}
Next, update the user factory to replace its current contents with the following:
// database/factories/UserFactory.php

public function definition()
{
  return [
    'name' => $this->faker->name,
    'email' => $this->faker->unique()->safeEmail,
    'password' => '$2y$10$92IXUNpkjO0rOQ5byMi.Ye4oKoEa3Ro9llC/.og/at2.uheWG/igi', // password
    'remember_token' => Str::random(10),
  ];
}
Uncomment the user factory in the database seeder:
// database/seeders/DatabaseSeeder.php
public function run()
{
    \App\Models\User::factory(10)->create(); // uncomment this
}
Populate the database with user records. These will now serve as our test users which we can use for logging into the app and testing subscriptions:
php artisan db:seed
Now we’re finally ready to start building the app. We’ll first build the login screen and then proceed to the user-only screens such as the user account screen and the locked screen.
Let’s start with the login screen:

// src/screens/LoginScreen.js
import React, { useState, useCallback, useContext } from "react";
import { View, Text, StyleSheet, TouchableOpacity } from "react-native";

import { Button, TextInput, withTheme } from "react-native-paper";
import { SafeAreaView } from "react-native-safe-area-context";

import axios from "axios";
import * as SecureStore from "expo-secure-store";

import { AuthContext } from "../context/AuthContext";

import config from "../config";

const LoginScreen = ({ navigation, theme }) => {
  const [email, setEmail] = useState("");
  const [password, setPassword] = useState("");
  const [buttonloading, setButtonLoading] = useState(false);

  const { colors } = theme;

  const loginText = buttonloading ? "Logging in.." : "Login";

  const { signIn } = useContext(AuthContext);

  // next: add code for logging in
};

export default withTheme(LoginScreen);
Next, add the function that gets executed when the user clicks on the login button. Here, we do the following:
expo-secure-store module. This will allow us to get it back later on when we need to make further requests to the serversignIn action from the reducer. This allows us to update the UI accordingly:
const login = useCallback(async () => {
  const device_name = "some device"; // note: you can use Expo device here
  setButtonLoading(true);

  try {
    const res = await axios.post(
      `${config.BASE_URL}/api/sanctum/token`,
      {
        email,
        password,
        device_name,
      }
    );

    if (res.data) {
      const ok = await SecureStore.isAvailableAsync();
      if (ok) {
        const { token, is_subscribed } = res.data;
        await SecureStore.setItemAsync("user_token", token);

        signIn({
          token,
          is_subscribed,
        });
      }

      setButtonLoading(false);
    }
  } catch (err) {
    setButtonLoading(false);
    alert(`Error occurred while trying to logins: ${err}`);
  }
}, [email, password]);
Next, return the UI for the login screen. This consists of the email and password field and the login button:
return (
  <SafeAreaView
    style={[styles.container, { backgroundColor: colors.background }]}
  >
    <TextInput
      mode="outlined"
      style={styles.input}
      onChangeText={(text) => setEmail(text)}
      value={email}
      placeholder="Email"
      keyboardType="email-address"
    />

    <TextInput
      mode="outlined"
      style={styles.input}
      onChangeText={(text) => setPassword(text)}
      value={password}
      placeholder="Password"
      secureTextEntry
    />

    <Button
      mode="contained"
      onPress={login}
      style={styles.button}
      loading={buttonloading}
    >
      {loginText}
    </Button>
  </SafeAreaView>
);
Add the styles:
const styles = StyleSheet.create({
  container: {
    flex: 1,
    paddingRight: 30,
    paddingLeft: 30,
    flexDirection: "column",
    alignItems: "center",
  },
  input: {
    fontSize: 15,
    height: 40,
    width: "100%",
    marginBottom: 10,
    backgroundColor: "#F5F5F7",
  },
  button: {
    padding: 0,
    marginTop: 15,
    width: "100%",
    borderRadius: 20,
  },
});
Here are the contents for the config.js file:
// src/config.js
const config = {
  APP_TITLE: "RNIAP Sample",
  BASE_URL: "YOUR NGROK URL",
  IOS_SUBSCRIPTION_ID: "YOUR IOS SUBSCRIPTION ID",
  ANDROID_SUBSCRIPTION_ID: "YOUR GOOGLE PLAY SUBSCRIPTION ID",
};

export default config;
We also imported the AuthContext earlier:
// src/context/AuthContext.js
import React from "react";
export const AuthContext = React.createContext();
There’s really nothing there since we will be populating it with methods within the src/Root.js file later.
The Account screen is where the user can subscribe to the app in order to unlock premium features.
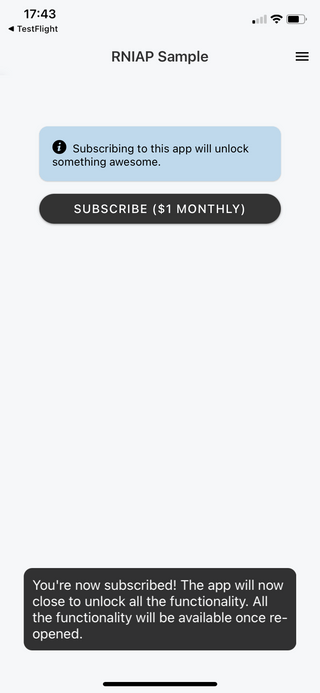
Start by importing the modules we need. The most important one here is expo-in-app-purchases. This allows us to implement InApp purchases within a React Native app. Without this module, this tutorial wouldn’t exist. There’s also the React Native IAP library, but I haven’t tried it yet:
// src/screens/AccountScreen.js
import React, { useState, useEffect } from "react";
import { StyleSheet, Platform } from "react-native";
import { Button, Card, withTheme } from "react-native-paper";
import { SafeAreaView } from "react-native-safe-area-context";

import * as SecureStore from "expo-secure-store";
import { getProductsAsync, purchaseItemAsync } from "expo-in-app-purchases";
import axios from "axios";

import AlertBox from "../components/AlertBox";

import config from "../config";

const defaultAlertMessage = "Subscribing to this app will unlock something awesome.";
Before we proceed, go ahead and add the code for the AlertBox component. This is the only one that’s not included in the subscription flow so it’s better to add it now:
// src/components/AlertBox.js
import React from "react";
import { View, Text, StyleSheet } from "react-native";
import { withTheme } from "react-native-paper";
import { Entypo } from "@expo/vector-icons";

const AlertBox = ({ text, theme }) => {
  const { colors } = theme;

  return (
    <View
      style={[
        styles.alert,
        {
          backgroundColor: colors.info,
        },
      ]}
    >
      <Text style={[styles.alertText, { color: colors.white }]}>
        <Entypo
          name="info-with-circle"
          size={17}
          color={colors.white}
        />
        {"  "}
        {text}
      </Text>
    </View>
  );
};

export default withTheme(AlertBox);

const styles = StyleSheet.create({
  alert: {
    padding: 15,
    marginBottom: 15,
    borderRadius: 10,
  },
  alertText: {
    fontSize: 13,
  },
});
Going back inside the account screen, we check for the user’s subscription status by making a request to the server. This is where we use the user token we got from the login screen earlier:
// src/screens/AccountScreen.js
const AccountScreen = ({ navigation, theme }) => {
  const { colors } = theme;

  const [alertMessage, setAlertMessage] = useState(defaultAlertMessage);
  const [subscribed, setSubscribed] = useState(false);

  const [subscribeButtonLoading, setSubscribeButtonLoading] = useState(false);

  const subscribeText = subscribeButtonLoading ? "Subscribing..." : "Subscribe ($1 monthly)";

  useEffect(() => {
    (async () => {
      try {
        const token = await SecureStore.getItemAsync("user_token");

        const instance = axios.create({
          baseURL: `${config.BASE_URL}/api`,
          timeout: 5000,
          headers: { Authorization: `Bearer ${token}` },
        });

        const res = await instance.get("/user");
        if (res.data.is_subscribed === "yes") {
          setSubscribed(true);
          setAlertMessage(" You are subscribed for $1/month.");
        }
      } catch (err) {
        alert("Problem ocurred while getting user info." + err);
      }
    })();
  }, []);

  // next: add code for subscribing user
}
Next, add the code for subscribing the user. This is where we use the expo-in-app-purchases module to accept payment from the user. On Android, this uses the Google Play Billing library. While on iOS it uses the Storekit framework.
First, we fetch the subscription plans you created earlier on the Google Play Developer dashboard and Apple Store Connect dashboard. We use the getProductsAsync() to do this. With the help of Platform.select(), we’re able to select the correct subscription plan based on the device’s operating system. If your plans have the same ID on both platforms, there’s no need to do this. Below that code is doing a similar thing. In this case, we’re using Platform.OS to determine the current platform. Once we have fetched the subscription plan and we know it exists, we call the purchaseItemAsync() method to initialize the purchase.
Note, calling the
getProductsAsync()method is a prerequisite to buying/subscribing to a product. Even if you already know the subscription ID beforehand, you still have to do it. Think of it as a handshake to Apple/Google’s servers before doing the actual thing.
const subscribe = async () => {
  setSubscribeButtonLoading(true);

  try {
    const items = Platform.select({
      ios: [config.IOS_SUBSCRIPTION_ID],
      android: [config.ANDROID_SUBSCRIPTION_ID],
    });

    const subscription_plan = Platform.OS === "android" ? config.ANDROID_SUBSCRIPTION_ID : config.IOS_SUBSCRIPTION_ID;

    const products = await getProductsAsync(items);

    if (products.results.length > 0) {
      setSubscribeButtonLoading(false);
      await purchaseItemAsync(subscription_plan);
    } else {
      setSubscribeButtonLoading(false);
    }
  } catch (err) {
    setSubscribeButtonLoading(false);
    alert("error occured while trying to purchase: " + err);
  }
};
The next step is to listen for purchases. We can’t do that from the account screen because it has to go through a lot of other code before it gets to that screen. By that time, the transaction will have already been marked as “complete”. We need to listen for incomplete transactions so we can make a request to the server along with its details.
The best place to listen for purchase transactions is from the entry point file. Start by importing all the modules we need:
// index.js
import { registerRootComponent } from "expo";

import {
  connectAsync,
  setPurchaseListener,
  finishTransactionAsync,
  IAPResponseCode,
} from "expo-in-app-purchases";

import RNRestart from "react-native-restart";
import Toast from "react-native-simple-toast";
import * as SecureStore from "expo-secure-store";

import { Platform } from "react-native";
import axios from "axios";

import App from "./App";

import config from "./src/config";
Next, create an immediately invoked function expression (IIFE). This is where we:
connectAsync() — this connects to the App Store or Google Play Store to initialize the app so that it’s able to accept payments. None of the code in the account screen earlier will work if this isn’t calledsetPurchaseListener() — the callback function that you pass to it will get executed every time there’s an incoming purchase transaction. We only process it further if the response code we get is successful (eg. the payment transaction was successful). Otherwise, we inform the user that it failed. This can happen for two common reasons, the user cancelled or the payment failedfinishTransactionAsync() method on the specific purchase — this method also expects a second parameter which is consumeItem. What you pass here will depend on the current platform. In Android, you need to set it to false. While in iOS, it should be set to true. This is because in Android, there’s a concept of “consuming” a purchase. This is for things like one-time payment to unlock a specific feature or item such as the ones you see in games. Setting consumeItem to false means that it’s a subscription and not a consumable. While in iOS, this isn’t necessary so consumeItem has a different meaning. You need to set it to true in order to mark the transaction as “finished” preventing it from triggering the purchase listener callback again(async function init() {
try {
await connectAsync();
setPurchaseListener(async ({ responseCode, results, errorCode }) => {
if (responseCode === IAPResponseCode.OK) {
results.forEach(async (purchase) => {
if (!purchase.acknowledged) {
const {
orderId,
purchaseToken,
acknowledged,
transactionReceipt,
productId,
} = purchase;
const consumeItem = Platform.OS === "ios";
await finishTransactionAsync(purchase, consumeItem);
const token = await SecureStore.getItemAsync(
"user_token"
);
const instance = axios.create({
baseURL: `${config.BASE_URL}/api`,
timeout: 5000,
headers: { Authorization: `Bearer ${token}` },
});
instance.post("/subscribe", {
orderId,
purchaseToken,
transactionReceipt,
platform: Platform.OS,
});
Toast.show(
"You're now subscribed! The app will now close to unlock all the functionality. All the functionality will be available once re-opened.",
Toast.LONG
);
setTimeout(() => {
RNRestart.Restart();
}, 5000);
}
});
} else {
alert(generalErrorMessage);
}
if (responseCode === IAPResponseCode.USER_CANCELED) {
alert("You cancelled. Please try again.");
} else if (responseCode === IAPResponseCode.DEFERRED) {
alert(
"You don't have permission to subscribe. Please use a different account."
);
}
});
} catch (err) {
alert("Error occurred: " + JSON.stringify(err));
}
})();
We will add the code for handling subscriptions in the server later. For now, let’s proceed to bring all the code together so we have a functional app.
It’s time to bring everything together. Create an App.js file and add the following:
// App.js
import { StatusBar } from "expo-status-bar";
import React from "react";
import { StyleSheet, View } from "react-native";
import Root from "./src/Root";

export default function App() {
  return (
    <View style={styles.container}>
      <StatusBar style="auto" />
      <Root />
    </View>
  );
}

const styles = StyleSheet.create({
  container: {
    flex: 1,
    justifyContent: "center",
  },
});
Next, create a Root.js file. This is where we actually bring everything together. Since this is where we set up our navigation, all the screens have to be imported. By default, we display a splash screen. This will serve as a temporary screen while the app is determining whether a user is logged in or not. If a user is currently logged in, we display the locked screen (the screen whose content is locked until the user subscribes). Otherwise, we display the login screen:
// Root.js
import React, { useEffect, useState, useReducer, useMemo } from "react";
import { createStackNavigator } from "@react-navigation/stack";
import { createDrawerNavigator } from "@react-navigation/drawer";
import { View, Text } from "react-native";
import { DefaultTheme, Provider as PaperProvider } from "react-native-paper";

import * as SecureStore from "expo-secure-store";
import axios from "axios";

import config from "./config";

import {
  NavigationContainer,
  DefaultTheme as NavigationDefaultTheme,
} from "@react-navigation/native";

import { DrawerContent } from "./components/DrawerContent";

import SplashScreen from "./screens/SplashScreen";

import HomeStackScreen from "./screens/HomeStackScreen";

import MainStackScreen from "./screens/MainStackScreen";
import AccountStackScreen from "./screens/AccountStackScreen";

import { AuthContext } from "./context/AuthContext";

const theme = {
  ...DefaultTheme,
  dark: true,
  roundness: 10,
  colors: {
    ...DefaultTheme.colors,
    background: "#F6F8FA",
    primary: "#333",
    info: "#BFD9EC",
  },
  fonts: {
    ...DefaultTheme.fonts,
    regular: 15,
  },
};

const MainStack = createStackNavigator();
const Drawer = createDrawerNavigator();
Next, we use the useReducer() hook to describe how the state would look based on the current action. In this case, we have three states:
RESTORE_TOKEN – This is the state for when the user is logged inSIGN_IN – The state for when the user signs in. This is the transition state between not being logged in and logged inLOGOUT – The state for when the user logs out. This updates the state to the defaults so that the login screen will be displayed instead:
const App = () => {
  const [loading, setLoading] = useState(true);

  const [state, dispatch] = useReducer(
    (prevState, action) => {
      switch (action.type) {
        case "RESTORE_TOKEN":
          return {
            ...prevState,
            userToken: action.token,
            isLoading: false,
            isSubscribed: action.is_subscribed,
          };

        case "SIGN_IN":
          return {
            ...prevState,
            userToken: action.token,
            isSubscribed: action.is_subscribed,
          };

        case "LOGOUT":
          return {
            ...prevState,
            userToken: null,
            isLoading: false,
          };
      }
    },
    {
      isLoading: true,
      userToken: null,
    }
  );
}
Next, we use useEffect() to check if the user is subscribed in the server. This is where we dispatch the RESTORE_TOKEN action so that the locked screen will be displayed instead of the login screen:
useEffect(() => {
  (async () => {
    try {
      const token = await SecureStore.getItemAsync("user_token");

      if (token) {
        const instance = axios.create({
          baseURL: `${config.BASE_URL}/api/`,
          timeout: 60000,
          headers: { Authorization: `Bearer ${token}` },
        });

        const res = await instance.get("/user");
        const is_subscribed = res.data.is_subscribed == "yes";

        dispatch({ type: "RESTORE_TOKEN", token, is_subscribed });
      }

      setLoading(false);
    } catch (err) {
      setLoading(false);
    }
  })();
}, []);
Next, inside the useMemo() hook, declare the actions which will be consumed by the reducer we created earlier. For the signOut action, we make a request to the server to sign the user out. This will revoke the token that was issued earlier when the user logged in. It’s also responsible for deleting the user token from the local storage. Lastly, it dispatches the SIGN_OUT action so the user sees the login screen instead:
const authContext = useMemo(
  () => ({
    signIn: (data) => {
      dispatch({
        type: "SIGN_IN",
        token: data.token,
        is_subscribed: data.is_subscribed,
      });
    },
    signOut: async () => {
      try {
        const token = await SecureStore.getItemAsync("user_token");

        const instance = axios.create({
          baseURL: `${config.BASE_URL}/api`,
          timeout: 60000,
          headers: { Authorization: `Bearer ${token}` },
        });

        const signout_res = await instance.post("/signout");
        await SecureStore.deleteItemAsync("user_token");

        dispatch({ type: "LOGOUT" });
      } catch (err) {
        console.log("error: ", err);
      }
    },
  }),
  []
);
Lastly, add the code for returning the UI. This uses a DrawerNavigator as the root navigator, and a StackNavigator for each individual screen:
if (loading) {
  return (
    <SplashScreen
      bgColor={theme.colors.background}
      color={theme.colors.primary}
    />
  );
}

return (
  <PaperProvider theme={theme}>
    <AuthContext.Provider value={authContext}>
      <NavigationContainer theme={theme}>
        <Drawer.Navigator
          title="app-drawer"
          drawerPosition="right"
          edgeWidth={-1}
          drawerContent={(props) => {
            if (state.userToken) {
              return <DrawerContent {...props} />;
            }
            return null;
          }}
        >
          {state.userToken === null && (
            <Drawer.Screen
              name="HomeStack"
              component={HomeStackScreen}
            />
          )}

          <React.Fragment>
            {state.userToken !== null && (
              <React.Fragment>
                <Drawer.Screen
                  name="MainStack"
                  component={MainStackScreen}
                />
                <Drawer.Screen
                  name="AccountStack"
                  component={AccountStackScreen}
                />
              </React.Fragment>
            )}
          </React.Fragment>
        </Drawer.Navigator>
      </NavigationContainer>
    </AuthContext.Provider>
  </PaperProvider>
);
Now let’s add the code for the components and screens we imported on the Root.js file earlier.
Here’s the code for the SplashScreen:
// src/screens/SplashScreen.js
import React from "react";
import { View, ActivityIndicator, StyleSheet } from "react-native";

const SplashScreen = ({ bgColor, color }) => {
  return (
    <View style={[styles.container, { backgroundColor: bgColor }]}>
      <ActivityIndicator size="large" color={color} />
    </View>
  );
};

export default SplashScreen;

const styles = StyleSheet.create({
  container: {
    flex: 1,
    alignItems: "center",
    justifyContent: "center",
  },
});
Here’s the code for the HomeStackScreen. This is the stack navigator for the login screen:
// src/screens/HomeStackScreen.js
import React from "react";
import { createStackNavigator } from "@react-navigation/stack";
import { withTheme } from "react-native-paper";

import LoginScreen from "./LoginScreen";

import config from "../config";

const HomeStack = createStackNavigator();

const HomeStackScreen = ({ navigation, theme }) => {
  const { colors } = theme;
  return (
    <HomeStack.Navigator>
      <HomeStack.Screen
        name="Login"
        component={LoginScreen}
        options={{
          title: config.APP_TITLE,
          headerLeft: null,
          headerTitleStyle: {
            color: colors.primary,
          },
        }}
      />
    </HomeStack.Navigator>
  );
};

export default withTheme(HomeStackScreen);
Here’s the code for the DrawerContent component. This is responsible for rendering the contents of the drawer navigator and navigating to specific screens of the app. It’s also responsible for dispatching the signOut action:
// src/components/DrawerContent.js
import React, { useCallback, useContext } from "react";
import { View, StyleSheet } from "react-native";
import { useTheme, Drawer } from "react-native-paper";
import { DrawerContentScrollView, DrawerItem } from "@react-navigation/drawer";

import { MaterialCommunityIcons } from "@expo/vector-icons";
import { MaterialIcons } from "@expo/vector-icons";

import { AuthContext } from "../context/AuthContext";

const icon_color = "#FFF";

export const DrawerContent = (props) => {
  const { signOut } = useContext(AuthContext);

  const logout = useCallback(() => {
    try {
      props.navigation.closeDrawer();
      signOut();
    } catch (err) {
      alert(
        "An error ocurred while trying to sign out. Please try again."
      );
    }
  }, []);

  return (
    <View style={styles.container}>
      <DrawerContentScrollView {...props}>
        <View style={styles.drawerContent}>
          <Drawer.Section style={styles.drawerSection}>
            <DrawerItem
              icon={({ color, size }) => (
                <MaterialCommunityIcons
                  name="lock"
                  size={24}
                  color={icon_color}
                />
              )}
              label="Locked"
              labelStyle={styles.label}
              onPress={() => {
                props.navigation.navigate("Locked");
              }}
            />
            <DrawerItem
              icon={({ color, size }) => (
                <MaterialIcons
                  name="person"
                  size={24}
                  color={icon_color}
                />
              )}
              label="Account"
              labelStyle={styles.label}
              onPress={() => {
                props.navigation.navigate("AccountStack");
              }}
            />

            <DrawerItem
              icon={({ color, size }) => (
                <MaterialCommunityIcons
                  name="logout"
                  size={24}
                  color={icon_color}
                />
              )}
              label="Sign Out"
              labelStyle={styles.label}
              onPress={logout}
            />
          </Drawer.Section>
        </View>
      </DrawerContentScrollView>
    </View>
  );
};

const styles = StyleSheet.create({
  container: {
    flex: 1,
    backgroundColor: "#333",
  },
  drawerContent: {
    flex: 1,
  },
  drawerSection: {
    marginTop: 15,
  },
  label: {
    fontSize: 16,
    color: "#FFF",
  },
});
Here’s the code for the MainStackScreen. This is the drawer navigator for the LockedStackScreen:
// src/screens/MainStackScreen.js
import React from "react";
import { createStackNavigator } from "@react-navigation/stack";
import { IconButton, withTheme } from "react-native-paper";

import LockedStackScreen from "./LockedStackScreen";

const MainStack = createStackNavigator();

import config from "../config";

const MainStackScreen = ({ navigation, theme }) => {
  const { colors } = theme;

  return (
    <MainStack.Navigator>
      <MainStack.Screen
        name="MainStack"
        component={LockedStackScreen}
        options={{
          title: config.APP_TITLE,
          headerTitleStyle: {
            color: colors.primary,
          },
          headerRight: () => (
            <IconButton
              icon="menu"
              size={20}
              color={colors.white}
              onPress={() => navigation.openDrawer()}
            />
          ),
        }}
      />
    </MainStack.Navigator>
  );
};

export default withTheme(MainStackScreen);
Here’s the code for the LockedStackScreen. This is the stack navigator for the LockedScreen:
// src/screens/LockedStackScreen.js
import React from "react";
import { createStackNavigator } from "@react-navigation/stack";

const LockedStack = createStackNavigator();

import LockedScreen from "./LockedScreen";

const CalcStackScreen = ({ navigation }) => {
  return (
    <LockedStack.Navigator headerMode="none">
      <LockedStack.Screen name="Locked" component={LockedScreen} />
    </LockedStack.Navigator>
  );
};

export default CalcStackScreen;
Lastly, we have the LockedScreen. The user can access this screen from the drawer navigation, but they can’t see its content if they’re not subscribed. If the user is subscribed, that’s the only time that it will make a request to the server to fetch the locked content:
Here’s the code for the LockedScreen:
// src/screens/LockedScreen.js
import React, { useState, useEffect } from "react";
import { Image, StyleSheet } from "react-native";
import { Card, Button, withTheme } from "react-native-paper";
import { SafeAreaView } from "react-native-safe-area-context";

import * as SecureStore from "expo-secure-store";
import axios from "axios";
import { Entypo } from "@expo/vector-icons";

import AlertBox from "../components/AlertBox";

import config from "../config";

const LockedScreen = ({ navigation, theme }) => {
  const { colors } = theme;

  const [subscribed, setSubscribed] = useState(false);
  const [content, setContent] = useState(null);

  useEffect(() => {
    (async () => {
      try {
        const token = await SecureStore.getItemAsync("user_token");
        const instance = axios.create({
          baseURL: `${config.BASE_URL}/api`,
          timeout: 5000,
          headers: { Authorization: `Bearer ${token}` },
        });

        const res = await instance.get("/user");

        if (res.data.is_subscribed === "yes") {
          setSubscribed(true);
          const content_res = await instance.get("/locked");
          setContent(content_res.data);
        }
      } catch (err) {
        alert("Problem ocurred while getting user info.");
      }
    })();
  }, []);

  return (
    <SafeAreaView style={styles.container}>
      <Card style={[styles.card, { backgroundColor: colors.card }]}>
        <Card.Content>
          {subscribed && (
            <Image
              resizeMode="contain"
              style={styles.image}
              source={{
                uri: content,
              }}
            />
          )}
          {!subscribed && (
            <AlertBox text="You need to subscribe before you can access this content." />
          )}
        </Card.Content>
      </Card>
    </SafeAreaView>
  );
};

export default withTheme(LockedScreen);

const styles = StyleSheet.create({
  container: {
    flex: 1,
    paddingRight: 30,
    paddingLeft: 30,
    flexDirection: "column",
  },
  card: {
    marginBottom: 20,
  },
  image: {
    width: "100%",
    height: 200
  }
});
It’s now time to proceed with the server side of things. We’ve only done a bit of setting up earlier, but we haven’t implemented the following yet:
First let’s implement user auth. Add the following code to the API routes file:
<?php
// routes/api.php

use Illuminate\Http\Request;
use Illuminate\Support\Facades\Route;

use App\Http\Controllers\AccountController;
use App\Http\Controllers\TokenController;

Route::middleware('auth:sanctum')->group(function () {
    Route::get('/user', [AccountController::class, 'get']);
    Route::post('/signout', [AccountController::class, 'signout']);
});

Route::post('/sanctum/token', [TokenController::class, 'get']);
Create the controllers:
php artisan make:controller AccountController
php artisan make:controller TokenController
Here’s the code for the TokenController .This is responsible for returning the user token based on the email and password supplied in the request. It makes use of the createToken() method we added earlier on the user model. This token is saved in the database so it’s valid for some time:
<?php
// app/Http/Controllers/TokenController.php

namespace App\Http\Controllers;

use Illuminate\Http\Request;
use Illuminate\Support\Facades\Hash;
use Illuminate\Validation\ValidationException;
use App\Models\User;

class TokenController extends Controller
{
    public function get(Request $request)
    {
        $request->validate([
            'email' => 'required|email',
            'password' => 'required',
            'device_name' => 'required',
        ]);

        $user = User::where('email', $request->email)->first();

        if (!$user || ! Hash::check($request->password, $user->password)) {
            throw ValidationException::withMessages([
                'email' => ['The provided credentials are incorrect.'],
            ]);
        }

        return [
            'is_subscribed' => $user->isSubscribed() ? "yes" : "no",
            'token' => $user->createToken($request->device_name)->plainTextToken,
            'email' => $user->email,
            'name' => $user->name,
        ];
    }
}
Next, we implement the fetching of user data and logging out. They’re both enclosed in the auth:sanctum middleware so they expect the user token to be passed in. If the token is valid, the code inside the method gets executed. The middleware modifies the request data such that we can call the user() method in the Request object to access the user’s data:
<?php

namespace App\Http\Controllers;

use Illuminate\Http\Request;

class AccountController extends Controller
{
    public function get(Request $request)
    {
        $user = $request->user();
        $user->is_subscribed = $user->isSubscribed() ? 'yes' : 'no';
        return $user;
    }

    // next: add signout method
}
To log the user out, we call the tokens()→delete() method on the user object. This deletes all the token entries for that user from the personal_access_tokens table:
public function signout(Request $request)
{
    $request->user()->tokens()->delete();
    return 'ok';
}
There are two steps for handling subscriptions in Android:
/subscribe routeThe first step adds the data required by the second step. While the second step verifies the data from the first step. We will use the google/cloud-pubsub package we installed earlier to handle the notifications sent by Google Cloud PubSub.
First, add the /subscribe route to the API routes:
// routes/api.php

// ..
use App\Http\Controllers\TokenController;
use App\Http\Controllers\SubscriptionController; // add this

Route::middleware('auth:sanctum')->group(function () {
  // ..
  Route::post('/signout', [AccountController::class, 'signout']);
  Route::post('/subscribe', [SubscriptionController::class, 'subscribe']); // add this
});
Next, create the subscription controller:
php artisan make:controller SubscriptionController
Add the code for handling the subscription request. This captures the purchaseToken and orderId passed by the app:
<?php
// app/Http/Controllers/SubscriptionController.php

namespace App\Http\Controllers;

use Illuminate\Http\Request;
use Illuminate\Support\Facades\Http;

class SubscriptionController extends Controller
{
    public function subscribe(Request $request) {
        $platform = request('platform');
        $receipt = null;
        $purchase_token = request('purchaseToken');
        $order_id = request('orderId');

        $user = $request->user();
        $this->verifySubscription($user, $platform, $purchase_token, $order_id, $receipt);
        return 'ok';
    }

    // next: add verifySubscription()
}
Next, add the code for updating the user’s subscription data. It says verifySubscription() because we will be updating this later to also handle iOS subscriptions:
private function verifySubscription($user, $platform, $purchase_token, $order_id, $receipt = null) {

    $gplay_data = [
        'gplay_order_token' => $purchase_token,
        'gplay_order_id' => $order_id,
    ];

    $user->update($gplay_data);

}
Next is step two. This is where we listen for requests made by Google Cloud PubSub. Open the routes/web.php file and update the route which will handle it:
// routes/web.php
use Illuminate\Support\Facades\Route;
use App\Http\Controllers\PubsubController;

Route::post('/pubsub', [PubsubController::class, 'subscribe']);
Create the controller:
php artisan make:controller PubsubController
Add the following code to it:
<?php
// app/Http/Controllers/PubsubController.php
namespace App\Http\Controllers;

use Illuminate\Http\Request;
use Google\Cloud\PubSub\PubSubClient;
use App\Jobs\SubscribeUser;

class PubsubController extends Controller
{
    public function subscribe()
    {
        $project_id = config('services.google_cloud.project_id');
        $config_path = config('service.google_cloud.config_path');

        $key_file = file_get_contents(storage_path($config_path));
        $pubsub = new PubSubClient([
            'projectId' => $project_id,
            'keyFile' => json_decode($key_file, true)
        ]);

        $req_body = file_get_contents('php://input');
        $req_data = json_decode($req_body, true);

        $data = json_decode(base64_decode($req_data\['message'\]['data']), true);

        $purchase_token = $data\['subscriptionNotification'\]['purchaseToken'];

        $pubsub->consume($req_data);

        SubscribeUser::dispatch($purchase_token)->delay(now()->addSeconds(5));

        return 'ok';
    }
}
The code above can be summarized in three steps:
base64_decode() in order to make sense of the data because it has been encodedWe haven’t created the SubscribeUser job yet. Go ahead and do so:
php artisan make:job SubscribeUser
Add the following code to it:
<?php
// app/Jobs/SubscribeUser.php

namespace App\Jobs;

use Illuminate\Bus\Queueable;
use Illuminate\Contracts\Queue\ShouldQueue;
use Illuminate\Foundation\Bus\Dispatchable;
use Illuminate\Queue\InteractsWithQueue;
use Illuminate\Queue\SerializesModels;

use App\Models\User;

class SubscribeUser implements ShouldQueue
{
    use Dispatchable, InteractsWithQueue, Queueable, SerializesModels;

    private $notification_type;
    private $purchase_token;

    public function __construct($notification_type, $purchase_token)
    {
        $this->notification_type = $notification_type;
        $this->purchase_token = $purchase_token;
    }

    public function handle()
    {
        $subscribe_codes = [1, 2, 4, 7];
        $unsubscribe_codes = [3, 5, 10, 12, 13];

        $user = User::where('gplay_order_token', $this->purchase_token)
            ->first();

        if ($user) {
            if (in_array($this->notification_type, $subscribe_codes)) {
                $user->setSubscribed()->save();
            }

            if (in_array($this->notification_type, $unsubscribe_codes)) {
                $user->setUnsubscribed()->save();
            }
        }
    }
}
In the code above, the handle() method gets called when the job gets executed. This is where we check for the notification type. To keep things simple, we’re only going to handle subscription and cancellation notification types. This allows us to switch the user status whether they are currently subscribed or not subscribed.
For the subscribe codes we have:
While for unsubscribe codes we have:
You can learn more about the various notification types in the documentation, real-time developer notifications reference guide.
Update the user model to include the setSubscribed() method. This updates the lastpayment_datetime field to the current datetime. This field needs to be updated every time the user’s subscription is renewed. This will allow us to use this field as the basis for determining if the user is still subscribed or not. Thankfully, Google PubSub will send notifications every time a user’s subscription is renewed so there’s no need to write additional code for handling that bit:
// app/Models/User.php
protected $fillable = [
  // ..
];

public function setSubscribed()
{
    $this->datetime_subscribed = now();
    $this->lastpayment_datetime = now()->toDateTimeString();

    return $this;
}
Next, add the method for setting the user as unsubscribed. Here, we simply set the datetime_subscribed and last_payment_date as null. This will effectively deactivate the premium features for the user. Note that we don’t update the gplay_order_id and gplay_order_token because they’re used as the basis for the notifications. Without it, the server won’t know which user to update. They won’t change on resubscription or renewal of existing subscription so they’re perfect for our purpose:
public function setUnsubscribe()
{
    $this->datetime_subscribed = null;
    $this->last_payment_date = null;
    return $this;
}
Lastly, add the config for the Google project. The project_id is the project value you see in the URL when you’re on the Google Cloud Console dashboard. While the config_path is the path to where you saved the service account config file earlier. It’s in the storage/app directory so you can simply refer to it as app/filename.json because storage_path() returns the path to the storage directory:
// config/services.php
'google_cloud' => [
  'project_id' => env('GOOGLE_PROJECT_ID'),
  'config_path' => 'app/filename.json',
],


// .env
GOOGLE_PROJECT_ID="YOUR GOOGLE PROJECT ID"
To handle iOS subscriptions, we need to process the transactionReceipt we passed earlier from the app. The request will also be sent to the /subscribe route so it uses the same verifySubsription() method we created earlier. Go ahead and update the existing code with the following:
// app/Http/Controllers/SubscriptionController.php

private function verifySubscription($user, $platform, $purchase_token, $order_id, $receipt = null) {
    $apple_iap_shared_secret = config('services.apple_iap.shared_secret');
    $apple_iap_live_url = config('services.apple_iap.live_url');
    $apple_iap_sandbox_url = config('services.apple_iap.sandbox_url');

    if ($platform === 'ios') {

        $req_body = json_encode([
            'receipt-data' => $receipt,
            'password' => $apple_iap_shared_secret,
            'exclude-old-transactions' => true
        ]);

        $response_data = $this->sendRequest($apple_iap_live_url, $req_body);
        if ($response_data['status'] === 21007) {
            $response_data = $this->sendRequest($apple_iap_sandbox_url, $req_body);
        }

        $latest_receipt_info = $response_data\['latest_receipt_info'\][0];
        $expire_in_ms = (int) $latest_receipt_info['expires_date_ms'];
        $expire = $expire_in_ms / 1000;
        $current_timestamp = now()->timestamp;

        if ($current_timestamp < $expire) {
            $user->update([
                'datetime_subscribed' => now(),
                'lastpayment_datetime' => now()->toDateTimeString(),
                'apple_order_id' => $latest_receipt_info['transaction_id']
            ]);
        }

    } else if ($platform === 'android') {
        $gplay_data = [
            'gplay_order_token' => $purchase_token,
            'gplay_order_id' => $order_id,
        ];

        $user->update($gplay_data);
    }
}

// next: add sendRequest() method
In the above code, we’re verifying with Apple’s servers that the receipt data is indeed valid and hasn’t expired yet. This requires us to pass a JSON string containing the following:
receipt-data — The transactionReceipt value passed from the apppassword — The password for the in-app purchase. You can get this from App Store Connect. From your apps page, select the app in question. Then under in-app purchases, click manage. Click app-specific shared secret to generate the password you can supply to this fieldexclude-old-transactions — Set it to true so you won’t get any old transactionsWe verify the transactionReceipt on both the live and Sandbox URLs. This way, we can just have a single handler for verifying subscriptions for iOS. We verify with the Live one first and if it fails, we use the Sandbox URL. We know that the request is invalid if we get a response code of 21007.
For a valid response, you will get a latest_receipt_info field. Extract the first item from that to get the data for the latest receipt for that specific purchase.
We then extract the expires_date_ms and divide it by 1000 to get the actual timestamp value which we can compare to the current timestamp value of the date library of choice (eg. Carbon). If the resulting value is greater than the current timestamp, it means that it’s still valid.
Here’s the sendRequest() method:
private function sendRequest($url, $req_body) {
    $response = Http::withBody($req_body, 'application/json')->post($url);
    $response_data = $response->json();

    return $response_data;
}
Lastly, add the config for iOS:
// config/services.php
'apple_iap' => [
  'shared_secret' => env('APPLE_IAP_SECRET'),
  'live_url' => 'https://buy.itunes.apple.com/verifyReceipt',
  'sandbox_url' => 'https://sandbox.itunes.apple.com/verifyReceipt',
],


// .env
APPLE_IAP_SECRET="YOUR IN APP PURCHASES SHARED SECRET"
The final piece of the puzzle is adding the controller for the locked content. This is optional since we’ve already implemented all the parts required for the in-app purchases to work:
// routes/api.php
// ...
use App\Http\Controllers\AccountController;
use App\Http\Controllers\LockedContentController; // add this

Route::middleware('auth:sanctum')->group(function () {
  // ..
  Route::post('/signout', [AccountController::class, 'signout']);
  Route::get('/locked', [LockedContentController::class, 'get']); // add this
});
Next, create the controller:
php artisan make:controller LockedContentController
Add the following code:
<?php
// app/Http/Controllers/LockedContentController.php
namespace App\Http\Controllers;

use Illuminate\Http\Request;

class LockedContentController extends Controller
{
    public function get(Request $request)
    {
        if ($request->user()->is_subscribed) {
          return asset('images/doge-meme.jpg');
        }
    }
}
For the image, just save any image on your public/images directory.
No tutorial is complete without running the app and seeing that it works. First, we need to make the server accessible to the internet. That way, it can be accessed from the app even when you’re running it on your phone. We can’t really test out in-app purchases in the Android emulator or iOS simulator, that’s why we need to use a real device.
If you’re on Mac, you can use Valet once again to share the server to the internet. This uses ngrok behind the scenes:
valet share
Otherwise, you can just use ngrok directory. For this, you need to download and set up the executable on your computer:
cd ~/directory_where_ngrok_is
./ngrok http -host-header=rniapserver.test 80
Once that’s done, update the src/config.js file in the React Native project with your HTTPS ngrok URL:
const config = {
  APP_TITLE: "RNIAP Sample",
  BASE_URL: "https://your.ngrok.io", // update this
  // ..
};
Save that and run the app on your device:
npx react-native run-android
npx react-native run-ios
At this point, you should now see a similar output to what I’ve shown you in the App Overview earlier.
In this tutorial, we learned how to implement in-app purchases in your React Native app. We also looked at how we can handle subscriptions in the server. But the app we’ve created isn’t really production-ready yet. There are still a few things we haven’t covered:
getPurchaseHistoryAsync() method for this purposeYou can find the project source code in this GitHub repo.

LogRocket's Galileo AI watches sessions for you and and surfaces the technical and usability issues holding back your React Native apps.
LogRocket also helps you increase conversion rates and product usage by showing you exactly how users are interacting with your app. LogRocket's product analytics features surface the reasons why users don't complete a particular flow or don't adopt a new feature.
Start proactively monitoring your React Native apps — try LogRocket for free.

Russ Miles, a software development expert and educator, joins the show to unpack why “developer productivity” platforms so often disappoint.

Discover what’s new in The Replay, LogRocket’s newsletter for dev and engineering leaders, in the February 18th issue.

Learn how to recreate Claude Skills–style workflows in GitHub Copilot using custom instruction files and smarter context management.

Claude Code is deceptively capable. Point it at a codebase, describe what you need, and it’ll autonomously navigate files, write […]
Would you be interested in joining LogRocket's developer community?
Join LogRocket’s Content Advisory Board. You’ll help inform the type of content we create and get access to exclusive meetups, social accreditation, and swag.
Sign up now
One Reply to "Implementing in-app purchases in React Native"
Hi.. Thanks for such a detailed post, it has been a life saver, I am still struggling with some bottlenecks, is there a way I can get in touch with you, to clarify some of my doubts
Regards
Robinson Raju