Platforms as a service (PaaS) are cloud-based services that help eliminate the cost and complexity of developing applications. Services like Heroku, Google App Engine, or AWS Elastic Beanstalk allow developers to build, run, and operate applications entirely in the cloud with pre-built software components that help create and scale applications quickly.

The problem with these services is that with convenient usability comes a higher price tag. Once you leave the free tier (for example on Heroku), it starts to get expensive. If you want to add a database to your service as an add-on, you have to dig even deeper into your pocket.
What if there was an option to implement your own PaaS on whichever infrastructure you like, with the benefits of a typical PaaS service and drastically reduced costs? Let me introduce you to CapRover – an open source DIY PaaS.
CapRover is an easy-to-use app/database deployment and web server manager that works for a variety of applications such as Node.js, Ruby, PHP, Postgres, and MongoDB. It runs fast and is very robust, as it uses Docker, Nginx, LetsEncrypt, and NetData under the hood behind its user-friendly interface.
CapRover helps you increase your productivity by focusing on your apps instead of the underlying infrastructure. Plus, with CapRover’s One Click Apps, you can set up applications like Postgres, MongoDB, Plausible Analytics, or PGAdmin by just clicking a single button.
CapRover is an excellent alternative to Heroku. Heroku is a platform as a service (PaaS) that enables developers to build, run, and operate applications entirely in the cloud. Since its introduction, Heroku has helped tons of developers improve their productivity and deploy applications more easily.
However, there is also downside to Heroku. Great usability comes with a cost. While Heroku does offer a free tier, if you want to run a production-ready application you will need to use one of their paid tiers. The price of these tiers is fairly expensive and is definitely based on the usability factor, especially compared to the same specs you would get by buying a Virtual Private Server (VPS). Furthermore, every app on the Heroku free tier goes to sleep after inactivity of around 30 minutes.
What if there was a way to implement your own version of Heroku on your own VPS? Let’s talk about CapRover, our own private, open-source, and free PaaS.
These are some of CapRover’s great features:
In this tutorial, the goal is to teach you to install CapRover on your own VPS, then demonstrate how to deploy a Node.js and Postgres application with a smooth CI/CD flow, so that when we push to our master branch, our app gets automatically rebuilt.
The official CapRover website suggests your VPS have a minimum of 1 GB of RAM to avoid build process problems. There are many cloud service providers such as Digital Ocean, Vultr, Hetzner, or Linode where you can buy a VPS starting at just three dollars per month.
CapRover is tested on Ubuntu 18.04. The official CapRover website suggests Ubuntu 18.04 over Ubuntu 20 to minimize your production issues. Ubuntu 18.04 will continue to receive updates until 2023 at the very least.
For this tutorial, I will be using the CX11 VPS from Hetzner that comes with 1 vCPU, 2 GB of RAM, 20 GB of Disk space, 20 TB of traffic, and costs only three dollars per month.
Your VPS fresh out of the box does not contain anything on it, other than your operating system. Before we install CapRover we first have to make sure that we have all the necessary tools installed that allow us to do that. Luckily, the only thing we really need is Docker.
Docker is a container engine that uses Linux Kernel features like namespaces and control groups to create containers on top of an operating system (learn more about it here).
If you’ve never heard of Docker, I highly encourage you to learn the basics before installing and working with CapRover. It will also drastically improve your development productivity.
Alright, let’s install the Docker Community Edition (Docker CE).
The following code will update the apt package index and install packages that allow apt to use a repository over HTTPS:
sudo apt-get update

sudo apt-get install \\
    apt-transport-https \\
    ca-certificates \\
    curl \\
    gnupg-agent \\
    software-properties-common
Add Docker’s official GPG (GNU Privacy Guard) key:
curl -fsSL https://download.docker.com/linux/ubuntu/gpg | sudo gpg --dearmor -o /usr/share/keyrings/docker-archive-keyring.gpg
Update the apt package index again, and install the latest version of Docker Engine and Containerd for your Ubuntu 18.04:
sudo add-apt-repository "deb [arch=amd64] https://download.docker.com/linux/ubuntu bionic stable"
sudo apt-get update
sudo apt-get install docker-ce docker-ce-cli containerd.io
Run docker -v to see your Docker version, and check if the installation was successful.
Finally, we can magically install CapRover with this simple command:
docker run -p 80:80 -p 443:443 -p 3000:3000 -v /var/run/docker.sock:/var/run/docker.sock -v /captain:/captain caprover/caprover
If you are using Digital Ocean you can also use their One-Click droplet that automatically installs CapRover for you.
Next, we want to point our domain to our VPS.
First, we have to find the public (or external) IP address of our VPS. You will find that IP address easily on your VPS user interface:

Next, go to your domain registrar’s website. Login, and navigate to your domain’s DNS settings. We will use a subdomain that we will point to our VPS via an A record:
![]()
We are using a wildcard subdomain here, which allows our applications to be accessible via yourApplicationName.server.yourDomainName.com (note that you don’t have to use .server here, you can use whatever name you want).
A firewall is a network security device that monitors incoming and outgoing network traffic and decides whether to allow or block specific traffic based on a defined set of security rules. For CapRover to properly work and communicate to the outside world we need to make sure to open the proper ports. According the official CapRover website it uses:
We will use the default firewall configuration tool for Ubuntu UFW (Uncomplicated Firewall) to set up our firewall.
First, enable the firewall:
sudo ufw enable
Then, allow the previously mentioned ports:
sudo ufw allow 80,443,3000,996,7946,4789,2377/tcp
sudo ufw allow 7946,4789,2377/udp
You can run ufw status to check the current status of your firewall.
You may have noticed that providers such as Digital Ocean or Hetzner provide your VPS with a dedicated firewall section on their website. These are called cloud firewalls. Cloud firewalls filter traffic before it even reaches your server. This could be very beneficial in the case of a DDoS attack, because the malicious traffic will not even reach your VPS. If you set up a cloud firewall, it is not necessary to have a software firewall like UFW enabled. Because setting up a cloud firewall mostly depends on the provider’s user interface, we are using UFW for this tutorial.
We are almost ready! On your local machine (in my case it’s a Macbook Pro), let’s install the CapRover CLI via npm and then set up the server.
Install the CapRover CLI:
npm i -g caprover
Now we can run the setup command. Based on some input, CapRover will let us configure a new secure password (the default is captain42) as well as an SSL certificate so we can enable HTTPS:
caprover serversetup
Here is a sample output:
Setup CapRover machine on your server...

? have you already started CapRover container on your server? Yes
? IP address of your server: [yourIPAddress]
? CapRover server root domain: server.[yourDomainName].com
? new CapRover password (min 8 characters): [hidden]
? enter new CapRover password again: [hidden]
? "valid" email address to get certificate and enable HTTPS: [[email protected]]
? CapRover machine name, with whom the login credentials are stored locally: [yourCustomCapRoverMachineName]

CapRover server setup completed: it is available as [yourCustomCapRoverMachineName] at https://captain.server.[yourDomainName].com

For more details and docs see CapRover.com
We can now navigate to https://captain.server.[yourDomainName].com:
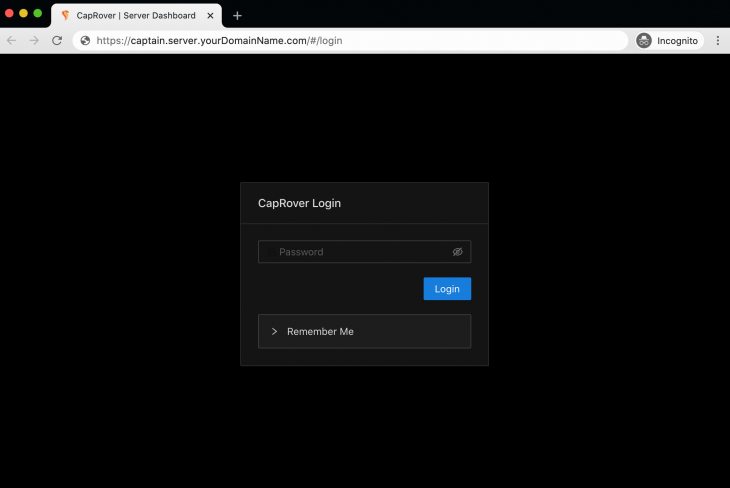
Let’s log in with our new and secure password:
Congratulations! Your CapRover PaaS is now up and running.
Now that you have set up your own PaaS, we can host your first Node.js application on it.
The goal of this section is to host a basic Node.js app that is connected to a Postgres database. Additionally, we want to have it set up in way that automatically rebuilds and deploys our app whenever we push to our master branch.
We will be using an example project from Github. If you want to learn more about how to create a CRUD Rest API with this tech stack, check out this tutorial.
First, I git cloned this project from Github and pushed it to a fresh private repository on my own Github account.
This example project scaffolds a basic Express.js app that is connected to a Postgres database. As you can see in the root folder, we have a Dockerfile as well as docker-compose.yml.
While we would usually just run the Docker Compose file and call it a day, there are some things we have to change to make it work with CapRover. CapRover is just a thin layer around Docker. It uses Docker to build and run your applications, which it accomplishes via the Docker API.
Although Docker Compose is a feature in Docker CLI, it is NOT available in the Docker API. This means CapRover cannot handle Docker Compose files. There are some ways around it, but we can work within that constraint.
Here is what we will do:
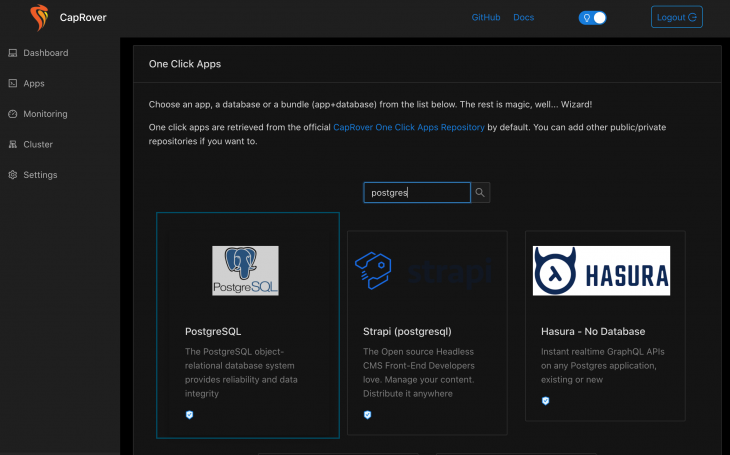
captain-definition fileSelect One Click Apps and choose the PostgreSQL application:
Then, enter the details for your database (such as the database name, username, and password):
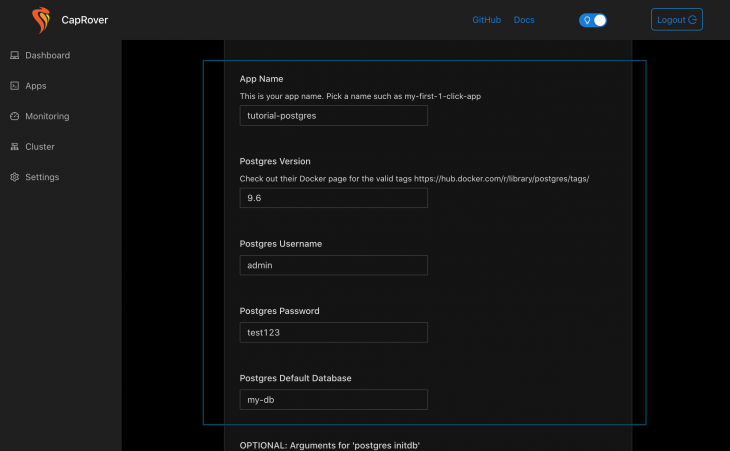
After the installation, the database will be available as srv-captain--YOUR_CONTAINER_NAME at port 5432 to other CapRover apps. In our case it is srv-captain--tutorial-postgres-db.
captain-definition fileOne of the key components of CapRover is the captain-definition file that sits at the root of your project. This file tells CapRover what to actually do.
In our case we want to tell it to run the Dockerfile that also sits in the root of our project. Create the file and add:
{
  "schemaVersion": 2,
  "dockerfilePath": "./Dockerfile"
 }
According to the official CapRover website, the
"schemaVersion"is always 2.
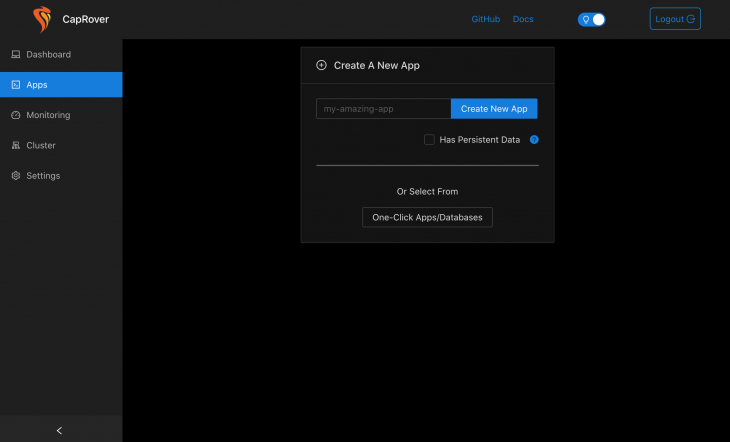
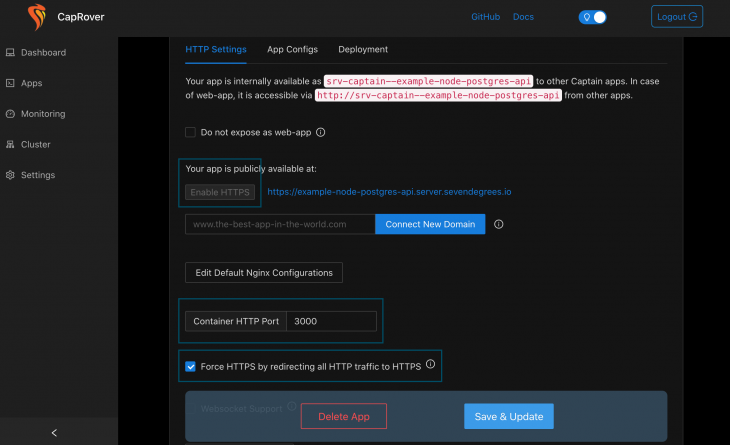
Next up, we have to create a custom app with CapRover’s interface. Simply give your app a name and click the Create New App button. In our case, our Node application is stateless because it communicates with a Postgres database. Therefore, we don’t need to check the Has Persistent Data checkbox.

Inside the HTTP Settings tab, we will Enable HTTPS as well as Force HTTPS by redirecting all HTTP traffic to HTTPS to ensure maximum security. Last but not least, we have to add the port our application is running on. In our case it is port 3000.
Inside the index.ts let’s add:
const client = new Client({
  user: "admin",
  password: "test123",
  host: "srv-captain--tutorial-postgres-db",
  database: "my-db"
});
Now let’s connect CapRover to our Github repo so that whenever we push to the master branch a new version gets built automatically. Connecting to Github is a two step process.
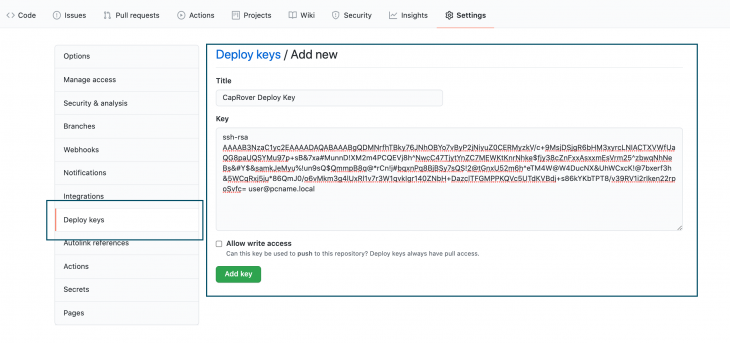
The first thing we have to get is a deploy key from our Github repo. On your VPS or local machine generate a new fresh public/private key pair with ssh-keygen.
Then, on your Github repo, navigate to Settings/Deploy keys. Here you should enter your public key:
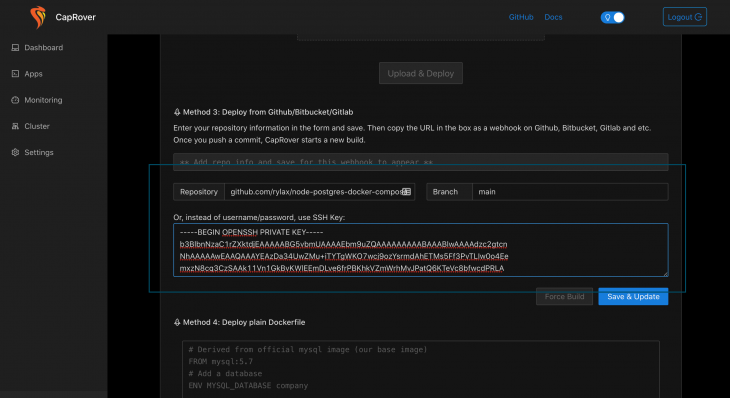
Back on our CapRover interface under the Deployment tab, we will first enter our repository location in the format of github.com/user/repository. Additionally you can specify your branch name. If you want your app to build whenever you push to your dev branch, for example, just enter dev.
Last but not least we have to add our private key instead of username and password. I highly encourage you to do so because it is much more secure:
For even more security, the official CapRover website suggests you use service accounts. You can read more about CapRover best practices here.
Click Save & Update and wait for your webhook URL to be generated:

Great! Now the final step is to copy this URL, and navigate back our repo’s Settings page on Github. Under Webhooks simply add a new webhook with the URL that CapRover has generated for you. You can leave the rest of the fields as they are:

As soon as you save your webhook, your app will automatically build itself on CapRover:

Finally, we can check out https://example-node-postgres-api.server.sevendegrees.io/ping and see that everything is running smoothly.

Congratulations, we have successfully set up a Node.js project connected to a Postgres database that automatically rebuilds whenever we push to our master branch. All of that in less than an hour, and for the price of just three dollars per month!
Unlike with Heroku, you are responsible for everything that happens on your server. Therefore, you should see your VPS’s security as your highest priority.
Here are some things I recommend you do:
Remember, the key to your servers’ security is to build up layers of security that make it harder for hackers to intrude your system. The more layers we have the harder it will be. No system will ever be one hundred percent secure, but you need to make sure to put your best effort into it.
In this tutorial we learned about what CapRover is, how you can set up your very own platform as a service in less than an hour, and how you can deploy production-ready apps by deploying a simple Node.js and Postgres application.
This only scratches the surface of what you can do with CapRover. I highly recommend you check out their official documentation to learn more.
If you have any questions, let me know in the comments below.
 Monitor failed and slow network requests in production
Deploying a Node-based web app or website is the easy part. Making sure your Node instance continues to serve resources to your app is where things get tougher. If you’re interested in ensuring requests to the backend or third-party services are successful, try LogRocket.

LogRocket lets you replay user sessions, eliminating guesswork around why bugs happen by showing exactly what users experienced. It captures console logs, errors, network requests, and pixel-perfect DOM recordings — compatible with all frameworks.
LogRocket's Galileo AI watches sessions for you, instantly identifying and explaining user struggles with automated monitoring of your entire product experience.
LogRocket instruments your app to record baseline performance timings such as page load time, time to first byte, slow network requests, and also logs Redux, NgRx, and Vuex actions/state. Start monitoring for free.
Would you be interested in joining LogRocket's developer community?
Join LogRocket’s Content Advisory Board. You’ll help inform the type of content we create and get access to exclusive meetups, social accreditation, and swag.
Sign up now
This guide walks you through creating a web UI for an AI agent that browses, clicks, and extracts info from websites powered by Stagehand and Gemini.

This guide explores how to use Anthropic’s Claude 4 models, including Opus 4 and Sonnet 4, to build AI-powered applications.

Which AI frontend dev tool reigns supreme in July 2025? Check out our power rankings and use our interactive comparison tool to find out.

Learn how OpenAPI can automate API client generation to save time, reduce bugs, and streamline how your frontend app talks to backend APIs.


2 Replies to "How to set up your own PaaS with CapRover"
Thank you for this great tutorial. I am having some issues after installing caprover on Azure VM. I think it’s something with SSH, after ufw step. It’s not working for me.
This is great tutorial. @viki, if you are having problem with port not listening to 3000, then check your Azure vm network inbound rule. I had the same issue before. For Azure you have to add rule from their Networking section.