Plugins in JavaScript allow us to extend the language to achieve some powerful (or not so powerful) features we desire. Plugins/libraries are essentially packaged code that save us from writing the same thing (features) over and over again.

Just plug it in, and play!
There are hundreds of frameworks in the JavaScript ecosystem, and each one of these frameworks provide us with a system to create plugins in order to add new things to the framework.
If you take a look at the npm registry, where almost all JavaScript plugins are published, you will see more than a million plugins published as both simple libraries and frameworks.
How you create plugins for each framework may differ significantly. For example, Vue.js has its own plugin system, which is different from how you’d create plugins for React. However, it all boils down to the same JavaScript code.
Therefore, being able to create plugins with vanilla JavaScript gives you the ability to create a plugin that works regardless of the framework in question.
Now, let’s get to business putting the above points in mind.
In this article, I will show you how to create a framework-agnostic plugin. For the purpose of this tutorial, we will be creating a carousel/slider plugin — the goal of the plugin.
This plugin will expose a few methods that can be called by the user of the plugin .next() and .prev()
TooSlidePlugin.tooSlide.jsI sometimes like to imagine how a plugin would be used (from an end developer’s perspective) before I even begin to create it.
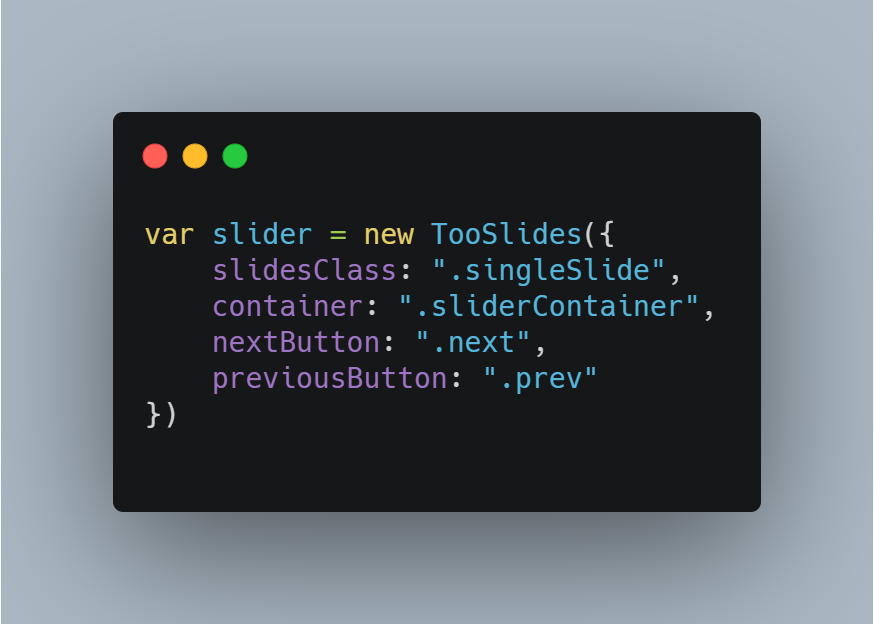
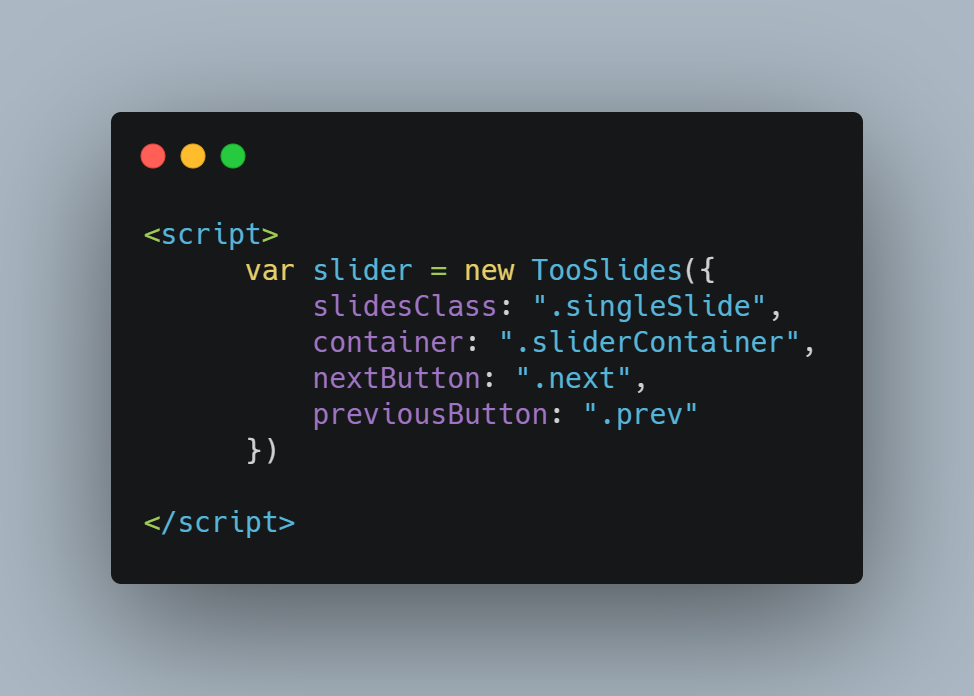
If you look at the code block above, it assumes there’s a constructor called TooSlides that receives an object with certain properties as an argument.
The properties of the object being slidesClass, container, nextButton, and previousButton. These are properties we want the user to be able to customize.
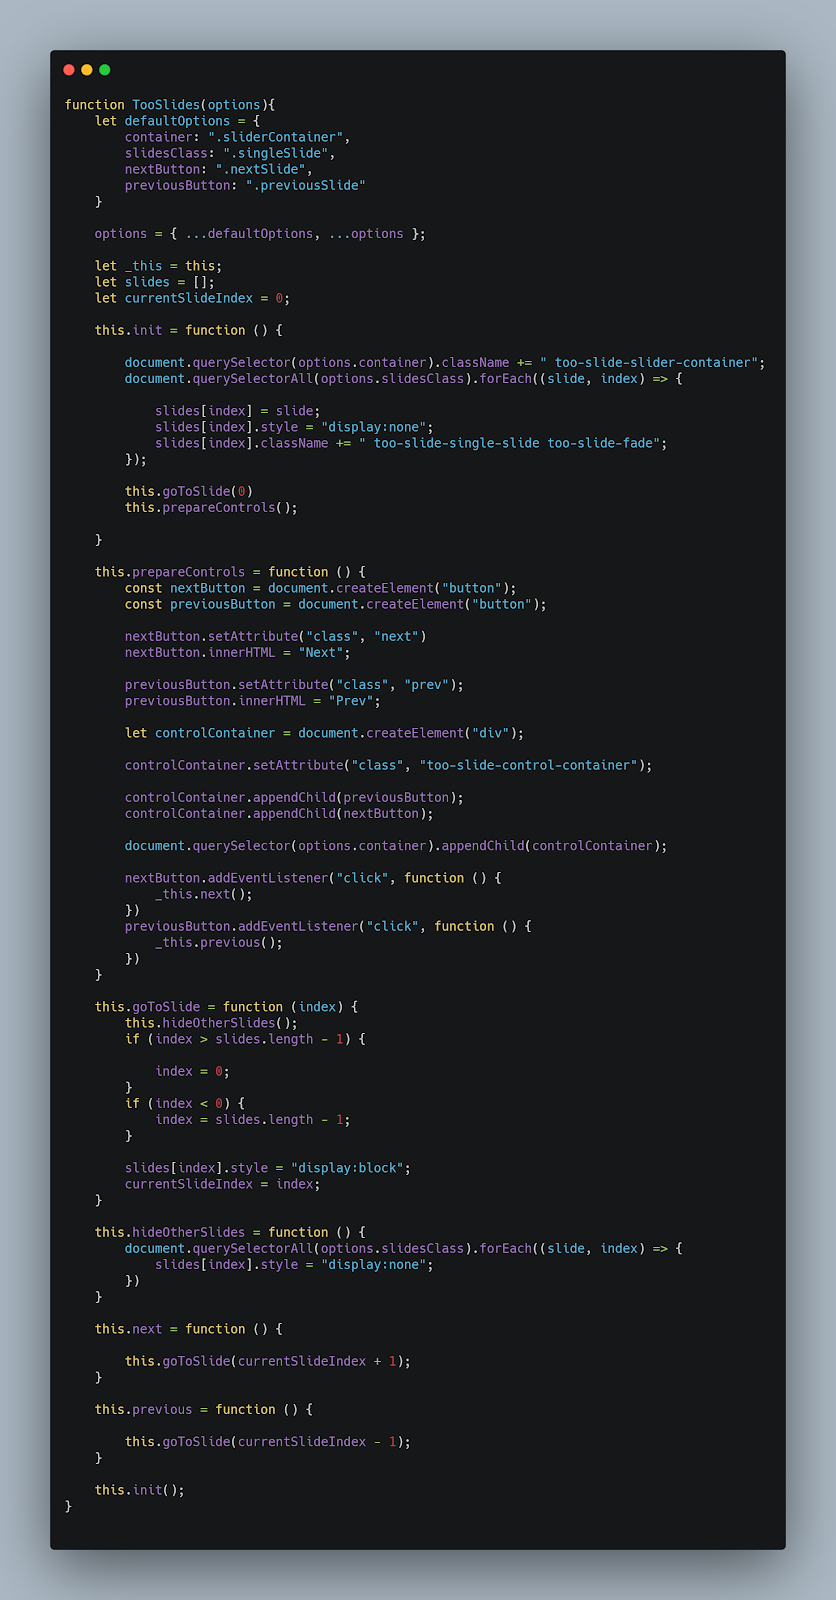
We will start by creating our plugin as a single constructor function so that it sort of has a namespace to itself.
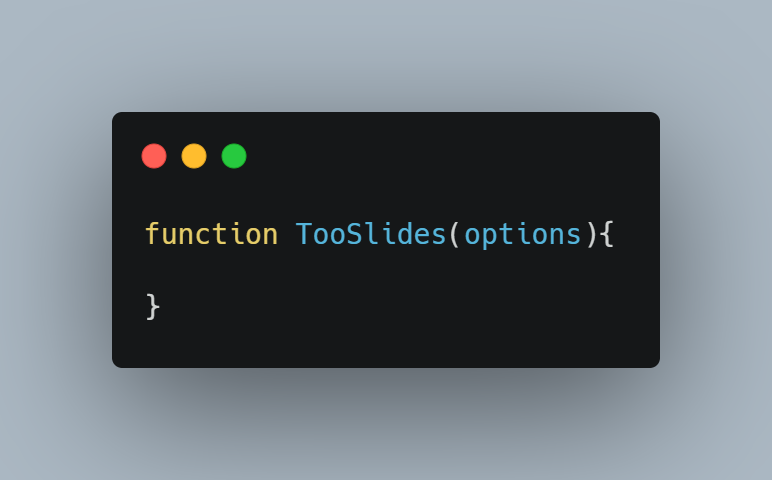
Since our plugin, TooSlides, expects an options argument, we will define some default properties, so that if our user doesn’t specify their own, the default ones are used.
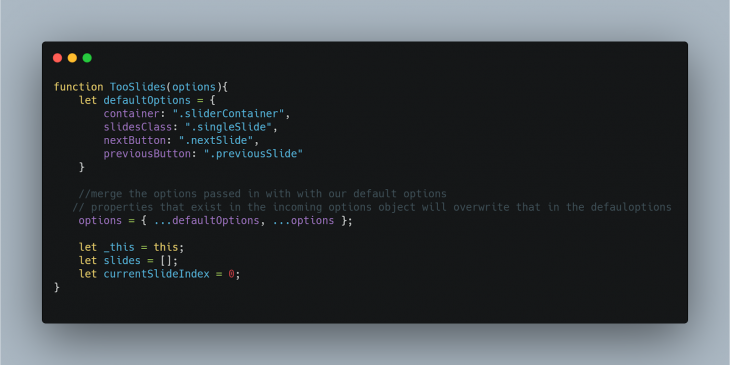
We created a defaultOptions object to hold some properties, and we also used a JavaScript spread operator to merge incoming options with the default one.
We assigned the this to another variable so we can still get access to it in inner functions.
We also created two variables slides which will hold all the images we want to use as slider, and currentSlideIndex, which holds the index of the slide that is currently being displayed.
Next, since our slider is expected to have some control which can be used to move the slide forward and backward, we will add the below the method in our constructor function:
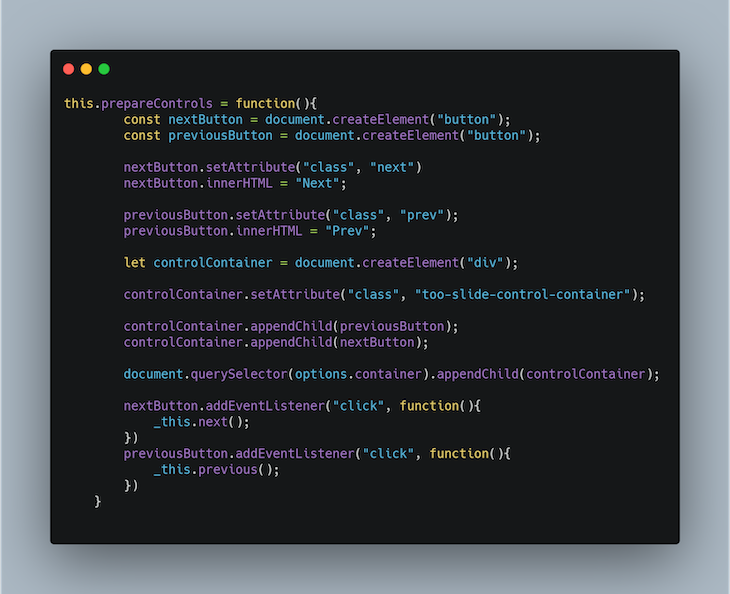
In the .prepareControls() method, we created a container DOM element to hold the control buttons. We created the next and previous buttons themselves and appended them to the controlContainer.
Then we attached event listeners to the two buttons which call the .next() and .previous() methods respectively. Don’t worry, we will create these methods shortly.
Next, we will add two methods: .goToSlide() and .hideOtherSlides().
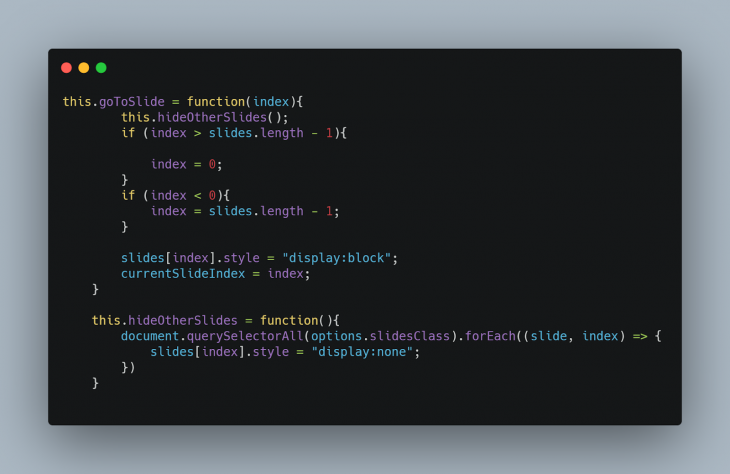
The .goToSlide() method takes an argument, index, which is the index of the slide we want to display. This method first hides any slide currently being displayed and then displays only the one we want to be displayed.
Next, we will add the .next() and .previous() helper methods that will help us move one step forward, or one step backward respectively (remember the event listeners we attached earlier?)
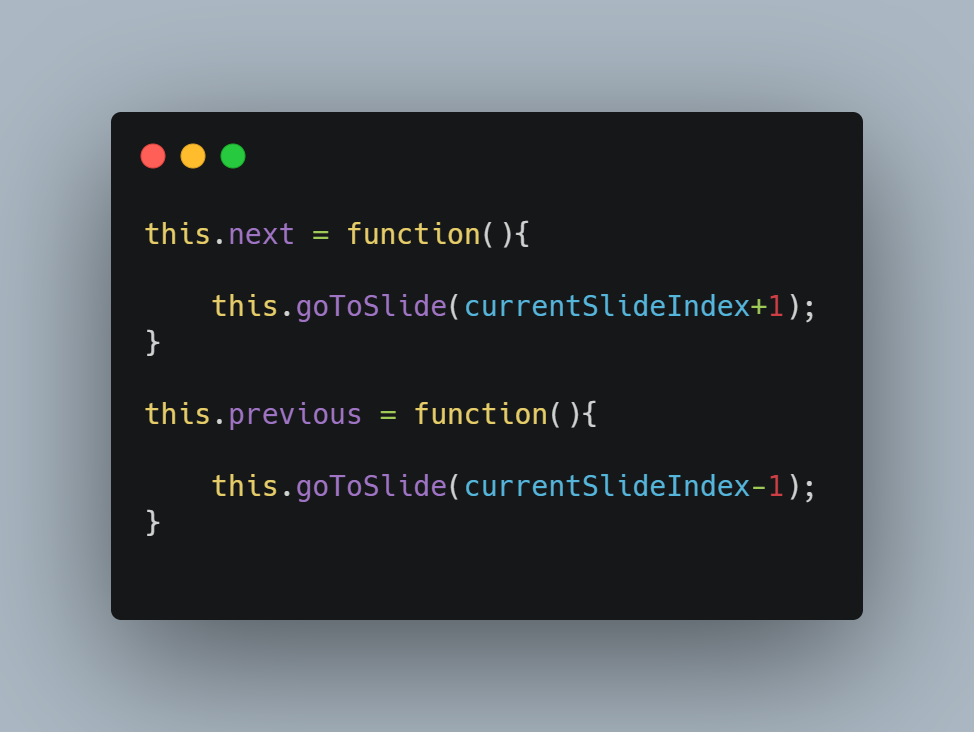
These two methods basically call the .goToSlide() method and move the currentSlideIndex by 1.
We will now also create an .init() method that will help us set things up whenever our constructor function is instantiated
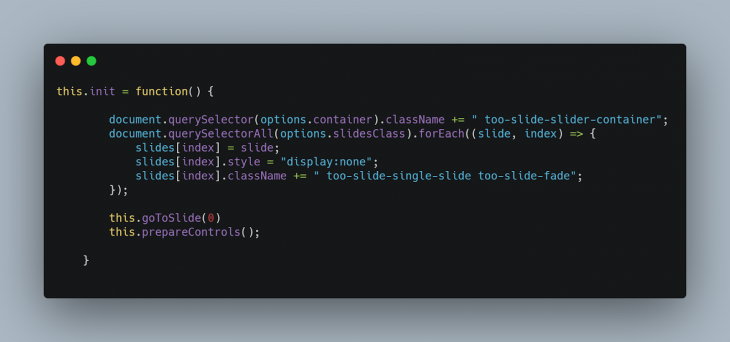
As you can see, the .init() method gets all slide images and store them in the slides array we declared earlier, and hides them all by default.
It then displays the first image in the slide by calling the .goToSlide(0) method, and it also sets up our control buttons by calling .prepareControls().
To wrap our constructor code up, we will call the .init() method within the constructor, so that whenever the constructor is initialized, the .init() method is always called.
The final code will look like this:
In the folder housing our plugin project, we will add a CSS file that contains basic styling for our slider. I’ll call this file tooSlide.css:
* {box-sizing: border-box}

body {font-family: Verdana, sans-serif; margin:0}
.too-slide-single-slide {
    display: none;
    max-height: 100%;
    width: 100%;

}

.too-slide-single-slide img{
    height: 100%;
    width: 100%;
}
img {vertical-align: middle;}

/* Slideshow container */
.too-slide-slider-container {
    width: 100%;
    max-width: 100%;
    position: relative;
    margin: auto;
    height: 400px;
}


.prev, .next {
  cursor: pointer;
  position: absolute;
  top: 50%;
  width: auto;
  padding: 10px;
  margin-right: 5px;
  margin-left: 5px;
  margin-top: -22px;
  color: white;
  font-weight: bold;
  font-size: 18px;
  transition: 0.6s ease;
  border-radius: 0 3px 3px 0;
  user-select: none;
  border-style: unset;
  background-color: blue;
}


.next {
  right: 0;
  border-radius: 3px 0 0 3px;
}


.prev:hover, .next:hover {
  background-color: rgba(0,0,0,0.8);
}


.too-slide-fade {
  -webkit-animation-name: too-slide-fade;
  -webkit-animation-duration: 1.5s;
  animation-name: too-slide-fade;
  animation-duration: 1.5s;
}

@-webkit-keyframes too-slide-fade {
  from {opacity: .4}
  to {opacity: 1}
}

@keyframes too-slide-fade {
  from {opacity: .4}
  to {opacity: 1}
}

/* On smaller screens, decrease text size */
@media only screen and (max-width: 300px) {
  .prev, .next,.text {font-size: 11px}
}
To test our plugin, we will create an HTML file. I’ll call mine index.html. We’ll also add 4 images to be used as slides, all within the same directory as our plugin JavaScript code.
My HTML file looks like this:
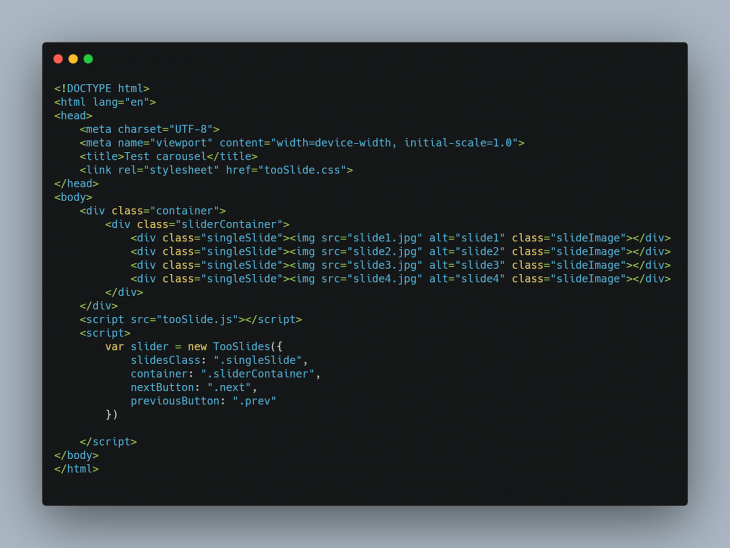
In the head section of the HTML file, I called the tooSlide.css file, while at the end of the file, I called the tooSlide.js file.
After doing this, we will be able to instantiate our plugin constructor:
You can check out the result of our plugin in this pen:
TooSlidePlugin
No Description
The documentation of your plugin is as important as every other part.
The documentation is how you teach people to use your plugin. As such, it requires you to put some thought into it.
For our newly-created plugin, I’d start by creating a README file in the directory of the project.
After writing your plugin, you most likely would want other developers to benefit from your new creation, so I’ll show you just how to do that.
You can make your plugin available to other people in two main ways:
And that’s it.
During the course of this article, we have built a plugin that does one thing: slide images. It is also dependency-free. Now we can start to help others with our code just like we’ve been helped too.
The code for this plugin tutorial is available on GitHub.
Debugging code is always a tedious task. But the more you understand your errors, the easier it is to fix them.
LogRocket allows you to understand these errors in new and unique ways. Our frontend monitoring solution tracks user engagement with your JavaScript frontends to give you the ability to see exactly what the user did that led to an error.

LogRocket records console logs, page load times, stack traces, slow network requests/responses with headers + bodies, browser metadata, and custom logs. Understanding the impact of your JavaScript code will never be easier!

A guide for using JWT authentication to prevent basic security issues while understanding the shortcomings of JWTs.

Discover how to build, render, and automate product demo videos with Remotion, replacing traditional screen recordings with reusable React code.

Chrome’s Modern Web Guidance embeds modern web platform skills into AI coding agents, helping them choose native HTML, CSS, and browser APIs over legacy patterns.

Learn how to use Fallow to analyze AI-generated code, detect dead code, duplicate logic, and complexity issues, and integrate automated code quality checks into your AI-assisted development workflow.
Hey there, want to help make our blog better?
Join LogRocket’s Content Advisory Board. You’ll help inform the type of content we create and get access to exclusive meetups, social accreditation, and swag.
Sign up now

