
Web servers play a key role in the functionality of web applications, controlling how quickly user requests are responded to.

Nginx is a stable, high-performing web server that is primarily for load balancing, reverse proxying, and caching. It can be configured as a mail proxy server and an HTTP server. It has a non-threaded and event-driven architecture, meaning it uses an asynchronous and non-blocking model. In simple terms, the Nginx web server significantly reduces a web app’s page load time.
In this article, we’ll compare the features, benefits, and efficiency of two popular web servers: Nginx and Apache. We’ll also examine Nginx’s structure and how it may be used to accelerate the deployment of a Node.js application. Deploying instances of a web app to a server manually can be monotonous and time-consuming for developers. Nginx accelerates web app deployment by automating many of the app development tasks that are typically handled manually.
Without further ado, let’s get started.
The Replay is a weekly newsletter for dev and engineering leaders.
Delivered once a week, it's your curated guide to the most important conversations around frontend dev, emerging AI tools, and the state of modern software.
To follow along with this tutorial, ensure that you have the following:
N.B., Ubuntu 20.04 operating system and Node.js v10.19.0 were used in this tutorial
Many web servers rely on a single-threaded mechanism. This has some shortcomings, one of which is the insufficiency in handling CPU-intensive applications. When multiple threads are running in a process with a single-threaded mechanism, each code or instruction will be processed individually and sequentially. Threads consume a lot of memory, so processing them in this way invariably leads to a drop in the application’s performance and an increase in page loading time.
Nginx, however, uses a non-threaded, event-driven architecture, enabling it to handle multiple requests concurrently and asynchronously. Nginx uses a master process for reading and validating configurations, as well as binding ports. The master process produces child processes, such as the cache loader process, cache manager process, and worker processes.
On the other hand, the worker processes handle incoming requests in a non-blocking manner and can be easily configured by setting an auto parameter on its directive as follows:
worker_processes auto;
The below diagram illustrates the Nginx master process with several worker processes and user requests and responses:
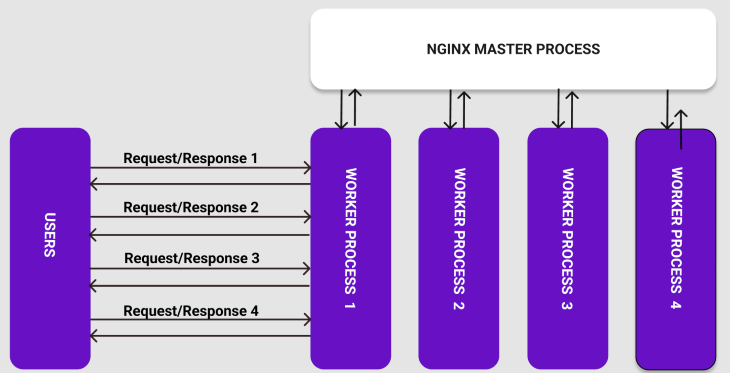
The master process is responsible for starting and maintaining the number of worker processes. With worker processes, Nginx can process thousands of network connections or requests.
According to a recent worldwide survey by W3 Techs, Nginx is used by 33.0 percent of websites, while Apache is used by 31.1 percent. Although both web servers are very popular, they have key differences that impact their functionality and performance.
There are two considerations to keep in mind to determine whether Nginx or Apache is right for your website: client requests and static content serving.
Apache handles client requests using inbuilt multi-processing modules (prefork and worker MPMs) that are located in its configuration file. With these modules, each thread and process handles one connection or request at a time. Apache is often a good choice for applications that have less traffic or a smaller number of simultaneous requests.
Nginx handles client requests using its event-driven, asynchronous, non-blocking worker processes, which can handle thousands of connections or requests simultaneously. Nginx can be a good choice for high-traffic applications or those that get a large number of requests at a time.
Nginx can serve static content faster than Apache because of its reverse-proxy nature. In order to serve static content with Apache, you must add a simple configuration to its http.conf file and your project’s directory.
Now that we’ve reviewed some key differences between Nginx and Apache, let’s move on to our hands-on demonstration and learn how to auto-deploy a web application with Nginx.
In order to deploy our application with the Nginx web server, we’ll first make a couple of configurations in the /etc/Nginx/Nginx.conf file.
The configuration file is made up of several contexts that are used to define directives to handle client requests:
Let’s start by installing Nginx:
First, in the terminal, update the package repository:
sudo apt-get update
Next, install Nginx by running the following command:
sudo apt-get install Nginx
Once you run this code, you’ll be prompted with a question asking if you want to continue. Confirm by typing Y and pressing Enter.
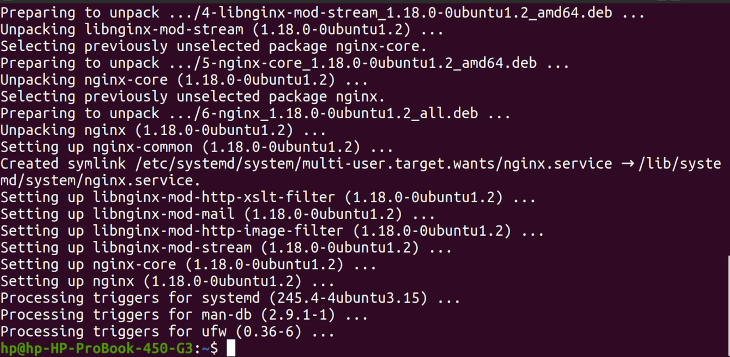
Now, you should see the following on your screen:
Following installation, the next step is to enable the firewall:
sudo ufw enable
After running the above command, you should see the following activation message:

To confirm that the installation was successful, run this command:
Nginx -v
This will log you in to the version of Nginx that we just installed:

To see a list of the applications available on your firewall, run this command:
sudo ufw app list

Notice the Nginx Full, Nginx HTTP, Nginx HTTPS logged to the screen. This means that both port 80 and port 443 have been added.
Nginx HTTP opens port 80, which is the default port Nginx listens to. Nginx HTTPS opens port 443, which is used to divert network traffic and secure connections. Nginx Full will allow both ports.
Now, use the following command to enable both ports:
sudo ufw allow 'Nginx Full'
Next, run a similar command to allow both HTTP and HTTPS:
sudo ufw allow 'Nginx HTTP'
sudo ufw allow 'Nginx HTTPS'
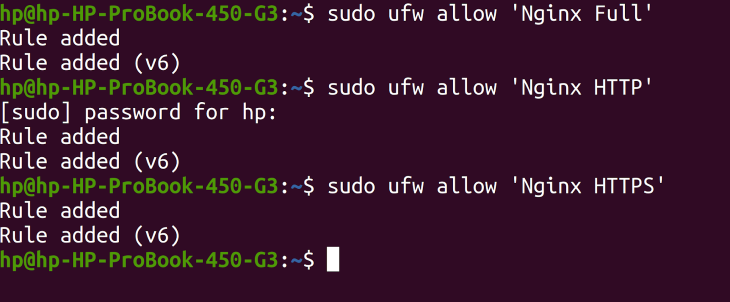
You’ll notice that the allow rule has been added for Nginx Fulland Nginx HTTP:
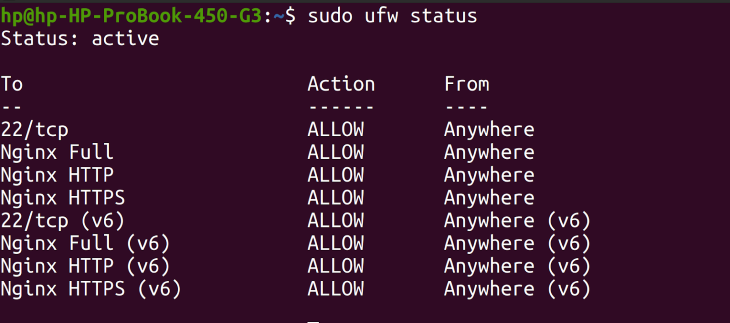
Use the following command to check the status and confirm that Nginx Full, Nginx HTTP, and Nginx HTTPS have all been allowed:
sudo ufw status
You can also check the status of your Nginx server with this command:
sudo systemctl status Nginx
Once you run this code, you should see Nginx.service running with an active state. You can also see the master process running, the process ID, and the main PID :
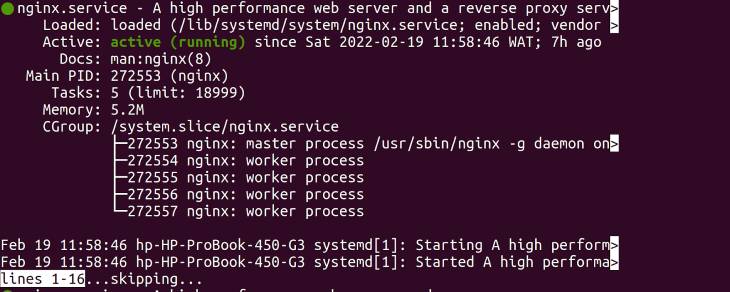
This confirms that your Nginx server is running successfully.
For this tutorial, you’ll be using a simple Node.js application.
First, clone the application from GitHub:
git clone https://github.com/debemenitammy/Log_Node_App.git
Next, install the dependencies:
npm install
Now, open the application in your code editor of choice. Run the following command in the application’s directory:
nodemon app.js
The application runs on port 3000, as shown in the terminal window:
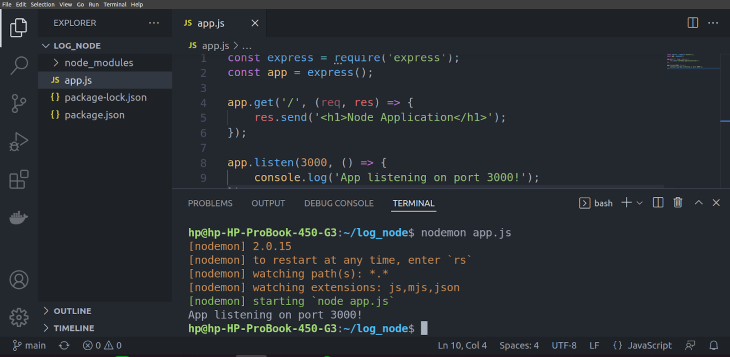
Now, you have an application running locally. Before moving on, ensure that you have an OpenSSH server and ssh keys set up in your OS. Also, have your domain name and hosting available, as you will be using it in the tutorial.
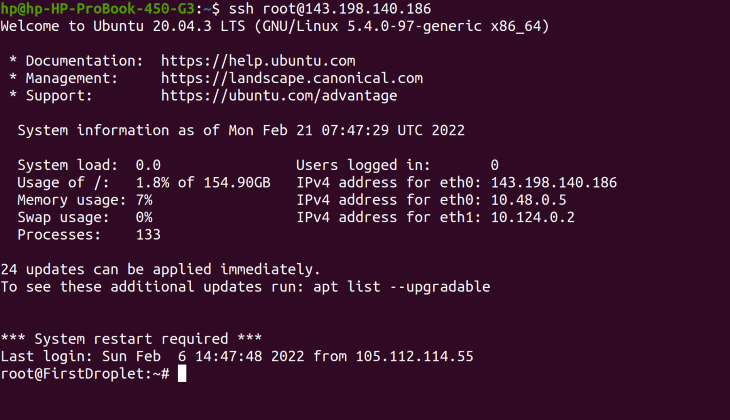
In this step, you’ll add more configurations to point your domain name to the server. First, you’ll need to create a record in your hosting provider DNS. Then, you’ll need to log in to your server using the secure shell protocol and your server’s IP address with this command:
ssh root@<your_ip_address>
Once you run this code, you’ll be logged in:
Update your package repository and install Node and npm on your server:
sudo apt update
curl -sL https://deb.nodesource.com/setup_16.x -o nodesource_setup.sh
sudo apt install nodejs
sudo apt install npm
Next, confirm that the installations were successful:
node -version
npm -version
Now, add your application to the server by creating a directory that will hold the application. At the prompt, create the directory test and cd into it as follows:

Next, clone the application from GitHub with this command:
git clone https://github.com/debemenitammy/Log_Node_App.git

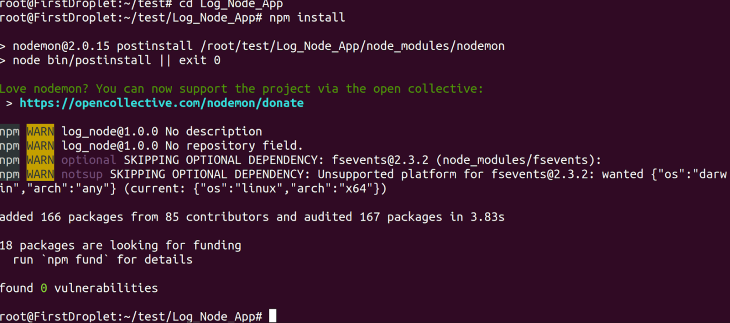
At this point, the application has been successfully cloned to the server but the dependencies and Node modules still need to be added. To install the dependencies, cd into the application Log_Node_App, like so:
cd Log_Node_App
npm install
Now, run the application:
node app.js
You’ll notice that the application is running on port 3000:

In your browser, navigate to the following URL: <your_ip_address>:3000, replacing the placeholder with your server’s IP address.
Your browser should display the application:

Use Control+C to end the application.
If you’d like your application to run in the background, you can install a production process manager (PM2):
npm install -g pm2
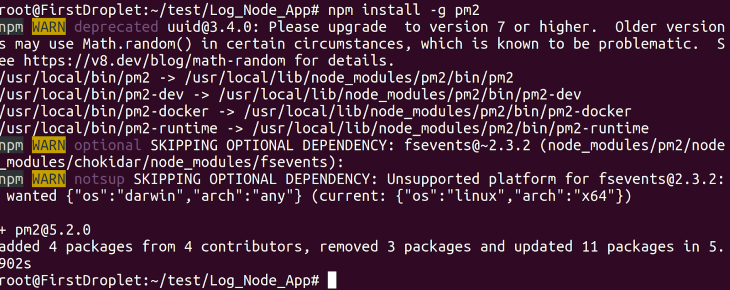
After installing PM2, use the following command to start running the application in the background:
pm2 start app.js
You should see the following display with an online status, indicating the application has started running in the background:

To confirm that the application is running, refresh your browser with the following URL: <your_ip_address>:3000.

Whenever you want to check the status of the application running with PM2, use this command:
pm2 status
The output of that command is the same as the output from the pm2 start app.js command used earlier. Notice the green online status:

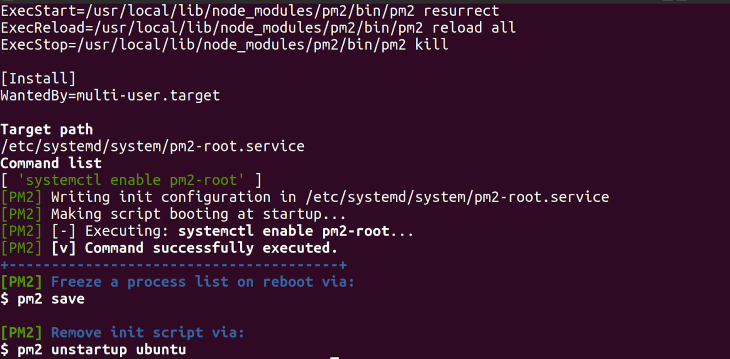
To ensure that the application will run any time there is a reboot, use this command:
pm2 startup ubuntu
This command logs the following to the terminal:
Use the following code to enable the firewalls and allow ssh:
ufw enable
ufw allows ssh
Now, confirm that the firewall has been enabled:
ufw status
Next, you will need to set your application to run on port 80, which is the HTTP port and also the default port for Nginx. Run this command:
ufw allow http

To allow the application to also run on HTTPS, use this command:
ufw allow https

Now, view the ports that have been allowed:
ufw status
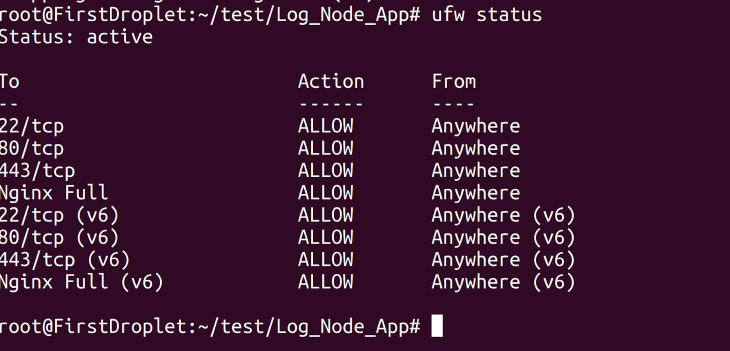
Port 443 and port 80 have been successfully allowed. Moving forward, you‘ll set up Nginx as a reverse proxy server in order to render your application that is running on port 3000 to run on port 80.
With Nginx, you can access your application by running your server’s IP address.
At this point, you have Nginx installed and can access its default configuration file located at /etc/Nginx/sites-available/default.
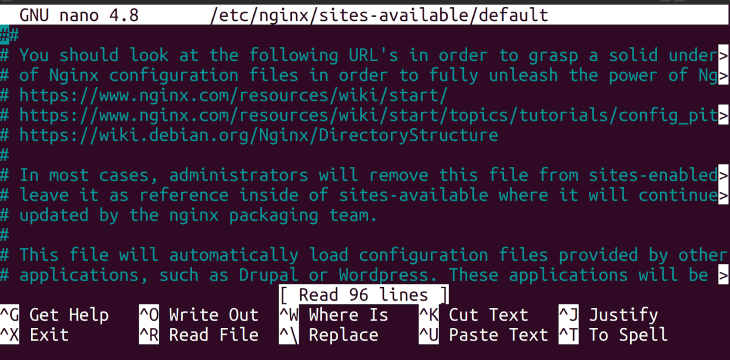
To edit this configuration file, run this command:
sudo nano /etc/Nginx/sites-available/default
Once you run this code, the file will be opened with the default configuration:
Next, scroll through the configuration file past the server block until you reach the location block:
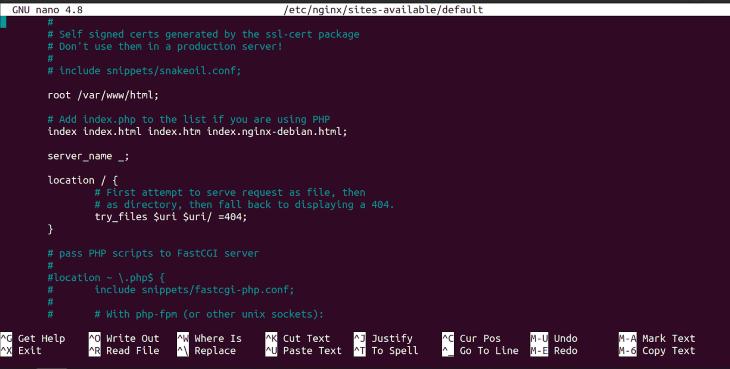
In the location block, add the following configurations:
proxy_pass http://localhost:3000;
proxy_http_version 1.1;
proxy_set_header Upgrade $http_upgrade;
proxy_set_header Connection 'upgrade';
proxy_set_header Host $host;
proxy_cache_bypass $http_upgrade;
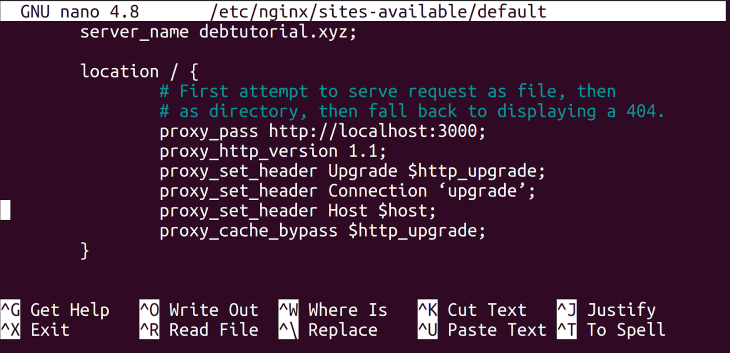
These configurations indicate that you are setting up Nginx as a reverse proxy to ensure that when port 80 is visited, it will load the application that runs on port 3000.
Now, add your domain name to the server_name, setting what Nginx should look for alongside your port settings. If you’d prefer that Nginx use an empty name as the server name, you can leave the server_name as a default.
In the server block, add your domain name, like so:
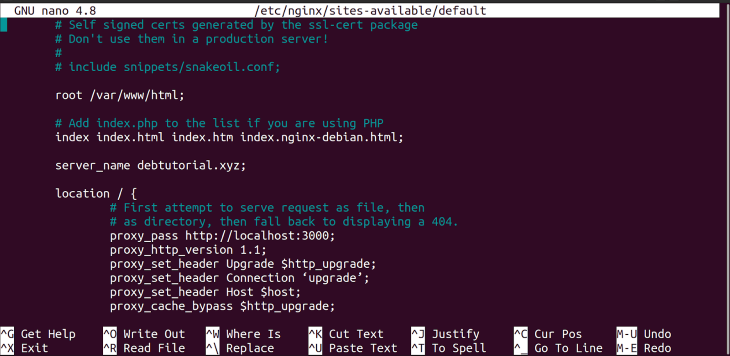
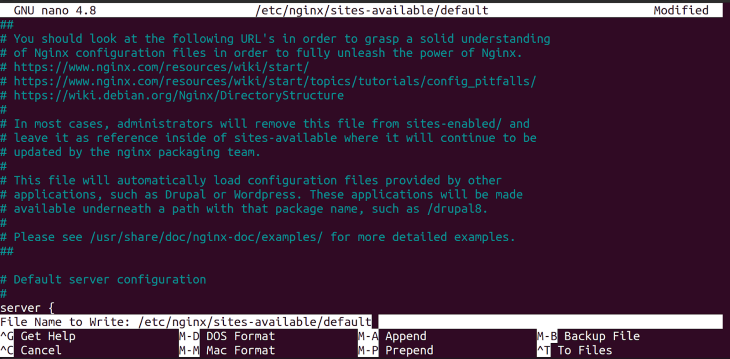
To save the changes you’ve made to your Nginx configuration file, use the CTR + X command and type yes at the prompt. Next, press enter to save the configuration file when prompted:
Any time you add configurations to Nginx, it is advisable to run this command to check if the configuration was successful:
sudo Nginx -t
The command’s output indicates that the configuration file test was successful:

Now, you can restart the service to apply the changes you made to the configuration. Then, the former worker processes will be shut down by Nginx and new worker processes will be started.
Restart the service with the following command:
sudo service Nginx restart
This command does not log any output to the terminal.
Now that the Nginx service has been restarted, you can check if all configurations added to Nginx work successfully. Add your server’s IP address in your browser, as shown:

From the above screenshot of the browser window, you can see that the application is running on the server’s IP address.
You have successfully set up Nginx to deploy your application!
In this tutorial, we demonstrated how to accelerate the deployment of a Node.js application in DevOps with Nginx. We also reviewed some of the key differences between Nginx and Apache and discussed how to determine which web server would be best for a given application.
We covered how to point a domain name to the server’s IP address and how to set up Nginx as a reverse proxy server, rendering the application on the server’s IP address.
Now that you’ve seen how Nginx automates many of the tasks typically handled by developers, try configuring your own applications with Nginx. Happy coding!
Install LogRocket via npm or script tag. LogRocket.init() must be called client-side, not
server-side
$ npm i --save logrocket

// Code:

import LogRocket from 'logrocket';
LogRocket.init('app/id');
// Add to your HTML:

<script src="https://cdn.lr-ingest.com/LogRocket.min.js"></script>
<script>window.LogRocket && window.LogRocket.init('app/id');</script>

Russ Miles, a software development expert and educator, joins the show to unpack why “developer productivity” platforms so often disappoint.

Discover what’s new in The Replay, LogRocket’s newsletter for dev and engineering leaders, in the February 18th issue.

Learn how to recreate Claude Skills–style workflows in GitHub Copilot using custom instruction files and smarter context management.

Claude Code is deceptively capable. Point it at a codebase, describe what you need, and it’ll autonomously navigate files, write […]
Would you be interested in joining LogRocket's developer community?
Join LogRocket’s Content Advisory Board. You’ll help inform the type of content we create and get access to exclusive meetups, social accreditation, and swag.
Sign up now
5 Replies to "How to accelerate web app deployment with Nginx"
I thought auto-deploy meant automated deploy.
Yes it does, Nginx is an open source tool that speeds up the processes of deploying applications by automating tasks that are usually done manually by developers.
But everything was done manually in your article…
What kind of an auto-deply was this!!! Wasn’t this all manual?
Nginx is an open source tool that speeds up the processes of deploying applications by automating tasks that are usually done manually by developers. You can visit this website for reference https://www.nginx.com/resources/webinars/three-ways-to-automate-with-nginx-and-nginx-plus/