Editor’s note: This article was last updated on 6 July 2022 to bring it up to date with the most recent version of Node.js.

The Replay is a weekly newsletter for dev and engineering leaders.
Delivered once a week, it's your curated guide to the most important conversations around frontend dev, emerging AI tools, and the state of modern software.
Building backend APIs comes with many hassles, one of which is user input validation. It’s important to add an extra layer of validation to incoming data because you can never rely on the users’ input alone.
There are many ways of carrying out input validation in Node.js, but in this article, we will talk about validatorjs, a validation library inspired by the Laravel framework’s validator.
The validatorjs library simplifies data validation in JavaScript. From the official site, some of the advantages of validatorjs are:
Let’s launch the following commands to initialize the project directory:
// clone starter application
git clone -b validation-starter https://github.com/lawrenceagles/validatorjs-example

// Enter app folder and install packages
cd validatorjs-example && npm install
In the code above, we installed the following dependencies:
req.body objectUser schemaWe also, installed Nodemon as a dev dependency.
Here, we will learn how to carry out basic input validation in a Node project.
The validatorjs package gives us a Validator constructor function with the following signature:
let validation = new Validator(data, rules [, customErrorMessages]);
In the code above, the Validator constructor has three arguments:
data, an object that contains the data you want to validaterules, an object that contains the validation rulescustomErrorMessages, an object that contains the custom error messages to return (this argument is optional)To work with validatorjs, we will write a simple validation middleware to validate user inputs on signup. To do this, start the MongoDB driver in your system and start the app’s dev server by running:
npm run dev
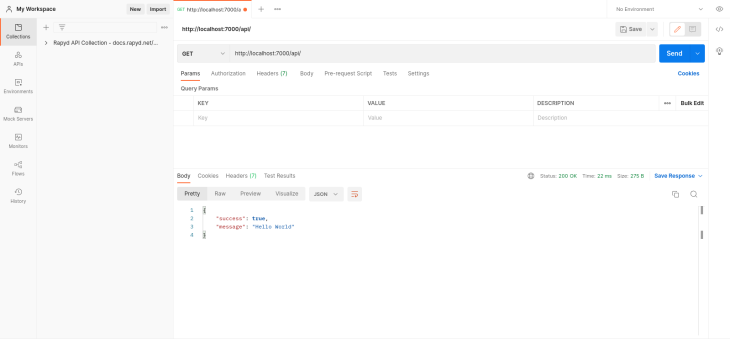
The application boilerplate comes with a simple endpoint that you can test. With the server running, run a GET request on http://localhost:7000/api/ using your favorite API client.
Now, update the validate.js file inside the helper folder as seen below:
const Validator = require('validatorjs');
const validator = async (body, rules, customMessages, callback) => {
    const validation = new Validator(body, rules, customMessages);
    validation.passes(() => callback(null, true));
    validation.fails(() => callback(validation.errors, false));
};
module.exports = validator;
The snippet above shows how to initialize the validatorjs package in AMD format. This method simplifies our code when writing multiple validation middlewares.
Now update validation middleware. The validation-middleware.js file inside the middleware folder should look like this:
const validator = require('../helpers/validate');
const signup = async (req, res, next) => {
    const validationRule = {
        "email": "required|string|email",
        "username": "required|string",
        "phone": "required|string",
        "password": "required|string|min:6|confirmed",
        "gender": "string"
    };

    await validator(req.body, validationRule, {}, (err, status) => {
        if (!status) {
            res.status(412)
                .send({
                    success: false,
                    message: 'Validation failed',
                    data: err
                });
        } else {
            next();
        }
    }).catch( err => console.log(err))
}
module.exports = {
    signup
};
In the snippet above, we defined a signup function that contains our validation rules and the validator higher order function that extends the validator constructor. This validator higher order function accepts four arguments:
To apply validation rules to our request body (req.body), object key names have to be the same. For instance, the email fields validation rule will look something like this:
"email": "required|email"
Let’s go over some of the validation rules used in the snippet above and what they mean:
required means the field must have a length greater than zerostring means the said field must be a stringemail means the field under validation must be in an email format (e.g., [email protected])min:6 means the said field string length must be greater than or equal to sixconfirmed means the field under validation must have a matching field foo_confirmation with matching values, commonly used for password confirmation fieldsNow that we know our validation rules and what they mean, update the signup method in the baseController.js file as seen below:
// src/controllers/base-controller.js
const { User } = require("../models");

module.exports = {
 ...
    signup: async (req, res) => {
        const { email, gender, username, password, phone } = req.body;
        const newUser = new User({ email, gender, username, password, phone });
        try {
            await newUser.save();
            return res.status(201).json({
                success: true,
                message: "signup successful",
                data: newUser
            });
        } catch (error) {
            return res.status(412).send({
                success: false,
                message: error.message
            })
        }
    }
The snippet above handles signup by creating and saving a new user in the MongoDB database. And the signup method only executes if the req.body object passes validation.
A successful request can be seen below:

And a failed request can be seen below:
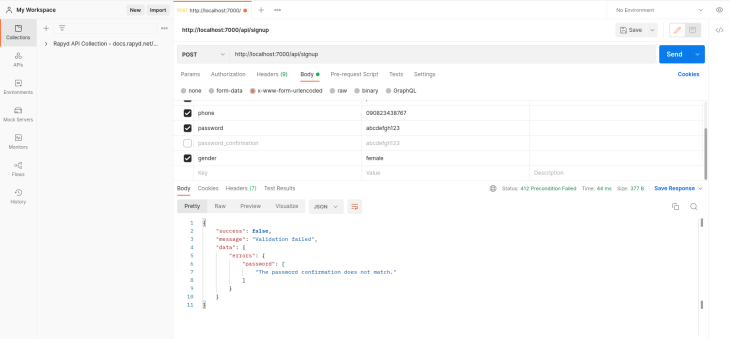
Note the endpoint queried above is http://localhost:7000/api/signup and it is a POST request.
In this section, we will learn how to write custom validation rules for these use cases:
To get started with the first use case, we will update the validate.js file as seen below:
// src/helpers/validate.js
const Validator = require('validatorjs');
...
const passwordRegex = /^(?=.*[a-z])(?=.*[A-Z])(?=.*\d)[a-zA-Z\d]/;

// Tighten password policy
Validator.register('strict', value => passwordRegex.test(value),
    'password must contain at least one uppercase letter, one lowercase letter and one number');

module.exports = validator;
This snippet above uses regex to validate incoming values for an input field with the strict validation rule.
Update the validationRule object as seen below:
// src/middleware/validation-middleware.js
     ...
    const validationRule = {
            "email": "required|email",
            "username": "required|string",
            "phone": "required|string",
            "password": "required|string|min:6|confirmed|strict",
            "gender": "string"
    }
     ...
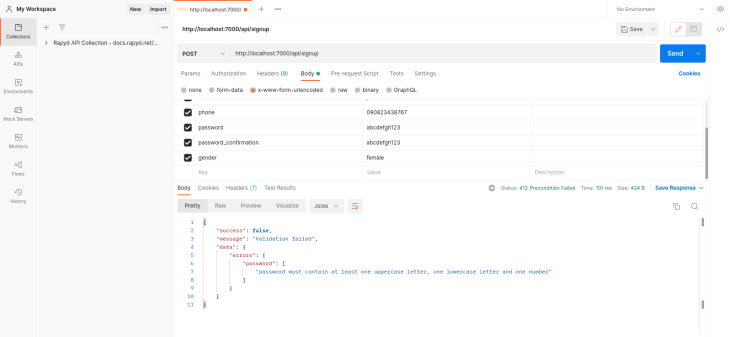
A sample request and response for a failed validation will look something like this:
For the second use case, where we want to check if the email or username attribute already exists, we’ll make an asynchronous call to our database to check our database and return an error accordingly.
We will use Validator.registerAsync(), that will enable us to make a non-blocking call to our database and also validate other fields simultaneously.
To this, first import the Models into the validate.js file with this code:
const Models = require("../models");
Then update the validate.js file as seen below:
// src/helpers/validate.js
const Validator = require('validatorjs');
const Models = require("../models");
...

/**
 * Checks if incoming value already exist for unique and non-unique fields in the database
 * e.g email: required|email|exists:User,email
 */
Validator.registerAsync('exist', function(value,  attribute, req, passes) {
    if (!attribute) throw new Error('Specify Requirements i.e fieldName: exist:table,column');
    //split table and column
    let attArr = attribute.split(",");
    if (attArr.length !== 2) throw new Error(`Invalid format for validation rule on ${attribute}`);

    //assign array index 0 and 1 to table and column respectively
    const { 0: table, 1: column } = attArr;
    //define custom error message
    let msg = (column == "username") ? `${column} has already been taken `: `${column} already in use`
    //check if incoming value already exists in the database
    Models[table].valueExists({ [column]: value })
    .then((result) => {
        if(result){
            passes(false, msg); // return false if value exists
            return;
        }
        passes();
    })
});

module.exports = validator;
The snippet above accepts table and column names as attributes and uses these values to query the database for values already existing in the specified table and column.
Now, let’s update the validation rule in the signup validation middleware as seen below:
// src/middleware/validation-middleware.js
...

const validationRule = {
        "email": "required|email|exist:User,email",
        "username": "required|string|exist:User,username",
        "phone": "required|string",
        "password": "required|string|min:6|confirmed|strict",
        "gender": "string"
}

...
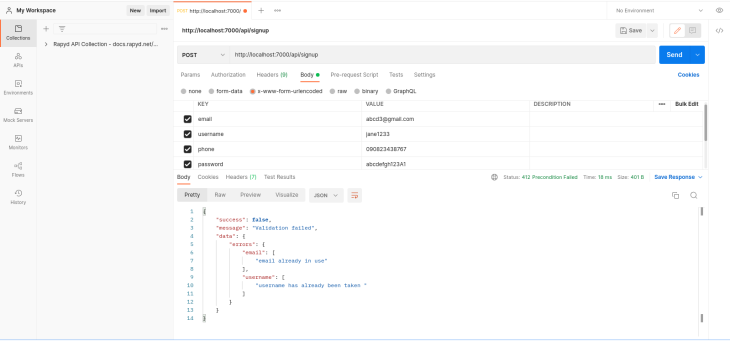
The snippet above checks if the values for email and username already exist in the database. And a sample failed request is shown in the image below:
In this tutorial, we have learned how to put basic input validation in place with validatorjs. We also learned how to define custom validation rules for two use cases. Validatorjs has more predefined rules than covered in this tutorial. You can learn more here.
The source code for this tutorial is available on GitHub as well. Feel free to clone it, fork it, or submit an issue.
 Monitor failed and slow network requests in production
Deploying a Node-based web app or website is the easy part. Making sure your Node instance continues to serve resources to your app is where things get tougher. If you’re interested in ensuring requests to the backend or third-party services are successful, try LogRocket.

LogRocket lets you replay user sessions, eliminating guesswork around why bugs happen by showing exactly what users experienced. It captures console logs, errors, network requests, and pixel-perfect DOM recordings — compatible with all frameworks.
LogRocket's Galileo AI watches sessions for you, instantly identifying and explaining user struggles with automated monitoring of your entire product experience.
LogRocket instruments your app to record baseline performance timings such as page load time, time to first byte, slow network requests, and also logs Redux, NgRx, and Vuex actions/state. Start monitoring for free.

Learn how to use Gemini CLI subagents to delegate frontend, backend, testing, and docs tasks to specialized agents with guardrails and clear ownership.

Learn how next-browser gives AI agents runtime context for debugging Next.js apps, including React props, hydration, PPR, forms, and performance.

Build dynamic LLM routing in Next.js with OpenRouter, TanStack AI, task classification, model fallbacks, and cost-aware routing.

TSRX adds first-class control flow, conditional hooks, and scoped styles to React via a TypeScript compiler extension — no new framework required.
Would you be interested in joining LogRocket's developer community?
Join LogRocket’s Content Advisory Board. You’ll help inform the type of content we create and get access to exclusive meetups, social accreditation, and swag.
Sign up now
