The time has arrived to create templates for our web pages. HTML is just about static content made dynamic with many different tools and frameworks.

Even for static web sites, it’s tough to reuse page pieces that would be the same all over the website. In many cases, the use of a server side mechanism is necessary.
With Pug, it’s a lot easier to reuse page pieces.
Pug is a high-performance template engine heavily influenced by HTML and implemented with JavaScript for Node.js and browsers. But there are ports for other languages like Java, Python, Ruby, etc.
It’s simple, fast, and flexible with an easy syntax that simplifies not only the creation but also the reuse of HTML code. If you’re familiar with Node.js, it’s a piece of cake.
In this article, we’ll show you how Pug works. We’re not going to focus on its options, settings, and properties: for this, we already have the official docs, which are great. Instead, we’ll see how it works in practice by creating our own template from scratch.
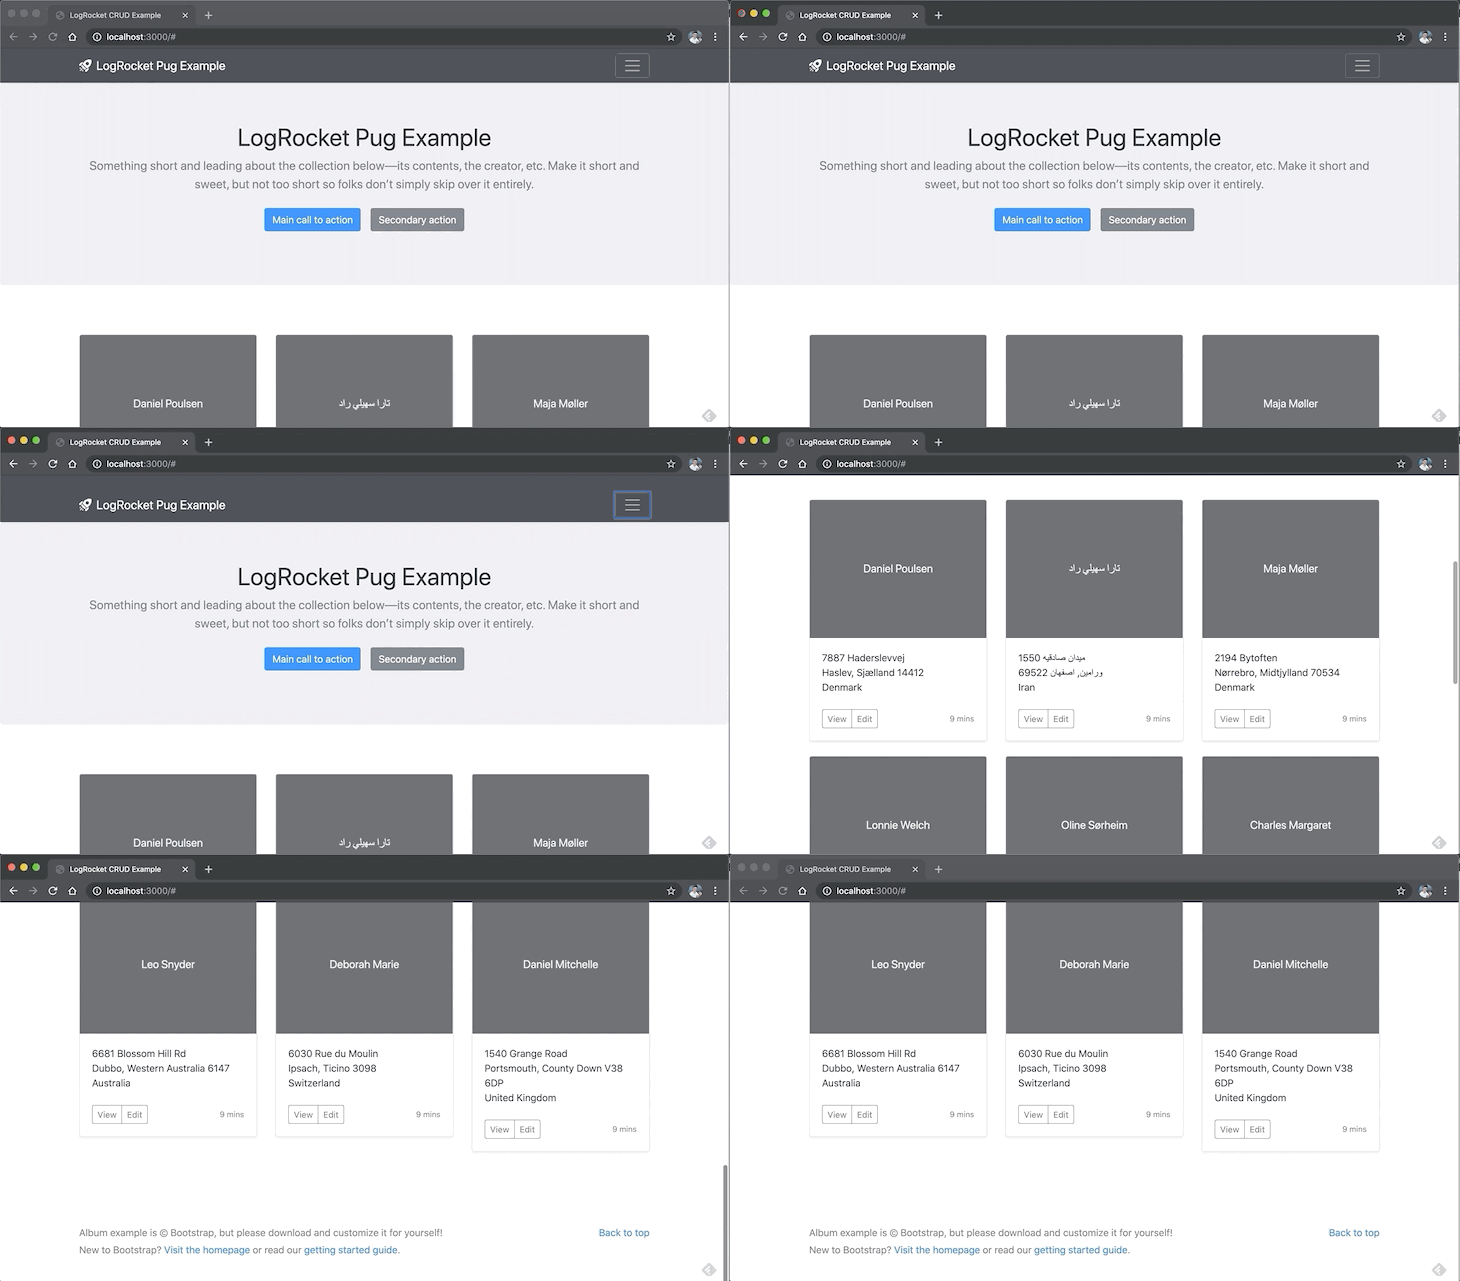
To infer style, let’s give it up to the power of Bootstrap. The goal is, by the end of the article, to have the following:

The design was taken from one of the official Bootstrap’s examples (an Album example). We’re going to recreate the same structure and design, but in Pug only.
The data will be fetched from the Random User Generation API, a free API for generating random user data. Like Lorem Ipsum, but for people. It’s very useful when you don’t want to set up a whole structure of APIs only for testing or sampling.
The structure will basically be composed of an Express server hosting our localhost application in Node.js that, in turn, will have only one route. This route will redirect to our Pug template, which will mount the final HTML output.
Before you proceed, I’d suggest inspecting the full source code of this Bootstrap example page so you can match each tag and CSS styles to the corresponding Pug ones.
The Replay is a weekly newsletter for dev and engineering leaders.
Delivered once a week, it's your curated guide to the most important conversations around frontend dev, emerging AI tools, and the state of modern software.
The setup for this tutorial is pretty simple: we’ll only need Node.js and npm (which already comes within Node).
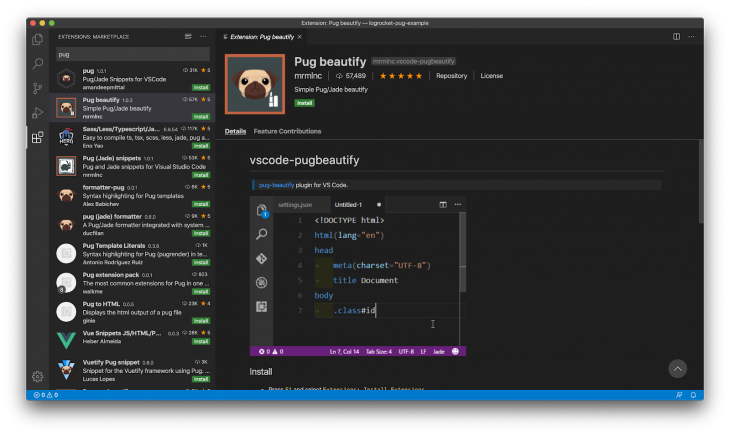
If you’re using Visual Studio Code as IDE, I recommend that you install the Pug beautify plugin since it is very helpful when it comes to code highlighting and snippets generation.

In a folder of your choice, run the following commands:
npm init -y
npm install express pug axios
The first is going to initialize our folder with a package.json, and the second will install the npm dependencies needed.
We’ll make use of axios as our HTTP client for the requests to the Random User API. It’s robust and very easy to work with.
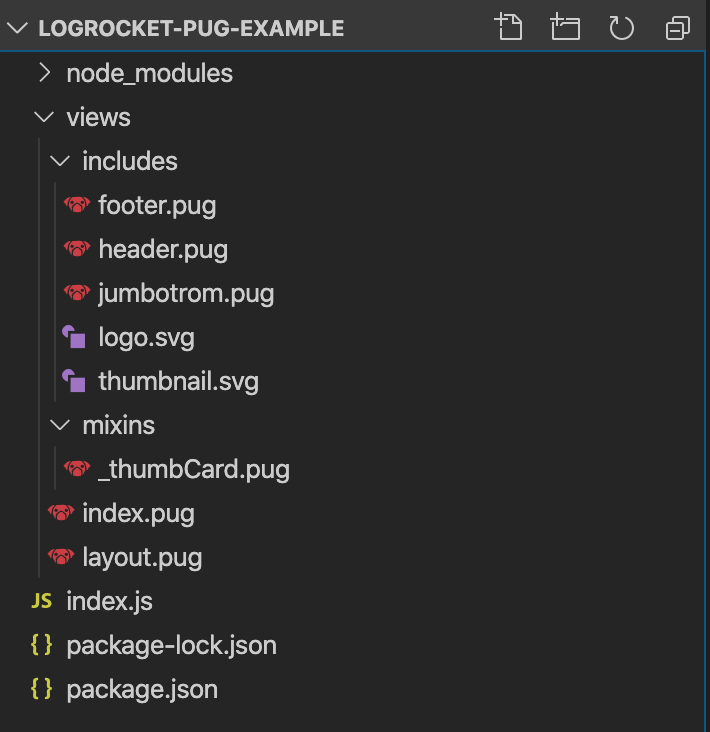
Now, let’s guarantee that your folder and files structures match mine to avoid further errors.
This is how it should look:

The views folder is where everything related to Pug is going to be placed. After you’ve successfully installed the Pug beautify plugin, each Pug file, which also ends in .pug extension, will have this icon properly identifying it.
The includes folder will be useful when we need to break down the pieces of our final page into “includables”. Any Pug file can be included in these. However, Pugs aren’t the only ones who can do this. You can include images, HTML files, and any other type of file you want.
The mixins folder is interesting because it stores Pug mixins. Pug mixins allow you to create reusable blocks of Pug. They’re basically external JavaScript functions that can take arguments as params and be reused anywhere in your Pug files.
They’re very useful in template list elements, like ul and ol or tables. Here, we’ll use them to iterate over the users and mount each of the user’s cards.
Let’s start with the card mixin. Specifically, the _thumbCard.pug file. Before proceeding to the code, take a look at a Random User API output so you can see the JSON we’ll be handling in this mixin.
Place the following code there:
mixin thumbCard(user)
  .col-md-4
    .card.mb-4.shadow-sm
      svg.bd-placeholder-img.card-img-top&attributes({"width": "100%"}, {"height": "225"}, {"focusable": "false"}, {"role": "img"})
        title #{user.name.first} #{user.name.last}
        rect(width="100%" height="100%" fill="#55595c")
        text(x="50%" y="50%" fill="#eceeef" dy=".3em") #{user.name.first} #{user.name.last}
      .card-body
        .card-text #{user.location.street.number} #{user.location.street.name}
        .card-text #{user.location.city}, #{user.location.state} #{user.location.postcode}
        .card-text.mb-4 #{user.location.country}
        .d-flex.justify-content-between.align-items-center
          .btn-group
            button.btn.btn-sm.btn-outline-secondary View
            button.btn.btn-sm.btn-outline-secondary Edit
          small.text-muted 9 mins
Each mixin starts with the reserved word mixin. It resembles a JavaScript function, and this one is receiving a user as parameter.
The template follows the rule of one line one element (an HTML element). And, of course, indentation is also important (two blank spaces).
Every Pug template line must start with the type of HTML element you want to add there. If you don’t inform it, the engine will create a div. Each element must have its properties placed right after its declaration.
For example, the “.col-md-4” corresponds to the CSS class of this element. CSS classes are preceded by a dot, and ids by a #, just like we do when mapping CSS normally.
Each level of indentation is a new inner element. Take a look at the svg element in the last code listing. After the CSS declarations, we have &attributes(). This is one of the possible ways to map HTML attributes in Pug. The subsequent rect and text elements show another way to do it (inside of parenthesis).
The #{} operator is the Pug binding operator, i.e., how you inject JavaScript objects into the Pug template.
Note that we’re making use of this feature to print the user’s first and last name, as well as the location right below. You can also place plain text (see View and Edit buttons).
Now we’ll get to the includes. Let’s start with the header.pug file:
header
  .collapse.bg-dark#navbarHeader
    .container
      .row
        .col-sm-8.col-md-7.py-4
          h4.text-white Hidden Content
          p.text-muted Add some information about the album below, the author, or any other background context. Make it a few sentences long so folks can pick up some informative tidbits. Then, link them off to some social networking sites or contact information.
        .col-sm-4.offset-md-1.py-4
          h4.text-white Contact
          ul.list-unstyled
            li
              a.text-white(href='#') Facebook
            li
              a.text-white(href='#') Twitter
            li
              a.text-white(href='#') Instagram
  nav.navbar.navbar-dark.bg-dark.shadow-sm
    .container.d-flex.justify-content-between
      a.navbar-brand.d-flex.align-items-center
        //- Including the svg logo
        include logo.svg
        strong LogRocket Pug Example
      button.navbar-toggler.collapsed&attributes({'data-toggle': 'collapse'}, {'data-target': '#navbarHeader'})
        span.navbar-toggler-icon
Here we have a similar composition. You’ll see that the code is a bit verbose, especially because we’re trying to emulate the exact same design as Bootstrap’s, which uses a lot of CSS classes.
Pay special attention here to the href link declarations. If you don’t put them there, Pug will generate links with anything else other than the inner text. And Bootstrap doesn’t work well with anemic links like that.
In the code, you can see that we’re including our first external file, the logo.svg (you can find it in the GitHub link at the end of this article) via reserved word include.
Let’s move on to the other include file, footer.pug. Here’s the code:
footer.text-muted
  .container
    p.float-right
      a(href="#") Back to top
    p Album example is © Bootstrap, but please download and customize it for yourself!
    p New to Bootstrap? #[a(href="https://getbootstrap.com/") Visit the homepage] or read our #[a(href="https://getbootstrap.com/docs/4.4/getting-started/introduction/") getting started guide].
The only new thing here is the use of the Pug’s interpolation. Pug provides operators for several interpolative needs. You can interpolate escaped and unescaped strings, as well as tags.
In our example, we need to place a sequence comprising an HTML element, plain text, and an HTML element again, all in the same line. For this, it’s necessary that we use the #[] operator, wrapping the new HTML element content inside of it. Simple, right?
Let’s go to the last Pug include file, jumbotron.pug:
section.jumbotron.text-center
    .container
        h1 LogRocket Pug Example
        p.lead.text-muted Something short and leading about the collection below—its contents, the creator, etc. Make it short and sweet, but not too short so folks don’t simply skip over it entirely.
        p
          a.btn.btn-primary.m-2(href="#") Main call to action
          a.btn.btn-secondary.m-2(href="#") Secondary action
Next, let’s build up the layout.pug file. Here’s the content:
doctype html
html
  head
    title LogRocket Pug Example
    link(rel='stylesheet' href='https://getbootstrap.com/docs/4.4/dist/css/bootstrap.min.css')
    style.
      .bd-placeholder-img {
        font-size: 1.125rem;
        text-anchor: middle;
        -webkit-user-select: none;
        -moz-user-select: none;
        -ms-user-select: none;
        user-select: none;
      }

      footer {
        padding-top: 3rem;
        padding-bottom: 3rem;
      }

      footer p {
        margin-bottom: .25rem;
      }

      @media (min-width: 768px) {
        .bd-placeholder-img-lg {
          font-size: 3.5rem;
        }
      }

  body
    include includes/header.pug

    main#main
      include includes/jumbotron.pug

      block content

    include includes/footer.pug

    script(src='https://code.jquery.com/jquery-3.4.1.slim.min.js')
    script(src='https://getbootstrap.com/docs/4.4/dist/js/bootstrap.bundle.min.js')
Note here how we’re importing external CSS and JavaScript files. Very similar to how it’s done normally in HTML.
To insert inline CSS styling in Pug, you need to first insert the style snippet. Then, everything else coming after is seen as CSS.
In the body, we’re including the header, jumbotron, and footer files. But note that we’re also inserting block content.
Pug supports template inheritance. Template inheritance works via the block and extends keywords. In a template, a block is simply a “block” of Pug that a child template may replace.
This process is recursive.
In other words, index.pug is the main file and it will extend from layout.pug that, in turn, includes other Pug files to compose itself.
Have a look at the contents of index.pug:
extends layout.pug
include mixins/_thumbCard

block content
  .album.py-5.bg-light
    .container
      .row
        each user in users
          +thumbCard(user)
The first line states what we’ve just said. Here, we’re also iterating over the list of users (this object must be injected in the index.js file). It’s also here where we call the mixin we’ve created, passing each one of the users during the iteration process.
Finally, we have the index.js content:
const express = require("express");
const axios = require("axios");
const app = express();

app.set("view engine", "pug");

app.get("/", async (req, res) => {
  const query = await axios.get("https://randomuser.me/api/?results=9");
  res.render("index", { users: query.data.results });
});

const PORT = 3000;
app.listen(PORT, () => {
  console.log(`Listening on port ${PORT}...`);
});
Nothing too special here: just an Express server being set along with the default route that, in turn, calls for the random users JSON.
The results have to go as the second argument in the render() function. Plus, to override the default one, you have to set the view engine (in our case, pug).
This is it. To test, run the application via the node index.js command and check the results out at the http://localhost:3000/ address.
You can find the final source code of this project here.
I hope you found this useful. In practice, learning Pug or anything else is better than just reading random terms.
The official docs and StackOverFlow’s forum are also great options to increase your knowledge and experience with Pug.
Essentially, Pug is very easy to use. Once you understand the templating dynamic it goes smoothly. Just make sure to think of your whole template as a compound of several smaller pieces that can have other nested smaller pieces, and so on.
Happy coding!
 Monitor failed and slow network requests in production
Deploying a Node-based web app or website is the easy part. Making sure your Node instance continues to serve resources to your app is where things get tougher. If you’re interested in ensuring requests to the backend or third-party services are successful, try LogRocket.

LogRocket lets you replay user sessions, eliminating guesswork around why bugs happen by showing exactly what users experienced. It captures console logs, errors, network requests, and pixel-perfect DOM recordings — compatible with all frameworks.
LogRocket's Galileo AI watches sessions for you, instantly identifying and explaining user struggles with automated monitoring of your entire product experience.
LogRocket instruments your app to record baseline performance timings such as page load time, time to first byte, slow network requests, and also logs Redux, NgRx, and Vuex actions/state. Start monitoring for free.

Compare the top AI development tools and models of February 2026. View updated rankings, feature breakdowns, and find the best fit for you.

Broken npm packages often fail due to small packaging mistakes. This guide shows how to use Publint to validate exports, entry points, and module formats before publishing.

Discover what’s new in The Replay, LogRocket’s newsletter for dev and engineering leaders, in the February 11th issue.

Cut React LCP from 28s to ~1s with a four-phase framework covering bundle analysis, React optimizations, SSR, and asset/image tuning.
Hey there, want to help make our blog better?
Join LogRocket’s Content Advisory Board. You’ll help inform the type of content we create and get access to exclusive meetups, social accreditation, and swag.
Sign up now
One Reply to "Getting started with Pug"
Super solid, gave me the basics of pug in a couple of minutes. Was trying to figure out how to modify a pug starter femplate.