
Every now and then, a new contender for well-acquainted technologies appears. Of course, this happens for Node.js as well. One of the most promising examples of this is Deno, and, to be honest, it seems to be the right one.

In this article, we’ll talk about what Deno is, compare it to Node.js, and build an example web application using Deno and Fresh. The web app will encompass the design of a REST API and web UI. We’ll describe some mechanisms of Fresh and a (poor man) solution for the database, create a frontend, and showcase the working app.
This demonstration example is available on GitHub and is inspired by the Angular Tour of Heroes example.
The Replay is a weekly newsletter for dev and engineering leaders.
Delivered once a week, it's your curated guide to the most important conversations around frontend dev, emerging AI tools, and the state of modern software.
Deno is a TypeScript and WebAssembly runtime that provides revolutionary approaches to some years-old problems of Node. Deno’s development specifically began to overcome some of the limits of Node that were identified by its designer, Ryan Dahl, and described in his 10 Things I Regret About Node.js presentation in 2018.
Ryan started building Deno from scratch using Rust (Node is written in C++). Deno uses Google’s V8 JavaScript engine, similar to Node.
It’s clear that both products have common roots and a similar name – did you notice that “Deno” is just “Node” with shuffled letters? Deno could also mean “DEstroy NOde.”
Since Deno natively executes TypeScript code, comparing Node and Deno is a little unfair. It would be better to compare Node using the ts-node module to Deno to achieve similar functionalities. On the other hand, Node together with ts-node will require some more time in module installation and transpiling (.ts to .js to be executed in Node).
Deno modules are designed to not have external dependencies, disrupting the famous dependency hell. As an example, this tool helps us understand how many packages we have to download in our node_modules directory for a project using pretty standard technologies.
Another striking difference between Node and Deno is that Deno does not use the npm ecosystem. In Deno, dependencies are simply handled by addressing the repository that hosts the TypeScript files we want to include in our codebase.
There are a lot of additional subtle differences between the two ecosystems that you can read about in this Stack Overflow answer.
Amongst the other standard libraries provided by Deno, we have Fresh.
Fresh is a full-stack, modern web framework designed to be comparable with other widespread web frameworks, such as Angular, Next.js, and more. It provides file system-based routing (similar to Next.js) and has a template engine that allows us to rapidly assemble web app UIs.
Fresh uses Preact to render pages on both the server and client, depending on the kind of component we need.
The webpage is composed of islands of interactivity. For these islands, rendering (and the logic behind it) is executed in the browser. This achieves maximum interactivity while the rest of the components of our web app are rendered on the server. Only the simplest HTML is delivered to the browser.
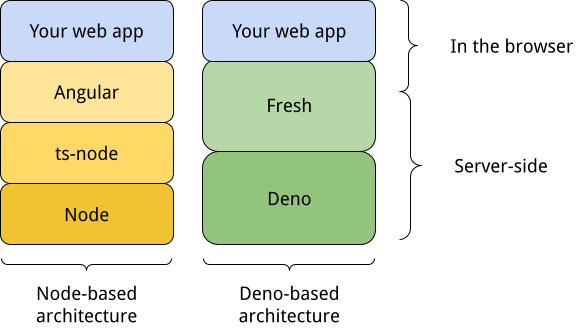
The figure above shows an architectural comparison between Node, Deno, ts-node, Angular, and Fresh for better context. Please note that there are way more layers to this and even the separation between code running in the browser and code running on the server can be blurry. This is purely a simplified version to compare different components.
In the next few sections, we will analyze code from this repository. Architecturally, the code is composed of three parts: a REST API, some data, and the front end (MVC anyone?).
The project is started with deno task start and we can navigate to http://localhost:8000 to see the sample app.
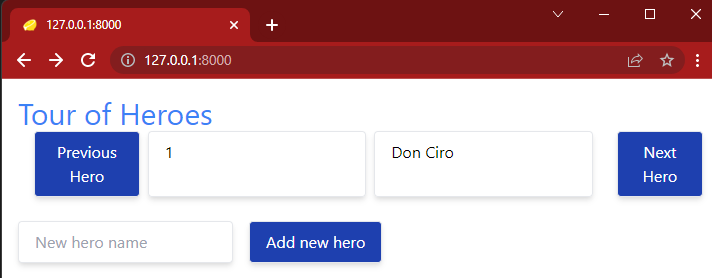
The UI is not really important, it’s just good enough to explain some of the interesting points in Deno and Fresh. The UI also allows us to add heroes to our list and scroll through it. The list is dynamically updated when new heroes are added.
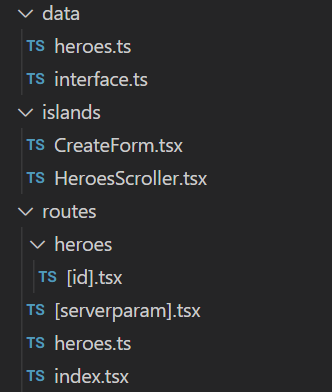
As said above, the REST API is provided by two files (/routes/heroes.ts and /routes/heroes/[id].tsx). We can compare the functionality differences in the table below:
| Function description | Type of request | Where it’s implemented |
| Get the list of all the heroes in the database | GET | /routes/heroes.ts |
| Create a new hero with the name passed in the body of the request | POST | |
| Get the details of a given hero | GET | /routes/heroes/[id].tsx |
| Update the details of a given hero | PUT | |
| Delete a given hero | DEL |
You might be asking if there’s a reason behind having two different files for implementing similar functionalities. Yes, there is!
For example, the two GETs may or may not take a query parameter. If no query parameter is specified, the invocation of the method will return the whole list of heroes. By specifying a value for the id parameter (that is the id of the hero), the GET method will return just the single object.
It is possible to have the same logic within the same file. For sake of clarity, however, I separated them into two files to show the mechanism of dynamic routes in Fresh.
The name of the file /heroes/[id].tsx looks a bit weird. This is because it represents the possibility of matching not just a single static path, but a whole bunch of different paths based on a pattern. This is a mechanism borrowed from Next.js.
In this way, we have a code that will serve all the URLs that match the http://localhost:8000/heroes/:id pattern.

When we don’t specify a parameter with http://localhost:8000/heroes, we get the whole list of heroes currently in the archive. This specific URL is routed on the file /routes/heroes.ts.
In the repository, we can also find the deno.postman_collection.json file that contains all the requests. Within each request is an example for each call to test the REST API without the need for writing code (the file is in Postman format but is easy to understand).
To keep the UI simple, not every function of the REST API is bound to a button. In our case, we like having a complete REST API to provide a full example.
To keep this project as simple as possible, we adopted the simplest solution to keep data: an array as a global variable.
This implies that we’ll lose the state of the data once we reboot the application. The interface to the object hero and the global array of objects are in the /data directory. There is nothing terribly exciting to discuss, but in general, this would be the place to initialize a connection to a proper database.
The meatiest part of our project is the frontend! It’s implemented by the files index.tsx (that will actually use the components in the islands within the islands directory) and [serverparam].tsx.
Firstly, let’s discuss the [serverparam].tsx file.
From the name, we can guess that it’ll provide a dynamic route. Everything is passed right after the path part of the URL becomes the parameter serverparam.
The code itself is not complex at all — it’ll just print some strings. The code is executed on the server and only the final HTML is returned to the client:
  return (
    <div>
      Hello {capitalizeFirstLetter(props.params.serverparam)}!<br />
      The server time is: {new Date().toDateString()}<br/>
      The server platform is: {platform() }
    </div>
  );
To test it, just go to http://localhost:8000/rosario and receive the message:
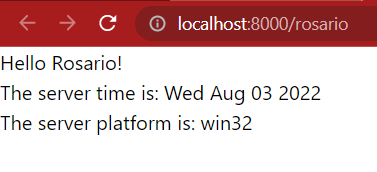
The proof that this page is rendered on the server is that by navigating on the same page from another computer with another operating system, it’ll produce exactly the same strings (the one about the operating system of the server in particular).
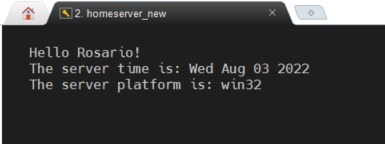
The image above shows the exact output from a Linux machine on my home network.
Let’s now concentrate on the index.tsx file, the main interface of the app. It uses the REST API and the data. The code, as expected, is pretty simple:
  export default function Home() {
    return (
      <div class={tw`p-4 mx-auto max-w-screen-md`}>
        <h1 class={tw`text(3xl blue-500)`}>Tour of Heroes</h1>
        <HeroesScroller start={1} />
        <br/>
        <Create></Create>
      </div>
    );
  }
The source is .tsx, so it’ll use TypeScript syntax intermixed with HTML wherever needed.
In the fragment above, we can see that the main result of the index.tsx file is to combine a title and two components: the HeroesScroller, which also takes a parameter, and another component called Create.
Before discussing the concept of islands, please note how the styling uses twind. This is used by default when we create a new project in Fresh with the command:
> deno run -A -r https://fresh.deno.dev NameOfTheProject
Now it’s time to talk about the islands. This is the code that is actually executed on the browser. There’s a special directory in the project called /island and files in that directory are handled differently. We can see this by running the project:
  > deno task start
  Task start deno run -A --watch=static/,routes/ dev.ts
  Watcher Process started.
  The manifest has been generated for 4 routes and 2 islands.
  Server listening on http://0.0.0.0:8000
We can see that Fresh has scanned the root directory and found four routes: the index file, the two files we discussed above for the REST API, and the [serverparam].tsx file. Together with the files, it also discovered two islands (the files in the /islands directory).
The “island” name was chosen to emphasize how the interactivity we want to achieve and run in the browser is actually segregated in these specific files. From a technical point of view, the TypeScript we write in a file contained in the islands directory is transpiled to JavaScript on the spot to be executed in the browser.
This is called “rehydrating the island on the client” in the official documentation. It overall has a huge impact on the development.
The combination of Deno and Fresh is a really incredible opportunity to start enjoying the development of small to medium-sized web app projects.
The lack of npm and its (bloated) ecosystem is a clear pro together, alongside the velocity in the whole development process.
Another huge benefit is the selective transpiling of TypeScript to JavaScript. On the island of interactivity, it’s a breath of fresh air (you see the pun, right?) in the development life cycle.
Deno modules leverage the vast experience of the developer community. They can truly use them fearlessly. Lastly, new modules are reviewed by the Deno core team which, to some extent, is a guarantee of quality.
Install LogRocket via npm or script tag. LogRocket.init() must be called client-side, not
server-side
$ npm i --save logrocket

// Code:

import LogRocket from 'logrocket';
LogRocket.init('app/id');
// Add to your HTML:

<script src="https://cdn.lr-ingest.com/LogRocket.min.js"></script>
<script>window.LogRocket && window.LogRocket.init('app/id');</script>

Broken npm packages often fail due to small packaging mistakes. This guide shows how to use Publint to validate exports, entry points, and module formats before publishing.

Discover what’s new in The Replay, LogRocket’s newsletter for dev and engineering leaders, in the February 11th issue.

Cut React LCP from 28s to ~1s with a four-phase framework covering bundle analysis, React optimizations, SSR, and asset/image tuning.

Rich Harris (creator of Svelte) joined PodRocket this week to unpack his Performance Now talk, Fine Grained Everything.
Hey there, want to help make our blog better?
Join LogRocket’s Content Advisory Board. You’ll help inform the type of content we create and get access to exclusive meetups, social accreditation, and swag.
Sign up now