Google just pulled a classic “I don’t want competitors in here” move. Devs can now access many Cursor and Windsurf-style features directly in their terminal and VS Code — completely free — via the newly-released Gemini CLI. If you’ve been paying for AI coding assistants, this news might just make your day.
Gemini CLI is an open-source AI agent that brings Gemini directly to your terminal. It uses a reason-and-act loop with built-in tools to handle complex tasks like fixing bugs, creating features, and improving test coverage.
And unlike Cursor and Windsurf — the darlings of the AI dev tool world — Gemini CLI works in your existing terminal. It can query and edit large codebases beyond Gemini’s 1M token context, like handling pull requests or complex rebases.
In this article, we’ll explore Gemini CLI’s agentic mode and how to utilize these features effectively. We’ll also examine the pricing differences and demonstrate how much you can save by choosing Gemini CLI as your IDE code assistant. I’ve made sure to cover how to use MCP with Gemini as well.
Let’s dive in!
The Replay is a weekly newsletter for dev and engineering leaders.
Delivered once a week, it's your curated guide to the most important conversations around frontend dev, emerging AI tools, and the state of modern software.
Gemini CLI brings AI directly to your existing workflow without forcing you to change your setup. Will it replace Windsurf and Cursor? Let’s find out — and see how we, as frontend devs, can utilize Gemini CLI to our advantage: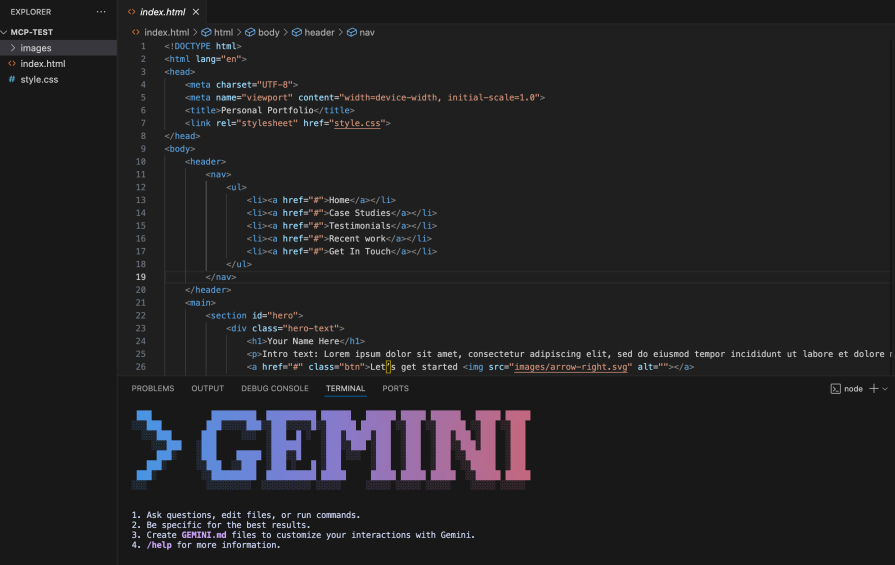
To get started, ensure you have Node.js version 18 or above installed. You can now go ahead to install Gemini CLI in your terminal by running this command:
npx https://github.com/google-gemini/gemini-cli
You can also install it with:
npm install -g @google/gemini-cli
gemini
You should see this screen upon successful installation:
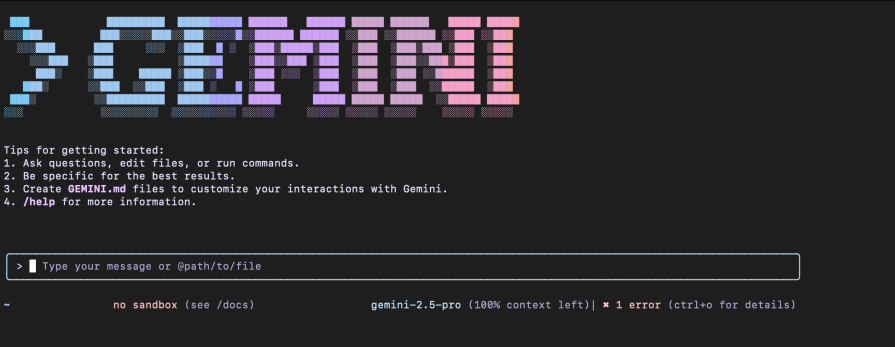
In the image above, we can see that it is using the Gemini-2.5-Pro 100% context, which is a million-token context window.
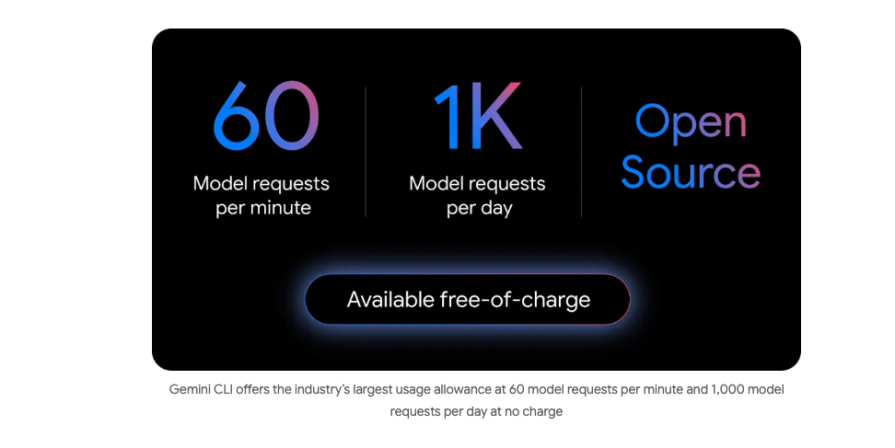
Gemini CLI is Google’s answer to Claude Code — at a fraction of the cost. We are talking about a $200 cost difference. Google enables you to make up to 1000 free requests per day, which is more than the paid versions for Cursor, Windsurf, and Claude Code:
Gemini CLI features an agent mode that brings CLI benefits directly into your development environment.
Its core features include:
/memory for context management, /stats for performance insights, /tools for capability discovery, and /mcp for protocol operationsLet’s see how these features are used in front-end development.
Like all other models, I will always advise that the first step toward success is drafting a clean, comprehensive prompt. Follow the steps in this article to achieve a good start with your prompt. It will help you as you prompt further: not just for the token’s sake, but also to avoid early hallucinations.
Essential Gemini CLI commands include /memory for context management, /stats for performance insights, /tools for capability discovery, and /mcp for protocol operations. These commands provide direct control over the AI agent’s functionality and allow developers to manage the CLI’s state and available resources.
Let’s say we want context for what our project entails. We’ll use the /memory command this way:
Use /memory refresh when your environment changes: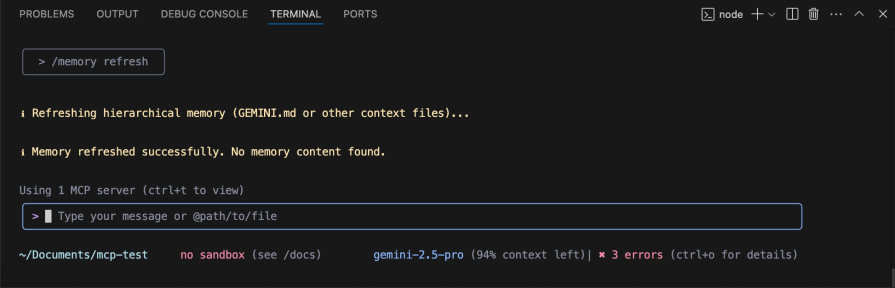
Start with /memory add to establish project context:
> /memory add "Use functional components, TypeScript interfaces, and Tailwind CSS"

> /memory add "Database is PostgreSQL, using Prisma ORM, API runs on port 3000"
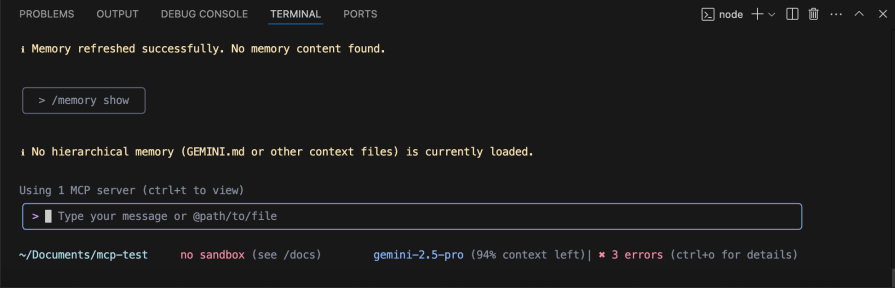
Use /memory show to verify what’s stored:
Continue adding relevant details as your project evolves. This helps Gemini provide more contextual and relevant responses based on your specific project setup and preferences.
Native support exists for common development tasks, including grep searches, terminal operations, and direct file manipulation (read/write).
When prompted to create a file, it triggers the writeFile tool, as seen below:

These tools are integrated directly into the CLI, allowing seamless interaction with your local development environment without switching contexts.
The CLI can search the web for information and fetch content from URLs, enabling it to access real-time data and current documentation to assist with development tasks.
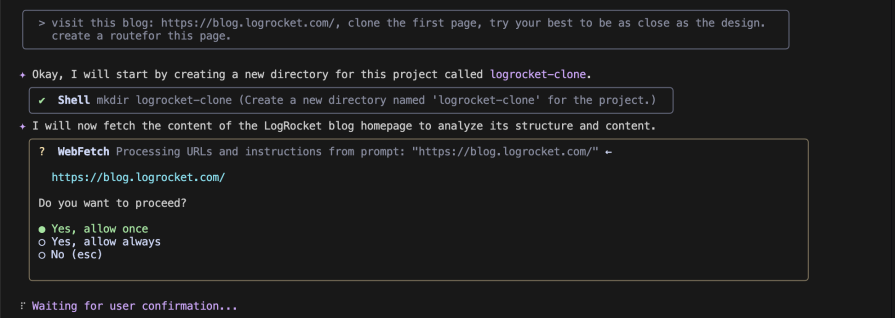
You can easily prompt Gemini CLI to visit a web app and copy the frontend design; it’s pretty easy. If I were doing that, I would do it this way:
> visit this blog: https://blog.logrocket.com/, clone the first page, try your best to be as close as the design. Create a route for this page.
Your results might not be perfect this way; I think the web connectivity was mainly designed to search through the internet and docs. To help with the code, stick to the following use case.
> Fetch the documentation from https://recharts.org/en-US/api and help me implement a responsive bar chart component
Gemini fetches the actual documentation and:
> Search for "React dashboard component performance 2025" and then fetch the documentation for the top recommended library to create a sales analytics dashboard

> Fetch the GitHub README from https://github.com/recharts/recharts and create a component that matches our design system
This takes off the guesswork of whether the AI’s knowledge is current and provides confidence that you’re using the latest, recommended patterns.
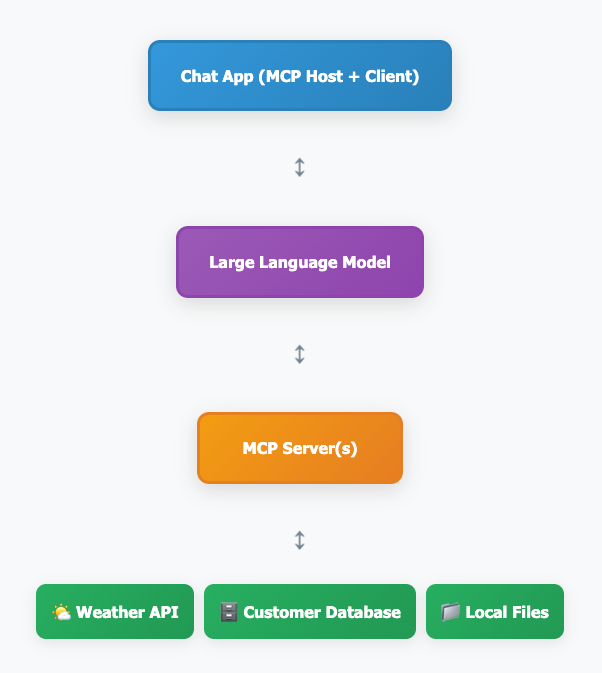
MCP is used to describe a standardized way for AI models like Gemini to connect with external data sources and tools. MCP consists of multiple components; the most important ones are the host, client, and server.
The host serves as the main application and can take various forms. It could be a code assistant integrated into your IDE, or virtually any other application that needs to connect to external data sources.
The MCP client (embedded within the host and supporting multiple instances) handles communication protocols and request formatting.
The MCP servers (which can have multiple simultaneous connections) serve as data bridges that connect through the standardized MCP protocol transport layer to ensure consistent communication regardless of underlying data sources. Other data sources could include a database, API, or external code repo.
Let’s take an AI chat app as an example. We’ll walk through what happens when you ask questions like:
When you ask “What is the weather like in New York?” in your chat application, the MCP host first discovers available tools from MCP servers.
The servers respond with options like weatherlookup, customercount, and file_search. The MCP host then sends your question, plus these available tools, to the LLM.
The LLM analyzes the request and decides to use the weather_lookup tool with the location parameter “New York”. This prompts the MCP host to execute the selected tool through the appropriate MCP server that calls the Weather API.
The server retrieves the data (“72°F, sunny, light breeze”) and sends the results back to the LLM. Finally, the LLM processes this information and provides you with the complete answer: “The weather in New York is currently 72°F and sunny with a light breeze.”
So the big question is, how does this help frontend developers? Let’s discuss an example of how MCP specifically helps frontend developers using Gemini CLI.
MCP servers can connect to design tools like Figma through Gemini CLI. Frontend developers can ask something like: “Access our Figma design system and create a React component that matches the button styles in our design library.”
The MCP server retrieves the actual design specifications and generates code that matches your exact design tokens.
Figma only allows you to access Dev Mode MCP Server as a paid feature. If you tried getting this done using the official Dev Mode MCP server docs and were disappointed, don’t stress; the open source community has got your back.
Using the figma-devloper-mcp community, I will guide you through a simple process to achieve design-to-code results in no time.
First, we need to get our Figma API key/token:
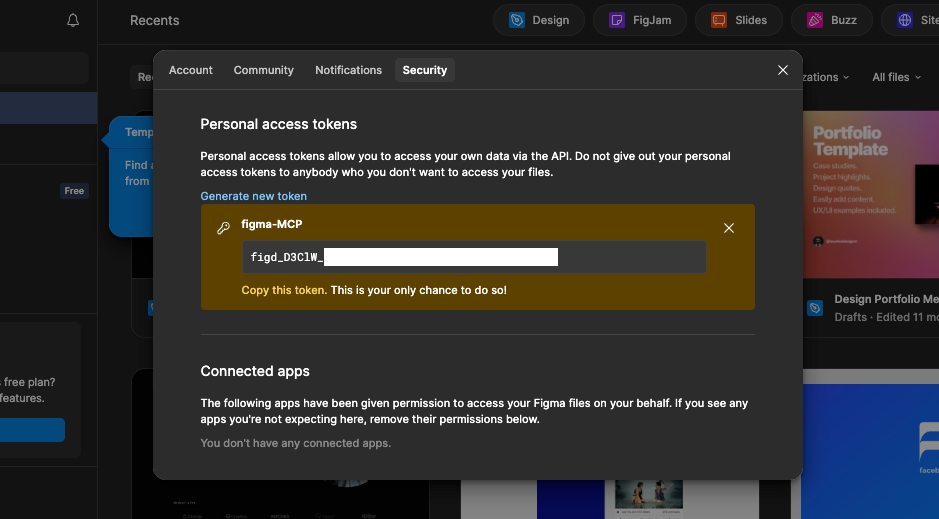
Here’s how to do it:
Keep the token safe. It will be shown once, and you will need it for the next step.
Open up your terminal, and run this command:
npx figma-developer-mcp --figma-api-key=YOUR_KEY --help
If you see something that looks like this:
Options:
  --figma-api-key      Figma API key (Personal Access Token)            [string]
  --figma-oauth-token  Figma OAuth Bearer token                         [string]
  --env                Path to custom .env file to load environment variables fr
                       om                                               [string]
  --port               Port to run the server on                        [number]
  --json               Output data from tools in JSON format instead of YAML
                                                      \[boolean\] [default: false]
  --help               Show help                                       [boolean]
  --version            Show version number
Then the figma-devloper-mcp package is working.
To test the server, replace the YOUR_API_KEY with your Figma API key, and run the command below:
npx figma-developer-mcp --figma-api-key=YOUR_API_KEY --port=3001
This should start the server and show it’s running:

Since this is an HTTP server (not stdio), use this configuration in your Gemini CLI settings. To navigate to your Gemini CLI settings, open a new terminal cd into .gemini. Then open it in VS Code or any code editor of your choice, navigate to the settings.json file, and add the code below:
json
{
  "mcpServers": {
    "figma-developer": {
      "type": "sse",
      "url": "http://localhost:3001/sse"
    }
  }
}
With these few steps, you’ve got your MCP server up and running! Now let’s see if Gemini recognizes this MCP.
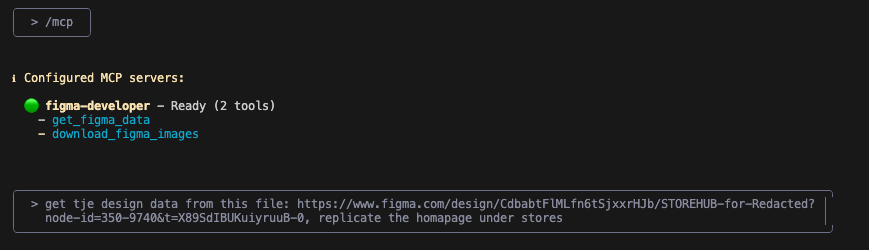
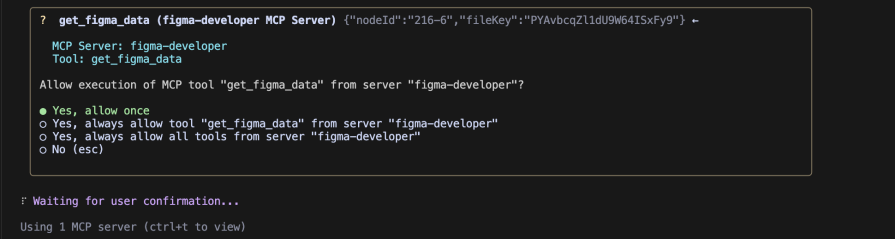
Create a project, open Gemini CLI in the project directory, and run /mcp,. You should see figma-developer as one of the MCPs ready to be used:
You can now prompt Gemini using the Figma-developer MCP to get assets and implement them by using the Figma design URL.
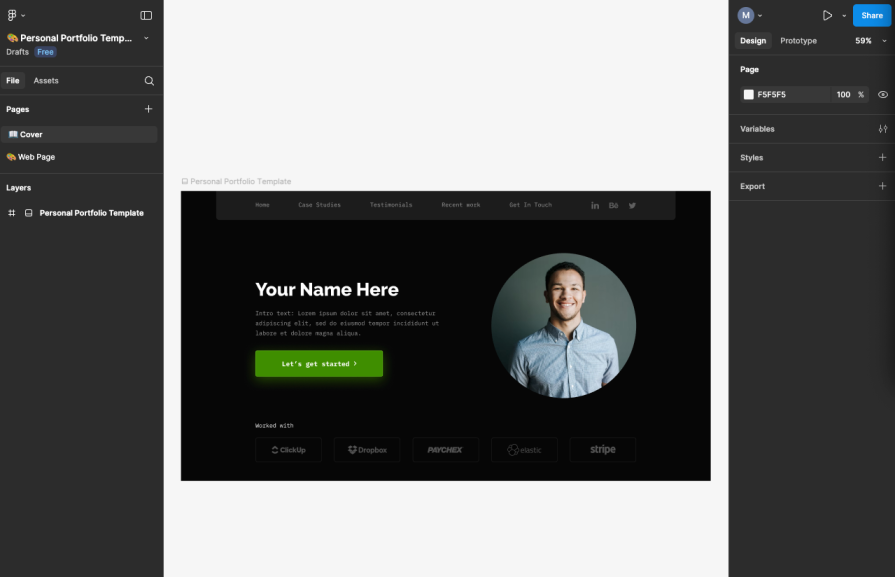
Let’s see how it works. We want to implement this design:
We’ll have to prompt our way there. Below, we have asked Gemini to get the design data from Figma, and we have attached a URL (the Figma design URL). We then asked this to be implemented using HTML and CSS:
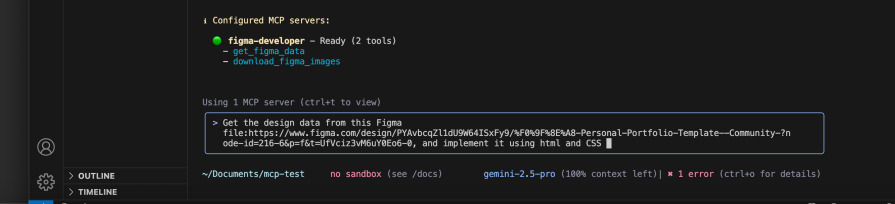
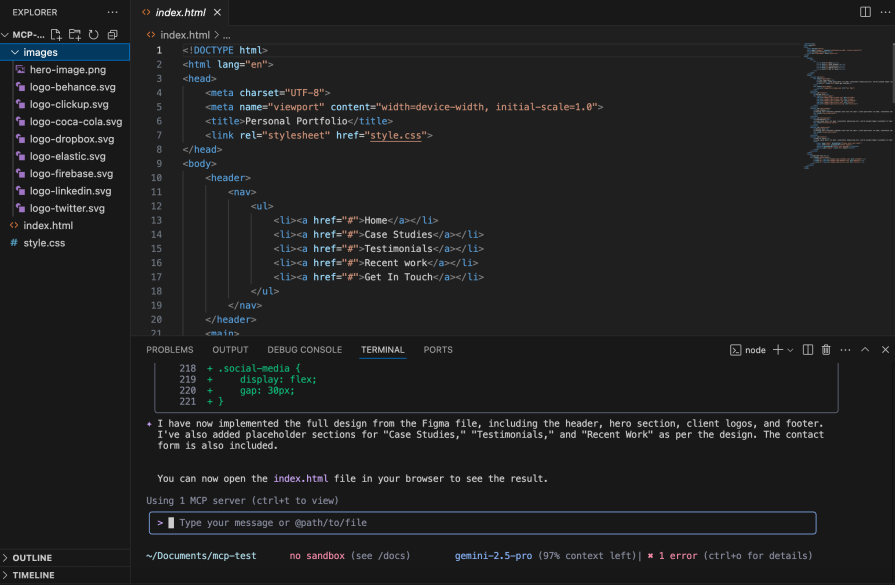
When you run it, Gemini picks the tool responsible for downloading assets, which is the get_figma_data:
And this does the magic. We have our assets downloaded and design implemented:
Here is the result:

In my opinion, it did a great job. But it didn’t replicate this design exactly, so we can reiterate until we get the results we want.
Cost is an important variable to consider when comparing Gemini CLI with Windsurf and Cursor. This table should help you make informed decisions according to your project preference or priority:
| Tool | Free Plan | Pro/Standard Plan | Enterprise Plan | Key Features |
|---|---|---|---|---|
| Gemini CLI | FREE – 60 requests/min, 1,000 requests/day, Gemini 2.5 Pro access, 1M token context | $19/month – Gemini Code Assist Standard | $45/month – Enterprise features, enhanced security | Open source, MCP support, built-in tools |
| Windsurf | FREE – 50 User Prompts, 200 Flow Action credits | $15/month – 500 prompt credits, unlimited completions | $30/month – Team features (reduced from $35) | Cascade agent, cleaner UI, MCP support |
| Cursor | FREE – 2,000 completions, 50 slow requests, 2-week Pro trial | $20/month – 500 fast requests, unlimited slow requests | $40/month Business, $200/month Ultra | Agent mode, multi-file editing, custom models |
Google didn’t jump into the AI trend immediately. They took their time to think through their approach, and with their financial strength behind them, they keep making insane moves.
Developers often argue about which model is better. You’ll see YouTube videos with benchmarks comparing performance, with creators defending their choice. You end up being either a Gemini fan, Claude fan, or GPT-4o fan.
Your preference usually depends on your experience. You might use one model for a specific task where it performed well, but then it could perform worse over time. Most developers end up leaning on all three major models.
Claude has focused on being the best coding model. Gemini has excelled in coding, UX, image generation, and video generation. GPT has been excellent across many use cases.
These are great models, but they’re somewhat useless by themselves. You have to build something around them.
That’s exactly what Gemini CLI, Windsurf, and Cursor offer; they created tools using these LLMs. They built file readers, context managers, and other development utilities.
So we ask the question again: Will Gemini CLI replace Cursor and Windsurf? Probably not entirely. Gemini CLI works great if you prefer your current terminal setup and want AI without changing your workflow.
Windsurf and Cursor still offer comprehensive IDE features. But if we consider price as a variable, Gemini CLI stands as a real threat to their dominance.

Compare the top AI development tools and models of March 2026. View updated rankings, feature breakdowns, and find the best fit for you.
Discover what’s new in The Replay, LogRocket’s newsletter for dev and engineering leaders, in the March 11th issue.

Buying AI tools isn’t enough. Engineering teams need AI literacy programs to unlock real productivity gains and avoid uneven adoption.

If your AI app or agent works perfectly in development but falls apart in production, you’re not alone. In a […]
Hey there, want to help make our blog better?
Join LogRocket’s Content Advisory Board. You’ll help inform the type of content we create and get access to exclusive meetups, social accreditation, and swag.
Sign up now

