Every mobile device comes with an inbuilt camera app for capturing pictures, recording videos, and a few more catchy functionalities that are specific to each device. But if you are working on an app that requires camera access, then you have to implement the camera functionality on your own.

You may ask, why would I need to implement the camera functionality again when the default camera app is already available?
The answer is because, if you want to provide a unique user interface catered to your app, or add functionality that is not present in the device’s default camera app, it is required.
In this article, you’ll learn to implement basic camera functionalities to your Flutter app using the official camera package that supports both Android and iOS platforms.
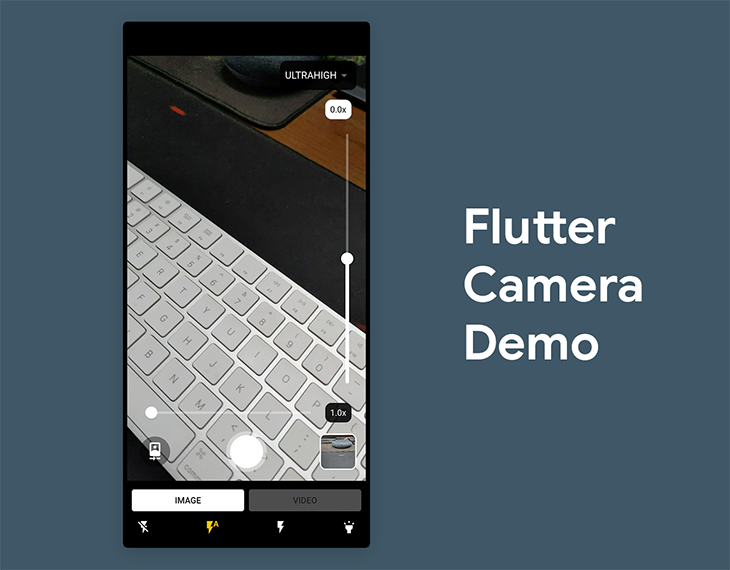
Before diving into the code, let’s review the app we’re going to build. The final app will contain most of the basic camera features, including:
We’ll also cover how to solve some common problems and add popular features for the Flutter camera, including:
The final app user interface will look like this:
Create a new Flutter project using the following command:
flutter create flutter_camera_demo
You can open the project using your favorite IDE, but for this example, I’ll be using VS Code:
code flutter_camera_demo
Add the following dependencies to your pubspec.yaml file:
camera: provides cross-platform APIs for implementing the camera functionalitiesvideo_player: for previewing the captured videospath_provider: for storing the images or videos inside a directory, where they can be easily accessed
dependencies:
camera: ^0.8.1+7
video_player: ^2.1.14
path_provider: ^2.0.2
Replace the content of your main.dart file with the following:
import 'package:flutter/material.dart';

import 'screens/camera_screen.dart';

Future<void> main() async {
  runApp(MyApp());
}

class MyApp extends StatelessWidget {
  @override
  Widget build(BuildContext context) {
    return MaterialApp(
      title: 'Flutter Demo',
      theme: ThemeData(
        primarySwatch: Colors.blue,
      ),
      debugShowCheckedModeBanner: false,
      home: CameraScreen(),
    );
  }
}
The CameraScreen class will contain code for all of the camera functionalities along with its user interface. We will be adding it in a bit, but before we do that, we have to get the available cameras present on the device.
In the main.dart file, define a global variable called cameras where we’ll store the list of available cameras. This will help us to easily reference them later.
import 'package:camera/camera.dart';

List<CameraDescription> cameras = [];
You can retrieve the cameras inside the main() function before initializing the app using the availableCameras() method — just make sure the function is async because it has to await retrieving the available cameras of the device, and normally Flutter’s main() function is a simple function with only the runApp() call:
Future<void> main() async {
  try {
    WidgetsFlutterBinding.ensureInitialized();
    cameras = await availableCameras();
  } on CameraException catch (e) {
    print('Error in fetching the cameras: $e');
  }
  runApp(MyApp());
}
Create a new file called camera_screen.dart and define the CameraScreen stateful widget inside it.
import 'package:camera/camera.dart';
import 'package:flutter/material.dart';

import '../main.dart';

class CameraScreen extends StatefulWidget {
  @override
  _CameraScreenState createState() => _CameraScreenState();
}

class _CameraScreenState extends State<CameraScreen> {
  @override
  Widget build(BuildContext context) {
    return Scaffold();
  }
}
Define a controller for the camera and a value for the isCameraInitialized Boolean variable, and you can use this to easily understand whether the camera is initialized and refresh the UI accordingly:
class _CameraScreenState extends State<CameraScreen> {
  CameraController? controller;
  bool _isCameraInitialized = false;

  @override
  Widget build(BuildContext context) {
    return Scaffold();
  }
}
The controller will help you access the different functionalities of the camera, but before using them, you have to initialize the camera.
Create a new method called onNewCameraSelected(). This method will help in handling two cases:
class _CameraScreenState extends State {
   // ...

   void onNewCameraSelected(CameraDescription cameraDescription) async {
      final previousCameraController = controller;
      // Instantiating the camera controller
      final CameraController cameraController = CameraController(
        cameraDescription,
        ResolutionPreset.high,
        imageFormatGroup: ImageFormatGroup.jpeg,
      );

      // Dispose the previous controller
      await previousCameraController?.dispose();

      // Replace with the new controller
      if (mounted) {
         setState(() {
           controller = cameraController;
        });
      }

      // Update UI if controller updated
      cameraController.addListener(() {
        if (mounted) setState(() {});
      });

      // Initialize controller
      try {
        await cameraController.initialize();
      } on CameraException catch (e) {
        print('Error initializing camera: $e');
      }

      // Update the Boolean
      if (mounted) {
        setState(() {
           _isCameraInitialized = controller!.value.isInitialized;
        });
      }
   }

   @override
   Widget build(BuildContext context) {
      return Scaffold();
   }
}
Call this function inside the initState() method and pass cameras[0] as the CameraDescription. The first index of the camera list is usually the back camera of the device.
0 of cameras list — back camera1 of cameras list — front cameraclass _CameraScreenState extends State {
// ...
@override
void initState() {
onNewCameraSelected(cameras[0]);
super.initState();
}
@override
Widget build(BuildContext context) {
return Scaffold();
}
}
Also, don’t forget to release the memory in dispose() method when the camera is not active:
@override
void dispose() {
  controller?.dispose();
  super.dispose();
}
Running the camera on any device is considered a memory-hungry task, so how you handle freeing up the memory resources, and when that occurs, is important. An app’s lifecycle states help in understanding the state changes so that you as a developer can react accordingly.
In Flutter, you can add the WidgetsBindingObserver mixin and manage the lifecycle changes by overriding the didChangeAppLifecycleState() method.
class _CameraScreenState extends State<CameraScreen>
    with WidgetsBindingObserver {

  // ...

  @override
  void didChangeAppLifecycleState(AppLifecycleState state) {
    final CameraController? cameraController = controller;

    // App state changed before we got the chance to initialize.
    if (cameraController == null || !cameraController.value.isInitialized) {
      return;
    }

    if (state == AppLifecycleState.inactive) {
      // Free up memory when camera not active
      cameraController.dispose();
    } else if (state == AppLifecycleState.resumed) {
      // Reinitialize the camera with same properties
      onNewCameraSelected(cameraController.description);
    }
  }

  @override
  Widget build(BuildContext context) {
    return Scaffold();
  }
}
Now that we’ve finished initializing and managing the camera state, we can define a very basic user interface for previewing the camera output.
The camera plugin of Flutter comes with a method called buildPreview() for displaying the camera output, and the user interface can be defined as follows:
class _CameraScreenState extends State<CameraScreen>
    with WidgetsBindingObserver {

  // ...

  @override
  Widget build(BuildContext context) {
    return Scaffold(
      body: _isCameraInitialized
          ? AspectRatio(
              aspectRatio: 1 / controller!.value.aspectRatio,
              child: controller!.buildPreview(),
            )
          : Container(),
    );
  }
}
The preview will look like this:

You will notice that the device status bar is visible on top; you can hide it to prevent it from obstructing the camera view by adding the following to the initState() method:
@override
void initState() {
  // Hide the status bar
  SystemChrome.setEnabledSystemUIOverlays([]);

  onNewCameraSelected(cameras[0]);
  super.initState();
}
The basic camera preview is ready! Now, we can start adding functionalities to the camera.
You can use the ResolutionPreset to define the quality of the camera view. While initializing the camera, we have used ResolutionPreset.high.
For changing the quality of the camera view, you have to reinitialize the camera controller with the new value. We’ll add a dropdown menu to the top-right corner of the camera view, where the users can select a resolution preset.
Add two variables inside the class, one for holding all the ResolutionPreset values, and the other one for storing the currentResolutionPreset value.
final resolutionPresets = ResolutionPreset.values;
ResolutionPreset currentResolutionPreset = ResolutionPreset.high;
Modify the camera controller instantiation in the onNewCameraSelected() method to use the currentResolutionPreset variable:
final CameraController cameraController = CameraController(
  cameraDescription,
  currentResolutionPreset,
  imageFormatGroup: ImageFormatGroup.jpeg,
);
The DropdownButton can be defined as follows:
DropdownButton<ResolutionPreset>(
  dropdownColor: Colors.black87,
  underline: Container(),
  value: currentResolutionPreset,
  items: [
    for (ResolutionPreset preset
        in resolutionPresets)
      DropdownMenuItem(
        child: Text(
          preset
              .toString()
              .split('.')[1]
              .toUpperCase(),
          style:
              TextStyle(color: Colors.white),
        ),
        value: preset,
      )
  ],
  onChanged: (value) {
    setState(() {
      currentResolutionPreset = value!;
      _isCameraInitialized = false;
    });
    onNewCameraSelected(controller!.description);
  },
  hint: Text("Select item"),
)
The onNewCameraSelected() method is called to reinitialize the camera controller with the new quality value.
You can set the zoom level of the camera using the setZoomLevel() method on the controller and passing the zoom value.
Before determining the zoom level, you should know the device camera’s minimum and maximum zoom levels.
Define three variables:
double _minAvailableZoom = 1.0;
double _maxAvailableZoom = 1.0;
double _currentZoomLevel = 1.0;
The best place to retrieve these values is from inside the onNewCameraSelected() method after the camera is initialized. You can get the minimum and maximum zoom level using:
cameraController
    .getMaxZoomLevel()
    .then((value) => _maxAvailableZoom = value);

cameraController
    .getMinZoomLevel()
    .then((value) => _minAvailableZoom = value);
You can implement a slider to let the user select an appropriate zoom level; the code for building the Slider is as follows:
Row(
  children: [
    Expanded(
      child: Slider(
        value: _currentZoomLevel,
        min: _minAvailableZoom,
        max: _maxAvailableZoom,
        activeColor: Colors.white,
        inactiveColor: Colors.white30,
        onChanged: (value) async {
          setState(() {
            _currentZoomLevel = value;
          });
          await controller!.setZoomLevel(value);
        },
      ),
    ),
    Container(
      decoration: BoxDecoration(
        color: Colors.black87,
        borderRadius: BorderRadius.circular(10.0),
      ),
      child: Padding(
        padding: const EdgeInsets.all(8.0),
        child: Text(
          _currentZoomLevel.toStringAsFixed(1) +
              'x',
          style: TextStyle(color: Colors.white),
        ),
      ),
    ),
  ],
)
Every time the slider is dragged, the setZoomLevel() method is called to update the zoom level value. In the above code, we have also added a Text widget to display the current zoom level value.
You can set the exposure offset value of the camera using the setExposureOffset() method on the controller and passing the exposure value.
First, let’s retrieve the minimum and maximum values of the camera exposure supported by the device.
Define three variables:
double _minAvailableExposureOffset = 0.0;
double _maxAvailableExposureOffset = 0.0;
double _currentExposureOffset = 0.0;
Get the minimum and maximum camera exposure values inside the onNewCameraSelected() method:
cameraController
    .getMinExposureOffset()
    .then((value) => _minAvailableExposureOffset = value);

cameraController
    .getMaxExposureOffset()
    .then((value) => _maxAvailableExposureOffset = value);
We’ll be building a vertical slider for displaying and controlling the exposure offset. Material Design doesn’t provide a vertical Slider widget, but you can use the RotatedBox class with three quarter-turns to achieve that.
Container(
  decoration: BoxDecoration(
    color: Colors.white,
    borderRadius: BorderRadius.circular(10.0),
  ),
  child: Padding(
    padding: const EdgeInsets.all(8.0),
    child: Text(
      _currentExposureOffset.toStringAsFixed(1) + 'x',
      style: TextStyle(color: Colors.black),
    ),
  ),
),
Expanded(
  child: RotatedBox(
    quarterTurns: 3,
    child: Container(
      height: 30,
      child: Slider(
        value: _currentExposureOffset,
        min: _minAvailableExposureOffset,
        max: _maxAvailableExposureOffset,
        activeColor: Colors.white,
        inactiveColor: Colors.white30,
        onChanged: (value) async {
          setState(() {
            _currentExposureOffset = value;
          });
          await controller!.setExposureOffset(value);
        },
      ),
    ),
  ),
)
In the above code, we have built a Text widget on top of the slider to display the current exposure offset value.
You can set the camera’s flash mode using the setFlashMode() method and passing a FlashMode value.
Define a variable to store the current value of flash mode:
FlashMode? _currentFlashMode;
Then get the initial flash mode value inside the onNewCameraSelected() method:
_currentFlashMode = controller!.value.flashMode;
On the user interface, we’ll show the available flash modes in a row and the user can tap on any one of them to choose that flash mode.
Row(
  mainAxisAlignment: MainAxisAlignment.spaceBetween,
  children: [
    InkWell(
      onTap: () async {
        setState(() {
          _currentFlashMode = FlashMode.off;
        });
        await controller!.setFlashMode(
          FlashMode.off,
        );
      },
      child: Icon(
        Icons.flash_off,
        color: _currentFlashMode == FlashMode.off
            ? Colors.amber
            : Colors.white,
      ),
    ),
    InkWell(
      onTap: () async {
        setState(() {
          _currentFlashMode = FlashMode.auto;
        });
        await controller!.setFlashMode(
          FlashMode.auto,
        );
      },
      child: Icon(
        Icons.flash_auto,
        color: _currentFlashMode == FlashMode.auto
            ? Colors.amber
            : Colors.white,
      ),
    ),
    InkWell(
      onTap: () async {
        setState(() {
          _isCameraInitialized = false;
        });
        onNewCameraSelected(
          cameras[_isRearCameraSelected ? 1 : 0],
        );
        setState(() {
          _isRearCameraSelected = !_isRearCameraSelected;
        });
      },
      child: Icon(
        Icons.flash_on,
        color: _currentFlashMode == FlashMode.always
            ? Colors.amber
            : Colors.white,
      ),
    ),
    InkWell(
      onTap: () async {
        setState(() {
          _currentFlashMode = FlashMode.torch;
        });
        await controller!.setFlashMode(
          FlashMode.torch,
        );
      },
      child: Icon(
        Icons.highlight,
        color: _currentFlashMode == FlashMode.torch
            ? Colors.amber
            : Colors.white,
      ),
    ),
  ],
)
The selected flash mode will be highlighted with an amber color instead of white.

To toggle between the front and rear cameras, you have to reinitialize the camera by providing the new value to the onNewCameraSelected() method.
Define a Boolean variable to understand whether the rear camera is selected, otherwise the front camera is selected.
bool _isRearCameraSelected = true;
Previously, we were initializing with the rear camera, so we will store true in this Boolean.
Now, we’ll show a button to toggle between the rear camera and the front camera:
InkWell(
  onTap: () {
    setState(() {
      _isCameraInitialized = false;
    });
    onNewCameraSelected(
      cameras[_isRearCameraSelected ? 0 : 1],
    );
    setState(() {
      _isRearCameraSelected = !_isRearCameraSelected;
    });
  },
  child: Stack(
    alignment: Alignment.center,
    children: [
      Icon(
        Icons.circle,
        color: Colors.black38,
        size: 60,
      ),
      Icon(
        _isRearCameraSelected
            ? Icons.camera_front
            : Icons.camera_rear,
        color: Colors.white,
        size: 30,
      ),
    ],
  ),
)
In the above code, if the _isRearCameraSelected Boolean is true, pass 0 as the index to the cameras (to flip to the front camera). Otherwise, pass 1 as the index (to flip to the rear camera).
You can use the takePicture() method on the camera controller to take a picture using the device camera. The captured picture is returned as a XFile (which is a cross-platform file abstraction).
Let’s define a function to handle the capturing of a picture:
Future<XFile?> takePicture() async {
  final CameraController? cameraController = controller;
  if (cameraController!.value.isTakingPicture) {
    // A capture is already pending, do nothing.
    return null;
  }
  try {
    XFile file = await cameraController.takePicture();
    return file;
  } on CameraException catch (e) {
    print('Error occured while taking picture: $e');
    return null;
  }
}
This function returns the captured picture as XFile if the capture is successful, otherwise it returns null.
The capture button can be defined as follows:
InkWell(
  onTap: () async {
    XFile? rawImage = await takePicture();
    File imageFile = File(rawImage!.path);

    int currentUnix = DateTime.now().millisecondsSinceEpoch;
    final directory = await getApplicationDocumentsDirectory();
    String fileFormat = imageFile.path.split('.').last;

    await imageFile.copy(
      '${directory.path}/$currentUnix.$fileFormat',
    );
  },
  child: Stack(
    alignment: Alignment.center,
    children: [
      Icon(Icons.circle, color: Colors.white38, size: 80),
      Icon(Icons.circle, color: Colors.white, size: 65),
    ],
  ),
)
After a successful capture, it saves the picture to the application’s documents directory with the timestamp as the image name so that all the captured pictures can be easily accessed later.
You can just use two TextButtons in a row for toggling between image and video mode.
Define a Boolean variable to store the selected mode:
bool _isVideoCameraSelected = false;
The UI buttons can be defined like this:
Row(
  children: [
    Expanded(
      child: Padding(
        padding: const EdgeInsets.only(
          left: 8.0,
          right: 4.0,
        ),
        child: TextButton(
          onPressed: _isRecordingInProgress
              ? null
              : () {
                  if (_isVideoCameraSelected) {
                    setState(() {
                      _isVideoCameraSelected = false;
                    });
                  }
                },
          style: TextButton.styleFrom(
            primary: _isVideoCameraSelected
                ? Colors.black54
                : Colors.black,
            backgroundColor: _isVideoCameraSelected
                ? Colors.white30
                : Colors.white,
          ),
          child: Text('IMAGE'),
        ),
      ),
    ),
    Expanded(
      child: Padding(
        padding: const EdgeInsets.only(
            left: 4.0, right: 8.0),
        child: TextButton(
          onPressed: () {
            if (!_isVideoCameraSelected) {
              setState(() {
                _isVideoCameraSelected = true;
              });
            }
          },
          style: TextButton.styleFrom(
            primary: _isVideoCameraSelected
                ? Colors.black
                : Colors.black54,
            backgroundColor: _isVideoCameraSelected
                ? Colors.white
                : Colors.white30,
          ),
          child: Text('VIDEO'),
        ),
      ),
    ),
  ],
)
To manage video recording using the device camera, you will have to define four functions to handle the states of the recording process:
startVideoRecording() to start the video recording processstopVideoRecording() to stop the video recording processpauseVideoRecording() to pause a recording if it is already in progressresumeVideoRecording() to resume the recording if it is in paused stateAlso, define a Boolean variable to store whether a recording is in progress:
bool _isRecordingInProgress = false;
You can start the video recording by calling the startVideoRecording() method on the camera controller:
Future<void> startVideoRecording() async {
  final CameraController? cameraController = controller;
  if (controller!.value.isRecordingVideo) {
    // A recording has already started, do nothing.
    return;
  }
  try {
    await cameraController!.startVideoRecording();
    setState(() {
      _isRecordingInProgress = true;
      print(_isRecordingInProgress);
    });
  } on CameraException catch (e) {
    print('Error starting to record video: $e');
  }
}
After starting the recording, the Boolean value of _isRecordingInProgress is set to true.
A video recording that is already in progress can be stopped by calling stopVideoRecording() method on the controller:
Future<XFile?> stopVideoRecording() async {
  if (!controller!.value.isRecordingVideo) {
    // Recording is already is stopped state
    return null;
  }
  try {
    XFile file = await controller!.stopVideoRecording();
    setState(() {
      _isRecordingInProgress = false;
      print(_isRecordingInProgress);
    });
    return file;
  } on CameraException catch (e) {
    print('Error stopping video recording: $e');
    return null;
  }
}
After the recording is stopped, the Boolean value _isRecordingInProgress is set to false. The stopVideoRecording() method returns the video file in XFile format.
You can pause a video recording that is in progress by calling pauseVideoRecording() method on the controller:
Future<void> pauseVideoRecording() async {
  if (!controller!.value.isRecordingVideo) {
    // Video recording is not in progress
    return;
  }
  try {
    await controller!.pauseVideoRecording();
  } on CameraException catch (e) {
    print('Error pausing video recording: $e');
  }
}
You can resume a paused video recording by calling the resumeVideoRecording() method on the controller:
Future<void> resumeVideoRecording() async {
  if (!controller!.value.isRecordingVideo) {
    // No video recording was in progress
    return;
  }
  try {
    await controller!.resumeVideoRecording();
  } on CameraException catch (e) {
    print('Error resuming video recording: $e');
  }
}
You can modify the button for taking pictures by checking whether the _isVideoCameraSelected Boolean is true and show the video start/stop button in that place.
InkWell(
  onTap: _isVideoCameraSelected
      ? () async {
          if (_isRecordingInProgress) {
            XFile? rawVideo = await stopVideoRecording();
            File videoFile = File(rawVideo!.path);

            int currentUnix = DateTime.now().millisecondsSinceEpoch;

            final directory = await getApplicationDocumentsDirectory();
            String fileFormat = videoFile.path.split('.').last;

            _videoFile = await videoFile.copy(
              '${directory.path}/$currentUnix.$fileFormat',
            );

            _startVideoPlayer();
          } else {
            await startVideoRecording();
          }
        }
      : () async {
          // code to handle image clicking
        },
  child: Stack(
    alignment: Alignment.center,
    children: [
      Icon(
        Icons.circle,
        color: _isVideoCameraSelected
            ? Colors.white
            : Colors.white38,
        size: 80,
      ),
      Icon(
        Icons.circle,
        color: _isVideoCameraSelected
            ? Colors.red
            : Colors.white,
        size: 65,
      ),
      _isVideoCameraSelected &&
              _isRecordingInProgress
          ? Icon(
              Icons.stop_rounded,
              color: Colors.white,
              size: 32,
            )
          : Container(),
    ],
  ),
)
Similarly, when the recording is in progress, you can check whether the Boolean _isRecordingInProgress is true and display the pause/resume button instead of the camera flipping button.
Let’s display a preview of the last captured picture or a recorded video on the bottom right corner of the camera view.
To achieve this, we have to define a method for video playback as well.
Define a video player controller:
VideoPlayerController? videoController;
The following method is for starting the video player with the video file stored in the _videoFile variable:
Future<void> _startVideoPlayer() async {
  if (_videoFile != null) {
    videoController = VideoPlayerController.file(_videoFile!);
    await videoController!.initialize().then((_) {
      // Ensure the first frame is shown after the video is initialized,
      // even before the play button has been pressed.
      setState(() {});
    });
    await videoController!.setLooping(true);
    await videoController!.play();
  }
}
Also, don’t forget to release the memory in the dispose() method:
@override
void dispose() {
  // ...
  videoController?.dispose();
  super.dispose();
}
The user interface of the preview can be defined as follows:
Container(
  width: 60,
  height: 60,
  decoration: BoxDecoration(
    color: Colors.black,
    borderRadius: BorderRadius.circular(10.0),
    border: Border.all(color: Colors.white, width: 2),
    image: _imageFile != null
        ? DecorationImage(
            image: FileImage(_imageFile!),
            fit: BoxFit.cover,
          )
        : null,
  ),
  child: videoController != null && videoController!.value.isInitialized
      ? ClipRRect(
          borderRadius: BorderRadius.circular(8.0),
          child: AspectRatio(
            aspectRatio: videoController!.value.aspectRatio,
            child: VideoPlayer(videoController!),
          ),
        )
      : Container(),
)
As we had stored all the captured images and recorded videos in a single folder of the application’s document directory, you can easily retrieve all the files. This might be necessary if you want to show them inside a gallery view, or if you just want to show a thumbnail of the last captured image or video file in the preview.
We’ll define a method that will also refresh the preview image/video when a new capture or recording is done.
// To store the retrieved files
List<File> allFileList = [];

refreshAlreadyCapturedImages() async {
  // Get the directory
  final directory = await getApplicationDocumentsDirectory();
  List<FileSystemEntity> fileList = await directory.list().toList();
  allFileList.clear();

  List<Map<int, dynamic>> fileNames = [];

  // Searching for all the image and video files using
  // their default format, and storing them
  fileList.forEach((file) {
    if (file.path.contains('.jpg') || file.path.contains('.mp4')) {
      allFileList.add(File(file.path));

      String name = file.path.split('/').last.split('.').first;
      fileNames.add({0: int.parse(name), 1: file.path.split('/').last});
    }
  });

  // Retrieving the recent file
  if (fileNames.isNotEmpty) {
    final recentFile =
        fileNames.reduce((curr, next) => curr[0] > next[0] ? curr : next);
    String recentFileName = recentFile[1];
    // Checking whether it is an image or a video file
    if (recentFileName.contains('.mp4')) {
      _videoFile = File('${directory.path}/$recentFileName');
      _startVideoPlayer();
    } else {
      _imageFile = File('${directory.path}/$recentFileName');
    }

    setState(() {});
  }
}
This article covers most of the important topics for using the camera plugin in Flutter, but you still may face certain issues while implementing the camera inside your app. The following are some the common issues:
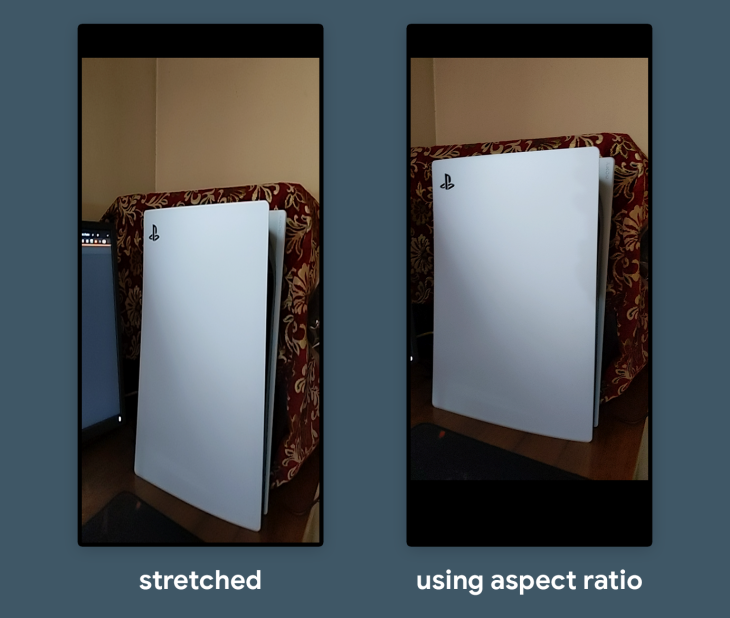
This is one of the most common mistakes while showing a preview of the camera. A stretched camera preview may occur if you try to use the screen width and height to estimate the preview size:
SizedBox(
  width: MediaQuery.of(context).size.width,
  height: MediaQuery.of(context).size.height,
  child: controller!.buildPreview(),
)
But this is not the correct way to show the preview. You should always use the aspect ratio of the camera preview that is accessible using the CameraController:
AspectRatio(
  aspectRatio: 1 / controller!.value.aspectRatio,
  child: controller!.buildPreview(),
)
The
CameraControllerreturns the aspect ratio value as (height : width), but it needs to be passed to theAspectRatiowidget in the format (width : height), so here it is done by taking the reciprocal of the preview aspect ratio (i.e., 1 / aspectRatio).
There’s another way of previewing the camera properly, using the CameraPreview widget:
CameraPreview(
  controller!,
)
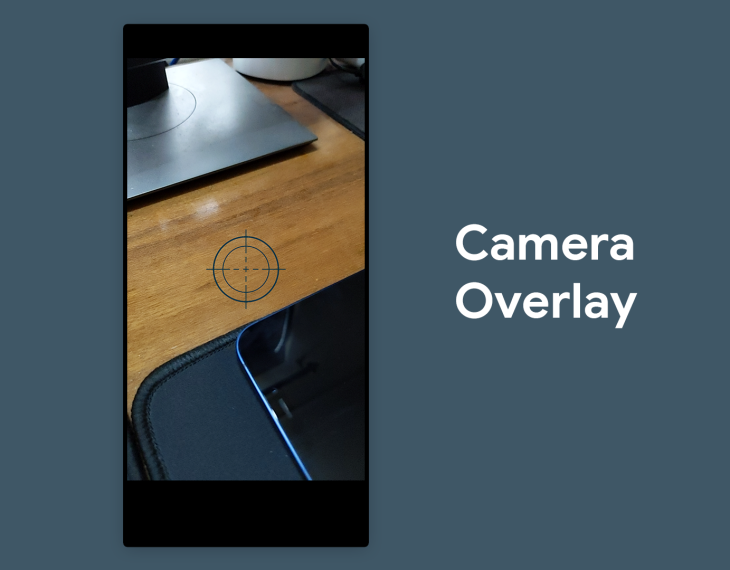
In certain situations, you might want to display an image overlay on top of the camera preview. Let’s try adding a camera viewfinder image.
First, create a new folder in the root directory of your Flutter project called assets. Add the image file to that folder and specify its path inside the pubspec.yaml file:
flutter:
  assets:
    - assets/camera_aim.png
Run the following command to import the image:
flutter pub get
To show the image on top of the camera preview, you have to wrap the preview widget with Stack and use a Image widget below the preview:
AspectRatio(
  aspectRatio: 1 / controller!.value.aspectRatio,
  child: Stack(
    children: [
      controller!.buildPreview(),
      Center(
        child: Image.asset(
          'assets/camera_aim.png',
          width: 150,
          height: 150,
        ),
      ),
    ],
  ),
)
The Center widget is used to make the viewfinder appear at the center of the preview. If you want to make the image translucent, wrap the Image with the Opacity widget with an opacity value between 0 and 1 (0 means fully transparent, and 1 mean fully opaque).
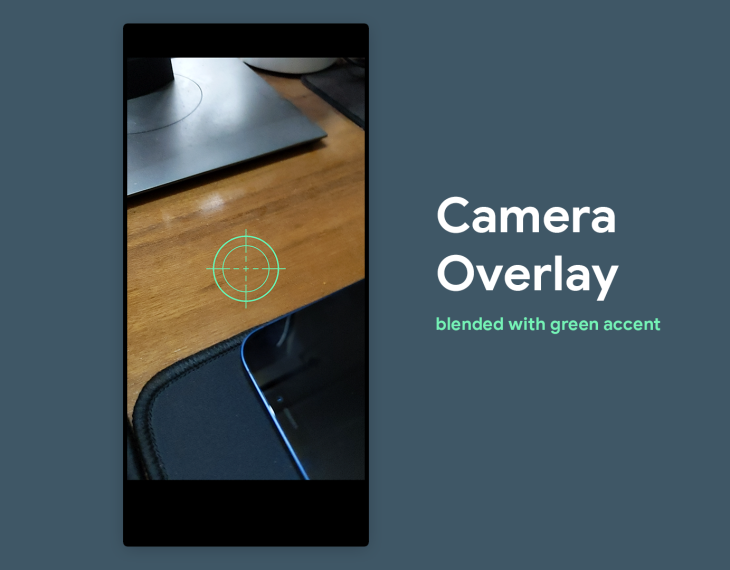
If you want to change the color of the overlay, you can use the color property of the Image widget, which helps in blending it with each pixel of the image:
Image.asset(
  'assets/camera_aim.png',
  color: Colors.greenAccent,
  width: 150,
  height: 150,
)
It’s important to handle the camera permission properly before releasing your app to production. The best way to manage permissions inside your Flutter app is using the permission_handler plugin.
Add the plugin to your pubspec.yaml file:
dependencies:
  permission_handler: ^8.3.0
Run the following command to install the plugin:
flutter pub get
For the Android platform, add the camera permission to your AndroidManifest.xml file inside the manifest tag:
<manifest xmlns:android="http://schemas.android.com/apk/res/android"
    package="com.souvikbiswas.flutter_camera_demo">
   <!-- Permission for accessing `camera` -->
   <uses-permission android:name="android.permission.CAMERA"/>
   <application ...>
Also, set the Android compileSdkVersion and targetSdkVersion to 31, and make sure the AndroidManifest.xml file specifies android:exported=``"``true``" inside the activity tag:
<activity
    android:name=".MainActivity"
    android:exported="true"
For the iOS platform, add the following inside your ios/Podfile:
post_install do |installer|
  installer.pods_project.targets.each do |target|
    flutter_additional_ios_build_settings(target)
    # Add the following -->
    target.build_configurations.each do |config|
      config.build_settings['GCC_PREPROCESSOR_DEFINITIONS'] ||= [
        '$(inherited)',
        ## dart: PermissionGroup.camera
        'PERMISSION_CAMERA=1',
      ]
    end
  end
end
Now, modify the initState() method from:
@override
void initState() {
  // Hide the status bar in Android
  SystemChrome.setEnabledSystemUIOverlays([]);
  // Set and initialize the new camera
  onNewCameraSelected(cameras[0]);
  refreshAlreadyCapturedImages();
  super.initState();
}
To the following:
@override
void initState() {
  // Hide the status bar in Android
  SystemChrome.setEnabledSystemUIOverlays([]);
  getPermissionStatus();
  super.initState();
}
The onNewCameraSelected and refreshAlreadyCapturedImages methods will be moved inside the getPermissionStatus:
getPermissionStatus() async {
  await Permission.camera.request();
  var status = await Permission.camera.status;
  if (status.isGranted) {
    log('Camera Permission: GRANTED');
    setState(() {
      _isCameraPermissionGranted = true;
    });
    // Set and initialize the new camera
    onNewCameraSelected(cameras[0]);
    refreshAlreadyCapturedImages();
  } else {
    log('Camera Permission: DENIED');
  }
}
NOTE: If you also want to record videos using a camera, you also need to ask for microphone permission is a similar manner.
In the above code snippet, first, it requests camera permission. If the permission, is granted then the previous two methods are called that help in initializing the camera, and the _isCameraPermissionGranted Boolean is updated to true.
You can define the Boolean to be false initially:
bool _isCameraPermissionGranted = false;
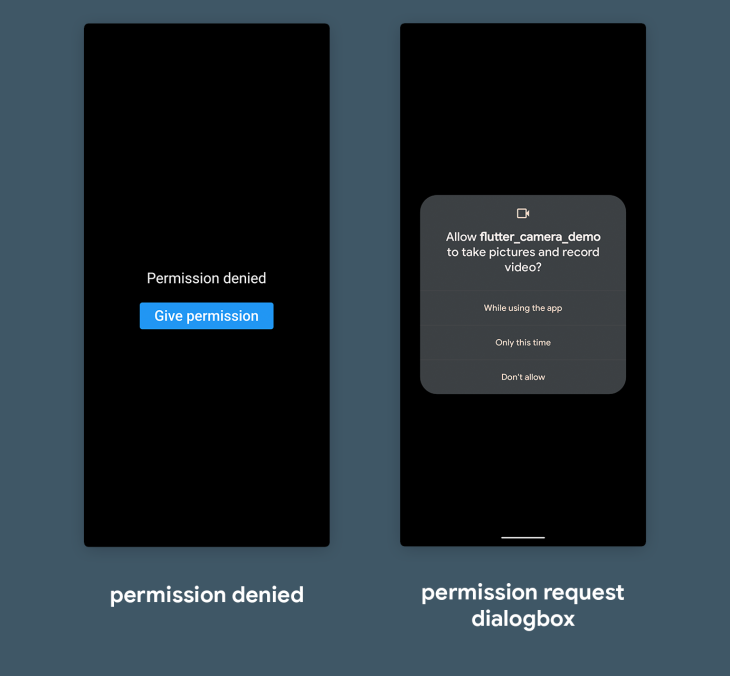
Finally, you need to update the UI when a user denies the permission to access camera. You can use the Boolean to show the alternate widgets. Inside the Scaffold body, add the following:
_isCameraPermissionGranted
    ? PreviewWidgetHere()
    : Column(
        mainAxisAlignment: MainAxisAlignment.center,
        children: [
          Row(),
          Text(
            'Permission denied',
            style: TextStyle(color: Colors.white),
          ),
          SizedBox(height: 16),
          ElevatedButton(
            onPressed: () {
              getPermissionStatus();
            },
            child: Text('Give permission'),
          ),
        ],
      )
When the permission is denied, text is shown along with a button to trigger the getPermissionStatus() method to request camera permission again.
The camera plugin comes with the setFocusPoint method that helps in changing the focus point by passing the offset position.
Add the following method to the CameraScreen class:
void onViewFinderTap(TapDownDetails details, BoxConstraints constraints) {
  if (controller == null) {
    return;
  }
  final offset = Offset(
    details.localPosition.dx / constraints.maxWidth,
    details.localPosition.dy / constraints.maxHeight,
  );
  controller!.setExposurePoint(offset);
  controller!.setFocusPoint(offset);
}
The setExposurePoint method is used for setting the correct exposure level on the focused object to make the visibility better. Now, you need to pass the details of the position where the user has tapped inside the camera.
Modify the CameraPreview like this:
 class="language-dart hljs">CameraPreview(
  controller!,
  child: LayoutBuilder(builder:
      (BuildContext context, BoxConstraints constraints) {
    return GestureDetector(
      behavior: HitTestBehavior.opaque,
      onTapDown: (details) =>
          onViewFinderTap(details, constraints),
    );
  }),
)
A GestureDetector widget is used for getting the position where the user has tapped and it is passed to the onViewFinderTap method.
Congratulations 🎉, you have created a full-fledged camera app with all the basic functionalities. You can even add custom features to this app now, and customize the user interface to match your app’s design palette.
Thank you for reading the article! If you have any suggestions or questions about the article or examples, feel free to connect with me on Twitter or LinkedIn. You can also find the repository of this app on my GitHub.
Install LogRocket via npm or script tag. LogRocket.init() must be called client-side, not
server-side
$ npm i --save logrocket

// Code:

import LogRocket from 'logrocket';
LogRocket.init('app/id');
// Add to your HTML:

<script src="https://cdn.lr-ingest.com/LogRocket.min.js"></script>
<script>window.LogRocket && window.LogRocket.init('app/id');</script>

Learn how to build smooth staggered animations in CSS using modern features like sibling-index(), complete with practical examples, fallbacks, and accessibility tips.

Compare the top AI development tools and models of July 2026. View updated rankings, feature breakdowns, and find the best fit for you.

Learn how to detect unused and ghost dependencies in JavaScript projects using Knip, a project-level linter that keeps your dependency graph accurate.

Learn how Storybook MCP enables AI agents to understand your component library, generate accurate UI, and validate code using documentation, stories, and automated tests.
Would you be interested in joining LogRocket's developer community?
Join LogRocket’s Content Advisory Board. You’ll help inform the type of content we create and get access to exclusive meetups, social accreditation, and swag.
Sign up now

