Canvas-gif is an excellent tool for accessing and editing GIF frames in Node.js projects, including adding text, furthering animations, and editing frames. Canvas-gif harnesses all the superpowers of Canvas, allowing you to manipulate every part of the image beyond just adding text to each GIF frame.
In this article, we will write a sample code to read and edit a GIF using canvas-gif for your next Node.js project. Before diving into editing GIFs, make sure you familiarize yourself with creating and saving images with node-canvas.
Jump ahead:
callBack function with canvas-gifThe Replay is a weekly newsletter for dev and engineering leaders.
Delivered once a week, it's your curated guide to the most important conversations around frontend dev, emerging AI tools, and the state of modern software.
The canvas-gif library allows you to read input GIFs as a buffer with the option to coalesce the GIF. However, if you intend to coalesce the GIF, you’ll need to install ImageMagick.
First, canvas-gif decodes the GIF into an UInt8Array(s) and creates a canvas instance for each frame that the GIF returns. Then, it transforms the UInt8Array into canvas ImageData and puts it into the CanvasRenderingContext. From there, the library passes the context and other relevant information to the functions to edit the frame.
The library will then manipulate the context and add the newly edited frame’s context to the encoder. Finally, canvas-gif will return the encoder’s data as a buffer, which we will write into a GIF file.
Now that we’ve covered the background, let’s dive in and set up a project to explore an example in action.
You’ll need to have Node.js and npm installed to work with canvas-gif.
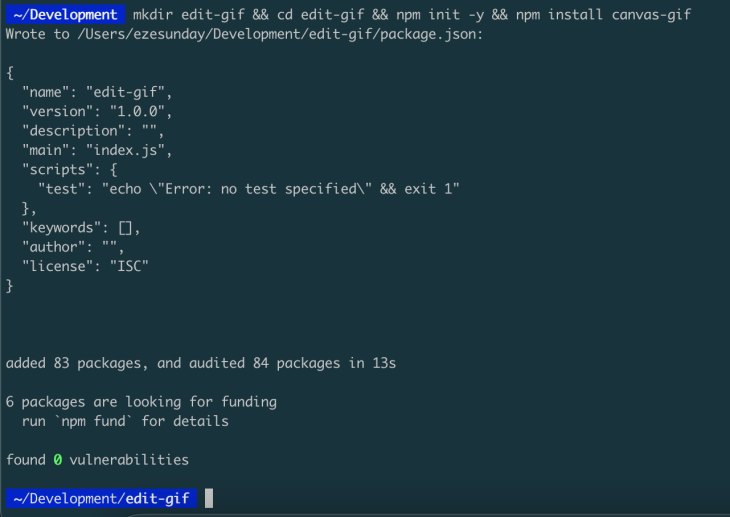
Create a directory for the project, initialize a Node.js project, and install the canvas-gif npm library with the command below:
mkdir edit-gif && cd edit-gif && npm init -y && npm install canvas-gif
Here’s an example of what will happen when you run the code:
After the setup and installation are complete, download a GIF and place it in the root directory. For this article, we’ll use this GIF:

Next, create an app.js file and add the following content to it:
const canvasGif = require("canvas-gif");
const fs = require("fs");

canvasGif(path.join(__dirname, "mr-rogers-nightmare.gif"), callBack, options)
  .then((buffer) =>
    fs.writeFileSync(path.resolve(__dirname, "output1.gif"), buffer)
  )
  .catch((error) => {
    console.log(error);
  });
Here, canvasGif exposes the callBack function to accept the GIF file path and requires a third optional configuration argument. Don’t worry; we’ll look at handling that soon.
callBack function with canvas-gifcallBack allows you to modify the frame’s context as a part of the Canvas API. Here, you can render 2D drawings, draw shapes, create images, text, and more. We’ll leverage this API to modify our GIF.
Enter the function definition below:
const callBack = (context, width, height, totalFrames, currentFrame) => {
};
As you can see, callBack accepts a context as the first argument, followed by width, height, totalFrames, and currentFrame, as shown in the code above.
To add text to each frame, we’ll modify the context by inputting the following code:
const callBack = (context, width, height, totalFrames, currentFrame) => {
// Edit the frame
  context.fillStyle = "#FFA500";
  context.font = '30px "Fira Code Retina"';
  context.fillText("Edited by Eze!", 40, 80);
};
When you pass callBack to canvasGif, it will manipulate the GIF frames and add the text, font, color, and the font family.
Now, our current code will look like this:
const canvasGif = require("canvas-gif");
const fs = require("fs");

const callBack = (context, width, height, totalFrames, currentFrame) => {
// Edit the frame
  context.fillStyle = "#FFA500";
  context.font = '30px "Fira Code Retina"';
  context.fillText("Edited by Eze!", 40, 80);
};
const options = {}

canvasGif(path.join(__dirname, "mr-rogers-nightmare.gif"), callBack, options)
  .then((buffer) =>
    fs.writeFileSync(path.resolve(__dirname, "output1.gif"), buffer)
  )
  .catch((error) => {
    console.log(error);
  });
Then, when we run it, we’ll get this output:

The text is in the GIF, but the GIF is rendering too fast, right? That’s because, by default, canvas-gif renders 60 frames per second (fps). To slow it down, let’s edit the fps in our option parameter and reduce it to 20fps by adding a key fps with a value of 20:
let options = {
  fps: 20
};
When we rerun the script, we get the following result:
This is much slower and resembles the original GIF 🙂. Now, you can add more configurations, like looping the GIF or setting a stopping point.
Here is the sample configuration template:
let options = {
   coalesce: false,
   delay: 0,
   repeat: 0,
   algorithm: "neuquant",
   optimiser: true,
   fps: 20,
   quality: 100,
};
Let’s look at each configuration:
delay: This sets the delay between each frame in milliseconds and defaults to 0repeat: This describes how many times the GIF should repeat and defaults to 0, which runs the GIF infinitelyalgorithm: This defines which algorithm the encoder should use as neuquant, but can be set to octree. Although octree may increase the processing time, it can decrease the file sizeoptimiser: This tells the encoder whether to use the inbuilt optimizer and defaults to falsefps: This describes the number of frames to render per second, with a default of 60fpsquality: This sets the quality of the GIF from 1 to 100. The higher the number, the better the quality. By default, it sets to 100coalesce: This allows you to coalesce the GIF, and it defaults to falseSo far, we’ve edited our GIF and added text to each frame. However, you can do more, including drawing shapes, manipulating pixels, and composing.
For example, here’s another context drawing that renders a smiley face:
const canvasGif = require("canvas-gif");
const fs = require("fs");

const callBack = (context, width, height, totalFrames, currentFrame) => {
// Edit the frame
  context.fillStyle = '#FFA500';
  context.strokeStyle = 'black';
  context.lineWidth = 5;
  context.beginPath();
  context.arc(80, 60, 50, 0, 2 * Math.PI);
  context.fill();
  context.stroke();
  context.closePath();
  //eyes
  context.fillStyle = 'white';
  context.beginPath();
  context.arc(67, 43.75, 7.5, 0, 2 * Math.PI);
  context.fill();
  context.stroke();
  context.closePath();
  context.beginPath();
  context.arc(92.5, 43.75, 7.5, 0, 2 * Math.PI);
  context.fill();
  context.stroke();
  context.closePath();
  //mouth
  context.strokeStyle = 'magenta';
  context.lineWidth = 5;
  context.beginPath();
  context.arc(80, 60, 37.5, 0, -1 * Math.PI);
  context.stroke();
  context.closePath();

};

let options = {
   coalesce: false,
   delay: 0,
   repeat: 0,
   algorithm: "neuquant",
   optimiser: true,
   fps: 20,
   quality: 100,
};

canvasGif(path.join(__dirname, "mr-rogers-nightmare.gif"), callBack, options)
  .then((buffer) =>
    fs.writeFileSync(path.resolve(__dirname, "output1.gif"), buffer)
  )
  .catch((error) => {
    console.log(error);
  });
Here’s the final product:

Although there are alternatives to canvas-gif, such as jimp, gifwrap, and text-on-gif, they don’t directly solve the same problems as canvas-gif.
To achieve something similar to what we did with canvas-gif, we’ll have to combine the capabilities of jimp and gifwrap. Here is an example of how you can use both of them to modify a GIF by placing text over it:
const { GifUtil, GifFrame, BitmapImage } = require("gifwrap");
const Jimp = require("jimp");
async function editGif() {
  var frames = [];
  let font = await Jimp.loadFont(Jimp.FONT_SANS_32_WHITE);
  let readGif = await GifUtil.read("mr-rogers-nightmare.gif");

  for (const frame of readGif.frames) {
    let jimpCopied = GifUtil.copyAsJimp(Jimp, frame);

    jimpCopied.print(font, 10, 0, "LogRocket");

    const modifiedFrame = new GifFrame(
      new BitmapImage(jimpCopied.bitmap, {
        disposalMethod: frame.disposalMethod,
        delayCentisecs: frame.delayCentisecs,
      })
    );

    frames.push(modifiedFrame);
  }

  GifUtil.quantizeDekker(frames);
  GifUtil.write("modified.gif", frames);
}
editGif()
In let readGif = await GifUtil.read("mr-rogers-nightmare.gif");, we read the GIF into memory with gifwrap and then looped through the frames to use jimp to create jimpCopied.print(font, 10, 0, "LogRocket");. From there, we made a new frame based on the text and the image in that specific frame.
Finally, we pushed all new frames into the frames array to create a new edited GIF.
This is the result you’ll get when you run the code:

Although this process works, it has performance problems and is too slow. Canvas-gif took about three seconds to modify a GIF, but it took 21 seconds to manipulate the same GIF with gifwrap and jimp.
This difference is because gifwrap generates a new GIF based on the existing GIF, while canvas-gif directly modifies the frames. Because of this, Canvas-gif implementation performs more efficiently than Gifwrap and Jimp implementation.
Although text-on-gif is straightforward, it focuses on manipulating GIFs to only add text. Unlike canvas-gif, which harnesses the features of Canvas, text-on-gif cannot manipulate every part of the image and only adds text to each GIF frame.
Here’s an example from the docs:
const TextOnGif = require("text-on-gif");
const generate = async ()=>{

  var gif = new TextOnGif({
    file_path: "mr-rogers-nightmare.gif"
  });

  gif.font_color = "orange";
  gif.font_size = "30px";

  var buffer = await gif.textOnGif({
    text: "Made with Love ",
    write_path: "mrroger.gif"
  });
}
generate()
The code above will generate this GIF:

In this article, we learned how to use canvas-gif to edit GIF animations and add shapes, text, or images. Since most of what you can do with canvas-gif depends on the Canvas API, I encourage you to learn more about the canvas API on MN and in the Node-canvas docs.
Happy hacking!
 Monitor failed and slow network requests in production
Deploying a Node-based web app or website is the easy part. Making sure your Node instance continues to serve resources to your app is where things get tougher. If you’re interested in ensuring requests to the backend or third-party services are successful, try LogRocket.

LogRocket lets you replay user sessions, eliminating guesswork around why bugs happen by showing exactly what users experienced. It captures console logs, errors, network requests, and pixel-perfect DOM recordings — compatible with all frameworks.
LogRocket's Galileo AI watches sessions for you, instantly identifying and explaining user struggles with automated monitoring of your entire product experience.
LogRocket instruments your app to record baseline performance timings such as page load time, time to first byte, slow network requests, and also logs Redux, NgRx, and Vuex actions/state. Start monitoring for free.
Learn practical techniques to reduce token usage in LLM applications and build more cost-efficient, scalable AI systems.
Build dynamic forms using a JSON schema-driven approach that keeps frontend and backend validation in sync.
Within roughly the same six-month window, Anthropic shipped Agent Teams for Claude Code, OpenAI published Swarm and the production-ready Agents […]

Compare the top AI development tools and models of March 2026. View updated rankings, feature breakdowns, and find the best fit for you.
Would you be interested in joining LogRocket's developer community?
Join LogRocket’s Content Advisory Board. You’ll help inform the type of content we create and get access to exclusive meetups, social accreditation, and swag.
Sign up now

