Are you beginning a new project, capturing requirements, selecting technologies to use, modeling data, and getting your team ready to start crafting some code? Whether you’re a solo developer or a team, every decision you make at the start of your project has pros and cons.
Do you start with a monolith — something like Ruby on Rails or Django, or do you start by separating your frontend and backend completely by creating an API that will be consumed by a Single Page Application (SPA)?
With SPAs and Serverless being all the rage these days, we will assume you have decided to create an API and SPA. Now you need to decide how you will build and host your API. But do you actually need an API?
Would you and/or your team’s time be better spent focusing on the user experience and SPA?
What if I told you there are tools that allow you to directly connect to your datastore securely from your SPA! We will build a note taking application for a company that will include permissions for notes.
Today we will focus on an exceptional technology and product suite — Google Cloud’s Firebase.
Firebase provides all of the tools you’ll need to get your project off the ground including hosting w/ free SSL cert and a global CDN, authentication, a datastore, blob storage, and so much more.
Okay, enough talk — it’s time to get to the code.
I will not go into your frontend selection choice, but I highly recommend Ember now that Octane has arrived, or Nextjs if you prefer React. With that being said, I will only be showing the JavaScript required to get your project working.
Before we can get started however, visit https://firebase.google.com and create your free account.
To get started, we will install the Firebase CLI and login to our Firebase account.
$: npm i -g firebase-tools
$: firebase login
Assuming you already have a project setup with your SPA of choice, let’s activate the Firebase features we will be using: hosting, authentication, and Firestore:
$: firebase init
? Which Firebase CLI features do you want to set up for this folder? Press Space
 to select features, then Enter to confirm your choices.
 ◯ Database: Deploy Firebase Realtime Database Rules
 ◉ Firestore: Deploy rules and create indexes for Firestore
 ◯ Functions: Configure and deploy Cloud Functions
❯◉ Hosting: Configure and deploy Firebase Hosting sites
 ◯ Storage: Deploy Cloud Storage security rules
 ◯ Emulators: Set up local emulators for Firebase features
=== Project Setup
First, let’s associate this project directory with a Firebase project.
You can create multiple project aliases by running Firebase using --add, but for now we’ll just set up a default project.
? Please select an option: (Use arrow keys) Use an existing project ❯ Create a new project Add Firebase to an existing Google Cloud Platform project Don't set up a default project i If you want to create a project in a Google Cloud organization or folder, please use "firebase projects:create" instead, and return to this command when you've created the project. ? Please specify a unique project id (warning: cannot be modified afterward) [6-30 characters]: logrocket-notes ? What would you like to call your project? (defaults to your project ID) ✔ Creating Google Cloud Platform project ✔ Adding Firebase resources to Google Cloud Platform project 🎉🎉🎉 Your Firebase project is ready! 🎉🎉🎉 Project information: - Project ID: logrocket-notes - Project Name: logrocket-notes Firebase console is available ati Using project logrocket-notes (logrocket-notes) === Firestore Setup Error: It looks like you haven't used Cloud Firestore in this project before. Go to https://console.firebase.google.com/project/logrocket-notes/database to create your Cloud Firestore database.Sign in
No Description
Now you may have noticed we encountered an error, and this is one of the things I love about Firebase. It tells you when you need to do something and gives you the link to go and do it!
Now copy the link provided and set up your project to use Firestore by selecting Create Database.

You’ll see you are presented with a modal asking what rules you’d like to start your database with by default. As I said at the beginning, these rules will be used to control access to your database front your SPA / FE client. With that said, select Start in production mode. It is good learn to use the rules from the start.
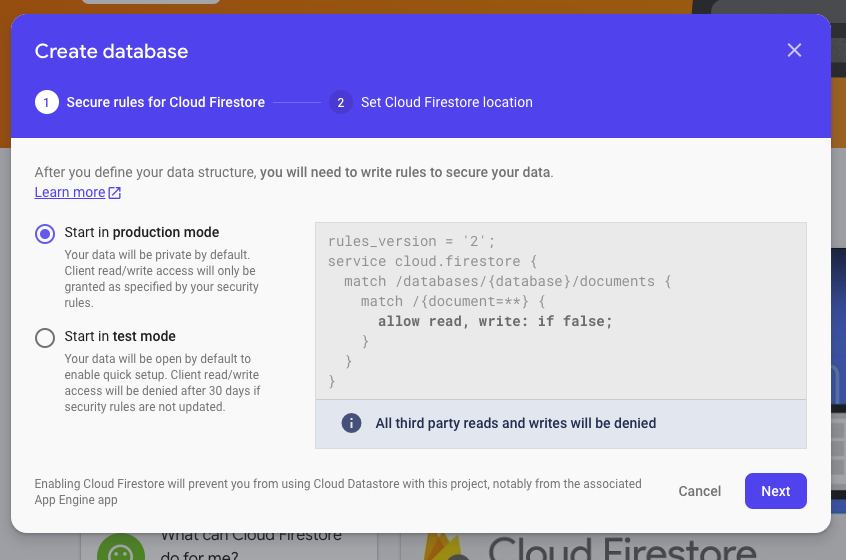
Next you’ll be asked to select your location — pick the location closest to you and/or your customer(s) and give it a few seconds to create the database.

Now that we have our database set up, we run our firebase init command again. Again, you’ll select Firestore and Hosting, but you’ll notice it does not ask you about selecting the project again.
If it does, simply select Use an existing project and select the project name you created earlier, and walk through the rest of the configuration.
=== Firestore Setup

Firestore Security Rules allow you to define how and when to allow
requests. You can keep these rules in your project directory
and publish them with firebase deploy.

? What file should be used for Firestore Rules? (firestore.rules)
Firestore indexes allow you to perform complex queries while
maintaining performance that scales with the size of the result
set. You can keep index definitions in your project directory
and publish them with firebase deploy.

? What file should be used for Firestore indexes? (firestore.indexes.json)
=== Hosting Setup

Your public directory is the folder (relative to your project directory) that
will contain Hosting assets to be uploaded with firebase deploy. If you
have a build process for your assets, use your build's output directory.

? What do you want to use as your public directory? public
? Configure as a single-page app (rewrite all urls to /index.html)? Yes
✔  Wrote public/index.html

i  Writing configuration info to firebase.json...
i  Writing project information to .firebaserc...
i  Writing gitignore file to .gitignore...

✔  Firebase initialization complete!
Now we are ready to go! Let’s run through what we did:
You might be asking, “but I thought you said we would be using Authentication too!”, and you’re correct.
We will be using Firebase Authentication but we do not configure that through the Firebase CLI, and we will get to that in a minute.
Now you may have noticed a few new files in your project:
.firebaserc // manages your project aliases and deploy targets.
firebase.json // is required and specifies which files and settings from your project directory are deployed to your Firebase project.
firestore.rules // is a file used to define the security rules for your Firestore database.
firestore.indexes.json // is a file used to define indexes for you Firestore queries.
It is time we start modeling some data, but if you haven’t realized Firestore is a NoSQL document datastore, used by some very large organizations and start-ups including The New York Times, Khan Academy, and Now IMS, and will have a different model than you may be familiar with using MySQL or Postgres for example.
I will use a plain old JavaScript object to show the structure of the models.
</users/{userId}
User {
  firstName: string;
  lastName: string;
  avatar: string;
  email: string;
}
/notes/{noteId}
Note {
  title: string;
  content: string;
  roles: {
    userId: string; // e.g., ['owner', 'reader', 'editor', 'commenter']
  }
}
/notes/{noteId}/comments/{commentId}
Comment {
  user: {
    name: string;
    id: string;
  };
  content: string;
}
Lets go through the models quickly:
As you can see, the User model stores the general information related to a user. We could put a role on the user model, but for this simple post we will put our user role on the note.
There is a trade-off for this model of security — let’s say you had saved the User role on the User, but you wanted to have an internal note about potential issue with a User.
If they have the appropriate role, e.g., Admin, on their user record, they could see the Note that is about them. By defining roles on the Note, we are explicitly setting permissions per note, giving us the ability to invite users to the Note and keeps others out.
The Notes model contains a title and the content of the note. The one thing you may find interesting is the roles object on the Note. This could be named anything — even users, as it will be used to restrict access to the Note.
As you may have noticed, the Comment model doesn’t have a field for noteId and we do not need to add that. We certainly can, but a Comment belongs to a subcollection of a Note — think of it as an access pattern similar to a REST API.
You do not need to use a where query to retrieve all of the comments for a Note. We will touch more on this when we start retrieving data.
Another observation you may have noticed is the Comment user object contains name and id.
When you are modeling data with NoSQL, it is important to model data based on your access patterns or how the data will be used in your view. Generally, when you have a comment you want to know who made the comment.
Using a SQL database, you would join the data and send it to the view layer. But, with NoSQL you can add that data and duplicate it to your record, giving you a simple and fast access pattern — this is called denormalized data. Now, when we query for a Comment, we get who authored it and their name.
With our basic models out of the way, let’s start writing some data access rules. Unlike SQL, NoSQL databases are usually schemaless. This means we can easily extend our data models, but also means we need to enforce the data structure within our application code.
The nice thing about Firestore is that you can handle schema rules and access patterns within your Security Rules, but these access patterns and schema rules do not apply to the Admin API access you have through things like Google Cloud Functions.
Open your firestore.rules file and lets start adding the rules for our client-side access.
firestore.rules
rules_version = '2';
service cloud.firestore {
  match /databases/{database}/documents {
    match /{document=**} {
      allow read, write: if false;
    }
  }
}
Firestore rules are extremely flexible and run per request. We have the ability to write functions to enable reusability and we will do so in this example.
firestore.rules
rules_version = '2';
service cloud.firestore {
  match /databases/{database}/documents {
    function isAuthenticated() {
      return request.auth != null;
    }
    function getRole(resource) {
      // Read from the "roles" map in the resource
      return resource.data.roles[request.auth.uid]
    }
    function isOneOfRoles(resource, array) {
      // Determine if the user is one of any array of roles
      return isAuthenticated() && (getRole(resource) in array);
    }
    function onlyNoteContentChanged() {
      // Ensure only the Note's content has changed
      return request.resource.data.title == resource.data.title
      && request.resource.data.roles == resource.data.roles
      && request.resource.data.keys() == resource.data.keys();
    }
    match /users/{user} {
      // Any user can see other user profiles
      allow read: if isAuthenticated();
      // only the current user can write to their own profile
      allow write: if  request.auth.uid == user;
    }
    match /notes/{note} {
      // Any authenticated user can create a note
      allow create: if isAuthenticated();
      // Only the note owner is permitted to delete it
      allow delete: if isOneOfRoles(resource, ['owner']);
      // The owner is permitted to update the note including the title, content and add users
      // Editors are only permitted to update the content of the note.
      allow update: if isOneOfRoles(resource, ['owner'])
        || (isOneOfRoles(resource, ['editor']) && onlyNoteContentChanged());
      allow read: if isOneOfRoles(resource, ['owner', 'editor', 'commenter', 'reader'])

      // the rules below apply to comments of the note
      // /notes/{note}/comments/{comment}
      match /comments/{comment} {
        // we are using a rules get query to retrieve the note and check the
        // roles to ensure the user can infact
        allow read: if isOneOfRoles(
          get(/databases/$(database)/document/notes/$(note)),
          ['owner', 'editor', 'commenter', 'reader']
        );
        allow create: if isOneOfRoles(
          get(/databases/$(database)/document/notes/$(note)),
          ['owner', 'editor', 'commenter']
        ) && request.resource.data.user.id == request.auth.uid;
      }
    }
  }
}
The rules engine provides request and resource variables for us to use — information about what is provide can be found here. Let’s walk through the rules and see what we added
isAuthenticated is a reusable helper we will make use of within many rules.
getRole is another reusable helper. It will be used to capture the role on the note document using the user’s authentication id.
isOneOfRoles is a helper function that checks if the user is authenticated, and validates that the user’s authenticated id has the appropriate role to perform an action.
onlyNoteContentChanged is a helper to validate the data structure of the document. As stated previously, Firestore is schema-less and requires you to perform data validation within your application or the Firestore rules.
I’ve made inline comments for each rule above which should make it pretty self explanatory. The Firestore Rules documentation is fantastic and I suggest you give them a read here.
Once you have updated your security rules, let’s get them deployed:
$ firebase deploy --only firestore:rules
=== Deploying to 'logrocket-notes'...

i  deploying firestore
i  cloud.firestore: checking firestore.rules for compilation errors...
✔  cloud.firestore: rules file firestore.rules compiled successfully
i  firestore: uploading rules firestore.rules...
✔  firestore: released rules firestore.rules to cloud.firestore

✔  Deploy complete!
Time to get Authentication working. I’ll only be providing the JavaScript required to get this completed. Firebase provides great documentation about using Authentication and I highly recommend you review their documentation here.
To keep it simple, I will use the Firebase UI component:
let ui = new firebaseui.auth.AuthUI(firebase.auth());
let uiConfig = {
  callbacks: {
    signInSuccessWithAuthResult: function (authResult, redirectUrl) {
      // User successfully signed in.
      // Return type determines whether we continue the redirect automatically
      // or whether we leave that to developer to handle.
      return false;
    },
    uiShown: function () {
      // The widget is rendered.
      // Hide the loader.
      document.getElementById('loader').style.display = 'none';
    },
  },
  // Will use popup for IDP Providers sign-in flow instead of the default, redirect.
  signInFlow: 'popup',
  signInOptions: [
    // Leave the lines as is for the providers you want to offer your users.
    firebase.auth.GoogleAuthProvider.PROVIDER_ID,
  ],
};
ui.start('#auth', uiConfig);

// Create an auth listener to get the real-time auth status
let myUser = null;
firebase.auth().onAuthStateChanged(user => {
  if (!user) {
    // user is not authenticated and need to transition view
    // do something here with your framework
    myUser = user; // this will be null.
  }
  // user is authenticated - framework of choice code here.
  // in react you could use an AuthContext as an example
  myUser = user.uid // get user id to use for queries, etc.
})
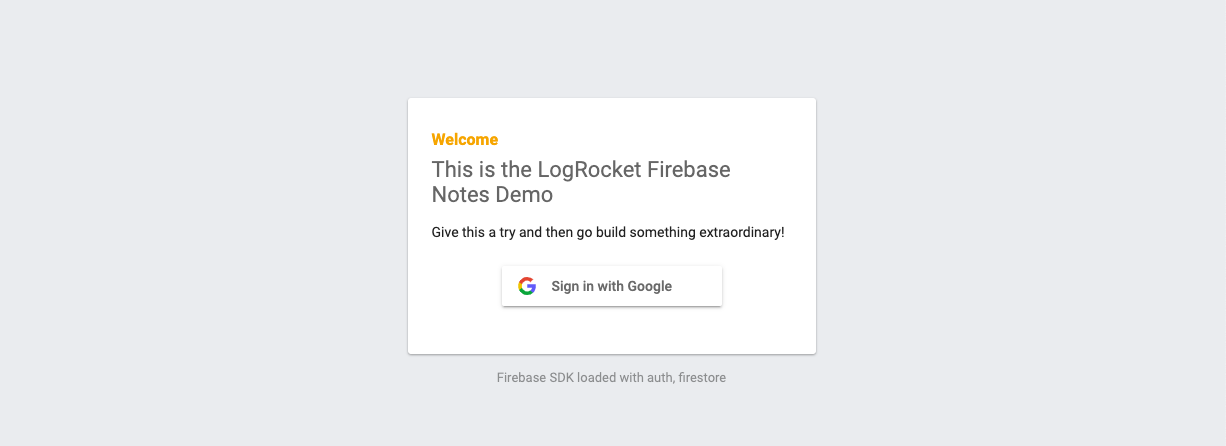
Here is what my rather simple UI looks like using the Firebase provided component:
Now that we have authentication completed, let’s create a note.
Build a simple form using your preferred framework and capture the form values. I will provide a sample function with the Firestore code for persisting data to the database.
//
function formSubmit() {
  const title = input.value;
  const content = input.value;
  const roles = {
    '124j243lk': 'owner',
    'fake_id_3': 'editor'
  }

  // save to firestore and have firestore assign a unique id
  firebase.firestore().collection('notes').add({
    title,
    content,
    roles
  });

  // if you would prefer to restrict documents by title uniqueness
  firebase.firestore().collection('notes').doc(title).set({
    title,
    content,
    roles
  });
}

Here is my sample form for adding notes. Ugly, I know — but this is not about styling, etc. Which I recommend Tailwind for.
Firestore offers you real-time data sync for your clients. Let’s setup a snapshot listener now and here are the docs to read about further.
db.collection('notes')
  .where(`roles.fake_id`, '==', 'owner')
  .onSnapshot(querySnapshot => {
    // if the query is empty just return
    if (querySnapshot.empty) return;
    // we have some docs --
    // do something depending on your framework of choice.
    // I will create an array of documents with their data and id
    const notes = querySnapshot.docs.map(doc => ({...doc.data(), id: doc.id}))
    // as you can see, I need to call doc.data() to get the data of the document.
    // for this quick and dirty exmaple i will simply loop through the docs and add to an html element
    notesDiv.innerHTML = `<span>Notes: ${notes.length}</span><br><hr />`;
    for (const note of notes) {
      notesDiv.innerHTML += `
        <strong>${note.title}</strong><br>
        <em>${note.content}</em><br/><hr />
      `;
    }
  });
Now that we have the snapshot listener created, lets see it working in our UI.

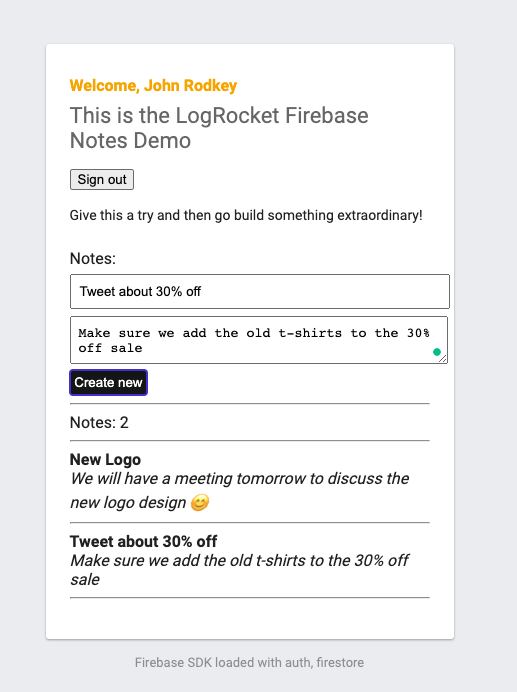
Great! We can see how many notes are returned in our query, we have the title bold, and the content italicized.
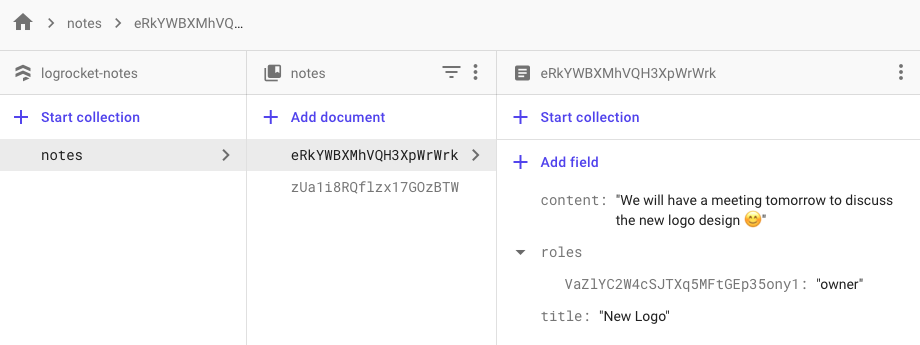
If we look in Firestore, we can see our documents and how they look in the Admin Console:
Let’s breakdown what we’ve done and what it means for you.
We have setup a scalable, real-time, NoSQL database with Google’s Firestore, we have configured and enabled authentication with Firebase Authentication, added authorization through Firestore rules, and we have a static site hosting with Firebase’s global CDN.
Everything offered by Firebase is built to get you to market quickly, providing scalable building blocks and encouraging you to build your applications with best practices.
But, we didn’t touch on many other Firebase offerings including Firebase Functions, which are powered by Google Cloud Functions, or Google Cloud Run which offer fantastic free-tiers to get you started with building out scalable APIs and backend systems should you need them. Again, all serverless.
We didn’t need to provision servers, we don’t need to worry about server updates or patches, we have a globally scalable database without needing to worry about adding nodes or sharding, we have a fast global CDN and generous free hosting, and we have authentication provided best practices.
There is much much more you can do with Firebase and Google Cloud. I’ll be creating many more posts related to Firebase and deep dive into each subject area in greater detail, so stay tuned!
Install LogRocket via npm or script tag. LogRocket.init() must be called client-side, not
server-side
$ npm i --save logrocket

// Code:

import LogRocket from 'logrocket';
LogRocket.init('app/id');
// Add to your HTML:

<script src="https://cdn.lr-ingest.com/LogRocket.min.js"></script>
<script>window.LogRocket && window.LogRocket.init('app/id');</script>

I migrated 20 production-style components from Tailwind to StyleX. Here’s what the data showed about LOC, CSS bundle size, build time, and type safety.

A guide for using JWT authentication to prevent basic security issues while understanding the shortcomings of JWTs.

Discover how to build, render, and automate product demo videos with Remotion, replacing traditional screen recordings with reusable React code.

Chrome’s Modern Web Guidance embeds modern web platform skills into AI coding agents, helping them choose native HTML, CSS, and browser APIs over legacy patterns.
Hey there, want to help make our blog better?
Join LogRocket’s Content Advisory Board. You’ll help inform the type of content we create and get access to exclusive meetups, social accreditation, and swag.
Sign up now

