
Just a short time ago, the only way to create and deploy games was to choose a game engine like Unity or Unreal, learn the language, and then package up your game and deploy it to your platform of choice.
The thought of attempting to deliver a game to a user through their browser would have seemed like an impossible task.
Fortunately, thanks to advancements in browser technologies and hardware acceleration becoming available in all popular browsers, improvements to JavaScript performance, and a steady increase in available processing power, creating interactive gaming experiences for browsers are becoming more and more common.
In this article, we’ll look at how we can create a game using Three.js. You can follow along here as well as watching the video tutorial:
But first, let’s review what Three.js is and why is it a good choice for game development.
The Replay is a weekly newsletter for dev and engineering leaders.
Delivered once a week, it's your curated guide to the most important conversations around frontend dev, emerging AI tools, and the state of modern software.
Three.js’ project description on GitHub aptly describes Three.js as “…an easy to use, lightweight, cross-browser, general purpose 3D library.”
Three.js makes it relatively straightforward for us, as developers, to draw 3D objects and models to the screen. Without it, we would need to interface directly with WebGL, which, while not impossible, can make even the smallest game development project take an incredible amount of time.
Traditionally, a “game engine” is comprised of multiple parts. For example, Unity and Unreal provide a way to render objects to the screen, but also a raft of other features, like networking, physics, and so on.
Three.js, however, is more limited in its approach and doesn’t include things like physics or networking. But, this simpler approach means that it’s easier to learn and more optimized to do what it does best: draw objects to the screen.
It also has a great set of samples that we can use to understand how to draw a variety of objects to the screen. Finally, it provides an easy and native way to load our models into our scene.
Three.js can be an attractive option as a game development engine if you don’t want your users to need to download an app via an app store or have any setup to play your game. If your game works in the browser, then you have the lowest barrier to entry, which can only be a good thing.
Today, we’ll take a tour through Three.js by making a game that uses shaders, models, animation, and game logic. What we’ll create will look like this:
The concept is simple. We’re in control of a rocket ship, tearing across a planet, and it’s our goal to pick up energy crystals. We also need to manage the health of our ship by picking up shield boosts and trying not to damage our ship too badly by hitting the rocks in the scene.
At the end of our run, the rocket ship returns to the mothership in the sky, and if the user clicks NEXT LEVEL, they get another go, this time with a longer path for the rocket to travel through.
As the user plays, the speed of the rocket ship increases, so they must work faster to dodge rocks and collect the energy crystals.
To create a game like this, we must answer the following questions:
By the time we’ve created this game, we will have overcome these challenges.
Before we start coding though, we must review some brief theory, specifically relating to how we will create the sense of movement within the game.
Imagine for a moment that you are in control of a helicopter in real life, and you are following an object on the ground. The object continues at a speed that gradually increases. In order for you to keep up, you must progressively increase the speed of the helicopter that you are in.
If there were no limits on the speed of the helicopter or the object on the ground, this would continue for as long as you would like to keep up with the object on the ground.
When creating a game that follows an object, as we are doing in this example, it can be tempting to apply the same logic. That is, to move the object in the world space as it speeds up, and update the speed of the camera that is following behind. However, this presents an immediate problem.
Basically, everyone playing this game will play it on their phones or desktop computers. These are devices that have finite resources. If we attempt to generate a possibly unlimited amount of objects as the camera moves, and then move that camera, eventually we will use up all the resources that are available and the browser tab will become unresponsive or crash.
We’re also required to create a plane (a flat 2D object) that represents the ocean. When we do this, we must give the dimensions for the ocean.
However, we can’t create a plane that is infinite in size, nor can we create a gigantic plane and just hope that the user never progresses far enough through our level that they will navigate off the plane.
That’s poor design, and hoping that people don’t play our game enough to experience bugs seems counter-intuitive.
Instead of moving our camera indefinitely in one direction, we instead keep the camera stationary and move the environment around it. This has several benefits.
One is that we always know where our rocket ship is, as the location of the rocket doesn’t move into the distance; it only moves side to side. This makes it easy for us to work out if objects are behind the camera and can be removed from the scene to free up resources.
The other benefit is that we can choose a point in the distance to create objects at. This means that as objects come towards the player, new items or objects will continually be created in the distance outside of the players’ view.
When they disappear from view, either by the player colliding with them or by going behind the player, these items are disposed from the scene to keep memory usage down.
To create this effect, we’ll need to do two things: First, we need to procedurally shift each item along the depth axis to move objects towards the camera. Secondly, we must provide our water surface with a value to be offset by and increase this offset over time.
This will give the effect that the waters’ surface is moving faster and faster.
Now that we’ve solved how we will move the rocket forward through the scene, let’s move on to setting up our project.
Let’s start making our game! The first thing we need to do is set up our build environment. For this example, I chose to use Typescript and Webpack. This article isn’t about the benefits of these technologies, so I won’t go into too much detail about them here except for a quick summary.
Using Webpack means that when we develop our project and as we save our files, Webpack will see that our files have changed and automatically reload our browser with our saved changes.
This means you don’t need to manually refresh the browser every time you make a change, which saves a lot of time. It also means we can use plugins like three-minifier, which reduces the size of our bundle when we deploy it.
Using TypeScript in our example means that our project will have type safety. I find this particularly useful when working with some of Three.js’ internal types, like Vector3s and Quaternions. Knowing that I’m assigning the right type of a value to a variable is very valuable.
We’ll also use Materialize CSS for our UI. For the few buttons and cards that we’ll use as our UI, this CSS framework will help significantly.
To start work on our project, create a new folder. Within the folder, create a package.json and paste the following contents in:
{
  "dependencies": {
    "materialize-css": "^1.0.0",
    "nipplejs": "^0.9.0",
    "three": "^0.135.0"
  },
  "devDependencies": {
    "@types/three": "^0.135.0",
    "@yushijinhun/three-minifier-webpack": "^0.3.0",
    "clean-webpack-plugin": "^4.0.0",
    "copy-webpack-plugin": "^9.1.0",
    "html-webpack-plugin": "^5.5.0",
    "raw-loader": "^4.0.2",
    "ts-loader": "^9.2.5",
    "typescript": "^4.5.4",
    "webpack": "^5.51.1",
    "webpack-cli": "^4.8.0",
    "webpack-dev-server": "^4.0.0",
    "webpack-glsl-loader": "git+https://github.com/grieve/webpack-glsl-loader.git",
    "webpack-merge": "^5.8.0"
  },
  "scripts": {
    "dev": "webpack serve --config ./webpack.dev.js",
    "build": "webpack --config ./webpack.production.js"
  }
}
Then, in a command window, type npm i to install the packages to your new project.
We now need to create three files, a base Webpack configuration file, followed by a development and production configuration for our project.
Create a webpack.common.js file within your project folder and paste in the following configuration:
const HtmlWebpackPlugin = require("html-webpack-plugin");
const CopyPlugin = require("copy-webpack-plugin");

module.exports = {
    plugins: [
        // Automatically creat an index.html with the right bundle name and references to our javascript.
        new HtmlWebpackPlugin({
            template: 'html/index.html'
        }),
        // Copy game assets from our static directory, to the webpack output
        new CopyPlugin({
            patterns: [
                {from: 'static', to: 'static'}
            ]
        }),
    ],
    // Entrypoint for our game
    entry: './game.ts',
    module: {
        rules: [
            {
                // Load our GLSL shaders in as text
                test: /.(glsl|vs|fs|vert|frag)$/, exclude: /node_modules/, use: ['raw-loader']
            },
            {
                // Process our typescript and use ts-loader to transpile it to Javascript
                test: /.tsx?$/,
                use: 'ts-loader',
                exclude: /node_modules/,
            }

        ],
    },
    resolve: {
        extensions: ['.tsx', '.ts', '.js'],
    },

}
Then, create a webpack.dev.js file and paste in these details. This configures the hot-reload functionality of the Webpack development server:
const { merge } = require('webpack-merge')
const common = require('./webpack.common.js')
const path = require('path');
module.exports = merge(common, {
    mode: 'development', // Don't minify the source
    devtool: 'eval-source-map', // Source map for easier development
    devServer: {
        static: {
            directory: path.join(__dirname, './dist'), // Serve static files from here
        },
        hot: true, // Reload our page when the code changes
    },
})
Finally, create a webpack.production.js file and paste in these details:
const { merge } = require('webpack-merge')
const common = require('./webpack.common.js')
const path = require('path');
const ThreeMinifierPlugin = require("@yushijinhun/three-minifier-webpack");
const {CleanWebpackPlugin} = require("clean-webpack-plugin");
const threeMinifier = new ThreeMinifierPlugin();

module.exports = merge(common, {
    plugins: [
        threeMinifier, // Minifies our three.js code
        new CleanWebpackPlugin() // Cleans our 'dist' folder between builds
    ],
    resolve: {
        plugins: [
            threeMinifier.resolver,
        ]
    },
    mode: 'production', // Minify our output
    output: {
        path: path.resolve(__dirname, 'dist'),
        filename: '[name].[fullhash:8].js', // Our output will have a unique hash, which will force our clients to download updates if they become available later
        sourceMapFilename: '[name].[fullhash:8].map',
        chunkFilename: '[id].[fullhash:8].js'
    },
    optimization: {
        splitChunks: {
            chunks: 'all', // Split our code into smaller chunks to assist caching for our clients
        },
    },
})
The next thing we need to do is configure our TypeScript environment to allow us to use imports from JavaScript files. To do this, create a tsconfig.json file and paste in the following details:
{
    "compilerOptions": {
        "moduleResolution": "node",
        "strict": true,
        "allowJs": true,
        "checkJs": false,
        "target": "es2017",
      "module": "commonjs"

    },
    "include": ["**/*.ts"]
}
Our build environment is now configured. Now it’s time to get to work creating a beautiful and believable scene for our players to navigate through.
Our scene comprises of the following elements:
We’ll carry out most of our work in a file called game.ts, but we’ll also break out parts of our game into separate files so we don’t end up with an incredibly long file. We can go ahead and create the game.ts file now.
Because we’re dealing with a quite complex topic, I’ll also include links to where this code is located within the project on GitHub. That should hopefully help you to keep your bearings and not get lost in a larger project.
SceneThe first thing we need to do is create a Scene so Three.js has something to render. Within our game.ts, we’ll add the following lines to construct our Scene and place a PerspectiveCamera in the scene, so we can see what’s happening.
Finally, we’ll create a reference for our renderer which we will assign later:
export const scene = new Scene()
export const camera = new PerspectiveCamera(
    75,
    window.innerWidth / window.innerHeight,
    0.1,
    2000
)

// Our three renderer
let renderer: WebGLRenderer;
To set our scene up, we need to carry out some tasks like creating a new WebGLRenderer and setting the size of the canvas that we want to draw to.
To do this, let’s create an init function and place it within our game.ts as well. This init function will carry out the initial setup for our scene, and only runs once (when the game is first loaded):
/// Can be viewed here
async function init() {
    renderer = new WebGLRenderer();
    renderer.setSize(window.innerWidth, window.innerHeight);
    document.body.appendChild(renderer.domElement);
}
We’ll also need to leverage a render and animation loop for our scene. We’ll need the animation loop to move objects on the screen as we need and we’ll need the render loop to draw new frames to the screen.
Let’s go ahead and create the render function now in our game.ts. At the start, this function will look pretty bare because it is simply requesting an animation frame and then rendering the scene.
There are quite a few reasons why we request an animation frame, but one of the main ones is that our game will pause if the user changes tabs, which will improve performance and reduce possibly wasting resources on the device:
// Can be viewed here
const animate = () => {
    requestAnimationFrame(animate);
    renderer.render(scene, camera);
}
So, now we have our empty scene with a camera in it, but nothing else. Let’s add some water to our scene.
SceneFortunately, Three.js includes an example of a water object that we can use in our scene. It includes real-time reflections and looks pretty good; you can check it out here.
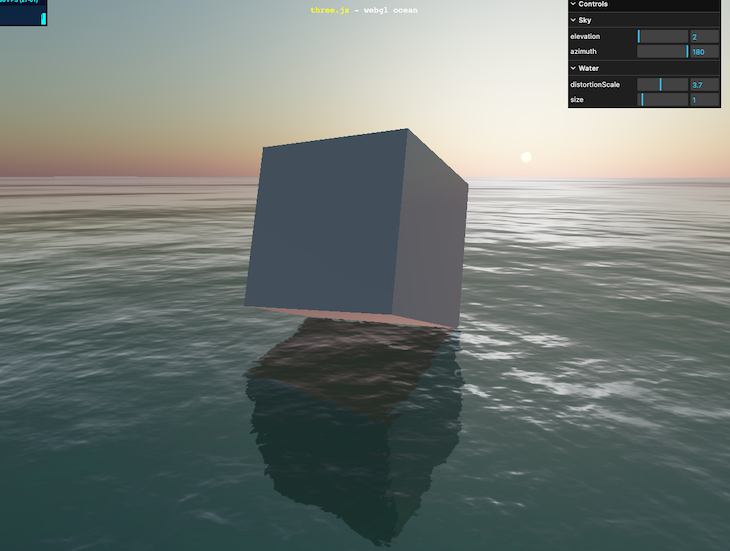
Fortunately for us, this water will accomplish most of what we want to do within our scene. The only thing we need to do is change the shader for the water slightly so we can update it from within our render loop.
We do this because if we offset our water texture by an increasing amount as time goes on, then it will give us the sensation of speed.
To demonstrate, this is the opening scene of our game, but I’m increasing the offset every frame. As the offset increases, it feels like the speed of the ocean beneath us is increasing (even though the rocket is actually stationary).
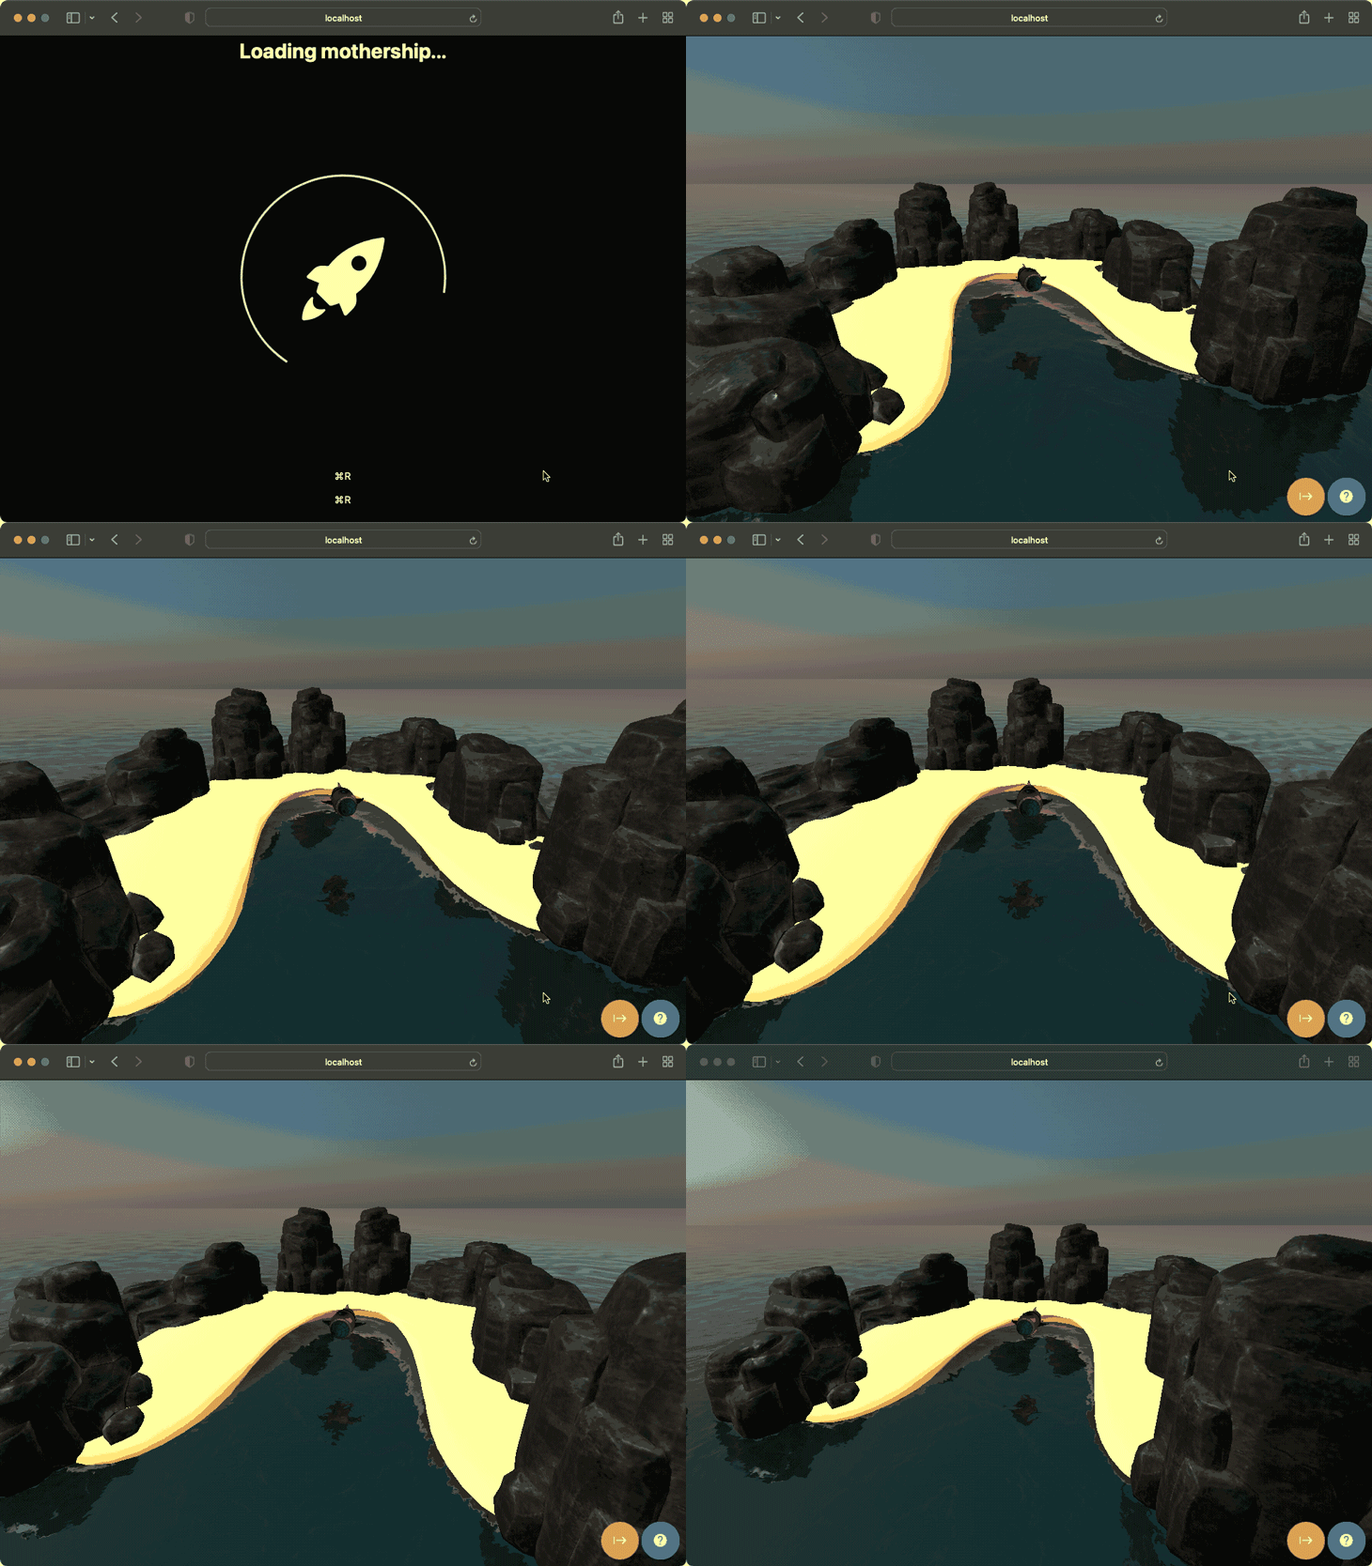
The water object can be found here on the Three.js GitHub. The only thing we’ll need to do is make a small change to make this offset controllable from our render loop (so we can update it over time).
The first thing we’ll do is grab a copy of the Water.js sample in the Three.js repository. We’ll place this file within our project at objects/water.js. If we open the water.js file, about halfway down, we’ll start to see something that looks like this:
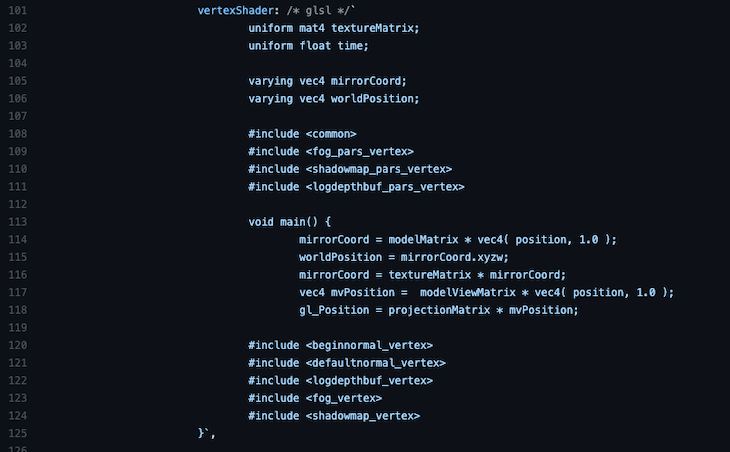
These are the shaders for our ocean material. Shaders themselves are outside of the scope of this article, but basically, they’re instructions that our game will give to our users’ computers on how to draw this particular object.
We also have our shader code here, which is written in OpenGraph Shader Language (GLSL), incorporated into a file that is otherwise JavaScript.
There’s nothing wrong with this, but if we move this shader code into a file by itself, then we can install GLSL support into our IDE of choice, and we’ll get things like syntax coloring and validation, which helps us to customize our GLSL.
To break the GLSL into separate files, let’s create a shader directory within our current objects directory, select the contents of our vertexShader and our fragmentShader, and move them into waterFragmentShader.glsl and waterVertexShader.glsl files, respectively.
Up the top of our waterFragmentShader.glsl file, we have a getNoise function. By default, it looks like this:
vec4 getNoise( vec2 uv ) {
  vec2 uv0 = ( uv / 103.0 ) + vec2(time / 17.0, time / 29.0);
  vec2 uv1 = uv / 107.0-vec2( time / -19.0, time / 31.0 );
  vec2 uv2 = uv / vec2( 8907.0, 9803.0 ) + vec2( time / 101.0, time / 97.0 );
  vec2 uv3 = uv / vec2( 1091.0, 1027.0 ) - vec2( time / 109.0, time / -113.0 );
  vec4 noise = texture2D( normalSampler, uv0 ) +
   texture2D( normalSampler, uv1 ) +
   texture2D( normalSampler, uv2 ) +
   texture2D( normalSampler, uv3 );
  return noise * 0.5 - 1.0;
}
To make this offset adjustable from our game code, we want to add a parameter to our GLSL file that allows us to modify it during execution. To do this, we must replace this function with the following function:
// Can be viewed here

uniform float speed;

vec4 getNoise(vec2 uv) {
    float offset;
    if (speed == 0.0){
        offset = time / 10.0;
    }
    else {
        offset = speed;
    }
    vec2 uv3 = uv / vec2(50.0, 50.0) - vec2(speed / 1000.0, offset);
    vec2 uv0 = vec2(0, 0);
    vec2 uv1 = vec2(0, 0);
    vec2 uv2 = vec2(0, 0);
    vec4 noise = texture2D(normalSampler, uv0) +
    texture2D(normalSampler, uv1) +
    texture2D(normalSampler, uv2) +
    texture2D(normalSampler, uv3);
    return noise * 0.5 - 1.0;
}
You’ll note that we’ve included a new variable within this GLSL file: the speed variable. This is the variable we’ll update to give the sensation of speed.
Within our game.ts, we now need to configure the water settings. Up at the top of our file, add the following variables:
// Can be viewed here

const waterGeometry = new PlaneGeometry(10000, 10000);

const water = new Water(
    waterGeometry,
    {
        textureWidth: 512,
        textureHeight: 512,
        waterNormals: new TextureLoader().load('static/normals/waternormals.jpeg', function (texture) {
            texture.wrapS = texture.wrapT = MirroredRepeatWrapping;
        }),
        sunDirection: new Vector3(),
        sunColor: 0xffffff,
        waterColor: 0x001e0f,
        distortionScale: 3.7,
        fog: scene.fog !== undefined
    }
);
Then, within our init function, we must configure the rotation and position of our water plane, like so:
// Can be viewed here
// Water
water.rotation.x = -Math.PI / 2;
water.rotation.z = 0;
scene.add(water);
This will give the correct rotation for the ocean.
Three.js comes with a fairly convincing sky that we can use for free within our project. You can see an example of this at the Three.js example page here.
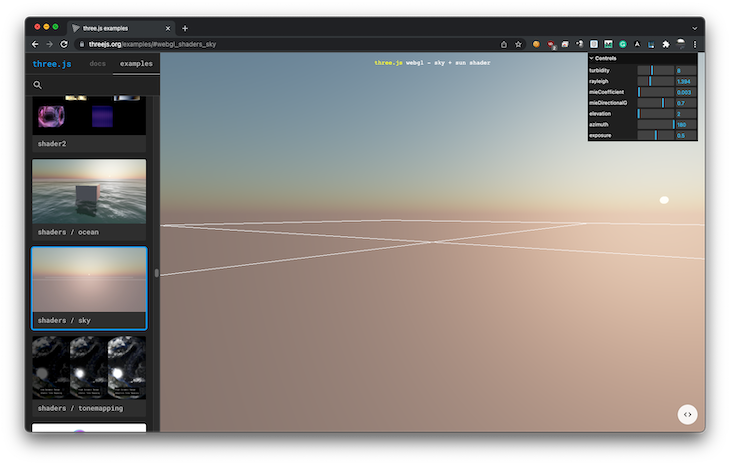
It’s quite easy to add a sky to our project; we simply need to add the sky to the scene, set a size for the skybox, and then set some parameters that control what our sky looks like.
Within our init function that we declared, we’ll add the sky to our scene and configure the visuals for the sky:
// Can be viewed here
const sky = new Sky();
sky.scale.setScalar(10000); // Specify the dimensions of the skybox
scene.add(sky); // Add the sky to our scene

// Set up variables to control the look of the sky
const skyUniforms = sky.material.uniforms;
skyUniforms['turbidity'].value = 10;
skyUniforms['rayleigh'].value = 2;
skyUniforms['mieCoefficient'].value = 0.005;
skyUniforms['mieDirectionalG'].value = 0.8;

const parameters = {
    elevation: 3,
    azimuth: 115
};

const pmremGenerator = new PMREMGenerator(renderer);

const phi = MathUtils.degToRad(90 - parameters.elevation);
const theta = MathUtils.degToRad(parameters.azimuth);

sun.setFromSphericalCoords(1, phi, theta);

sky.material.uniforms['sunPosition'].value.copy(sun);
(water.material as ShaderMaterial).uniforms['sunDirection'].value.copy(sun).normalize();
scene.environment = pmremGenerator.fromScene(sky as any).texture;

(water.material as ShaderMaterial).uniforms['speed'].value = 0.0;
Scene preparationThe last thing we need to do with our initial scene initialization is add some lighting and add our rocket model and our mothership model:
// Can be viewed here
// Set the appropriate scale for our rocket
rocketModel.scale.set(0.3, 0.3, 0.3);
scene.add(rocketModel);
scene.add(mothershipModel);

// Set the scale and location for our mothership (above the player)
mothershipModel.position.y = 200;
mothershipModel.position.z = 100;
mothershipModel.scale.set(15,15,15);
sceneConfiguration.ready = true;
Now we have our scene with some nice-looking water and a rocket. But, we lack anything that can actually make it a game. To resolve this, we need to construct some basic parameters to control the game and allow the player to move towards certain goals.
Up the top of our game.ts file, we’ll add the following sceneConfiguration variable, which helps us keep track of objects within our scene:
// Can be viewed here
export const sceneConfiguration = {
    /// Whether the scene is ready (i.e.: All models have been loaded and can be used)
    ready: false,
    /// Whether the camera is moving from the beginning circular pattern to behind the ship
    cameraMovingToStartPosition: false,
    /// Whether the rocket is moving forward
    rocketMoving: false,
    // backgroundMoving: false,
    /// Collected game data
    data: {
        /// How many crystals the player has collected on this run
        crystalsCollected: 0,
        /// How many shields the player has collected on this run (can be as low as -5 if player hits rocks)
        shieldsCollected: 0,
    },
    /// The length of the current level, increases as levels go up
    courseLength: 500,
    /// How far the player is through the current level, initialises to zero.
    courseProgress: 0,
    /// Whether the level has finished
    levelOver: false,
    /// The current level, initialises to one.
    level: 1,
    /// Gives the completion amount of the course thus far, from 0.0 to 1.0.
    coursePercentComplete: () => (sceneConfiguration.courseProgress / sceneConfiguration.courseLength),
    /// Whether the start animation is playing (the circular camera movement while looking at the ship)
    cameraStartAnimationPlaying: false,
    /// How many 'background bits' are in the scene (the cliffs)
    backgroundBitCount: 0,
    /// How many 'challenge rows' are in the scene (the rows that have rocks, shields, or crystals in them).
    challengeRowCount: 0,
    /// The current speed of the ship
    speed: 0.0
}
Now, we must perform the initialization for the current level that the player is on. This scene setup function is important because it will be called every time the user begins a new level.
So, we need to set the location of our rocket back to the start and clean up any old assets that were in use. I’ve put some comments in-line so you can see what each line is doing:
// Can be viewed here
export const sceneSetup = (level: number) => {
    // Remove all references to old "challenge rows" and background bits
    sceneConfiguration.challengeRowCount = 0;
    sceneConfiguration.backgroundBitCount = 0;

    // Reset the camera position back to slightly infront of the ship, for the start-up animation
    camera.position.z = 50;
    camera.position.y = 12;
    camera.position.x = 15;
    camera.rotation.y = 2.5;

    // Add the starter bay to the scene (the sandy shore with the rocks around it)
    scene.add(starterBay);

    // Set the starter bay position to be close to the ship
    starterBay.position.copy(new Vector3(10, 0, 120));

    // Rotate the rocket model back to the correct orientation to play the level
    rocketModel.rotation.x = Math.PI;
    rocketModel.rotation.z = Math.PI;

    // Set the location of the rocket model to be within the starter bay
    rocketModel.position.z = 70;
    rocketModel.position.y = 10;
    rocketModel.position.x = 0;

    // Remove any existing challenge rows from the scene
    challengeRows.forEach(x => {
        scene.remove(x.rowParent);
    });

    // Remove any existing environment bits from the scene
    environmentBits.forEach(x => {
        scene.remove(x);
    })

    // Setting the length of these arrays to zero clears the array of any values
    environmentBits.length = 0;
    challengeRows.length = 0;

    // Render some challenge rows and background bits into the distance
    for (let i = 0; i < 60; i++) {
        // debugger;
        addChallengeRow(sceneConfiguration.challengeRowCount++);
        addBackgroundBit(sceneConfiguration.backgroundBitCount++);
    }

    //Set the variables back to their beginning state

    // Indicates that the animation where the camera flies from the current position isn't playing
    sceneConfiguration.cameraStartAnimationPlaying = false;
    // The level isn't over (we just started it)
    sceneConfiguration.levelOver = false;
    // The rocket isn't flying away back to the mothership
    rocketModel.userData.flyingAway = false;
    // Resets the current progress of the course to 0, as we haven't yet started the level we're on
    sceneConfiguration.courseProgress = 0;
    // Sets the length of the course based on our current level
    sceneConfiguration.courseLength = 1000 * level;

    // Reset how many things we've collected in this level to zero
    sceneConfiguration.data.shieldsCollected = 0;
    sceneConfiguration.data.crystalsCollected = 0;

    // Updates the UI to show how many things we've collected to zero.
    crystalUiElement.innerText = String(sceneConfiguration.data.crystalsCollected);
    shieldUiElement.innerText = String(sceneConfiguration.data.shieldsCollected);

    // Sets the current level ID in the UI
    document.getElementById('levelIndicator')!.innerText = `LEVEL ${sceneConfiguration.level}`;
    // Indicates that the scene setup has completed, and the scene is now ready
    sceneConfiguration.ready = true;
}
We expect two types of devices to play our game: desktop computers and mobile phones. To that end, we need to accommodate two types of input options:
Let’s configure these now.
Up the top of our game.ts, we’ll add the following variables to track whether the left or right keys have been pressed on the keyboard:
let leftPressed = false;
let rightPressed = false;
Then, within our init function, we’ll register the keydown and keyup events to call the onKeyDown and onKeyUp functions, respectively:
document.addEventListener('keydown', onKeyDown, false);
document.addEventListener('keyup', onKeyUp, false);
Finally, for keyboard input, we’ll register what to do when these keys are pressed:
// Can be viewed here
function onKeyDown(event: KeyboardEvent) {
    console.log('keypress');
    let keyCode = event.which;
    if (keyCode == 37) { // Left arrow key
        leftPressed = true;
    } else if (keyCode == 39) { // Right arrow key
        rightPressed = true;
    }
}

function onKeyUp(event: KeyboardEvent) {
    let keyCode = event.which;
    if (keyCode == 37) { // Left arrow key
        leftPressed = false;
    } else if (keyCode == 39) { // Right arrow key
        rightPressed = false;
    }
}
Our mobile users won’t have a keyboard to give their input to, so, we’ll use nippleJS to create a joystick on the screen and use the output from the joystick to affect the position of the rocket on the screen.
Within our init function, we’ll check if the device is a touch device by checking to see if it has a non-zero amount of touchpoints on the screen. If it is, we’ll create the joystick, but we’ll also set the movement of the rocket back to zero once the player releases control of the joystick:
// Can be viewed here
if (isTouchDevice()) {
    // Get the area within the UI to use as our joystick
    let touchZone = document.getElementById('joystick-zone');

    if (touchZone != null) {
        // Create a Joystick Manager
        joystickManager = joystick.create({zone: document.getElementById('joystick-zone')!,})
        // Register what to do when the joystick moves
        joystickManager.on("move", (event, data) => {
            positionOffset = data.vector.x;
        })
        // When the joystick isn't being interacted with anymore, stop moving the rocket
        joystickManager.on('end', (event, data) => {
            positionOffset = 0.0;
        })
    }
}
Within our animate function, we keep track of what to do if the left or right keys are pressed at that moment or if the joystick is in use. We also clamp the position of the rocket to an acceptable left and right position, so the rocket can’t move totally outside of the screen:
// Can be viewed here
// If the left arrow is pressed, move the rocket to the left
if (leftPressed) {
    rocketModel.position.x -= 0.5;
}
// If the right arrow is pressed, move the rocket to the right
if (rightPressed) {
    rocketModel.position.x += 0.5;
}
// If the joystick is in use, update the current location of the rocket accordingly
rocketModel.position.x += positionOffset;
// Clamp the final position of the rocket to an allowable region
rocketModel.position.x = clamp(rocketModel.position.x, -20, 25);
As we’ve already discussed, the rocket ship stays stationary within our scene and the objects move towards it. The speed of these objects moving gradually increases as the user continues to play, which increases the difficulty of the level over time.
Still within our animation loop, we want to progressively move these objects towards the player. When the objects leave the player’s view, we want to remove them from the scene so we don’t take up unnecessary resources on the player’s computer.
Within our render loop, we can set up this functionality like so:
// Can be viewed here
if (sceneConfiguration.rocketMoving) {
    // Detect if the rocket ship has collided with any of the objects within the scene
    detectCollisions();

    // Move the rocks towards the player
    for (let i = 0; i < environmentBits.length; i++) {
        let mesh = environmentBits[i];
        mesh.position.z += sceneConfiguration.speed;
    }

    // Move the challenge rows towards the player
    for (let i = 0; i < challengeRows.length; i++) {
        challengeRows[i].rowParent.position.z += sceneConfiguration.speed;
        // challengeRows[i].rowObjects.forEach(x => {
        //     x.position.z += speed;
        // })
    }

    // If the furtherest rock is less than a certain distance, create a new one on the horizon
    if ((!environmentBits.length || environmentBits[0].position.z > -1300) && !sceneConfiguration.levelOver) {
        addBackgroundBit(sceneConfiguration.backgroundBitCount++, true);
    }

    // If the furtherest challenge row is less than a certain distance, create a new one on the horizon
    if ((!challengeRows.length || challengeRows[0].rowParent.position.z > -1300) && !sceneConfiguration.levelOver) {
        addChallengeRow(sceneConfiguration.challengeRowCount++, true);
    }

    // If the starter bay hasn't already been removed from the scene, move it towards the player
    if (starterBay != null) {
        starterBay.position.z += sceneConfiguration.speed;
    }

    // If the starter bay is outside of the players' field of view, remove it from the scene
    if (starterBay.position.z > 200) {
        scene.remove(starterBay);
    }
We can see that there are a few functions that are part of this call:
detectCollisionsaddBackgroundBitaddChallengeRowLet’s explore what these functions accomplish within our game.
detectCollisionsCollision detection is an important avenue of our game. Without it, we won’t know if our rocket ship has hit any of the goals or if it’s hit a rock and should slow down. This is why we want to use collision detection within our game.
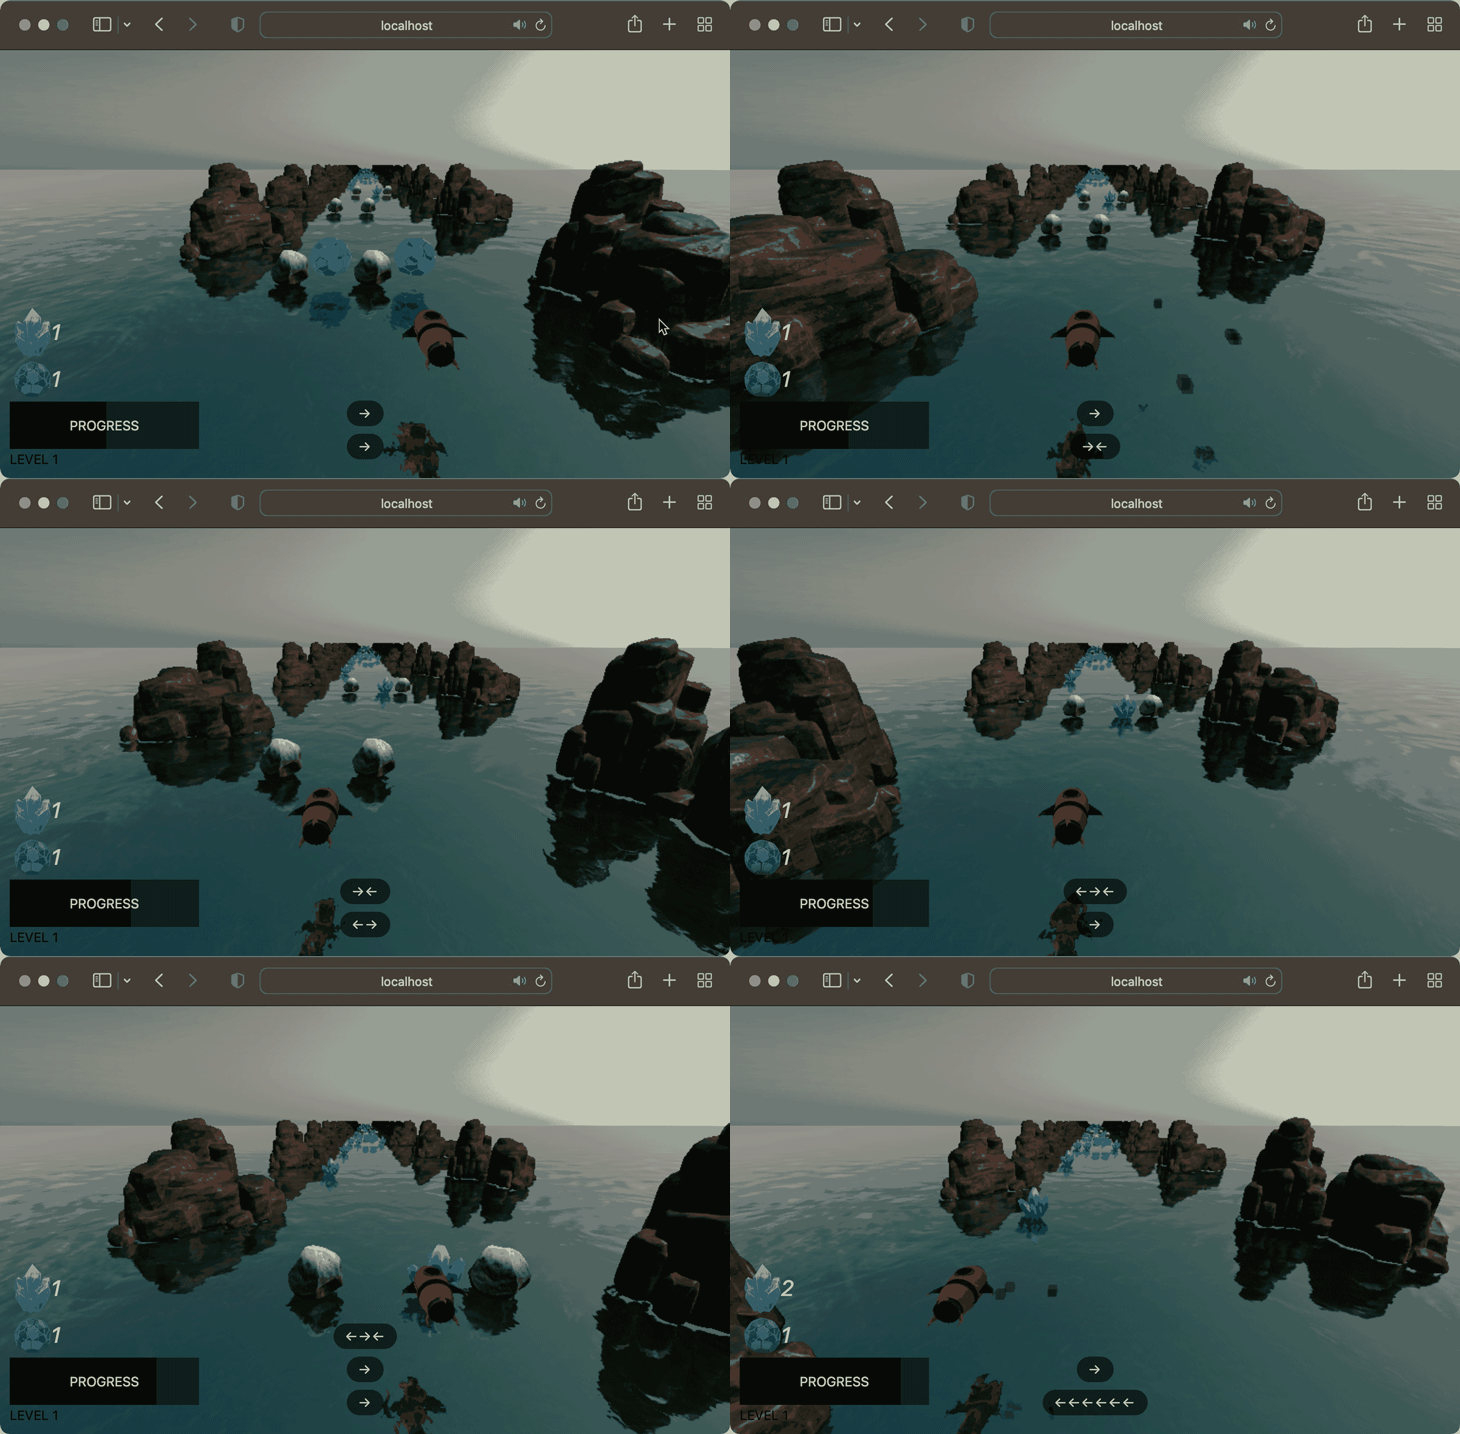
Normally, we could use a physics engine to detect collisions between objects in our scene, but Three.js doesn’t have an included physics engine.
That’s not to say that physics engines don’t exist for Three.js, though. They certainly do, but for our needs, we don’t need to add a physics engine to check if our rocket has hit another object.
Essentially, we want to answer the question, “Does my rocket model currently intersect with any other models on the screen?” We also need to react in certain ways depending on what’s been hit.
For example, if our player keeps slamming the rocket into rocks, we need to end the level once an amount of damage has been sustained.
To achieve this, let’s create a function that checks for the intersection of our rocket and objects in the scene. Depending on what the player has hit, we’ll react accordingly.
We’ll place this code within our game directory within a file called collisionDetection.ts:
// Can be viewed here

export const detectCollisions = () => {
    // If the level is over, don't detect collisions
    if (sceneConfiguration.levelOver) return;
    // Using the dimensions of our rocket, create a box that is the width and height of our model
    // This box doesn't appear in the world, it's merely a set of coordinates that describe the box
    // in world space.
    const rocketBox = new Box3().setFromObject(rocketModel);
    // For every challange row that we have on the screen...
    challengeRows.forEach(x => {
        // ...update the global position matrix of the row, and its children.
        x.rowParent.updateMatrixWorld();
        // Next, for each object within each challenge row...
        x.rowParent.children.forEach(y => {
            y.children.forEach(z => {
                // ...create a box that is the width and height of the object
                const box = new Box3().setFromObject(z);
                // Check if the box with the obstacle overlaps (or intersects with) our rocket
                if (box.intersectsBox(rocketBox)) {
                    // If it does, get the center position of that box
                    let destructionPosition = box.getCenter(z.position);
                    // Queue up the destruction animation to play (the boxes flying out from the rocket)
                    playDestructionAnimation(destructionPosition);
                    // Remove the object that has been hit from the parent
                    // This removes the object from the scene
                    y.remove(z);
                    // Now, we check what it was that we hit, whether it was a rock, shield, or crystal
                    if (y.userData.objectType !== undefined) {
                        let type = y.userData.objectType as ObjectType;
                        switch (type) {
                            // If it was a rock...
                            case ObjectType.ROCK:
                                // ...remove one shield from the players' score
                                sceneConfiguration.data.shieldsCollected--;
                                // Update the UI with the new count of shields
                                shieldUiElement.innerText = String(sceneConfiguration.data.shieldsCollected);
                                // If the player has less than 0 shields...
                                if (sceneConfiguration.data.shieldsCollected <= 0) {
                                    // ...add the 'danger' CSS class to make the text red (if it's not already there)
                                    if (!shieldUiElement.classList.contains('danger')) {
                                        shieldUiElement.classList.add('danger');
                                    }
                                } else { //Otherwise, if it's more than 0 shields, remove the danger CSS class
                                    // so the text goes back to being white
                                    shieldUiElement.classList.remove('danger');
                                }

                                // If the ship has sustained too much damage, and has less than -5 shields...
                                if (sceneConfiguration.data.shieldsCollected <= -5) {
                                    // ...end the scene
                                    endLevel(true);
                                }
                                break;
                            // If it's a crystal...
                            case ObjectType.CRYSTAL:
                                // Update the UI with the new count of crystals, and increment the count of
                                // currently collected crystals
                                crystalUiElement.innerText = String(++sceneConfiguration.data.crystalsCollected);
                                break;
                            // If it's a shield...
                            case ObjectType.SHIELD_ITEM:
                                // Update the UI with the new count of shields, and increment the count of
                                // currently collected shields
                                shieldUiElement.innerText = String(++sceneConfiguration.data.shieldsCollected);
                                break;
                        }
                    }
                }
            });
        })
    });
}
The only other thing we need to do for our collision detection is to add a short animation that plays when the user collides with an object. This function will take the location of where the collision occurred and spawn some boxes from this origin point.
The finished result will look like this.
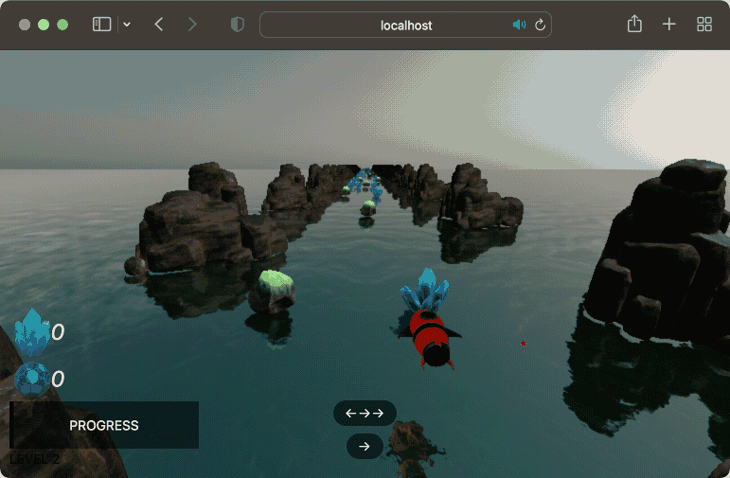
To achieve this, we must create the boxes in a circle around where the collision occurs and animate them outwards so it looks like they explode out from the collision. To do this, let’s add this functionality within our collisionDetection.ts file:
// Can be viewed here
const playDestructionAnimation = (spawnPosition: Vector3) => {

    // Create six boxes
    for (let i = 0; i < 6; i++) {
        // Our destruction 'bits' will be black, but have some transparency to them
        let destructionBit = new Mesh(new BoxGeometry(1, 1, 1), new MeshBasicMaterial({
            color: 'black',
            transparent: true,
            opacity: 0.4
        }));

        // Each destruction bit object within the scene will have a 'lifetime' property associated to it
        // This property is incremented every time a frame is drawn to the screen
        // Within our animate loop, we check if this is more than 500, and if it is, we remove the object
        destructionBit.userData.lifetime = 0;
        // Set the spawn position of the box
        destructionBit.position.set(spawnPosition.x, spawnPosition.y, spawnPosition.z);
        // Create an animation mixer for the object
        destructionBit.userData.mixer = new AnimationMixer(destructionBit);

        // Spawn the objects in a circle around the rocket
        let degrees = i / 45;

        // Work out where on the circle we should spawn this specific destruction bit
        let spawnX = Math.cos(radToDeg(degrees)) * 15;
        let spawnY = Math.sin(radToDeg(degrees)) * 15;

        // Create a VectorKeyFrameTrack that will animate this box from its starting position to the final
        // 'outward' position (so it looks like the boxes are exploding from the ship)
        let track = new VectorKeyframeTrack('.position', [0, 0.3], [
            rocketModel.position.x, // x 1
            rocketModel.position.y, // y 1
            rocketModel.position.z, // z 1
            rocketModel.position.x + spawnX, // x 2
            rocketModel.position.y, // y 2
            rocketModel.position.z + spawnY, // z 2
        ]);

        // Create an animation clip with our VectorKeyFrameTrack
        const animationClip = new AnimationClip('animateIn', 10, [track]);
        const animationAction = destructionBit.userData.mixer.clipAction(animationClip);

        // Only play the animation once
        animationAction.setLoop(LoopOnce, 1);

        // When complete, leave the objects in their final position (don't reset them to the starting position)
        animationAction.clampWhenFinished = true;
        // Play the animation
        animationAction.play();
        // Associate a Clock to the destruction bit. We use this within the render loop so ThreeJS knows how far
        // to move this object for this frame
        destructionBit.userData.clock = new Clock();
        // Add the destruction bit to the scene
        scene.add(destructionBit);

        // Add the destruction bit to an array, to keep track of them
        destructionBits.push(destructionBit);
    }
And that’s our collision detection sorted out, complete with a nice animation when the object is destroyed.
addBackgroundBitAs our scene progresses, we want to add some cliffs on either side of the player so it feels like their movement is appropriately constricted within a certain space. We use the modulo operator to procedurally add the rocks to the right or left of the user:
// Can be viewed here
export const addBackgroundBit = (count: number, horizonSpawn: boolean = false) => {
    // If we're spawning on the horizon, always spawn at a position far away from the player
    // Otherwise, place the rocks at certain intervals into the distance-
    let zOffset = (horizonSpawn ? -1400 : -(60 * count));
    // Create a copy of our original rock model
    let thisRock = cliffsModel.clone();
    // Set the scale appropriately for the scene
    thisRock.scale.set(0.02, 0.02, 0.02);
    // If the row that we're adding is divisble by two, place the rock to the left of the user
    // otherwise, place it to the right of the user.
    thisRock.position.set(count % 2 == 0 ? 60 - Math.random() : -60 - Math.random(), 0, zOffset);
    // Rotate the rock to a better angle
    thisRock.rotation.set(MathUtils.degToRad(-90), 0, Math.random());
    // Finally, add the rock to the scene
    scene.add(thisRock);
    // Add the rock to the beginning of the environmentBits array to keep track of them (so we can clean up later)
    environmentBits.unshift(thisRock);// add to beginning of array
}
addChallengeRowAs our scene progresses, we also want to add our “challenge rows” to the scene. These are the objects that contain rocks, crystals, or shield items. Each time one of these new rows is created, we randomly assign rocks, crystals, and shields to each row.
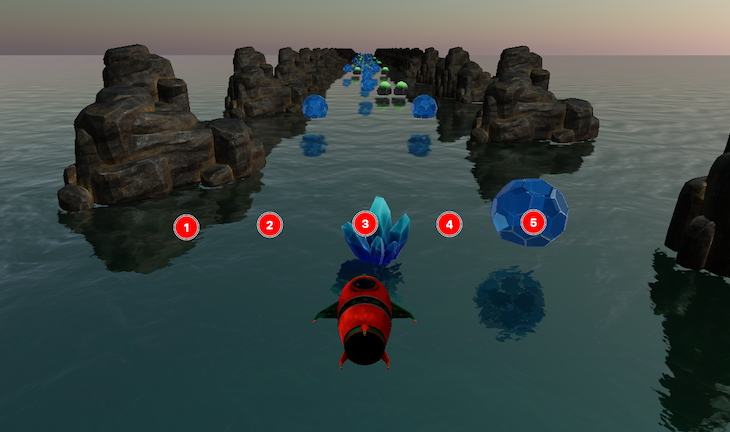
So, in the above example, cells 1, 2, and 4 have nothing added to them, whereas cells 3 and 5 have a crystal and shield item added, respectively.
To achieve this, we think of these challenge rows as split into five different cells. We spawn a certain item in each cell depending on the output of our random function, like so:
// Can be viewed here
export const addChallengeRow = (count: number, horizonSpawn: boolean = false) => {
    // Work out how far away this challenge row should be
    let zOffset = (horizonSpawn ? -1400 : -(count * 60));
    // Create a Group for the objects. This will be the parent for these objects.
    let rowGroup = new Group();
    rowGroup.position.z = zOffset;
    for (let i = 0; i < 5; i++) {
        // Calculate a random number between 1 and 10
        const random = Math.random() * 10;
        // If it's less than 2, create a crystal
        if (random < 2) {
            let crystal = addCrystal(i);
            rowGroup.add(crystal);
        }
        // If it's less than 4, spawn a rock
        else if (random < 4) {
            let rock = addRock(i);
            rowGroup.add(rock);
        }
       // but if it's more than 9, spawn a shield
        else if (random > 9) {
            let shield = addShield(i);
            rowGroup.add(shield);
        }
    }
    // Add the row to the challengeRows array to keep track of it, and so we can clean them up later
    challengeRows.unshift({rowParent: rowGroup, index: sceneConfiguration.challengeRowCount++});
    // Finally add the row to the scene
    scene.add(rowGroup);
}
The rock, crystal, and shield creation function can be viewed at any one of those links.
The last things we need to complete within our render loop are the following:
Towards the end of our render function, we can add the following code to accommodate this functionality:
// Can be viewed here

// Call the function to relocate the current bits on the screen and move them towards the rocket
// so it looks like the rocket is collecting them
moveCollectedBits();
// If the rockets progress equals the length of the course...
if (sceneConfiguration.courseProgress >= sceneConfiguration.courseLength) {
    // ...check that we haven't already started the level-end process
    if (!rocketModel.userData.flyingAway) {
        // ...and end the level
        endLevel(false);
    }
}
// If the level end-scene is playing...
if (rocketModel.userData.flyingAway) {
    // Rotate the camera to look at the rocket on it's return journey to the mothership
    camera.lookAt(rocketModel.position);
}
And that’s our render loop completed.
When people load our game, they see some buttons that give them the ability to start playing.
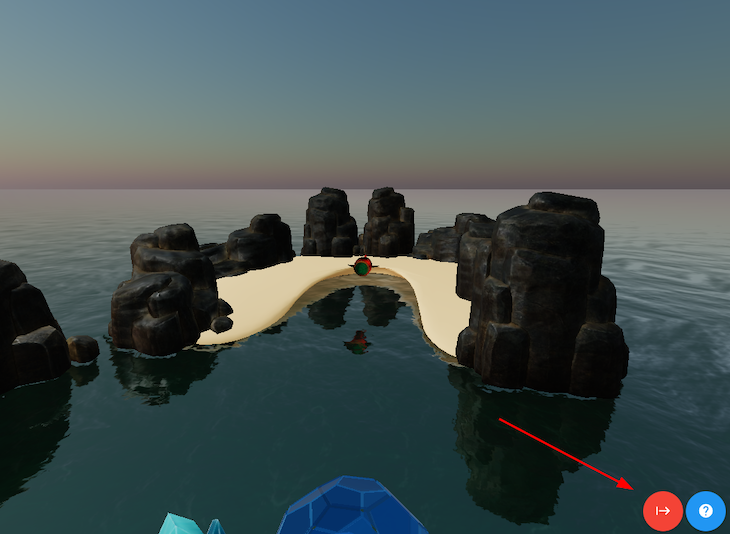
These are just simple HTML elements that we programmatically show or hide depending on what is happening in the game. The question icon gives the player some idea of what the game is about and includes instructions on how to play the game. It also includes the (very important!) licenses for our models.
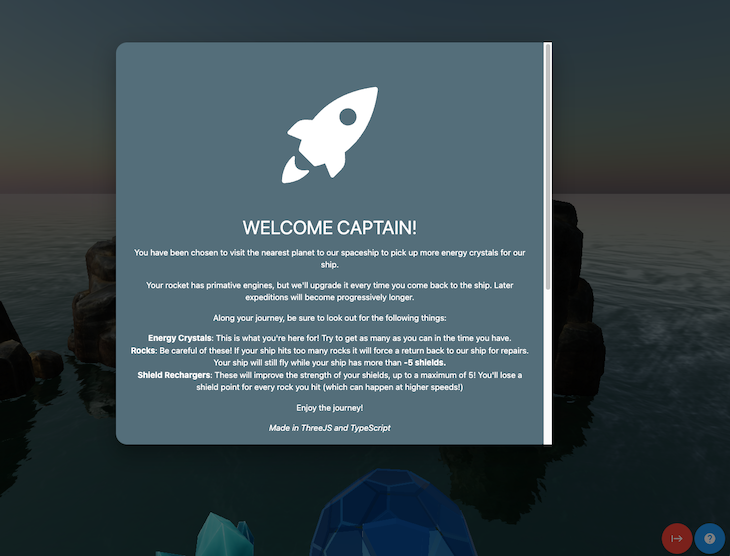
And, pressing the red button starts the gameplay. Notice that when we hit the red Play button, the camera moves and rotates to behind the rocket, getting the player ready for the scene to start.
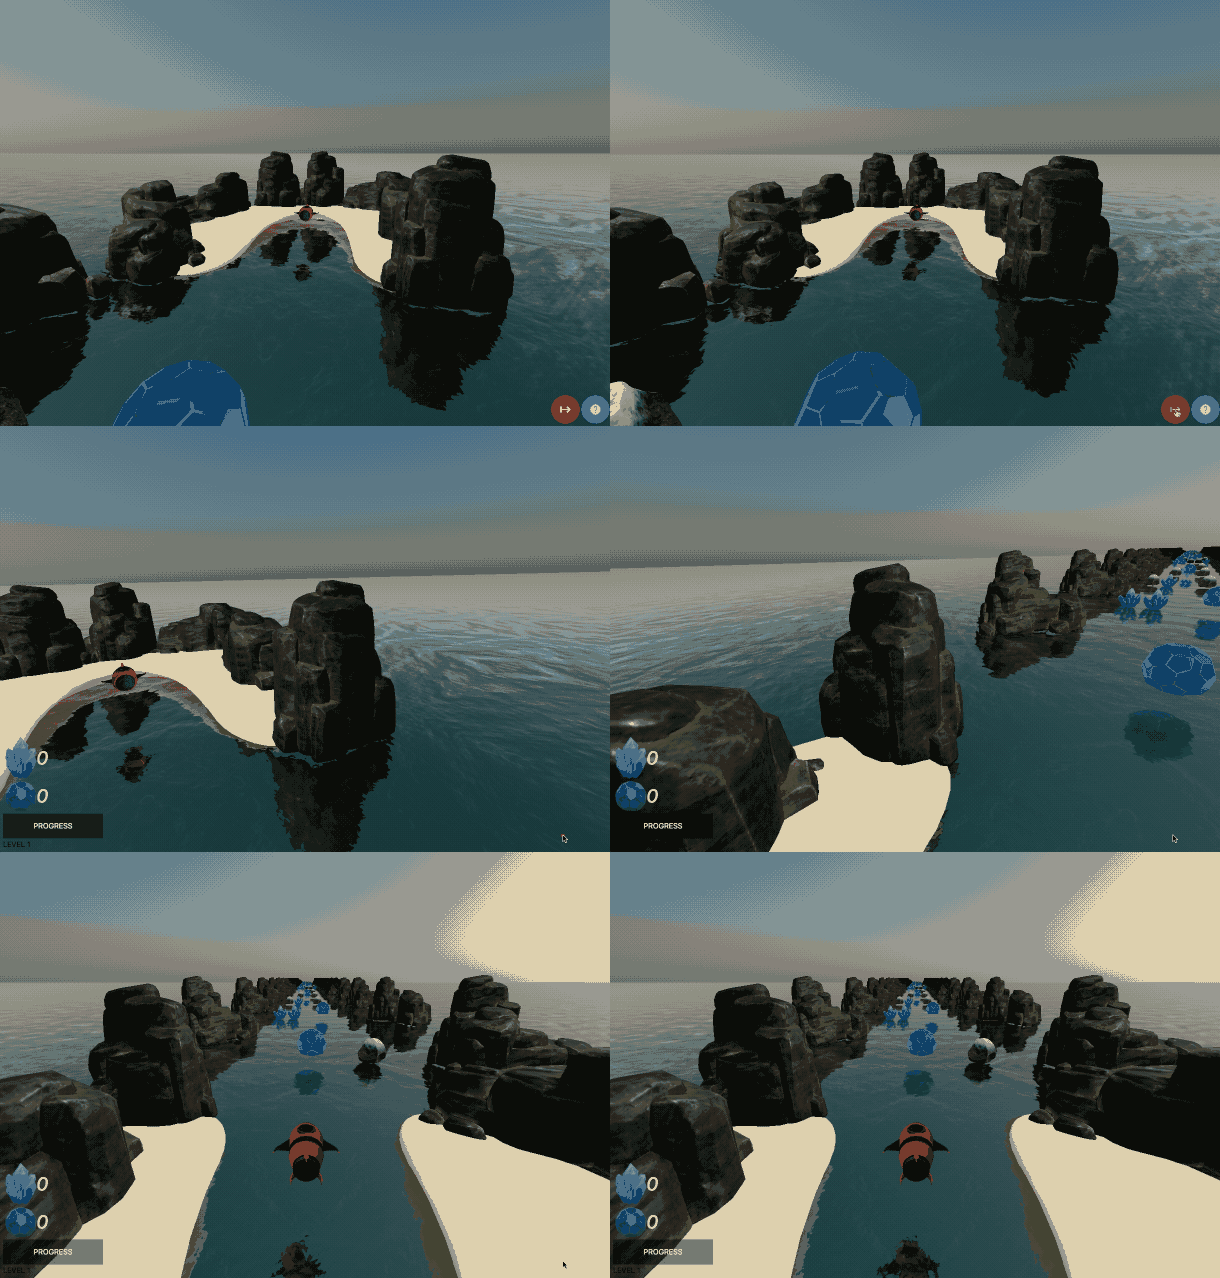
Within our scene init function, we register the event to do this to the onClick handler of this button. To create the rotation and movement functions, we need to do the following:
KeyframeTrack to manage the movements and rotations from both game positionsTo do this, we’ll add the following code in our init function, like so:
// Can be viewed here

startGameButton.onclick = (event) => {
    // Indicate that the animation from the camera starting position to the rocket location is running
    sceneConfiguration.cameraStartAnimationPlaying = true;
    // Remove the red text on the shield item, if it existed from the last level
    shieldUiElement.classList.remove('danger');
    // Show the heads up display (that shows crystals collected, etc)
    document.getElementById('headsUpDisplay')!.classList.remove('hidden');

    // Create an animation mixer on the rocket model
    camera.userData.mixer = new AnimationMixer(camera);
    // Create an animation from the cameras' current position to behind the rocket
    let track = new VectorKeyframeTrack('.position', [0, 2], [
        camera.position.x, // x 1
        camera.position.y, // y 1
        camera.position.z, // z 1
        0, // x 2
        30, // y 2
        100, // z 2
    ], InterpolateSmooth);

    // Create a Quaternion rotation for the "forwards" position on the camera
    let identityRotation = new Quaternion().setFromAxisAngle(new Vector3(-1, 0, 0), .3);

    // Create an animation clip that begins with the cameras' current rotation, and ends on the camera being
    // rotated towards the game space
    let rotationClip = new QuaternionKeyframeTrack('.quaternion', [0, 2], [
        camera.quaternion.x, camera.quaternion.y, camera.quaternion.z, camera.quaternion.w,
        identityRotation.x, identityRotation.y, identityRotation.z, identityRotation.w
    ]);

    // Associate both KeyFrameTracks to an AnimationClip, so they both play at the same time
    const animationClip = new AnimationClip('animateIn', 4, [track, rotationClip]);
    const animationAction = camera.userData.mixer.clipAction(animationClip);
    animationAction.setLoop(LoopOnce, 1);
    animationAction.clampWhenFinished = true;

    camera.userData.clock = new Clock();
    camera.userData.mixer.addEventListener('finished', function () {
        // Make sure the camera is facing in the right direction
        camera.lookAt(new Vector3(0, -500, -1400));
        // Indicate that the rocket has begun moving
        sceneConfiguration.rocketMoving = true;
    });

    // Play the animation
    camera.userData.mixer.clipAction(animationClip).play();
    // Remove the "start panel" (containing the play buttons) from view
    startPanel.classList.add('hidden');
}
We also have to wire up our logic for what to do when our level comes to an end, and the code to do so can be seen here.
Creating a game in Three.js gives you access to an incredible amount of possible customers. As people can play the game within their browser with nothing to download or install to their devices, it becomes quite an appealing way to develop and distribute your game.
As we’ve seen, it’s very possible to create an engaging and fun experience for a wide array of users. So, the only thing you need to work out is, what will you create in Three.js?
There’s no doubt that frontends are getting more complex. As you add new JavaScript libraries and other dependencies to your app, you’ll need more visibility to ensure your users don’t run into unknown issues.
LogRocket is a frontend application monitoring solution that lets you replay JavaScript errors as if they happened in your own browser so you can react to bugs more effectively.

LogRocket works perfectly with any app, regardless of framework, and has plugins to log additional context from Redux, Vuex, and @ngrx/store. Instead of guessing why problems happen, you can aggregate and report on what state your application was in when an issue occurred. LogRocket also monitors your app’s performance, reporting metrics like client CPU load, client memory usage, and more.
Build confidently — start monitoring for free.

React Server Components and the Next.js App Router enable streaming and smaller client bundles, but only when used correctly. This article explores six common mistakes that block streaming, bloat hydration, and create stale UI in production.

Gil Fink (SparXis CEO) joins PodRocket to break down today’s most common web rendering patterns: SSR, CSR, static rednering, and islands/resumability.

@container scroll-state: Replace JS scroll listeners nowCSS @container scroll-state lets you build sticky headers, snapping carousels, and scroll indicators without JavaScript. Here’s how to replace scroll listeners with clean, declarative state queries.

Explore 10 Web APIs that replace common JavaScript libraries and reduce npm dependencies, bundle size, and performance overhead.
Would you be interested in joining LogRocket's developer community?
Join LogRocket’s Content Advisory Board. You’ll help inform the type of content we create and get access to exclusive meetups, social accreditation, and swag.
Sign up now
One Reply to "Creating a game in Three.js"
Nowadays, isn’t H5 typically used for game development?