QR codes are a convenient and efficient way to store and share information. Reading and writing QR codes can easily be done with Node.js, the popular JavaScript runtime environment. In this article, we will go over the steps for reading and writing QR codes in Node using three popular libraries: qrcode-reader and jimp for reading QR codes, and qrcode for generating QR codes.

To jump ahead:
The Replay is a weekly newsletter for dev and engineering leaders.
Delivered once a week, it's your curated guide to the most important conversations around frontend dev, emerging AI tools, and the state of modern software.
The qrcode library provides a simple API for writing QR codes.
To install the qrcode library, you will need to have Node.js and npm (the Node.js package manager) installed on your system. If you do not have these tools installed, you can download and install them from the Node.js website.
Once you have Node.js and npm installed, you can install the qrcode library and its dependencies using npm.
Open a terminal window and run the following command:
npm install qrcode
To generate a QR code image, you can use the toFile method from the qrcode module. This method takes a file path, the text to encode in the QR code, and an options object as arguments, and generates a QR code image file at the specified file path.
Here is an example of how to use the toFile method to generate a QR code image file:
// __ Importing qrcode __ \\
const QRCode = require('qrcode');

QRCode.toFile('/output-file-path/file.png', 'Encode this text in QR code', {
  errorCorrectionLevel: 'H'
}, function(err) {
  if (err) throw err;
  console.log('QR code saved!');
});
This code will generate a QR code image file with the specified text and error correction level, and save it to the specified output file.
The error correction level specifies the amount of redundancy encoded in the QR code to allow for errors to be corrected when the code is scanned.
In addition to generating QR code image files, the qrcode library also allows you to generate QR code images in other formats, such as JPEG or SVG. To do this, you can use the toString method, which returns a string containing the QR code image data in the specified format.
Here is an example of how to use the toString method to generate a QR code image in SVG format:
// __ Importing qrcode __ \\
const QRCode = require('qrcode');

QRCode.toString('Encode this text in QR code', {
  errorCorrectionLevel: 'H',
  type: 'svg'
}, function(err, data) {
  if (err) throw err;
  console.log(data);
});
This code will generate a QR code image with the specified text and error correction level, and return it as a string of SVG data. You can then use this data to display the QR code image in a browser or other application.
You can scan the QR code below and see the string that you gave as an input to the toString method in the above code snippet.
This is the output:

In this section, you will be reading the QR code file that you generated and saved in the previous section.
To read QR codes in Node, you will use the qrcode-reader and jimp library. These libraries provide simple APIs for parsing and reading QR codes from images and video sources.
To install the qrcode-reader and jimp libraries, you will once again need to install the required npm packages for reading QR codes.
Open a terminal window and run the following command:
npm install qrcode-reader jimp
To read QR codes from image files, you can use the qrcode-reader module’s decode method and the jimp module’s read method. The jimp read method parses the image, which will be decoded by the decode method of qrcode-reader module.
Here is an example of how to use the read and decode methods to read a QR code from the image we previously saved:
// __ Importing jimp __ \\
const Jimp = require("jimp");

// __ Importing filesystem = __ \\
const fs = require('fs')

// __ Importing qrcode-reader __ \\
const qrCodeReader = require('qrcode-reader');

// __ Read the image and create a buffer __ \\
const buffer = fs.readFileSync('/output-file-path/file.png');

// __ Parse the image using Jimp.read() __ \\
Jimp.read(buffer, function(err, image) {
    if (err) {
        console.error(err);
    }
// __ Creating an instance of qrcode-reader __ \\

    const qrCodeInstance = new qrCodeReader();

    qrCodeInstance.callback = function(err, value) {
        if (err) {
            console.error(err);
        }
// __ Printing the decrypted value __ \\
        console.log(value.result);
    };

// __ Decoding the QR code __ \\
    qrCodeInstance.decode(image.bitmap);
});
This code will read the QR code from the image file and log the result to the console. If the QR code is successfully decoded, the result will be a string containing the QR code’s text. If the QR code cannot be decoded, the result will be null.
In the output below, you can see the string that we encoded using the qrcode library.
This is the output:
Encode this text in QR code
You can see that the qrcode library is very useful and can be used with different parameters to create QR codes. The best thing about this library is that it can work with both React.js apps and Node.js servers.
You might be wondering what could be a potential use case for using QR code in a Node.js backend service. Let’s demonstrate an example for creating a simple login route and authenticating a user on the basis of a QR code coming from the frontend.
First, run the following code:
mkdir my-server
Then, we initialize the backend server:
npm init
Next, we have to create the controller and route files:
touch controller.js route.js
Now, install the Node packages:
npm install express jsonwebtoken nodemon
Express: This library is used to create a server and listen on a port in Node.js
Jsonwebtoken: This library is used to create a JWT for sending back to the client
Nodemon: This library is used for detecting live changes in the server code
This will prompt you to enter some metadata and create a package-lock.json file.
After we initialize the backend, the next step is to install the necessary dependencies:
Npm install express jsonwebtoken qrcode
When our server is configured, let’s create a controller function for login. Copy and paste the following code into your controller.js file:
// __ controller.js __\\

exports.login = async (req, res) => {
  try {

// __ Extract the secret from the request body. __ \\
    const secret = req.body.secret;
// __ Validate the secret. __ \\

    if (secret === VALID_SECRET) {
// __ Generate a JWT token. __ \\
      const token = jwt.sign({ user: 'example' }, JWT_SECRET, { expiresIn: '1h' });

// __ Send the JWT token to the client. __ \\
      res.json({ token });
    } else {

// __ If the secret is invalid, return an error. __ \\
      res.status(401).json({ error: 'Invalid QR code' });
    }
  } catch (error) {
    console.error(error);
    res.status(500).json({ error: 'Server error' });
  }
};

exports.test = async (req, res) => {

console.log("Hitting the test route");
return res.status(200).json( {message: "Hitting the test route"} );
}
In the code above, we created a login controller that extracts the secret from the request body and validates it. If the validation is successful, it creates a JWT token, signs it with this secret, and sends it back to the client. If the validation fails, it responds with a status code of 401.
N.B., We have added a test function in the file to check the liveness of our server.
After the controller is completed, we will now create a login route to expose our resource. Copy and paste the following code into the route.js file:
// __ route.js __ \\

const app = require("express");
const router = app.Router();

const authController = require("./controller");
router.post("/login", authController.login);
router.get("/test", authController.test);

module.exports = router;
The last step is to write code for index.js and our server will be up and running:
// __ index.js __ \\
const express = require("express");
const app = express();

const auth = require("./route");

app.use("/auth", auth);

const port = process.env.PORT || 3001;
app.listen(port, () => {
console.log(`Listening to port ${port}...`);
});
To run the server, first add the following code in the scripts objects located in package.json:
"start": "nodemon index.js",
Now, run:
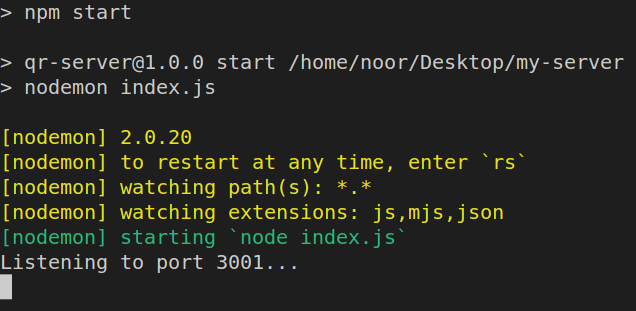
npm start
Your output should look like this:

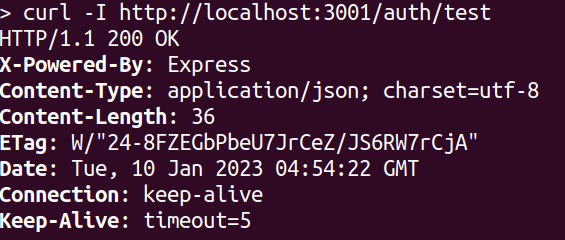
Let’s test our server by hitting the test route that we previously configured. We can test it in many ways, such as with Postman or Thunder Client, but I will use a curl request.
Open your terminal and run the following command:
curl -I http://localhost:3001/auth/test
The output should look like this:

Now that we have tested our server’s liveness, we can send requests to the login route from the frontend we built and authenticate our users.
In this tutorial, we learned how to store and share information in a convenient and efficient way by using QR codes. Whether we need to encode data for a web or mobile app, it can easily be achieved using the Node runtime environment. We also learned how to encode data in different forms in a QR code, such as an SVG file. Finally, we created a Node.js server for authenticating our user with a JWT token by signing it using the QR code secret coming from the frontend.
To further explore Node modules, visit their documentation page.
Happy coding! 😇
 Monitor failed and slow network requests in production
Deploying a Node-based web app or website is the easy part. Making sure your Node instance continues to serve resources to your app is where things get tougher. If you’re interested in ensuring requests to the backend or third-party services are successful, try LogRocket.

LogRocket lets you replay user sessions, eliminating guesswork around why bugs happen by showing exactly what users experienced. It captures console logs, errors, network requests, and pixel-perfect DOM recordings — compatible with all frameworks.
LogRocket's Galileo AI watches sessions for you, instantly identifying and explaining user struggles with automated monitoring of your entire product experience.
LogRocket instruments your app to record baseline performance timings such as page load time, time to first byte, slow network requests, and also logs Redux, NgRx, and Vuex actions/state. Start monitoring for free.

Broken npm packages often fail due to small packaging mistakes. This guide shows how to use Publint to validate exports, entry points, and module formats before publishing.

Discover what’s new in The Replay, LogRocket’s newsletter for dev and engineering leaders, in the February 11th issue.

Cut React LCP from 28s to ~1s with a four-phase framework covering bundle analysis, React optimizations, SSR, and asset/image tuning.

Rich Harris (creator of Svelte) joined PodRocket this week to unpack his Performance Now talk, Fine Grained Everything.
Would you be interested in joining LogRocket's developer community?
Join LogRocket’s Content Advisory Board. You’ll help inform the type of content we create and get access to exclusive meetups, social accreditation, and swag.
Sign up now