Editor’s note: This article was last updated on 10 July 2023 to add a section on solving common Apache Node issues.

There is a correlation between website performance and user engagement across all industry verticals. Having a server solution that can handle high traffic volume, respond to requests quickly, and mitigate cyber risk can be beneficial for both customer satisfaction and retention.
Apache is a popular, open source server that offers several benefits for improving application performance and security. Apache is used with over 30 percent of all websites, including those of many well-established companies, such as Slack, The New York Times, and LinkedIn.
In this article, we’ll examine some of the benefits that Apache brings to Node.js applications. We’ll also walk through a tutorial with a working code sample to demonstrate how to configure Apache for a Node application.
Jump ahead:
N.B., the tutorial portion of this article was developed using an Ubuntu 18.04 operating system and Node.js v14.17.6.
Let’s start by checking if Apache is already installed on our system by running this command:
apache2 -v
This will display the version of Apache that is currently installed:

If Apache is not currently installed and you are using an Ubuntu OS, follow these steps to install the apache2 package on your system. Update your package repository with the following command:
sudo apt-get update
Once your repository has been successfully updated, install Apache by running this command:
sudo apt-get install apache2
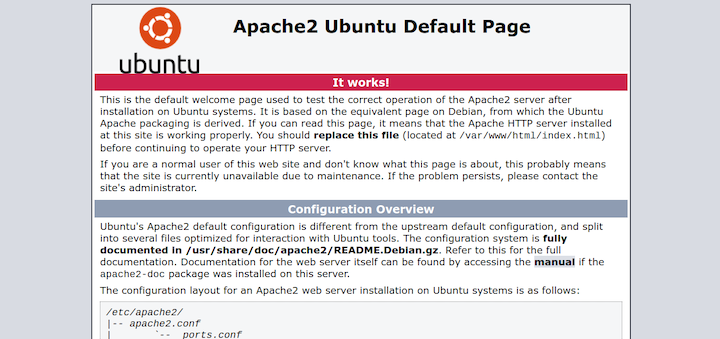
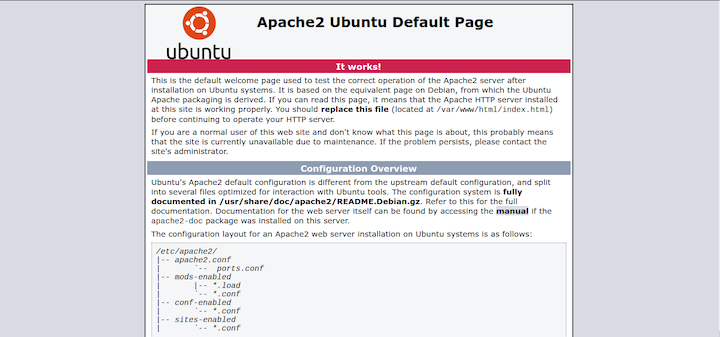
Check that Apache has been installed correctly by pasting http://127.0.0.1 into your browser. If the installation was successful, you should see the following default page:
Next, check your IP address using the following command:
ifconfig
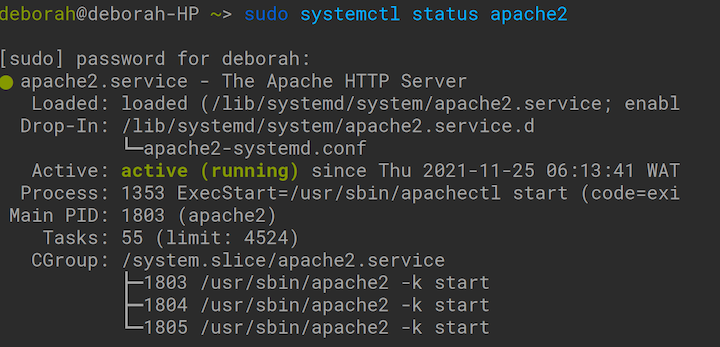
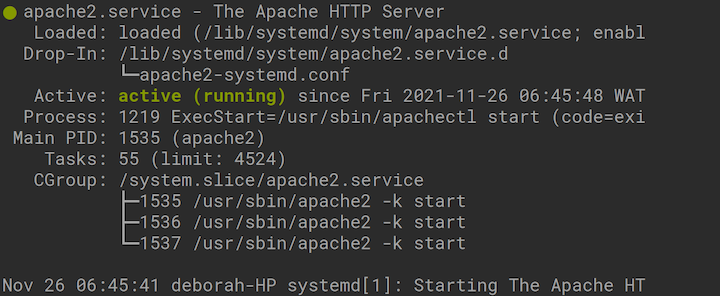
If you paste your IP address in the browser, you should see the same default page displayed on the screen. Ubuntu automatically starts the Apache server following installation. Now, confirm the status of apache2:
sudo systemctl status apache2
The status screen should confirm that the Apache server is up and running:
For this tutorial, we’ll use a Node.js demo application that was built on the Express.js framework with a MongoDB database. Here are the steps to follow along:
npm install commandLet’s start by reviewing the demo’s app.js file:
require('dotenv').config();
const express = require('express');
const app = express();
const mongoose = require('mongoose');
const cors = require('cors');
const bcrypt = require('bcrypt');
const bodyParser = require('body-parser');
const crypto = require('crypto');
const jwt = require('jsonwebtoken');
const authRoute = require('./routes/auth.route');
const suggestionRoute = require('./routes/suggestion.route');
const documentationRoute = require('./routes/documentation.route');
const port = process.env.PORT || 3000;
const corsOptions = {
    "origin": "*",
    optionsSuccessStatus: 200
}
//middlewares
app.use(cors(corsOptions));
app.use(bodyParser.json());
app.use(express.json());
//routes
app.use('/', documentationRoute);
app.use('/api', authRoute);
app.use('/api', suggestionRoute);
//Connection to mongoose
try {
    mongoose.connect(process.env.DB_CONNECTION, {
        useNewUrlParser: true,
        useUnifiedTopology: true,
        useFindAndModify: false,
        useCreateIndex: true
    }, () => console.log('Connected to DB'));
} catch (error) {
    console.log(`connection failed!! ${error}`)
}

app.listen(port, () => console.log(`Server started on port ${port}`));
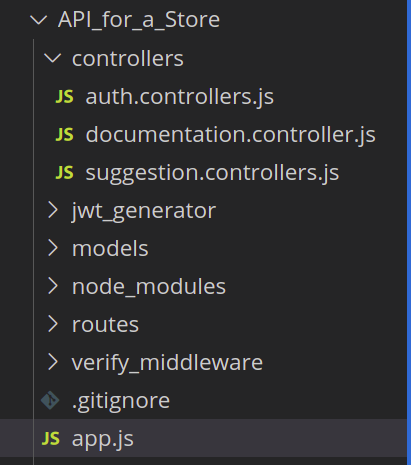
In the controllers folder, we define the documentationRoute. Then, we send the documentationRoute on the root request. Here is the Node application’s file structure:
Now, let’s navigate to the documentation.controllers.js file in the controllers folder and review the contents:
exports.documentation = (request, response) => {
    response.redirect("https://explore.postman.com/templates/15198/store");
}
The exports.documentation function accepts a request and responds with a link to the Node API documentation for the postman. This Node application was built on MongoDB. We will need to create our own MongoDB cluster in order to generate our URI. In the code editor, we create a .env text configuration file to set a DB_CONNECTION string for our session:
DB_CONNECTION =
Next, let’s test the application to ensure it’s successfully connected to the database and is running. Launch the Node application:
npm start
Here’s the result:
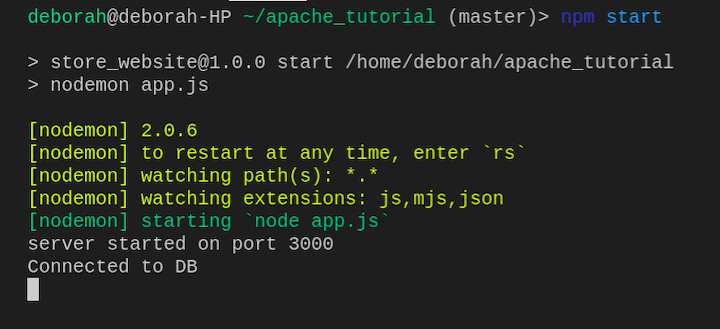
The Node application is connected to the database and is running on port 3000. Next, let’s configure the Apache server for the Node application!
We’ll reconfigure the Apache server to listen on port 80 and redirect all requests to the Node application running on port 3000. To configure the Apache server for the Node application, we’ll follow these steps:
proxy and proxy_http modulesTo begin, we need to start the Apache server. If you have been following along with this tutorial, the Apache server should still be running. If this is the case, simply run the following command:
sudo systemctl status apache2
You should see the following output:
Paste localhost into the browser. If Apache is running successfully, the following will be displayed:
Next, we need to create the configuration file. The apache2.conf file contains the Apache server’s configuration, and the sites-available directory is where we can create configuration files that Apache will run. First, let’s open a new tab and cd into the sites-available directory:
cd /etc/apache2/sites-available
Now, run the ls command:

Next, we’ll open the 000-default.conf default configuration file in order to make edits:
sudo nano 000-default.conf
Here’s the open default configuration file:
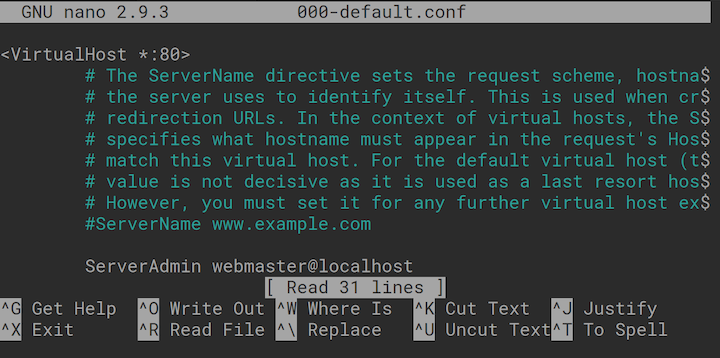
VirtualHost enables the Apache server to share its resources with multiple domains or hostnames. Any edits to the configuration must be made between VirtualHost‘s opening and closing tags. Refer to the Apache documentation for additional information about VirtualHost.
The Apache VirtualHost is defined in the 000-default.conf file and is set up to listen for requests on port 80. We’ll configure the 000-default.conf file so that all requests coming in via port 80 will be proxied, or forwarded, to the Node application running on port 3000.
We use ProxyPass to map the root URL at the specified address: http://localhost:3000:
ProxyPass / http://localhost:3000/
Copy the following into the 000-default.conf file:

Next, use the Control+X command to save and exit.
proxy and proxy_http modulesFor ProxyPass to work, we must enable the proxy and proxy_http modules that act as gateways to allow for the passing of the request. The sites-enabled directory contains symlinks to the configuration file defined in the sites-available directory. The Apache server will load files from the sites-enabled directory while applying the configurations defined in the sites-available directory. The sites-enabled and sites-available directories are both critical for configuring Apache for Node.
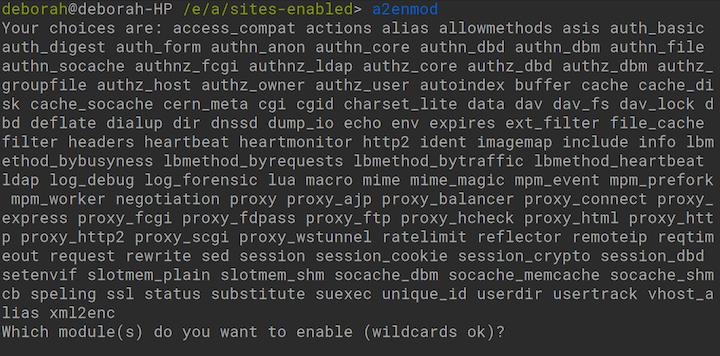
Go to the sites-enabled directory and run the following:
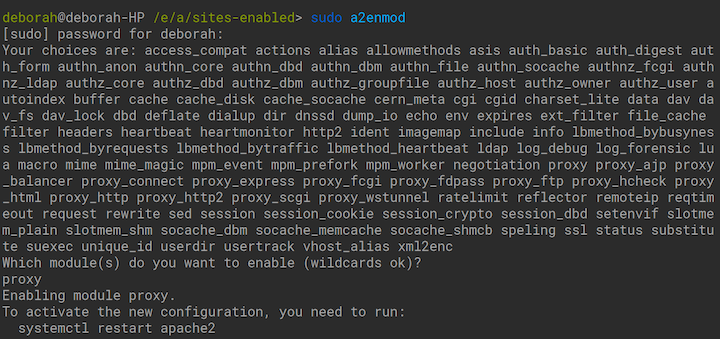
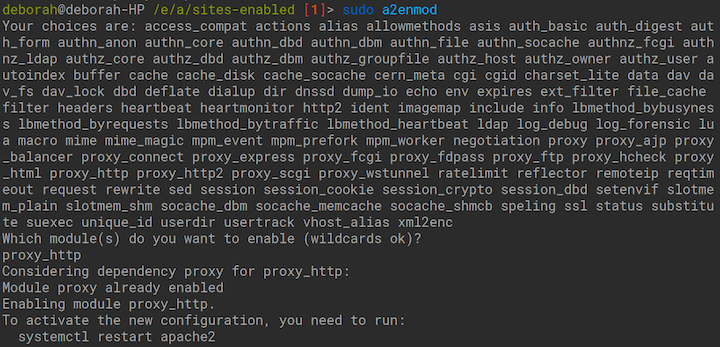
sudo a2enmod
a2enmod is an acronym for “Apache2 enable module.” Running this command will list all modules that are available to be enabled. Next, we are prompted to enter the name of a module that we’d like to enable:
We enter proxy at the prompt to enable the proxy module:
Next, we enter proxy_http at the prompt to enable the proxy_http module:
It’s important to note that we used the sudo command to run the a2enmod script. Running the a2enmod script without the sudo command will result in a Permission denied error:

Because we changed the configuration file, we must reload the Apache server in order to apply the configuration. In the sites-enabled directory, use the following command to reload the apache2 server:
sudo systemctl reload apache2
Now, use this command to stop the apache2 server:
sudo systemctl stop apache2
Next, use this command to start the apache2 server:
sudo systemctl start apache2
To check if the Apache configuration is configured correctly, paste http://localhost:80 into the browser window. If the configuration was applied successfully, we’ll see the Node application displayed:
When configuring Apache for Node.js applications, it’s common to encounter errors or configuration-related challenges. With the right troubleshooting techniques, these errors can be resolved. There are numerous issues that one can encounter during the configuration of Apache for Node and there is not one right solution for each issue. A right solution is the one that works for you.
In this section, we will explore some common Apache Node troubleshooting tips. By following these troubleshooting tips, you can ensure a smooth and reliable deployment of your Node.js application on Apache.
Now, let’s proceed with the steps to solve common Apache Node issues:
/var/log/apache2/error_log. It contains passenger messages and application errorsNow that we have talked extensively about the Configuration of Apache, let’s take a look at the benefits that Apache brings to the table.
Apache provides three core benefits for Node applications:
An app is more likely to retain users when its contents load quickly. Caching improves the performance of an application by saving bandwidth and improving the application’s speed. Any time a Node application gets simultaneous, multiple requests for the same static contents, caching is essential.
By configuring Apache for a Node application, we allow the Apache server to install the static contents. When there are future requests for the same contents, the response will come directly from Apache, rather than from the application’s server.
A high-performing app must be readily available to users, even as it scales. Load balancing improves an app’s responsiveness by distributing incoming requests across multiple servers. A popular app may get thousands of requests per second. By configuring Apache for a Node application, we permit Apache to distribute the multiple events across all servers in the application.
It’s important to ensure your application is protected from viruses, malware, and other cyber risks. With reverse proxy, Apache can be configured to act as a firewall or filter for all incoming requests. Reverse proxy helps to mitigate some security threats, such as DDoS attacks. Additional benefits of reverse proxy are improved user request management and the encryption of the application’s IP address and data.
In this article, we reviewed some of the Apache server’s benefits, basic commands, and file structure. We also demonstrated how to configure the Apache server for a Node application to improve performance and security. See the Apache server documentation and Wiki for additional information, tips, and tricks.
 Monitor failed and slow network requests in production
Deploying a Node-based web app or website is the easy part. Making sure your Node instance continues to serve resources to your app is where things get tougher. If you’re interested in ensuring requests to the backend or third-party services are successful, try LogRocket.

LogRocket lets you replay user sessions, eliminating guesswork around why bugs happen by showing exactly what users experienced. It captures console logs, errors, network requests, and pixel-perfect DOM recordings — compatible with all frameworks.
LogRocket's Galileo AI watches sessions for you, instantly identifying and explaining user struggles with automated monitoring of your entire product experience.
LogRocket instruments your app to record baseline performance timings such as page load time, time to first byte, slow network requests, and also logs Redux, NgRx, and Vuex actions/state. Start monitoring for free.

Learn how to protect full-stack projects from NPM supply chain attacks with a practical security checklist.

Explore 15 essential MCP servers for web developers to enhance AI workflows with tools, data, and automation.

Learn how contrast-color() automatically picks accessible text colors using native CSS, without JavaScript.

Learn how to build a harness-style AI workflow using Claude Code with specialized Dev, QE, and Ops subagents, gated handoffs, MCP telemetry, and LEARNING.md.
Hey there, want to help make our blog better?
Join LogRocket’s Content Advisory Board. You’ll help inform the type of content we create and get access to exclusive meetups, social accreditation, and swag.
Sign up now

