Editor’s note: This article was last updated for content and code by Ukeje Goodness on 15 July 2024, as well as to compare Arduino UNO to models like Arduino Nano and Arduino Mega.

Arduino is a simplified version of an AVR microcontroller for beginners in embedded systems. Although this tutorial uses the Arduino UNO, the procedure specified here is also easy to follow for other Arduino boards.
Rust is a systems programming language that perfectly suits low-level systems and communicates properly with hardware systems. It was designed to be a modern-day alternative to C++, but with more memory safety, efficiency, and speed.
This tutorial is aimed at Rust or embedded systems developers looking to learn how to run Rust on a microcontroller. The prerequisites for following along include:
The Replay is a weekly newsletter for dev and engineering leaders.
Delivered once a week, it's your curated guide to the most important conversations around frontend dev, emerging AI tools, and the state of modern software.
Embedded systems technology has lacked novelty for decades. The language of choice for programming lightning-fast, embedded devices has long since been C/C++, but Rust provides even faster development support.
Rust is a great fit for embedded systems development because it:
If you have already programmed Arduinos in C++, it will be relatively easy to transition to doing so with Rust, once you master the basics. You can learn more about embedded Rust here. You can also see the available microcontroller crates here.
The Arduino UNO is based on the ATMega328P under the AVR microcontrollers family developed by Atmel. The Arduino can be programmed with its programming language, which is derived from C++, using the Arduino IDE editor, but because it is also an open source project, other systems-compatible programming languages can also be used to program the Arduino.
There are also the Arduino Nano and Mega alternatives. The Arduino Nano is a smaller, more compact version of the UNO. It’s useful in cases where space is a constraint.
You will need the Arduino Mega over the UNO for projects that require more I/O pins, memory, or multiple serial communications:
| Feature | Arduino UNO | Arduino Nano | Arduino Mega |
|---|---|---|---|
| Microcontroller | ATMega328P | ATMega328P | ATMega2560 |
| Operating voltage | 5V | 5V | 5V |
| Input voltage (recommended) | 7-12V | 7-12V | 7-12V |
| Digital I/O Pins | 14 (6 PWM) | 14 (6 PWM) | 54 (15 PWM) |
| Analog input pins | 6 | 8 | 16 |
| Flash memory | 32 KB | 32 KB | 256 KB |
| SRAM | 2 KB | 2 KB | 8 KB |
| EEPROM | 1 KB | 1 KB | 4 KB |
| Clock speed | 16 MHz | 16 MHz | 16 MHz |
| USB connection | Standard USB-B | Mini USB-B | Standard USB-B |
| Form factor | Standard | Compact | Large |
| Price | Moderate | Lower | Higher |
The normal procedure for embedded systems development with the Arduino involves the following steps:
This article focuses on the third through fifth steps, but the wiring for the tutorial will be made available.
To follow this article, you will need an Arduino board, as well as the following software prerequisites:
avrdudeavrdude is a cargo-generate template for avr-hal projects. It currently supports the following hardware:
A Hardware Abstraction Layer (HAL) is required to run Rust on AVR microcontrollers and other common boards. To get this, you need the nightly Rust compiler that compiles Rust code to AVR on your machine. Run the command below to install it:
rustup toolchain install nightly
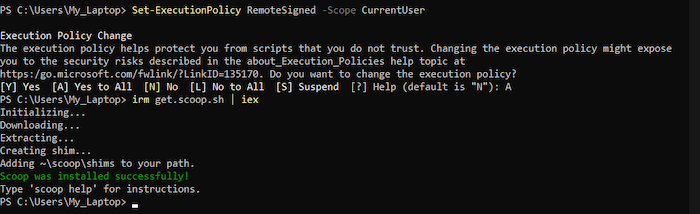
On Windows, you will need to install Scoop via Powershell using the command:
Set-ExecutionPolicy RemoteSigned -Scope CurrentUser # Needed to run a remote script the first time
irm get.scoop.sh | iex
The output at the end should look as follows:
Afterwards, run the following commands on Powershell to install avr-gcc and avrdude:
scoop install avr-gcc
scoop install avrdude
On macOS, simply set up the homebrew-avr tap and run the following commands:
xcode-select --install # for the fist time
brew tap osx-cross/avr
brew install avr-binutils avr-gcc avrdude
If you use a Linux distribution like Ubuntu, the command is:
sudo apt install avr-libc gcc-avr pkg-config avrdude libudev-dev build-essential
There is an installation guide for all operating systems here, should you come across an obstacle when following the guide above.
After any of these steps, the next step is to install the ravedude tool for flashing the microcontroller board against cargo:
cargo +stable install ravedude
This tool handles everything from finding the board, flashing the board, and listening to connections. You simply have to run the cargo run command.
avrdudeStarting a new project is made simpler with the cargo-generate crate. Simply run the following commands consecutively to create a new project:
cargo install cargo-generate
Now, run this command to generate and instantiate the template. You haven’t created a project at this time, but the tool will handle that:
cargo generate --git https://github.com/Rahix/avr-hal-template.git
After running the command, you should see an input field to specify a name for your project. This tutorial uses “rust-x-arduino” as the project name.
After inputting your preferred name, click Enter. The next log shows a list of microcontrollers available under the avrdude template. This article uses Arduino UNO, a variant that is readily available to everyone.
Navigate into the project after the build, and open the folder as a project in your preferred code editor. The project structure should look like the image below:

N.B., If there is an error when installing the libudev-sys crate, you will have to include it in your cargo.toml file under dependencies:
[dependencies]
libudev-sys = "0.1"
The libudev Rust binding is a crate that provides declarations and linkage for the libudev C library. It is Linux-specific, so it is not available for Windows or OSX operating systems. Alternatively, you can run the command below to install the libudev-sys crate:
sudo apt-get install libudev-dev
Consult the libudev-sys repository in case of further issues arising from pkg-config.
Now, you can build the project with the build command:
cargo build
This might take a while because it is a CPU-intensive task. Afterward, you will find a .elf file under target/avr-atmega328p/debug/.
To run your own program, you can edit the main.rs file, which already contains an example code for a basic LED Blinking program:
#![no_std]
#![no_main]

use panic_halt as _;

#[arduino_hal::entry]
fn main() -> ! {
    let dp = arduino_hal::Peripherals::take().unwrap();
    let pins = arduino_hal::pins!(dp);

    let mut led = pins.d13.into_output();

    loop {
        led.toggle();
        arduino_hal::delay_ms(1000);
    }
}
From the first two lines of code, it is clear that there is no standard library and no main because it is an embedded project with no operating system.
The line #[arduino_hal::entry] specifies the entry point in the program. The line uses panic_halt as _; is used to handle panics.
In the main function, the Peripherals are unwrapped. In embedded Rust, Peripherals refer to the components that make sense of their surroundings and interact with humans. They include sensors, actuators, and motor controllers, as well as the fundamental parts of the microcontroller like the CPU, RAM, or flash memory. You can learn more about Peripherals in the embedded Rust book.
Next, we gain access to the Arduino board’s pins to set the digital output for the default pin (D13) to high.
Every Arduino program contains the void setup() and void loop(). We have just gone through the setup; the other part of the code shows the looping.
The toggle method in the loop is used to turn the LED on and off, while the delay_ms method is used to delay the loop by the specified milliseconds.
When working with the Arduino microcontroller in the official Arduino IDE, you simply have to write the program in Arduino, which is C++-based, and upload the program source file to the board via the USB port.
With Rust, we will be following a longer but similar procedure. Start by listing the open USB ports in your machine with the Linux command:
lsusb
If your Arduino board is plugged into your device via the USB, you should see the name of the USB connected to the Arduino board like in the image below:

Next, we will be setting the serial com port for ravedude with this script:
export RAVEDUDE_PORT=/dev/ttyUSB0
This tells ravedude which port the Arduino is connected to. Running the command below will build and flash the program into the Arduino:
cargo run
The Arduino will behave as programmed when the program is uploaded into the microcontroller. In this case, the LED lights on the board will blink according to the time intervals specified in the program:

It is worth mentioning that there is an examples directory on the avr-hal crate/repository, where you can find example Arduino project programs to try out. For example, if you are using the Arduino UNO, you can select it, navigate to the src/bin directory, and find different programs compatible with the Arduino UNO board.
If you wish to write your own project, you have to generate the AVR-HAL template like we did in the previous section.
This guide covered the essential steps to get started with running Rust on Arduino, from setting up your environment to writing and flashing your first Rust program on an Arduino board.
Don’t forget to check out the official documentation for embedded Rust development as well as the Embedded Rust book. There is also a GitHub repository where all resources related to embedded Rust are stored; it can serve as a useful starting point for trying out new things, and is based on the official Rust on Embedded Devices Working Group.
Finally, if you wish to go further into embedded development with Rust, you can check out an entire playlist by Vers Binarii here.
Debugging Rust applications can be difficult, especially when users experience issues that are hard to reproduce. If you’re interested in monitoring and tracking the performance of your Rust apps, automatically surfacing errors, and tracking slow network requests and load time, try LogRocket.
LogRocket lets you replay user sessions, eliminating guesswork around why bugs happen by showing exactly what users experienced. It captures console logs, errors, network requests, and pixel-perfect DOM recordings — compatible with all frameworks.
LogRocket's Galileo AI watches sessions for you, instantly identifying and explaining user struggles with automated monitoring of your entire product experience.

Modernize how you debug your Rust apps — start monitoring for free.

Why the future of DX might come from the web platform itself, not more tools or frameworks.

A hands-on test of Claude Code Review across real PRs, breaking down what it flagged, what slipped through, and how the pipeline actually performs in practice.

CSS art once made frontend feel playful and accessible. Here’s why it faded as the web became more practical and prestige-driven.

Learn how inline props break React.memo, trigger unnecessary re-renders, and hurt React performance — plus how to fix them.
Would you be interested in joining LogRocket's developer community?
Join LogRocket’s Content Advisory Board. You’ll help inform the type of content we create and get access to exclusive meetups, social accreditation, and swag.
Sign up now

