In the past few years, the web development coding technique has changed, and developers have started adopting various JavaScript frameworks due to their versatile features instead of conventional programming languages like Java and PHP. The next big question was how to test the code written on these new frameworks.

Do you know which is the best JavaScript testing framework? It’s nearly impossible to say a particular testing tool is the best one, but a few names like JEST, Mocha, Karma, and AVA are often considered the most performant.
Most testers are not aware of the power of AVA. This article will explain the basics of AVA and help you understand its different features, including how to create test case file. This can help you choose the right tool for your specific test case.
In addition to AVA, I will also talk about linting and XO, a new linting tool. This article should give you a better idea about what linting is and how it is beneficial while testing.
AVA is an open-source test runner for Node.js that makes code testing easy and convenient, and test cases more stable, readable, and organized. It was developed by Sindre Sorhus and Kevin Mårtensson in 2014.
AVA provides detailed error output for test cases with a feature called “Magic assert,” which handles errors and displays them in a simple and informative way. It also supports new language features. It gives complete control to the tester, and its simple syntax makes it popular relative to other tools in the same category.
Some of AVA’s best features are listed below.
AVA executes test cases in parallel by default, which takes less time as compared to other tools. To run in parallel forces the tester to make sure all tests are completely independent of each other, which is always good practice.
Another great feature of AVA is that you have the option to only run the one test that you are working on. This is useful if you have a number of failed test cases and you want to fix them one by one.
AVA is capable of identifying the affected test files and only rerunning tests in those specific files. This is possible due to the “watch mode” feature, which is fantastic. If you change a test case file it will rerun just that file. If you change a source file it will rerun all test cases that depend on it.
AVA contains its own plugin that is designed to be flexible and configurable for different use cases.
For each test file, AVA starts a new Node.js process, which means you can safely modify the global state without affecting unrelated tests. It can also run multiple test files altogether, each in its own process.
Observable support is a data type that can be used to model push-based data sources such as sockets, DOM events, and timer intervals, among others. It is best used if you want to emit a bunch of streamed data values. It can be composed with a higher-order combination, and does not start emitting data until an observer has subscribed.
AVA has a number of plugins to connect with different text editors like Sublime, Atom, and VS Code.
As with every tool, AVA also has some disadvantages.
One of the major disadvantages is that AVA does not support browser testing, which can limit its use cases. Fortunately, the AVA development team is working on resolving this issue.
AVA also does not have any built-in support for the DOM. And because it is a relatively new tool, Ava still has a lot of open issues.
The community is still growing, but it remains small, so documents or tutorials are fewer as compared to other testing frameworks.
The installation process of AVA is fast, you just need to follow a few simple steps. Before you begin, you must install Node.js in order to install AVA.
Then, enter this code into the command prompt:
mkdir ava_folder
cd    ava_folder
npm init ava
This will create a folder called ava_folder. The next line of code cd ava_folder will move inside that folder, and the last command will install AVA. There will be some new files in the folder.
To verify the installation, open the package.json file, and if it contains the code below (except the version), everything should be set:
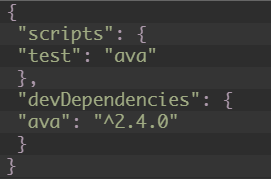
If you prefer using yarn, then follow the below command:
yarn add ava --dev
You can also install AVA manually with the following command:
npm install --save-dev ava
To create the test file, open the root directory where AVA is installed and create a file with the name SampleTest.js.
Write the below code in the file just for testing purposes:
const SampleTest= require('ava');

SampleTest('foo', t => {
                         t.pass();
                        }
           );
SampleTest('bar', async t => {
                              const bar = Promise.resolve('bar');
                              t.is(await bar, 'bar');
                             });
Once the test file is created, the next question is how to execute them. You can use the below command to execute:
npm SampleTest
As mentioned before, AVA has an intelligent watch mode. To run tests with watch mode enabled use the below command:
npx ava --watch
AVA provides an option to pass command-line arguments to test files.
You need two -- argument terminators while invoking AVA through npm script:
npm SampleTest -- -- --hello world
XO is a powerful linting tool. If you’re unfamiliar with linting tools, no worries, I’ll explain them here.
Linting helps you to improve your code by analyzing source code to flag programming errors, bugs, stylistic errors, and suspicious constructs. Linters can make you and your code more productive, saving you time and money.
XO is one of the most popular choices among linters due to its many features. It avoids and controls silly mistakes in syntax while writing JavaScript code. Adding XO to the project folder is a simple task and can be achieved by executing a single-line command.
One of the best features is that it fixes many issues automatically with the simple command xo --fix.
Another great quality of XO is that it supports different plugins. Some of the editor plugins include Sublime Text, Atom, Vim, TextMate 2, VSCode, Emacs, and WebStorm. XO also supports ESLint plugins like unicorn, import, ava, node, and many more.
TypeScript files (.ts, .d.ts and .tsx) are supported by XO. Suppose you have a number of files to configure – there’s no need to specify file paths to lint, because XO lints all .js files automatically (except commonly ignored paths).
XO has major support on the database side. It can generate Go code for a database schema or a custom query. It is a command-line tool, and works by using metadata and SQL introspection queries to identify the types and relationships within a schema and apply a standard set of Go templates against the discovered relationships.
At present, it can generate types for tables, stored procedures, enums, and custom SQL queries for different databases like PostgreSQL, Oracle, MySQL, Microsoft SQL Server, and SQLite3.
XO requires Node.js, so it is recommended to install Node.js before installing XO.
To install through the console, use the below command:
npm install — global xo
You can also install XO manually using the below command in the command prompt:
npm init xo
Once it is installed in a particular directory, find the package.json file. If the file contains the same code pictured below (except the version), installation was successful:
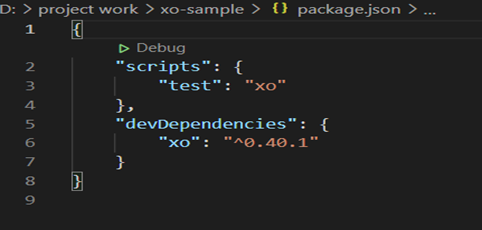
In this section, you will learn how to test Node.js code using XO. For demonstration purposes, we will write test cases for an app that adds two numbers together, and use the Visual Studio plugin to run the test.
First, create a folder in which to write the code. In the screenshot below, you can see I created a folder with the name TESTSAMPLEXO.
Run the below command in the terminal of Visual Studio:
Npm init -y
Once the above command gets executed, the package.json file should look like this screenshot:
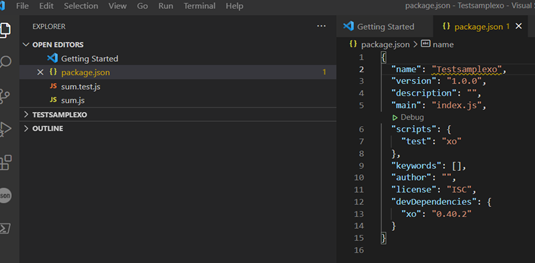
Now create a test file as sum.js in the same folder, created in previous steps. It should looks like this:
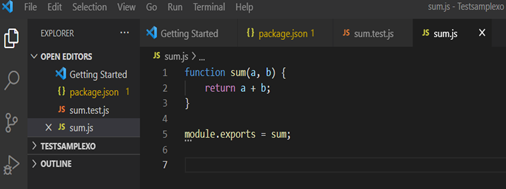
The next step is to add XO in the directory(TESTSAMPLEXO). To do this, execute the following command:
npm init xo
One more file needs to be created with the name sum.text.js (in my case) under the same directory. Write the test cases as shown below in the image:

Finally, it’s time to execute the test command. Use the below syntax to execute the test case:
npm test
If an error arises while running the command, clear them one by one as per the instructions shown.
Each time after clearing the error, you must execute the command npm test in the command prompt or terminal, and the test output will show like below:
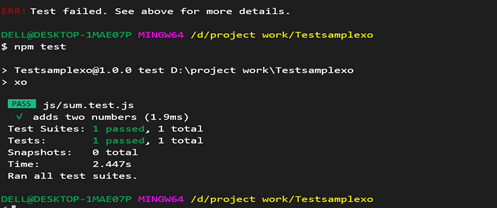
In this article, you learned about AVA, a testing tool for JavaScript, and XO, a linting tool. Now you are familiar with the power of these tools.
XO is a useful tool for improving and refining code, and catching bugs before they become larger issues.
As explained earlier, AVA is really worth a try. It combines the ease of use of Jasmine with the simplicity of Tape. It supports both front and back-end JavaScript applications, and can make testing JS code a breeze.
Install LogRocket via npm or script tag. LogRocket.init() must be called client-side, not
server-side
$ npm i --save logrocket

// Code:

import LogRocket from 'logrocket';
LogRocket.init('app/id');
// Add to your HTML:

<script src="https://cdn.lr-ingest.com/LogRocket.min.js"></script>
<script>window.LogRocket && window.LogRocket.init('app/id');</script>
Hey there, want to help make our blog better?
Join LogRocket’s Content Advisory Board. You’ll help inform the type of content we create and get access to exclusive meetups, social accreditation, and swag.
Sign up now
Get to know RxJS features, benefits, and more to help you understand what it is, how it works, and why you should use it.

Explore how to effectively break down a monolithic application into microservices using feature flags and Flagsmith.

Native dialog and popover elements have their own well-defined roles in modern-day frontend web development. Dialog elements are known to […]

LlamaIndex provides tools for ingesting, processing, and implementing complex query workflows that combine data access with LLM prompting.